
Line Message API : push message & reply

Workflow preview
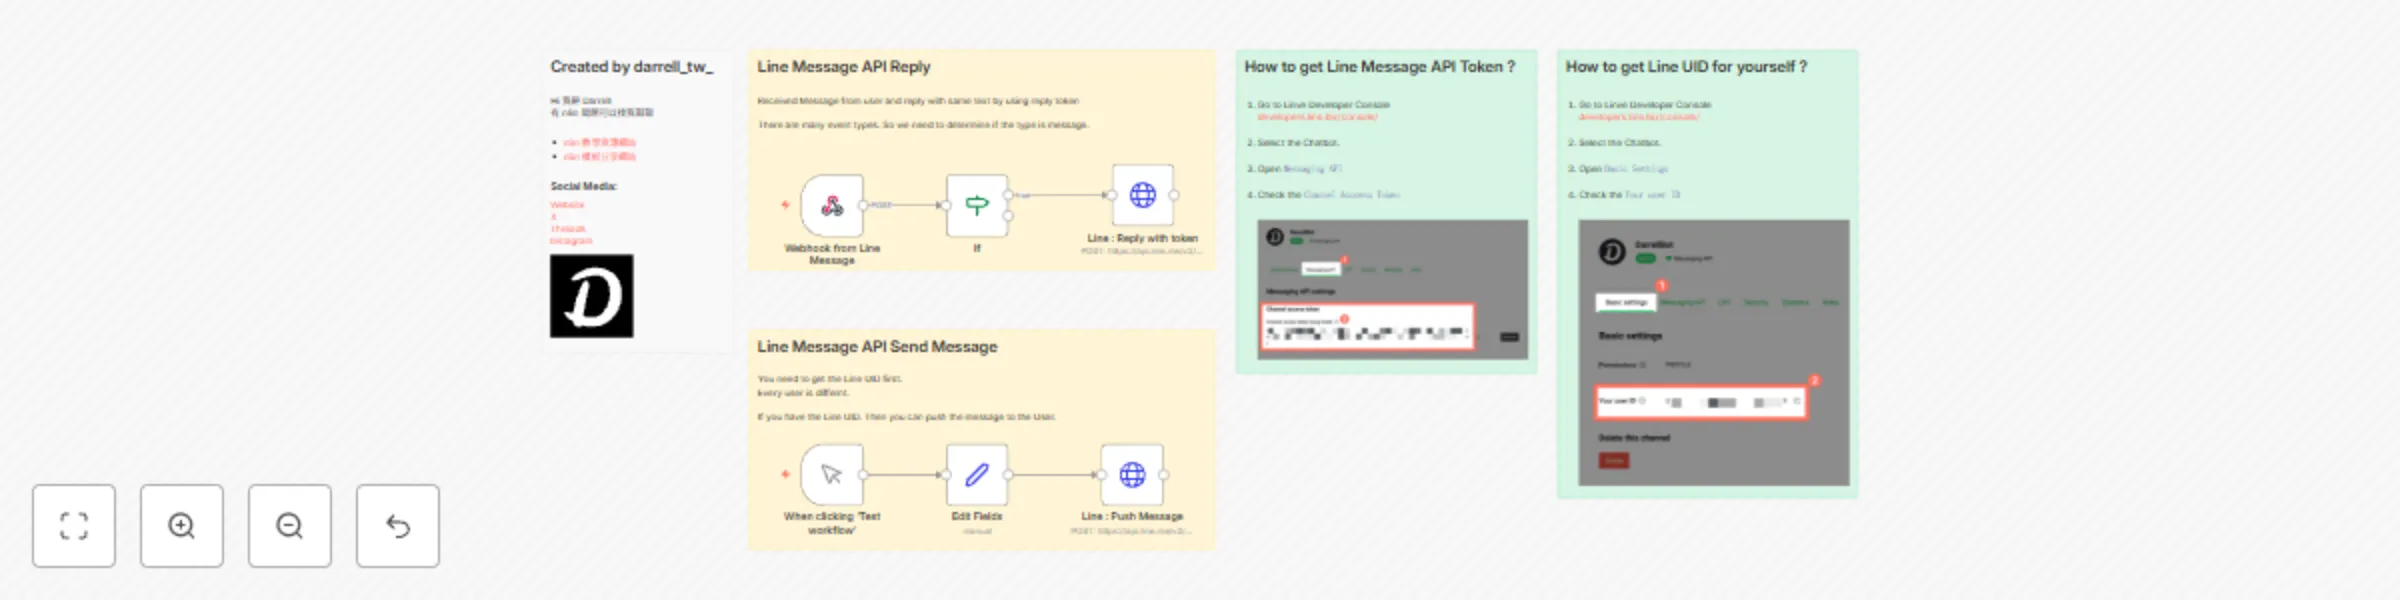
Workflow preview
100%
Line Message API : push message & reply preview
Open on n8n.io

Important notice

This workflow is provided as-is. Please review and test before using in production.

1. Workflow Overview

Workflow Description This workflow demonstrates how to use the LINE Messaging API to handle two scenarios: 1. Replying to a user's message using a reply token . 2. Sending a push message to a speci...

Best for

  • Support Chatbot automation workflows
  • intermediate n8n builders looking for reusable templates

Tools used

n8n-nodes-base.httprequest, n8n-nodes-base.webhook, n8n-nodes-base.stickynote, n8n-nodes-base.if, n8n-nodes-base.manualtrigger, n8n-nodes-base.set

Source and attribution

This workflow is cataloged by N8N Workflows and links back to its original n8n.io source page by darrell_tw.

Original n8n.io source

1.1 Workflow description

Title
Line Message API : push message & reply
Workflow name
Line Message API : push message & reply

Workflow Description

This workflow demonstrates how to use the LINE Messaging API to handle two scenarios:

  1. Replying to a user's message using a reply token.
  2. Sending a push message to a specific LINE user using their user ID.

Key Features

  1. Webhook Integration: Receives and processes incoming messages from LINE using a webhook.
  2. Conditional Logic: Checks if the received event type is a message and handles it accordingly.
  3. Reply Message: Automatically responds to the user's message using the LINE reply token.
  4. Push Message: Sends a test message to a specific LINE user using their unique user ID.

Pre-Configuration

To simplify the setup process, create a Header Auth credential in n8n:

  • Name: Authorization
  • Value: Bearer {line token}
    This will authenticate all API requests to the LINE Messaging API.

Node Configurations

1.1. Webhook from LINE Message

  • Purpose: Captures incoming events from the LINE Messaging API.
  • Configuration:
    • HTTP Method: POST
    • Path: {n8n-webhook-page}

1.2. If Condition

  • Purpose: Checks if the received event type is message.
  • Configuration:
    • Condition:
      • {{ $json.body.events[0].type }} equals "message"

1.3. Line: Reply with Token

  • Purpose: Replies to the user's message using the LINE reply token.
  • Configuration:
    • Method: POST
    • URL: https://api.line.me/v2/bot/message/reply
    • JSON Body:
      {
        "replyToken": "{{ $('Webhook from Line Message').item.json.body.events[0].replyToken }}",
        "messages": [
          {
            "type": "text",
            "text": "收到您的訊息 : {{ $('Webhook from Line Message').item.json.body.events[0].message.text }}"
          }
        ]
      }
      

2.1. Manual Trigger: Test Workflow

  • Purpose: Triggers the workflow for testing the push message functionality.
  • Configuration: No additional setup required.

2.2. Edit Fields

  • Purpose: Prepares the unique LINE user ID for the push message.
  • Configuration:
    • Field:
      • line_uid: Uxxxxxxxxxxxx

2.3. Line: Push Message

  • Purpose: Sends a test message to a specific LINE user.
  • Configuration:
    • Method: POST
    • URL: https://api.line.me/v2/bot/message/push
    • JSON Body:
      {
        "to": "{{ $json.line_uid }}",
        "messages": [
          {
            "type": "text",
            "text": "推播測試"
          }
        ]
      }
      

工作流程描述

此工作流程展示如何使用 LINE Messaging API 處理兩種情境:

  1. 使用 reply token 回應使用者的訊息。
  2. 使用使用者的 user ID 發送 推播訊息

主要功能

  1. Webhook 整合:透過 Webhook 接收並處理來自 LINE 的訊息。
  2. 條件邏輯:檢查接收到的事件類型是否為訊息並進行處理。
  3. 回應訊息:使用 LINE 的 reply token 自動回覆使用者的訊息。
  4. 推播訊息:使用 LINE User ID 向指定用戶發送測試訊息。

預先設定

為簡化設定流程,請在 n8n 中建立 Header Auth 憑證:

  • 名稱Authorization
  • Bearer {line token}
    此設定將用於認證所有 LINE Messaging API 的請求。

節點設定

1.1. Webhook from LINE Message

  • 用途:接收來自 LINE Messaging API 的事件。
  • 設定
    • HTTP 方法POST
    • 路徑{n8n-webhook-page}

1.2. If 條件判斷

  • 用途:檢查接收到的事件類型是否為 message
  • 設定
    • 條件
      • {{ $json.body.events[0].type }} 等於 "message"

1.3. Line: Reply with Token

  • 用途:使用 LINE reply token 回應使用者訊息。
  • 設定
    • 方法POST
    • URLhttps://api.line.me/v2/bot/message/reply
    • JSON 主體
      {
        "replyToken": "{{ $('Webhook from Line Message').item.json.body.events[0].replyToken }}",
        "messages": [
          {
            "type": "text",
            "text": "收到您的訊息 : {{ $('Webhook from Line Message').item.json.body.events[0].message.text }}"
          }
        ]
      }
      

2.1. 手動觸發:測試工作流程

  • 用途:測試推播訊息功能。
  • 設定:無需額外設定。

2.2. Edit Fields

  • 用途:準備推播訊息所需的 LINE 使用者 ID。
  • 設定
    • 欄位
      • line_uidUxxxxxxxxxxxx

2.3. Line: 推播訊息

  • 用途:向特定 LINE 使用者發送測試訊息。
  • 設定
    • 方法POST
    • URLhttps://api.line.me/v2/bot/message/push
    • JSON 主體
      {
        "to": "{{ $json.line_uid }}",
        "messages": [
          {
            "type": "text",
            "text": "推播測試"
          }
        ]
      }
      

1.2 Logical Blocks

This catalog entry is organized from the workflow JSON. The node-level section below shows the executable blocks available for review before importing the template.

2. Block-by-Block Analysis

Block 1 - Line : Reply with token

Type / Role
n8n-nodes-base.httpRequest - httpRequest
Config choices
Version 4.2

Block 2 - Webhook from Line Message

Type / Role
n8n-nodes-base.webhook - webhook
Config choices
Version 2

Block 3 - Sticky Note

Type / Role
n8n-nodes-base.stickyNote - stickyNote
Config choices
Version 1

Block 4 - If

Type / Role
n8n-nodes-base.if - if
Config choices
Version 2.2

Block 5 - Sticky Note1

Type / Role
n8n-nodes-base.stickyNote - stickyNote
Config choices
Version 1

Block 6 - When clicking ‘Test workflow’

Type / Role
n8n-nodes-base.manualTrigger - manualTrigger
Config choices
Version 1

Block 7 - Edit Fields

Type / Role
n8n-nodes-base.set - set
Config choices
Version 3.4

Block 8 - Line : Push Message

Type / Role
n8n-nodes-base.httpRequest - httpRequest
Config choices
Version 4.2

Block 9 - Sticky Note2

Type / Role
n8n-nodes-base.stickyNote - stickyNote
Config choices
Version 1

Block 10 - Sticky Note3

Type / Role
n8n-nodes-base.stickyNote - stickyNote
Config choices
Version 1

Block 11 - Sticky Note4

Type / Role
n8n-nodes-base.stickyNote - stickyNote
Config choices
Version 1

3. Summary Table

Workflow Line Message API : push message & reply
Complexity intermediate
Nodes 11
Categories Support Chatbot
Author darrell_tw
Published 15 Jan 2025

4. Reproducing the Workflow from Scratch

  1. 1. Download the workflow JSON

    Use the JSON export at /data/workflows/2733/2733.json as the source template for this automation.

  2. 2. Import the template into n8n

    Open n8n, import the downloaded JSON, and review each node before activating the workflow.

  3. 3. Configure credentials and variables

    Replace placeholder credentials, API keys, webhook URLs, account IDs, and environment-specific values with your own settings.

  4. 4. Test with sample data

    Run the workflow manually or in a staging workspace, inspect node output, and confirm downstream systems receive the expected data.

  5. 5. Activate and monitor

    Enable the workflow only after testing, then monitor executions, errors, and rate limits during the first production runs.

5. General Notes & Resources

Review imported nodes carefully before activation. This catalog entry is intended to help you inspect the workflow structure, understand required services, and find related templates faster.

Node names, credentials, schedules, webhook paths, and external service limits may need adjustment for your workspace.

Frequently asked questions

What does Line Message API : push message & reply do?

Workflow Description This workflow demonstrates how to use the LINE Messaging API to handle two scenarios: 1. Replying to a user's message using a reply token . 2. Sending a push message to a speci...

What do I need before importing this workflow?

Review the workflow JSON, configure any required credentials in n8n, and test the automation in a safe workspace before using it in production.

Can I customize this workflow?

Yes. Use the block-by-block analysis and the downloadable JSON to inspect each node, then adjust credentials, prompts, schedules, filters, or destinations for your Support Chatbot use case.



