Automated Instagram Reels posting from Airtable content calendar
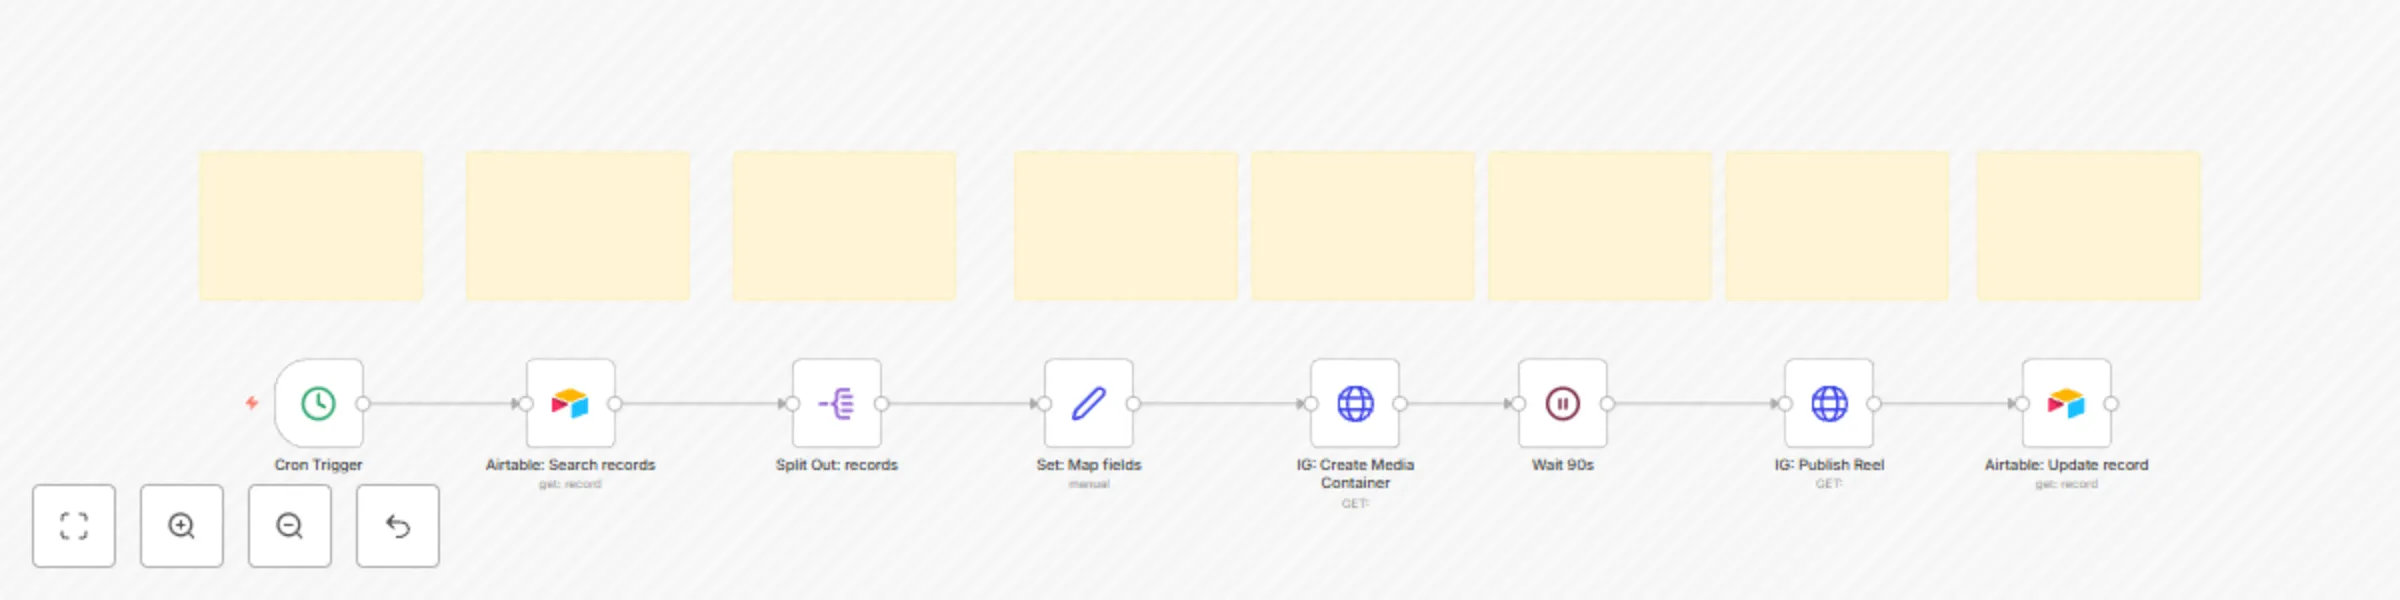
Workflow preview


 Early Deal
DISCOUNT 20%

Important notice
This workflow is provided as-is. Please review and test before using in production.
Overview
A guide to understand, operate, and extend the workflow.
1) What this workflow does (and why it’s useful)
Goal: Turn a simple Airtable sheet into a content calendar that automatically publishes Instagram Reels via the Instagram Graph API, on a schedule you control in n8n.
Why this matters:
- Your team plans everything in Airtable (user-friendly, collaborative).
- n8n posts for you at the right time, every time.
- You keep full control (no third-party SaaS lock-in, no manual uploads).
- Later, you can reuse the same queue to post YouTube Shorts / TikTok (omnichannel).
Core flow (one row = one post):
- Cron starts the workflow at a set time.
- Airtable – Search grabs due rows:
status = "To Post" AND scheduled_at <= NOW() AND platform = "IG". - Split Out processes each row individually.
- Set (Map fields) normalizes Airtable fields →
video_url,caption,recordId. - IG: Create Media Container registers your video as REEL.
- Wait 90s lets IG process the video.
- IG: Publish Reel publishes the container.
- Airtable – Update marks the row as Posted, stores
ig_media_id, and timestamp.
2) Architecture at a glance
[Cron]
  → [Airtable: Search records]
    → [Split Out: records]
      → [Set: Map fields]
        → [IG: Create Media Container]
          → [Wait 90s]
            → [IG: Publish Reel]
              → [Airtable: Update record]
Sticky Notes inside the workflow explain each step (they’re rendered from parameters.content with Markdown).
3) Airtable schema (recommended)
Create a table (e.g., Posts) with these fields:
| Field | Type | Purpose |
|---|---|---|
video_url |
URL or Text | Directly accessible (public) URL to your MP4 |
caption |
Long text | Final caption (hashtags, line breaks, emojis) |
platform |
Single select | Set IG for this workflow |
status |
Single select | To Post → will be picked up; Posted later |
scheduled_at |
Date/Time (UTC) | When to post |
ig_media_id |
Text (optional) | Filled by n8n after publishing |
posted_at |
Date/Time | Filled by n8n after publishing |
Filter used in the Airtable “Search records” node:
AND({status}='To Post', {scheduled_at}<=NOW(), {platform}='IG')
> Tip: If you localize/rename fields, update the filter accordingly.
4) Prerequisites & credentials
- Instagram Business/Creator account connected to a Facebook Page.
- IG User ID for the connected account.
- Long-lived IG Access Token with permissions to create and publish content.
- n8n environment variables (Settings → Environments):
IG_API_VERSION(e.g.,v21.0)IG_USER_IDIG_ACCESS_TOKEN
- Airtable credential in n8n using a Personal Access Token (as in your example).
- A publicly accessible
video_url(e.g., S3/GCS signed URL, public CDN, Drive/Dropbox direct link). The API pulls from your URL; it cannot fetch files behind logins.
5) Node-by-node deep dive (what each node expects/returns)
A) Cron Trigger
- What it does: Starts the workflow on a schedule (daily at 09:00 in the template).
- How to use: Adjust hours/minutes to your cadence (hourly, twice a day, etc.).
B) Airtable: Search records
- Operation:
search - Base/Table: Select from dropdowns (matches your account).
- Options → filterByFormula:
AND({status}='To Post', {scheduled_at}<=NOW(), {platform}='IG') - Return: An array under
records[]. Eachrecordhasidandfields.
C) Split Out: records
- What it does: Turns the
records[]array into individual items. - Why: Downstream steps can then act on each post separately.
D) Set: Map fields
- What it does: Normalizes data to predictable keys and keeps the
recordId. - Outputs:
recordId={{$json.id}}video_url={{$json.fields.video_url}}caption={{$json.fields.caption}}scheduled_at={{$json.fields.scheduled_at}}
E) IG: Create Media Container (REELS)
- Endpoint:
POST https://graph.facebook.com/{v}/{ig-user-id}/media - Body params:
video_url={{$json.video_url}}caption={{$json.caption}}media_type=REELSshare_to_feed=true(optional)access_token=${IG_ACCESS_TOKEN}
- Return: JSON with container id under
id(this is yourcreation_idfor publishing).
F) Wait 90s
- Why: IG needs time to process the video behind
video_url. - Tip: If your videos are large or high bitrate, you may increase to
120–180s.
G) IG: Publish Reel
- Endpoint:
POST https://graph.facebook.com/{v}/{ig-user-id}/media_publish - Body params:
creation_id = {{$json.id}}(the container id from step E)access_token = ${IG_ACCESS_TOKEN}
- Return: JSON with
id= ig_media_id (the published media).
H) Airtable: Update record
- What it does: Writes results back to the same row.
- Fields updated (example):
status = "Posted"ig_media_id = {{$json.id}}posted_at = {{$now}}
6) First-run checklist (do this once)
- In both Airtable nodes, pick your Base and Table (via dropdown).
- Confirm filterByFormula matches your field names exactly.
- Add one test row in Airtable:
video_url= a public MP4 URLcaption= a small captionplatform=IGstatus=To Postscheduled_at= in the past (so it’s due now)
- Set Cron to run in the next minute (or click Execute Workflow manually).
- Confirm the flow:
- Airtable search → returns 1 record
- Container created → you get an
id - After 90s → Publish returns a
media id - Airtable updated → row becomes
Postedwithig_media_idandposted_at
7) Daily operations (how to use it day-to-day)
- Your team fills Airtable with upcoming posts.
- Keep
status = To Post, set accuratescheduled_atin UTC. - n8n’s Cron checks regularly and posts due items.
- After publishing, the row is marked Posted (so it won’t re-post).
Backfilling:
If you need to post a bunch of older content, set scheduled_at in the past for those rows and let Cron pick them up. If needed, run the workflow manually.