Push multiple files to GitHub repository via Github REST API
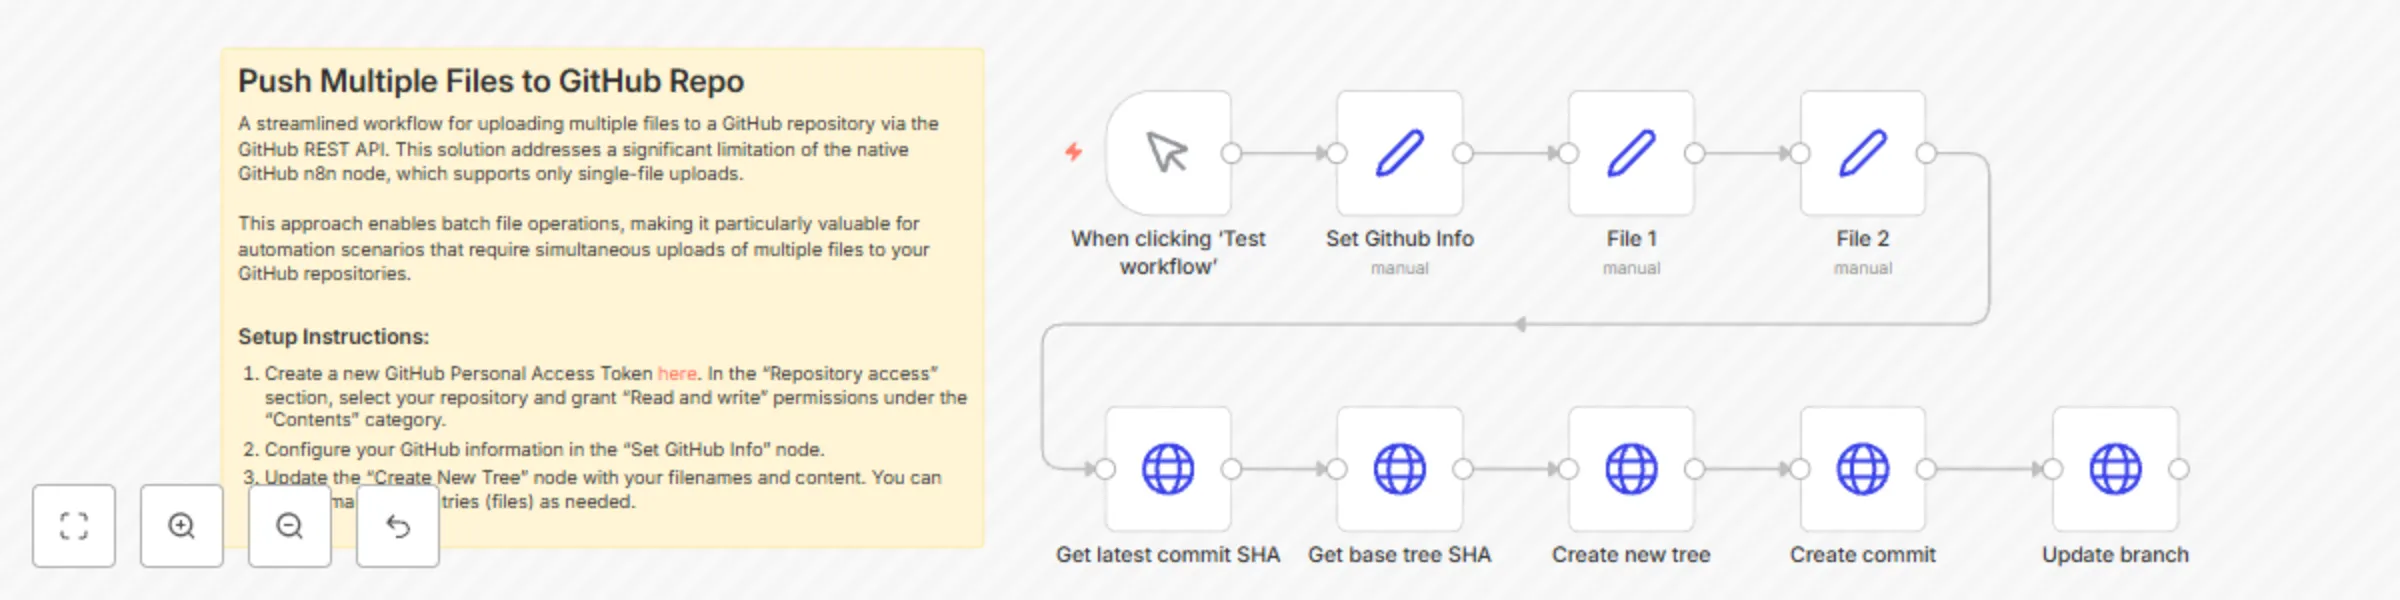
Workflow preview


 Early Deal
DISCOUNT 20%

Important notice
This workflow is provided as-is. Please review and test before using in production.
Overview
Introduction
This workflow offers a streamlined solution for uploading multiple files to a GitHub repository simultaneously using GitHub's REST API. It addresses a significant limitation of n8n's native GitHub node, which only supports single-file uploads at a time. By leveraging GitHub's Git Data API, this workflow creates a new Git tree containing multiple files, commits this tree, and updates the target branch—all in a single automated process.
The workflow is particularly valuable for automation scenarios that require batch file operations, such as deploying website updates, publishing documentation, or maintaining configuration files across repositories. It eliminates the need for multiple separate API calls when working with multiple files, making your automation more efficient and less prone to partial update issues.
By abstracting the complexities of GitHub's Git Data API into a reusable workflow, it provides a practical solution for developers, content managers, and DevOps professionals who need to programmatically manage repository content at scale.
Who is this for?
This workflow is designed for:
- Developers and DevOps engineers who need to automate file updates in GitHub repositories
- Content managers who regularly publish multiple files to GitHub-hosted websites or documentation
- Automation specialists looking to integrate GitHub operations into larger workflows
- Teams using n8n for CI/CD processes who need to push code or configuration changes
Users should have basic familiarity with GitHub concepts (repositories, branches, commits) and should be comfortable obtaining and using GitHub Personal Access Tokens. While the workflow handles the API complexity, users should understand the fundamentals of version control to effectively utilize and customize it.
What problem is this workflow solving?
This workflow addresses several key challenges:
Limited batch operations: n8n's native GitHub node only supports uploading one file at a time, making multi-file operations cumbersome and inefficient.
API complexity: GitHub's Git Data API requires multiple sequential calls with interdependent data to create commits with multiple files, which is complex to implement manually.
Automation bottlenecks: Without this workflow, automating multi-file updates would require either multiple separate API calls (risking partial updates) or custom scripting outside of n8n.
Consistency issues: When files need to be updated together (e.g., code and corresponding documentation), this workflow ensures they're committed in a single atomic operation.
By solving these issues, the workflow enables reliable, atomic updates of multiple files, maintaining repository consistency and simplifying automation processes.
What this workflow does
Overview
This workflow uses GitHub's REST API to push multiple files to a repository in a single operation. It follows Git's internal model by:
- Retrieving the current state of the repository
- Creating a new tree with the files to be added or updated
- Creating a new commit with this tree
- Updating the branch reference to point to the new commit
Process
Initialization: The workflow starts with a manual trigger and sets up GitHub credentials and repository information.
File Content Definition: Two "Set" nodes define the content for the files to be uploaded.
Repository State Retrieval:
- The workflow fetches the latest commit SHA for the specified branch
- It then retrieves the base tree SHA from this commit
Tree Creation: A new Git tree is created that includes both files (file1.txt and file2.txt), specifying their paths and content.
Commit Creation: A new commit is created with the specified commit message, referencing the new tree and the parent commit.
Branch Update: Finally, the branch reference is updated to point to the new commit, making the changes visible in the repository.
Setup
To use this workflow:
Import the workflow: Download the workflow JSON and import it into your n8n instance.
Create a GitHub Personal Access Token:
- Go to GitHub Settings → Developer Settings → Personal Access Tokens → Fine-grained tokens
- Create a new token with "Contents" permission (Read and write) for your target repository
Configure the workflow:
- Update the "Set Github Info" node with:
- Your GitHub Personal Access Token
- Your GitHub username
- Your repository name
- The target branch (default is "main")
- A commit message
- Update the "Set Github Info" node with:
Define file content:
- Modify the "File 1" and "File 2" nodes with the content you want to upload
Adjust file paths if needed:
- In the "Create new tree" node, update the file paths if you want to change where the files are stored in the repository
Save and run the workflow: Click "Test workflow" to execute the process.
How to customize this workflow to your needs
This workflow can be adapted in several ways:
Add more files:
- Create additional "Set" nodes for more file content
- In the "Create new tree" node, add more tree entries following the same pattern (path, mode, type, content)
Change file locations:
- Modify the "path" parameters in the "Create new tree" node to place files in different directories
Dynamic file content:
- Replace the static content in the "File" nodes with data from other sources
- Use previous nodes or HTTP requests to generate file content dynamically
Conditional file updates:
- Add IF nodes to determine which files should be updated based on certain conditions
- Create separate branches in your workflow for different update scenarios
Scheduled updates:
- Replace the manual trigger with a Schedule node to run the workflow at specific intervals
- Combine with other triggers like Webhook or database events to push files when certain events occur
Error handling:
- Add Error Trigger nodes to handle potential API failures
- Implement notification nodes to alert you of successful pushes or failures