Create a cryptocurrency-powered API for selling resources with AgentGatePay
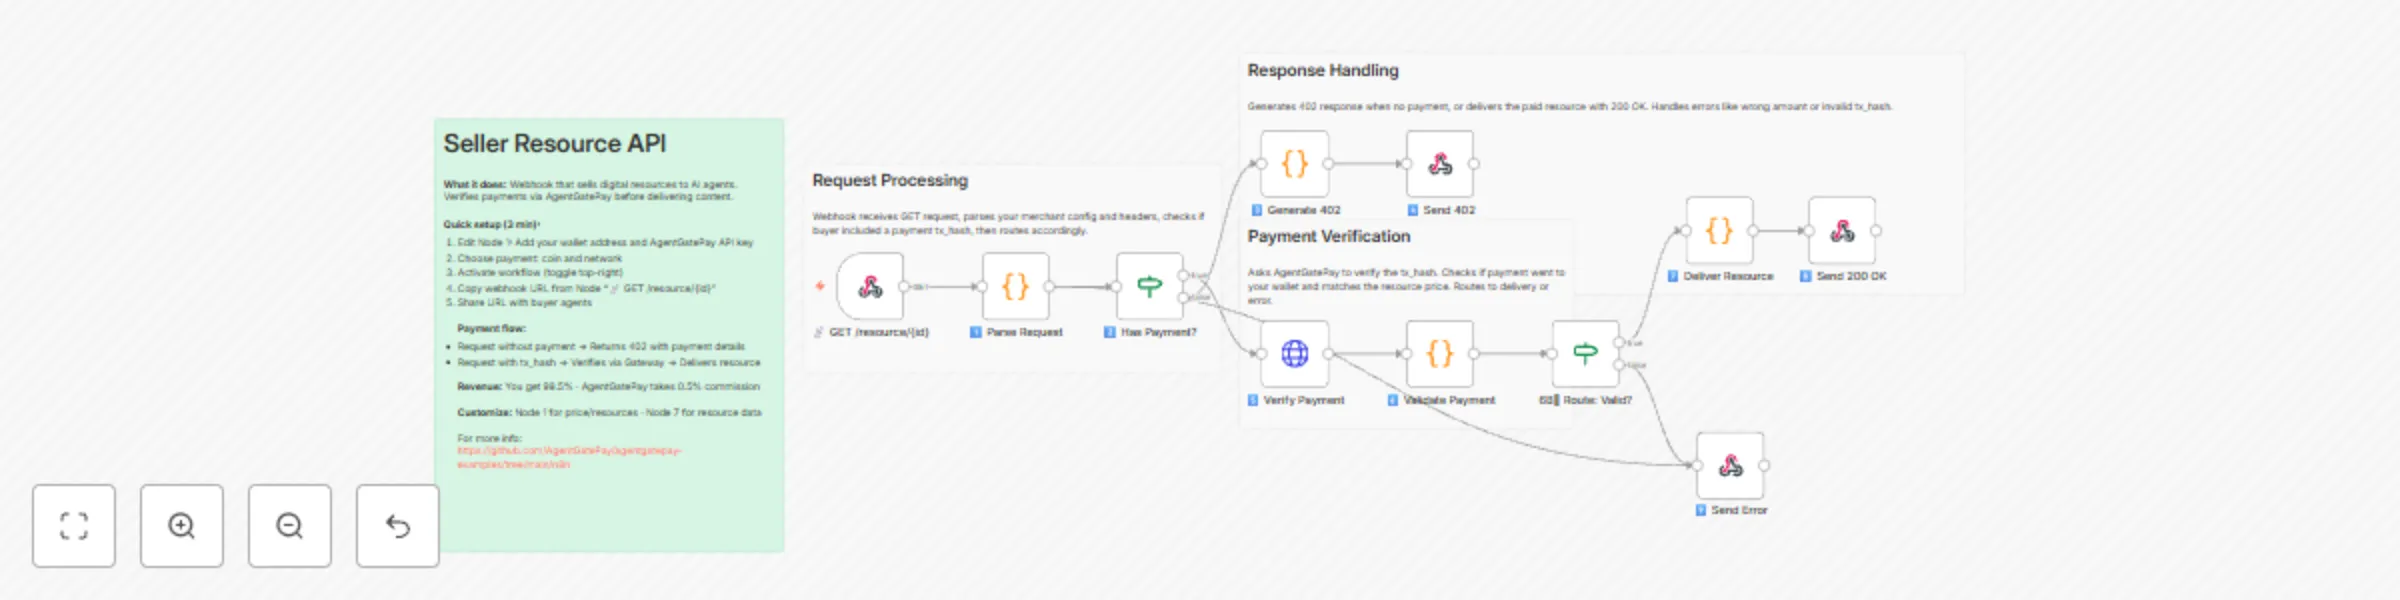
Workflow preview


 Early Deal
DISCOUNT 20%

Important notice
This workflow is provided as-is. Please review and test before using in production.
Overview
AgentGatePay N8N Quick Start Guide
Get your AI agents paying for resources autonomously in under 10 minutes.
> ⚠️ BETA VERSION: These templates are currently in beta. We're actively adding features and improvements based on user feedback. Expect updates for enhanced functionality, additional blockchain networks, and new payment options.
What You'll Build
- Buyer Agent: Automatically pays for API resources using USDC, USDT, or DAI on Ethereum, Base, Polygon, or Arbitrum blockchains
- Seller API: Accepts multi-token payments and delivers resources
- Monitoring: Track spending and revenue in real-time across all chains and tokens
Supported Tokens:
- USDC (6 decimals) - Recommended
- USDT (6 decimals)
- DAI (18 decimals)
Supported Blockchains:
- Ethereum (mainnet)
- Base (recommended for low gas fees ~$0.001)
- Polygon
- Arbitrum
Prerequisites (5 minutes)
1. Create AgentGatePay Accounts
Buyer Account (agent that pays):
curl -X POST https://api.agentgatepay.com/v1/users/signup \
  -H "Content-Type: application/json" \
  -d '{
    "email": "[email protected]",
    "password": "SecurePass123!",
    "user_type": "agent"
  }'
Seller Account (receives payments):
curl -X POST https://api.agentgatepay.com/v1/users/signup \
  -H "Content-Type: application/json" \
  -d '{
    "email": "[email protected]",
    "password": "SecurePass123!",
    "user_type": "merchant"
  }'
Save both API keys - shown only once!
2. Deploy Transaction Signing Service (2 minutes)
One-Click Render Deploy:
- Click:

- Enter:
AGENTGATEPAY_API_KEY: Your buyer API keyWALLET_PRIVATE_KEY: Your wallet private key (0x...)
- Deploy → Copy service URL:
https://your-app.onrender.com
3. Fund Wallet
- Send USDC, USDT, or DAI to your buyer wallet
- Default: Base network (lowest gas fees)
- Need ~$1 in tokens for testing + ~$0.01 ETH for gas (on Ethereum) or ~$0.001 on Base
Installation (3 minutes)
Step 1: Import Templates
In N8N:
- Go to Workflows → Add Workflow
- Click ⋮ (three dots) → Import from File
- Import all 3 workflows:
🤖 Create a Cryptocurrency-Powered API for Selling Digital Resources with AgentGatePay💲Create a Cryptocurrency-Powered API for Selling Digital Resources with AgentGatePay📊 AgentGatePay - Monitoring Dashboard
Step 2: Create Data Table
In N8N Settings:
- Go to Settings → Data → Data Tables
- Create table:
AgentPay_Mandates - Add column:
mandate_token(type: String) - Save
Configuration (2 minutes)
Configure Seller API First
Open: 💲Seller Resource API - CLIENT TEMPLATE
Edit Node 1 (Parse Request):
const SELLER_CONFIG = {
  merchant: {
    wallet_address: "0xYourSellerWallet...",  // ← Your seller wallet
    api_key: "pk_live_xyz789..."              // ← Your seller API key
  },
  catalog: {
    "demo-resource": {
      id: "demo-resource",
      price_usd: 0.01,                        // $0.01 per resource
      description: "Demo API Resource"
    }
  }
};
Activate workflow → Copy webhook URL
Configure Buyer Agent
Open: 🤖 Buyer Agent - CLIENT TEMPLATE
Edit Node 1 (Load Config):
const CONFIG = {
  buyer: {
    email: "[email protected]",              // ← Your buyer email
    api_key: "pk_live_abc123...",            // ← Your buyer API key
    budget_usd: 100,                         // $100 mandate budget
    mandate_ttl_days: 7                      // 7-day validity
  },
  seller: {
    api_url: "https://YOUR-N8N.app.n8n.cloud/webhook/YOUR-WEBHOOK-ID"  // ← Seller webhook base URL ONLY (see README.md for extraction instructions)
  },
  render: {
    service_url: "https://your-app.onrender.com"  // ← Your Render URL
  }
};
Run Your First Payment (1 minute)
Execute Buyer Agent
- Open Buyer Agent workflow
- Click Execute Workflow
- Watch the magic happen:
- Mandate created ($100 budget)
- Resource requested (402 Payment Required)
- Payment signed (2 transactions: merchant + commission)
- Payment verified on blockchain
- Resource delivered
Total time: ~5-8 seconds
Verify on Blockchain
Check transactions on BaseScan:
https://basescan.org/address/YOUR_BUYER_WALLET
You'll see:
- TX 1: Commission to AgentGatePay (0.5% = $0.00005)
- TX 2: Payment to seller (99.5% = $0.00995)
Monitor Activity - Choose Buyer/Seller or both
Buyer Monitoring
Open: 📊 AgentGatePay - Monitoring Dashboard
Edit Node 1: Set your buyer wallet address and API key
Execute → See:
- Mandate budget remaining
- Payment history
- Total spent
- Average transaction size
Seller Monitoring
Open: 📊 AgentGatePay - Monitoring Dashboard
Edit Node 1: Set your seller wallet address and API key
Execute → See:
- Total revenue
- Commission breakdown
- Top payers
- Payment count
How It Works
Payment Flow
1. Buyer Agent requests resource
   ↓
2. Seller returns 402 Payment Required
   (includes: wallet address, price, token, chain)
   ↓
3. Buyer signs TWO blockchain transactions via Render:
   - Merchant payment (99.5%)
   - Gateway commission (0.5%)
   ↓
4. Buyer resubmits request with transaction hashes
   ↓
5. Seller verifies payment with AgentGatePay API
   ↓
6. Seller delivers resource
Key Concepts
AP2 Mandate:
- Pre-authorized spending authority
- Budget limit ($100 in example)
- Time limit (7 days in example)
- Stored in N8N Data Table for reuse
x402 Protocol:
- HTTP 402 "Payment Required" status code
- Seller specifies payment details
- Buyer pays and retries with proof
Two-Transaction Model:
- Transaction 1: Merchant receives 99.5%
- Transaction 2: Gateway receives 0.5%
- Both verified on blockchain
Customization
Change Resource Price
Edit seller Node 1:
catalog: {
  "expensive-api": {
    id: "expensive-api",
    price_usd: 1.00,  // ← Change price
    description: "Premium API access"
  }
}
Add More Resources
catalog: {
  "basic": { id: "basic", price_usd: 0.01, description: "Basic API" },
  "pro": { id: "pro", price_usd: 0.10, description: "Pro API" },
  "enterprise": { id: "enterprise", price_usd: 1.00, description: "Enterprise API" }
}
Buyer requests by ID: ?resource_id=pro
Change Blockchain and Token
By default, templates use Base + USDC. To change:
Edit buyer Node 1 (Load Config):
const CONFIG = {
  buyer: { /* ... */ },
  seller: { /* ... */ },
  render: { /* ... */ },
  payment: {
    chain: "polygon",  // Options: ethereum, base, polygon, arbitrum
    token: "DAI"       // Options: USDC, USDT, DAI
  }
};
Important:
- Ensure your wallet has the selected token on the selected chain
- Update Render service to support the chain (add RPC URL)
- Gas fees vary by chain.
Token Decimals:
- USDC/USDT: 6 decimals (automatic conversion)
- DAI: 18 decimals (automatic conversion)
Schedule Monitoring
Replace "Execute Workflow" trigger with Schedule Trigger:
- Buyer monitoring: Every 1 hour
- Seller monitoring: Every 6 hours
Add Slack/Email node to send alerts.
Troubleshooting
"Mandate expired"
Fix: Delete mandate from Data Table → Re-execute workflow
"Transaction not found"
Fix: Wait 10-15 seconds for blockchain confirmation → Retry
"Render service unavailable"
Fix: Render free tier spins down after 15 min → First request takes ~5 sec (cold start)
"Insufficient funds"
Fix: Send more tokens (USDC/USDT/DAI) to buyer wallet
- Check balance on blockchain explorer (BaseScan for Base, Etherscan for Ethereum, etc.)
"Webhook not responding"
Fix: Ensure seller workflow is Active (toggle in top-right)
Production Checklist
Before going live:
- Use separate wallet for agent (not your main wallet)
- Set conservative mandate budgets ($10-100)
- Monitor spending daily (use monitoring workflows)
- Upgrade Render to paid tier ($7/mo) for no cold starts
- Set up Slack/email alerts for low balance
- Test with small amounts first ($0.01-0.10)
- Keep API keys secure (use N8N credentials manager)
- Review transactions on blockchain explorer weekly
Summary
You just built:
- Autonomous payment agent (buys resources automatically)
- Monetized API (sells resources for USDC, USDT, or DAI)
- Multi-chain support (Ethereum, Base, Polygon, Arbitrum)
- Real blockchain transactions (verified on-chain)
- Budget management (AP2 mandates)
- Monitoring dashboard (track spending/revenue)
Total setup time: ~10 minutes Total cost: $0 (Render free tier + AgentGatePay free)
Ready to scale? Connect multiple agents, add more resources, integrate with your existing systems!
Questions? Check README.md or contact [email protected]
Website: https://www.agentgatepay.com