Generate website screenshots on-demand with ScreenshotMachine API via webhooks
Workflow preview


 Early Deal
DISCOUNT 20%

Important notice
This workflow is provided as-is. Please review and test before using in production.
Overview
This n8n template enables you to instantly generate high-quality screenshots of any specified public URL by simply sending a webhook request. It’s an indispensable tool for developers, content creators, marketers, or anyone needing on-demand visual captures of web pages without manual intervention, all while including crucial security measures.
🔧 How it works
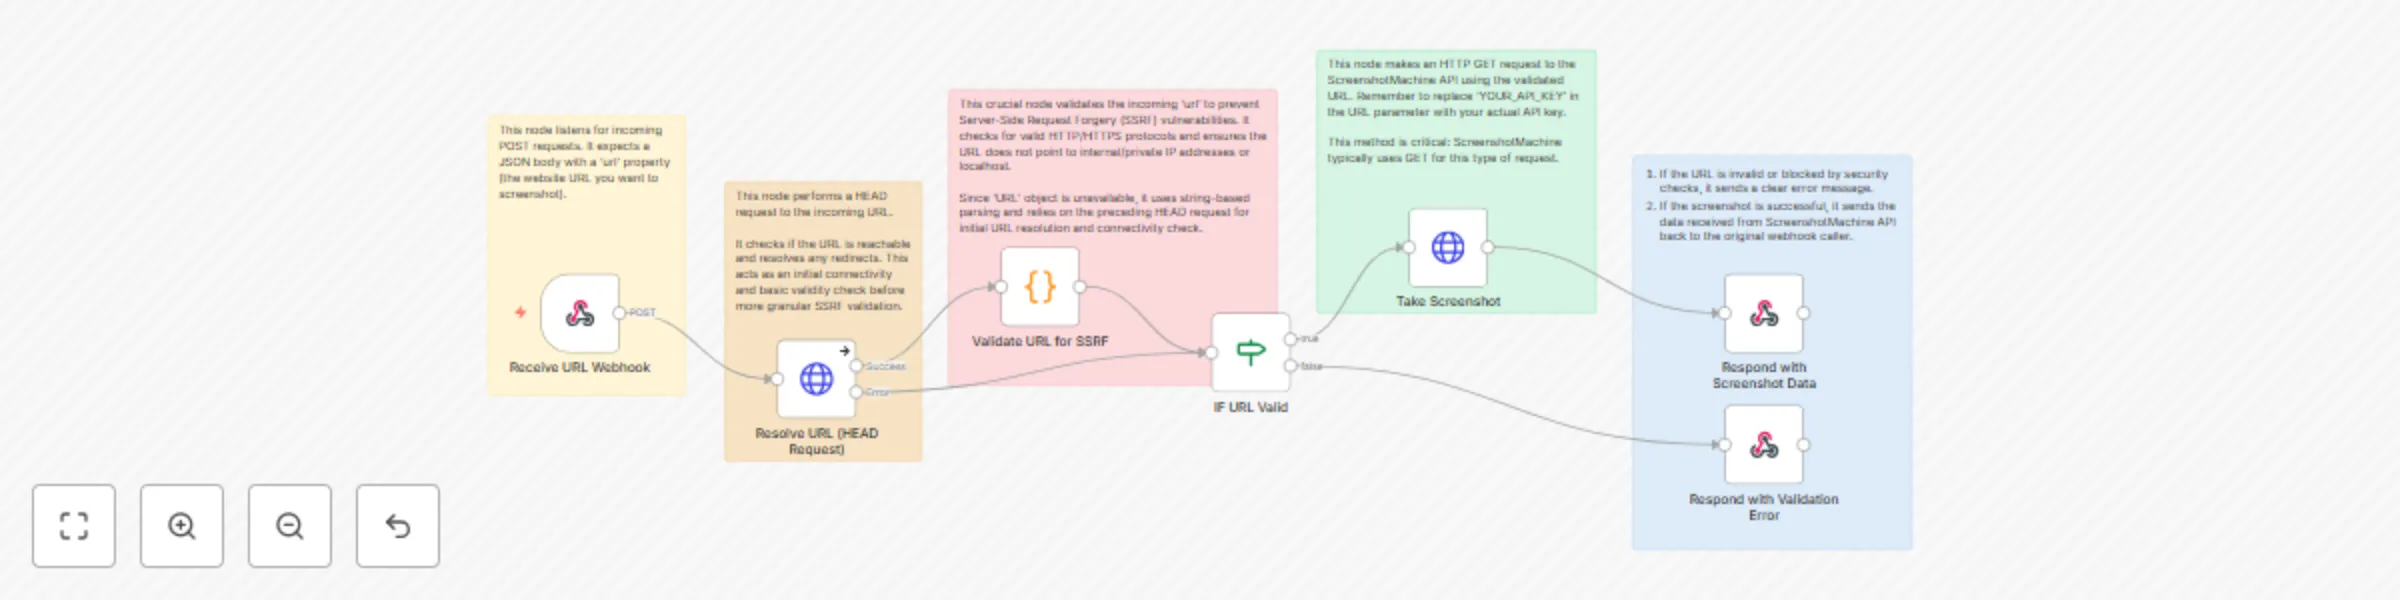
- Receive URL Webhook: This node acts as the entry point for the workflow. It listens for incoming POST requests and expects a JSON body containing a url property with the website you want to screenshot. You can trigger it from any application or service capable of sending an HTTP POST request.
- Validate URL for SSRF: This is a crucial security step. This Function node validates the incoming url to prevent Server-Side Request Forgery (SSRF) vulnerabilities. It checks for valid http:// or https:// protocols and, more importantly, ensures the URL does not attempt to access internal/private IP addresses or localhost. If the URL is deemed unsafe or invalid, it flags it for an error response.
- IF URL Valid: This IF node checks the isValidUrl flag set by the previous validation step.
- If the URL is valid (true), the workflow proceeds to take the screenshot.
- If the URL is invalid or flagged for security (false), the workflow branches to Respond with Validation Error.
- Take Screenshot: This node sends an HTTP GET request to the ScreenshotMachine API to capture an image of the validated URL. Remember to replace YOUR_API_KEY in the URL field of this node with your actual API key from ScreenshotMachine.
- Respond with Screenshot Data: This node sends the data received directly from the Take Screenshot node back to the original caller of the webhook. This response typically includes information about the generated screenshot, such as the URL to the image file, success status, and other metadata from the ScreenshotMachine API.
- Respond with Validation Error: If the IF URL Valid node determines the URL is unsafe or invalid, this node sends a descriptive error message back to the webhook caller, explaining why the request was denied due to security concerns or an invalid format.
🔒 Security Considerations
This template includes a dedicated Validate URL for SSRF node to mitigate Server-Side Request Forgery (SSRF) vulnerabilities. SSRF attacks occur when an attacker can trick a server-side application into making requests to an unintended location. Without validation, an attacker could potentially use your n8n workflow to scan internal networks, access sensitive internal resources, or attack other services from your n8n server.
The validation checks for:
- Only http:// or https:// protocols.
- Prevention of localhost or common private IP ranges (e.g., 10.x.x.x, 172.16.x.x - 172.31.x.x, 192.168.x.x).
While this validation adds a significant layer of security, always ensure your n8n instance is properly secured and updated.
👤 Who is it for?
This workflow is ideal for:
- Developers: Automate screenshot generation for testing, monitoring, or integrating visual content into applications.
- Content Creators: Quickly grab visuals for articles, presentations, or social media posts.
- Marketing Teams: Create dynamic visual assets for campaigns, ads, or competitive analysis.
- Automation Enthusiasts: Integrate powerful screenshot capabilities into existing automated workflows.
- Website Owners: Monitor how your website appears across different tools or over time.
📑 Prerequisites
To use this template, you will need:
- An n8n instance (cloud or self-hosted).
- An API Key from ScreenshotMachine. You can obtain one by signing up on their website: https://www.screenshotmachine.com/
📑 Data Structure
When you trigger the webhook, send a POST request with a JSON body structured as follows:
{
  "url": "https://www.example.com"
}
If the URL is valid, the workflow will return the JSON response directly from the ScreenshotMachine API. This response typically includes information about the generated screenshot, such as the URL to the image file, success status, and other metadata:
{
  "status": "success",
  "hash": "...",
  "url": "https://www.screenshotmachine.com/...",
  "size": 12345,
  "mimetype": "image/jpeg"
}
If the URL is invalid or blocked by the security validation, the workflow will return an error response similar to this:
{
  "status": "error",
  "message": "Access to private IP addresses is not allowed for security reasons."
}
⚙️ Setup Instructions
Import Workflow: In your n8n editor, click "File" > "Import from JSON" and paste the provided workflow JSON.
Configure Webhook Path:
- Double-click the Receive URL Webhook node.
- In the 'Path' field, set a unique and descriptive path (e.g., /website-screenshot).
Add ScreenshotMachine API Key:
Double-click the Take Screenshot node.
In the 'URL' parameter, locate YOUR_API_KEY and replace it with your actual API key obtained from ScreenshotMachine.
Example URL structure: http://api.screenshotmachine.com/?key=YOUR_API_KEY&url={{ $json.validatedUrl }}
Activate Workflow: Save and activate the workflow.
📝 Tips
- Processing Screenshots: You're not limited to just responding with the screenshot data! You can insert additional nodes after the Take Screenshot node (and before the Respond with Screenshot Data node) to further process or utilize the generated image. Common extensions include:
- Saving to Cloud Storage: Use nodes for Amazon S3, Google Drive, or Dropbox to store the screenshots automatically, creating an archive.
- Sending via Email: Attach the screenshot to an email notification using an Email or Gmail node for automated alerts or reports.
- Posting to Chat Platforms: Share the screenshot directly in a Slack, Discord, or Microsoft Teams channel for team collaboration or visual notifications.
- Image Optimization: Use an image processing node (if available via an API or a custom function) to resize, crop, or compress the screenshot before saving or sending.
- Custom Screenshot Parameters: The ScreenshotMachine API supports various optional parameters (e.g., width, height, quality, delay, fullpage).
- Upgrade: Extend the Receive URL Webhook to accept these parameters in the incoming JSON body (e.g., {"url": "...", "width": 1024, "fullpage": true}).
- Leverage: Dynamically pass these parameters to the Take Screenshot HTTP Request node's URL to customize your screenshots for different use cases.
- Scheduled Monitoring:
- Upgrade: Combine this workflow with a Cron or Schedule node. Set it to run periodically (e.g., daily, hourly).
- Leverage: Automatically monitor your website or competitors' sites for visual changes. You could then save screenshots to cloud storage and even trigger a comparison tool if a change is detected.
- Automated Visual Regression Testing:
- Upgrade: After taking a screenshot, store it with a unique identifier. In subsequent runs, take a new screenshot, then use an external image comparison API or a custom function to compare the new screenshot with a baseline.
- Leverage: Get automated alerts if visual elements on your website change unexpectedly, which is critical for quality assurance.
- Dynamic Image Generation for Social Media/Marketing:
- Upgrade: Feed URLs (e.g., for new blog posts, product pages) into this workflow. After generating the screenshot, use it to create dynamic social media images or marketing assets.
- Leverage: Streamline the creation of engaging visual content, saving design time.