Support Chatbot Workflows
Build a website-powered customer support chatbot with Decodo, Pinecone and Gemini
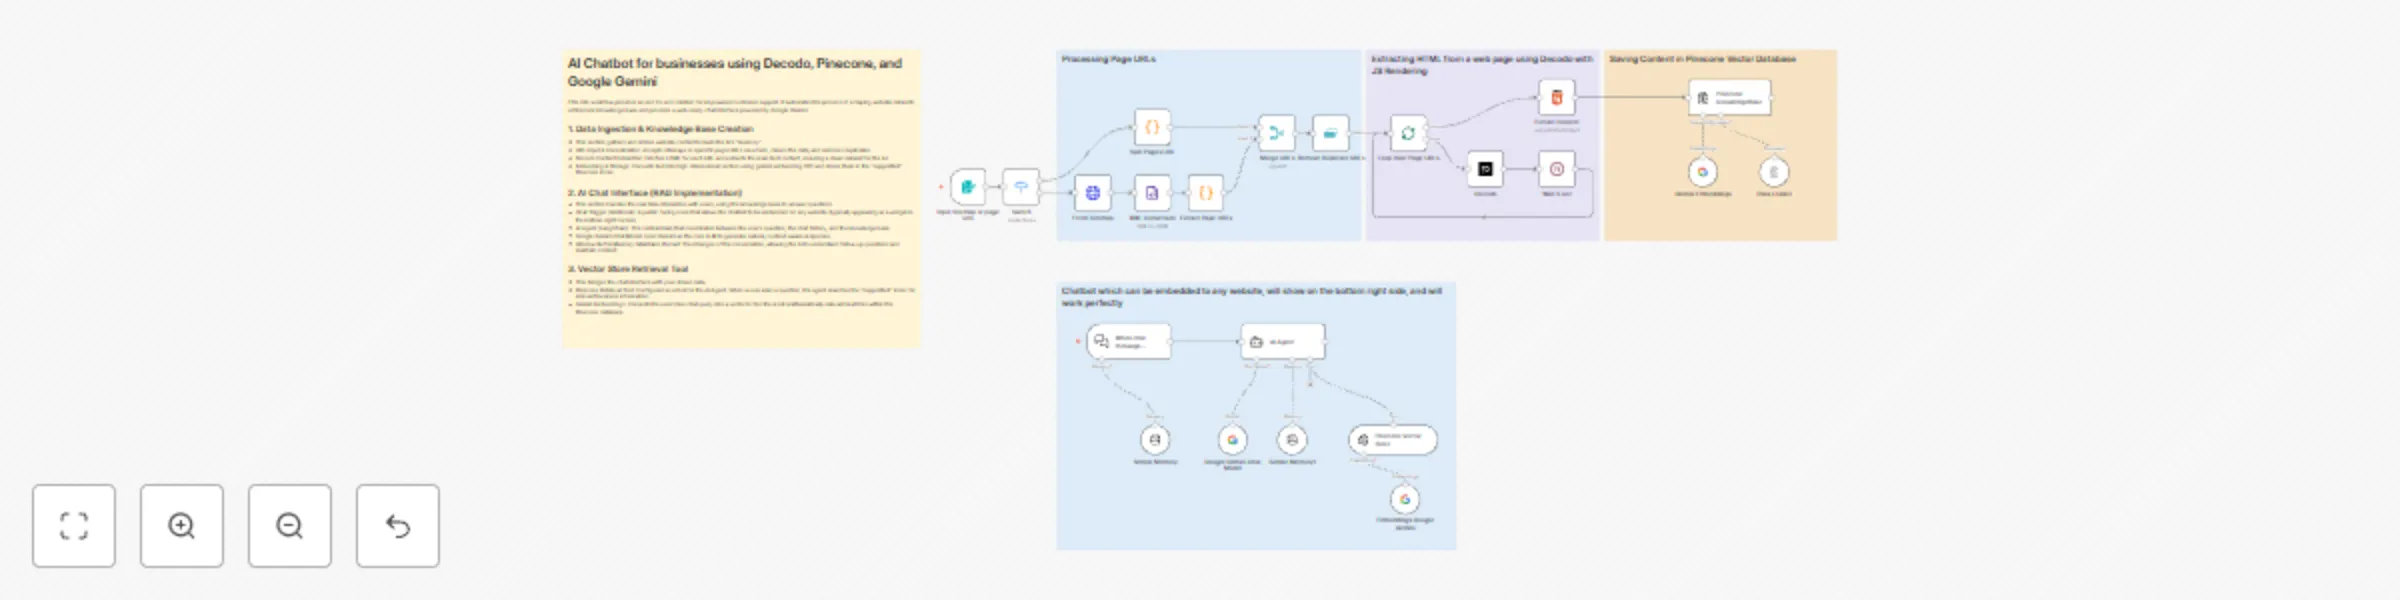
**Categories:** Business Automation, Customer Support, AI, Knowledge Management This comprehensive workflow enables businesses to build and deploy a custom-trained AI Chatbot in minutes. By combining a sophisticated data scraping engine with a RAG-based (Retrieval-Augmented Generation) chat interface, it allows you to transform website content into a high-performance support agent. Powered by **Google Gemini** and **Pinecone**, this system ensures your chatbot provides accurate, real-time answers based exclusively on your business data. ### **Benefits** * **Instant Knowledge Sync** - Automatically crawls sitemaps and URLs to keep your AI up-to-date with your latest website content. * **Embeddable Anywhere** - Features a ready-to-use chat trigger that can be integrated into the bottom-right of any website via a simple script. * **High-Fidelity Retrieval** - Uses vector embeddings to ensure the AI "searches" your documentation before answering, reducing hallucinations. * **Smart Conversational Memory** - Equipped with a 10-message window buffer, allowing the bot to handle complex follow-up questions naturally. * **Cost-Efficient Scaling** - Leverages Gemini’s efficient API and Pinecone’s high-speed indexing to manage thousands of customer queries at a low cost. ### **How It Works** 1. **Dual-Path Ingestion:** The process begins with an n8n Form where you provide a sitemap or individual URLs. The workflow automatically handles XML parsing and URL cleaning to prepare a list of pages for processing. 2. **Clean Content Extraction:** Using **Decodo**, the workflow fetches the HTML of each page and uses a specialized extraction node to strip away code, ads, and navigation, leaving only the high-value text content. **SignUp using:** [dashboard.decodo.com/register?referral_code=55543bbdb96ffd8cf45c2605147641ee017e7900](dashboard.decodo.com/register?referral_code=55543bbdb96ffd8cf45c2605147641ee017e7900). 3. **Vectorization & Storage:** The cleaned text is passed to the **Gemini Embedding** model, which converts the information into 3076-dimensional vectors. These are stored in a **Pinecone** "supportbot" index for instant retrieval. 4. **RAG-Powered Chat Agent:** When a user sends a message through the chat widget, an **AI Agent** takes over. It uses the user's query to search the Pinecone database for relevant business facts. 5. **Intelligent Response Generation:** The AI Agent passes the retrieved facts and the current chat history to **Google Gemini**, which generates a polite, accurate, and contextually relevant response for the user. ### **Requirements** * **n8n Instance:** A self-hosted or cloud instance of n8n. * **Google Gemini API Key:** For text embeddings and chat generation. * **Pinecone Account:** An API key and a "supportbot" index to store your knowledge base. * **Decodo Access:** For high-quality website content extraction. ### **How to Use** 1. **Initialize the Knowledge Base:** Use the Form Trigger to input your website URL or Sitemap. Run the ingestion flow to populate your Pinecone index. 2. **Configure Credentials:** Authenticate your Google Gemini and Pinecone accounts within n8n. 3. **Deploy the Chatbot:** Enable the Chat Trigger node. Use the provided webhook URL to connect the backend to your website's frontend chat widget. 4. **Test & Refine:** Interact with the bot to ensure it retrieves the correct data, and update your knowledge base by re-running the ingestion flow whenever your website content changes. ### **Business Use Cases** * **Customer Support Teams** - Automate answers to 80% of common FAQs using your existing documentation. * **E-commerce Sites** - Help customers find product details, shipping policies, and return information instantly. * **SaaS Providers** - Build an interactive technical documentation assistant to help users navigate your software. * **Marketing Agencies** - Offer "AI-powered site search" as an add-on service for client websites. ### **Efficiency Gains** * **Reduce Ticket Volume** by providing instant self-service options. * **Eliminate Manual Data Entry** by scraping content directly from the live website. * **Improve UX** with 24/7 availability and zero wait times for customers. **Difficulty Level:** Intermediate **Estimated Setup Time:** 30 min **Monthly Operating Cost:** Low (variable based on AI usage and Pinecone tier)

Create an all-in-one Discord assistant with Gemini, Llama Vision & Flux images
This n8n template demonstrates how to build **O'Carla**, an advanced all-in-one Discord AI assistant. It intelligently handles natural conversations, professional image generation, and visual file analysis within a single server integration. Use cases are many: Deploy a smart community manager that remembers past interactions, an on-demand artistic tool for your members, or an AI that can "read" and explain uploaded documents and images! ## Good to know * **API Costs:** Each interaction costs vary depending on the model used (Gemini vs. OpenRouter). Check your provider's dashboard for updated pricing. * **Infrastructure:** This workflow requires a separate Discord bot script (e.g., Node.js) to forward events to the n8n Webhook. It is recommended to host the bot using **PM2** for 24/7 uptime. ## How it works 1. **Webhook Trigger:** Receives incoming data (text and attachments) from your Discord bot. 2. **Intent Routing:** The workflow uses conditional logic to detect if the user wants an image (via keyword `gambar:`), a vision analysis (via attachments), or a standard chat. 3. **Multi-Model Intelligence:** * **Gemini 2.5:** Powers rapid and high-quality general chat reasoning. * **Llama 3.2 Vision (via OpenRouter):** Specifically used to describe and analyze images or text-based files. * **Flux (via Pollinations):** Uses a specialized AI Agent to refine prompts and generate professional-grade images. 4. **Contextual Memory:** A 50-message buffer window ensures O'Carla maintains the context of your conversation based on your Discord User ID. 5. **Clean UI Output:** Generated image links are automatically shortened via **TinyURL** to keep the Discord chat interface tidy. ## How to use 1. Connect your **Google Gemini** and **OpenRouter** API keys in the respective nodes. 2. Replace the Webhook URL in your bot script with this workflow's **Production Webhook URL**. 3. Type `gambar: [your prompt]` in Discord to generate images. 4. Upload an image or file to Discord to trigger the AI Vision analysis. ## Requirements * n8n instance (Self-hosted or Cloud). * Google Gemini API Key. * OpenRouter API Key. * Discord Bot Token and hosting environment. ## Customising this workflow O'Carla is highly flexible. You can change her personality by modifying the **System Message** in the Agent nodes, adjust the memory window length, or swap the LLM models to specialized ones like Claude 3.5 or GPT-4o.

AI chatbot for Max Messenger with voice recognition (GigaChat +SaluteSpeech)
**Name:** AI Chatbot for Max Messenger with Voice Recognition (GigaChat + Sber) **Description:** ### How it works This workflow powers an intelligent, conversational AI bot for Max messenger that can understand and respond to both **text and voice messages**. The bot uses GigaChat AI with built-in memory, allowing it to remember the conversation history for each unique user and answer follow-up questions. Voice messages are transcribed using Sber SmartSpeech. It's a complete solution for creating an engaging, automated assistant within your Max bot, using Russian AI services. ### Step-by-step * **Max Trigger:** The workflow starts when the **Max Trigger** node receives a new message sent to your Max bot. * **Access Control:** The **Check User** node verifies the sender's user ID against an allowed list. This prevents unauthorized users from accessing your bot. * **Access Denied Response:** If the user is not authorized, the **Access Denied** node sends a polite rejection message. * **Message Type Routing:** The **Text/Attachment** (Switch) node checks if the message contains plain text or has attachments (voice, photo, file). * **Attachment Processing:** If an attachment is detected, the **Download Attachment** (HTTP Request) node retrieves it, and the **Attachment Router** (Switch) node determines its type (voice, photo, or file). * **Voice Transcription:** For voice messages, the workflow gets a Sber access token via **Get Access Token** (HTTP Request), merges it with the audio file, and sends it to **Get Response** (HTTP Request) which uses Sber SmartSpeech API to transcribe the audio to text. * **Input Unification:** The **Voice to Prompt** node converts transcribed text into a prompt, while **Text to Prompt** does the same for plain text messages. Both paths merge at the **Combine** node. * **AI Agent Processing:** The unified prompt is passed to the **AI Agent**, powered by **GigaChat Model** and using **Simple Memory** to retain the last 10 messages per user (using Max `user_id` as the session key). * **Response Delivery:** The AI-generated response is sent back to the user via the **Send Message** node. ### Set up steps Estimated set up time: 15 minutes 1. **Get Max bot credentials:** Visit https://business.max.ru/ to create a bot and obtain API credentials. Add these credentials to **Max Trigger**, **Send Message**, and **Access Denied** nodes. 2. **Add GigaChat credentials:** Register for GigaChat API access and add your credentials to the **GigaChat Model** node. 3. **Add Sber credentials:** Obtain Sber SmartSpeech API credentials and add them to **Get Access Token** and **Get Response** nodes (HTTP Header Auth). 4. **Configure access control:** Open the **Check User** node and change the `user_id` value (currently 50488534) to your own Max user ID. This ensures only you can use the bot during testing. 5. **Customize bot personality:** Open the **AI Agent** node and edit the system message to change the bot's name, behavior, and add your own contact information or links. 6. **Test the bot:** Activate the workflow and send a text or voice message to your Max bot to verify it responds correctly. ### Notes This workflow is specifically designed for Russian-speaking users and uses Russian AI services (GigaChat and Sber SmartSpeech) as alternatives to OpenAI. Make sure you have valid API access to both services before setting up this workflow.

Restaurant GPT-4 receptionist for bookings & delivery using Vapi, Telegram, Airtable
## This AI receptionist handles restaurant bookings and delivery orders with Vapi, Telegram, and Airtable ## Who’s it for This n8n template is built for **restaurants** that want to automate table bookings and delivery or takeaway orders using an AI receptionist. It’s suitable for small to mid-sized restaurants that receive bookings and orders via voice calls or Telegram and want a structured, reliable backend without manual handling. ## How it works The workflow powers an AI receptionist that operates through **Vapi (voice)** and **Telegram (chat)**. For table bookings, it collects party size and preferred time, checks table availability within the requested time range, and returns available options or a “no availability” response. For orders, the menu is fetched from **Airtable**, items are validated, prices are calculated, and order details are collected. Delivery addresses are validated and checked against supported areas. If delivery is unavailable, the system automatically offers takeaway. All confirmed bookings and orders are saved to Airtable. ## How to set up 1. Download JSON flows from the Dropbox folder, copy Airtable base with template tables to your account. 2. Get Airtable, OpenAI, Telegram Bot, Google Maps API credentials. 3. Set up credentials and test. ## How to customize the workflow You can plug a VAPI assistant. Copy the prompt from the AI agent and paste it into VAPI system prompt section. Also add MCP tool and call it `restaurant tool`. You can adjust booking rules, table capacity logic, menu structure, restaurant location, delivery zones, pricing calculations, and message wording to match your restaurant’s operations.

Build a voice & text Telegram Bot with GPT-4.1-Mini and Gemini transcription
**How it works:** This Telegram automation works with voice and text messages given to the Telegram bot, and it returns the response in voice form if the input is in voice form. If the input is in text form, it will return a response in text form. **Use Cases:** - Customer Support - Personal Chatbot **Prerequisites:** - OpenAI API Key - Gemini API Key - Telegram Bot built by BotFather - Telegram Bot's API Key **Target Audience:** AI Automation learners who want to learn how to build and set up a basic Telegram Bot using n8n. **How to set up:** 1. Create a telegram bot using BotFather, and the BotFather will give you an API key 2. Copy the API key and set it up in a Telegram node inside n8n 3. Get a free gemini api from https://aistudio.google.com/ 4. Set up the Gemini API in the Transcribe recording node 5. Get an OpenAI API key from https://platform.openai.com/docs/overview and make sure to top up your credits 6. Copy the API key from the OpenAI platform and set it up in any OpenAI Chat Model, and it will be configured for all other nodes automatically by n8n That's it! Now you can activate the workflow and test it by sending a simple message to your Telegram bot
Create an intelligent Facebook Messenger chatbot with GPT-4o-mini & message memory
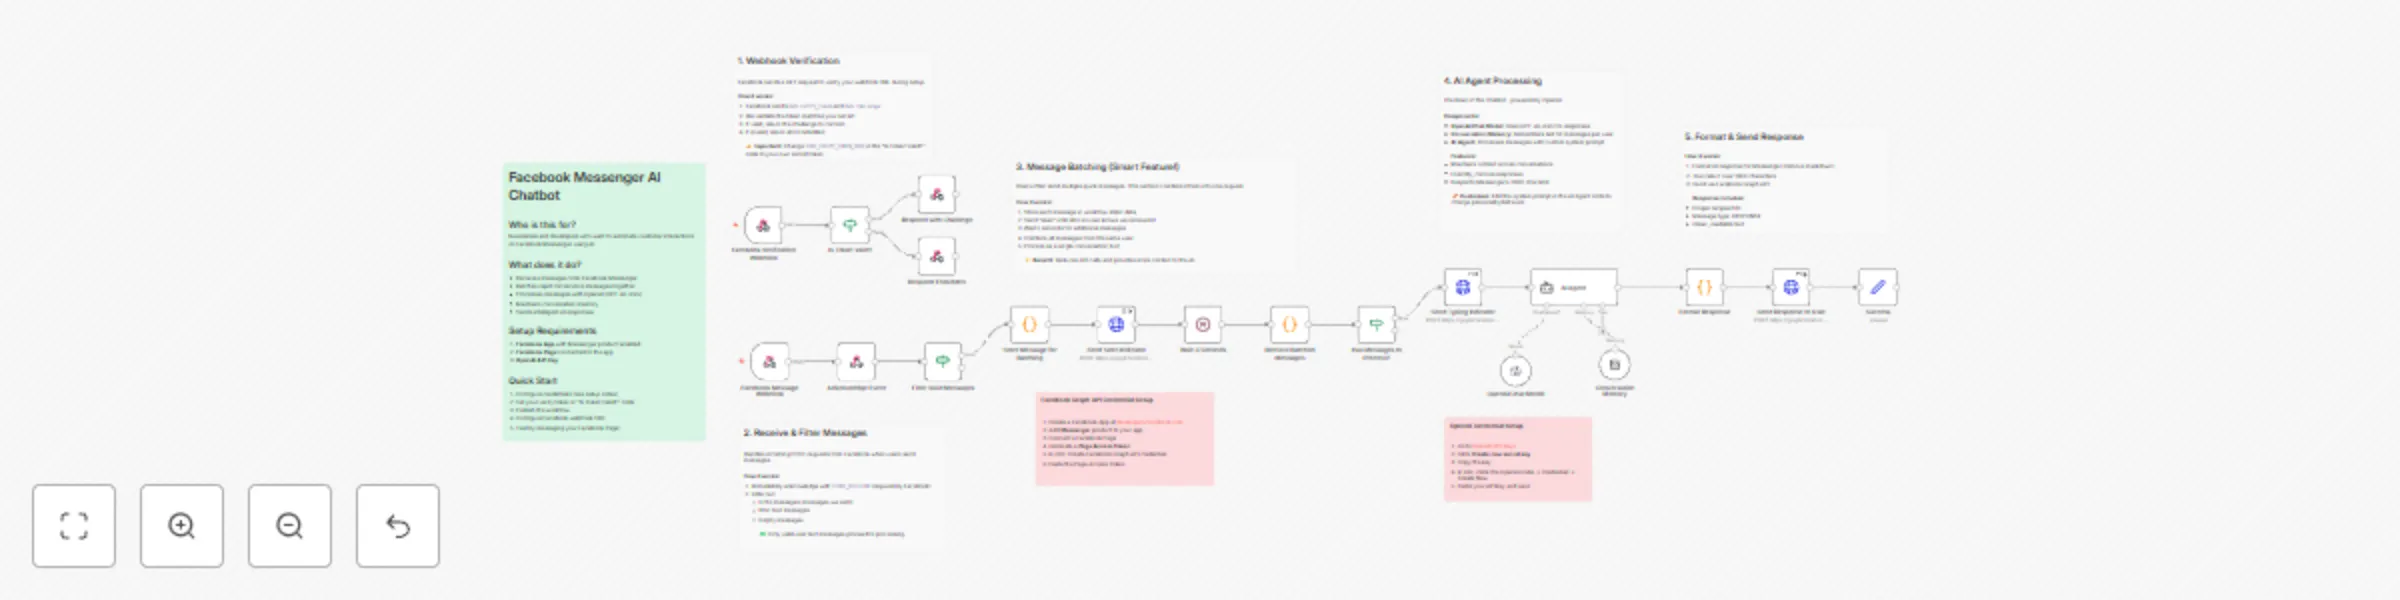
## Who is this for? Businesses and developers who want to automate customer support or engagement on Facebook Messenger using AI-powered responses. ## What does it do? Creates an intelligent Facebook Messenger chatbot that: - Responds to messages using OpenAI (gpt-4o-mini) - Batches rapid-fire messages into a single AI request - Maintains conversation history (50 messages per user) - Shows professional UX feedback (seen indicators, typing bubbles) ## How it works 1. **Webhook Verification** - Handles Facebook's GET verification request 2. **Message Reception** - Receives incoming messages via POST webhook 3. **Message Batching** - Waits 3 seconds to collect multiple quick messages 4. **AI Processing** - Sends combined message to OpenAI with conversation context 5. **Response Delivery** - Formats and sends the AI response back to Messenger ## Setup 1. Configure **Facebook Graph API** credential with your Page Access Token 2. Configure **OpenAI API** credential with your API key 3. Set your verify token in the "Is Token Valid?" node 4. Register the webhook URL in Facebook Developer Console ## Key Features - **Message Batching**: Combines "Hey" + "Can you help" + "with my order?" into one request - **Conversation Memory**: Remembers context from previous messages - **Echo Filtering**: Prevents responding to your own messages - **Response Formatting**: Cleans markdown for Messenger's 2000-char limit

Smart human takeover & auto pause AI-powered Facebook Messenger chatbot
 # 🤖 Facebook Messenger Chatbot - Smart Human Takeover, Auto Pause & Context-Aware ## Adaptable to n8n 1.113+ and 2.x **by Nguyen Thieu Toan (Jay Nguyen)** --- ## 📖 Overview An **intelligent Facebook Messenger chatbot** that automatically detects human agent intervention and pauses AI responses accordingly. Features smart pause management, full context preservation, and seamless handoff between AI and human support. **Perfect for:** - 💼 Customer support with AI + human escalation - 🎯 Sales conversations requiring manual intervention - 🛠️ Technical support needing human expertise - 🤝 Any chatbot requiring human oversight capability **Requirements:** n8n v1.113.0+, Facebook App with Messenger, Google Gemini API key (or compatible LLM) --- ## 🔗 Complementary Workflow [Smart Facebook Messenger Chatbot – Message Batching & History](https://n8n.io/workflows/9192) Enhances Messenger automation with intelligent batching, conversation tracking, and context-aware responses. Messages are grouped, stored, and processed with full history for smoother interactions. **Why combine?** - 🧩 **Smart Batch (v3)**: Efficient multi-message handling, reduced spam - 📜 **Conversation History**: Maintains context across sessions - 🤖 **AI Responses**: Natural, context-aware replies - ⚡ **Scalability**: Sequential processing for reliable delivery 👉 Access workflow [Smart Facebook Messenger Chatbot – Message Batching & History](https://n8n.io/workflows/9192) --- ## ⚡ Key Features ### **Core Capabilities** | Feature | Description | |---------|-------------| | 🔍 **Human Takeover Detection** | Automatically detects when admin/human sends messages from page via metadata checking | | ⏸️ **Smart Auto-Pause** | Bot pauses for configurable duration (default 60s) when human joins conversation | | 📝 **Context Preservation** | Saves both AI and human responses in conversation history for seamless continuity | | 📋 **Whitelist Management** | Tracks paused users with timestamp-based auto-resume (no manual intervention needed) | | 🔄 **Seamless Handoff** | Smooth transition between AI and human, then automatic resume after timeout | | 🏢 **Multi-Page Support** | Single workflow handles multiple Facebook Pages via `page_id` differentiation | | 📊 **Full History Context** | AI sees both previous AI and human responses when resuming | ### **Technical Highlights** - ✅ Metadata-based detection (`message.metadata == "bot_rep"`) - ✅ Timestamp-based pause management (auto-expires) - ✅ Upsert operation for whitelist (updates if exists, inserts if new) - ✅ Composite key indexing (`user_id` + `page_id`) - ✅ Zero manual cleanup required - ✅ Full conversation context preserved across handoffs --- ## 🏗️ How It Works ``` ┌──────────────────────────────────────────────────────────┐ │ 1. Message Intake │ │ • The system receives incoming messages from different │ │ sources and identifies their type. │ └──────────────────────────────────────────────────────────┘ ↓ ┌──────────────────────────────────────────────────────────┐ │ 2. Human Interaction Recognition │ │ • Detects when a human is involved and records the event │ │ • Adjusts automated handling accordingly. │ └──────────────────────────────────────────────────────────┘ ↓ ┌──────────────────────────────────────────────────────────┐ │ 3. Pause & Resume Control │ │ • Temporarily pauses automation when needed │ │ • Resumes once conditions are met. │ └──────────────────────────────────────────────────────────┘ ↓ ┌──────────────────────────────────────────────────────────┐ │ 4. Automated Response │ │ • Processes messages with context │ │ • Generates and delivers appropriate replies. │ └──────────────────────────────────────────────────────────┘ ``` --- ## 🛠️ Setup Guide ### Step 1: Facebook App Setup ### Step 2: Data Storage Preparation ### Step 3: Workflow Configuration ### Step 4: Testing --- ## 👤 About the Author **Nguyen Thieu Toan (Nguyễn Thiệu Toàn / Jay Nguyen)** *AI Automation Specialist | n8n Workflow Expert | Business Optimization Consultant* **Services**: AI Automation Solutions, n8n Workflow Development, Custom Chatbot Implementation, Team Training Programs **Contact**: - 🌐 [nguyenthieutoan.com](https://nguyenthieutoan.com) - 📘 [Facebook](https://www.facebook.com/nguyenthieutoan) - 💼 [LinkedIn](https://www.linkedin.com/in/nguyenthieutoan) - 🐦 [X (Twitter)](https://www.x.com/nguyenthieutoan) - 📺 [YouTube](https://www.youtube.com/@NguyenThieuToan) - 📧 [email protected] **GenStaff Company**: [genstaff.net](https://genstaff.net) | [email protected] --- ## 📄 License After purchase, use in commercial/personal projects. No redistribution or resale. Keep author attribution when sharing. **Last Updated**: December 18, 2025 | **Version**: 1.0 | **n8n Compatibility**: v1.123.0+ and v2.0.0+ | **Facebook API**: v23.0/v24.0 --- **Ready to enable intelligent human-AI collaboration in your Facebook Messenger? Import this workflow and transform your chatbot today! 🚀**

Enhance customer support with RAG-powered AI
This workflow automates customer support across multiple channels (Email, Live Chat, WhatsApp, Slack, Discord) using AI-powered responses enhanced with Retrieval Augmented Generation (RAG) and your product documentation. It intelligently handles incoming queries, provides instant and context-aware answers, and escalates complex or negative-sentiment cases to your human support team. All interactions are logged and categorized for easy tracking and reporting. --- ## Key Features - **Omnichannel Support:** Handles customer queries from Email, Live Chat, WhatsApp, Slack, and Discord. - **AI-Powered Answers:** Uses RAG to generate accurate, context-aware responses based on your product documentation. - **Automatic Escalation:** Detects low-confidence or negative-sentiment cases and escalates them to your human support team. - **Conversation Logging:** Automatically logs and categorizes all conversations for future analysis. - **Weekly Reporting:** Sends automated weekly summaries and metrics to your support team. --- ## How It Works 1. **Trigger:** The workflow starts when a new message is received on any supported channel. 2. **Normalization:** Incoming messages are normalized into a common format for unified processing. 3. **Context Management:** Conversation history is fetched and merged with the new query for better AI context. 4. **AI Response:** The workflow uses RAG to generate a response, referencing your product documentation. 5. **Confidence & Sentiment Analysis:** The response is scored for confidence and sentiment. 6. **Escalation Logic:** If the response is low-confidence or negative, the workflow escalates the case to your support team and creates a ticket. 7. **Response Delivery:** The answer (or escalation notice) is sent back to the customer on the original channel. 8. **Logging & Reporting:** All interactions are logged, categorized, and included in weekly reports. --- ## Configuration 1. **Connect Your Channels:** Set up triggers for each channel you want to support (Email, Webhook, WhatsApp, Slack, Discord). 2. **Add Your Documentation:** Integrate your product documentation source (e.g., Google Docs, Notion, or a knowledge base) for the RAG model. 3. **Configure AI Model:** Set your preferred AI provider and model (e.g., OpenAI, Azure OpenAI, etc.). 4. **Set Escalation Rules:** Adjust confidence thresholds and escalation logic to fit your support workflow. 5. **Integrate Support Tools:** Connect your ticketing system (e.g., Zendesk) and reporting tools (e.g., Google Sheets, Slack). 6. **Test the Workflow:** Send test queries from each channel to ensure correct routing, AI responses, and escalation. --- ## Use Cases - Provide instant, accurate answers to customer questions 24/7. - Reduce manual workload for your support team by automating common queries. - Ensure complex or sensitive cases are quickly escalated to human agents. - Gain insights into support trends with automated logging and weekly reports. --- ## Requirements - n8n version 2.0.2 or later - Accounts and credentials for your chosen channels and AI provider - Access to your product documentation in a supported format --- ## Notes - Please review and customize the workflow to fit your company’s privacy and data handling policies. - For best results, keep your product documentation up to date and well-structured.
Book beauty appointments and answer FAQs with GPT-4, Google Calendar, Gmail, and Instagram
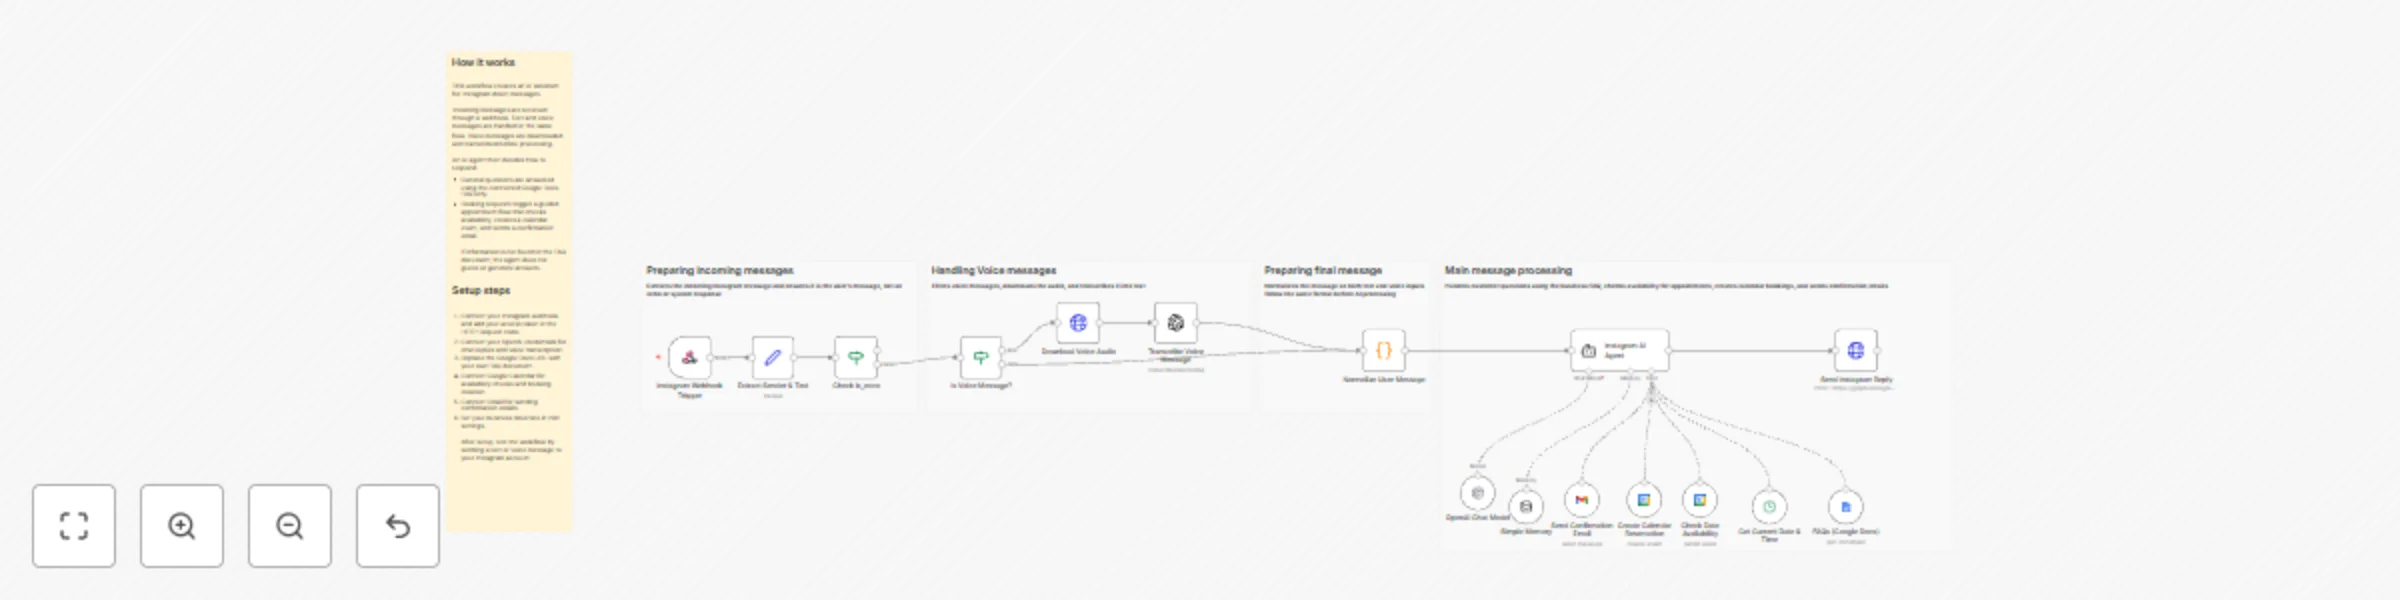
📝 Description Instagram AI Beauty Assistant with Booking & Calendar Automation 💄 Smart Instagram AI Assistant for Beauty & Cosmetics Brands Help customers instantly on Instagram using a smart AI assistant designed specifically for beauty, skincare, makeup, and nail businesses. This workflow answers product questions using FAQs only, handles voice messages, and schedules consultation bookings with timezone-safe Google Calendar reservations and automatic confirmation emails. Perfect for salons, cosmetic brands, clinics, and Instagram-first businesses. ⚙️ How it works Customers send messages or voice notes via Instagram DM The AI detects whether the message is: A product or policy question A voice message (which gets transcribed) A request to book a consultation or meeting Product questions are answered only using your FAQs (no hallucinations) Booking requests: Get grounded using the current date and time Check available slots before booking Collect customer details (name, phone, email, topic) Confirmed bookings are created in Google Calendar with rich event summaries A confirmation email is sent automatically to the customer 🧰 Setup steps Connect your Instagram webhook or messaging API Connect your OpenAI account (chat + voice transcription) Connect Google Calendar for reservations Connect Gmail for confirmation emails Customize your FAQs and availability rules Set your business timezone That’s it — your Instagram assistant is ready to work 24/7 ✨ 🔄 Customization tips Update FAQs anytime without retraining the AI Adjust tone and branding in the system message Customize calendar summaries and email templates Add rescheduling, cancellation, or reminders Clone the workflow for multiple beauty brands or clients 🤝 Need Help Setting It Up or Customizing It? If you’d like help connecting Instagram, setting up Google Calendar and Gmail, or customizing this AI assistant for your business or for clients… 📩 I offer setup and customization services including: Instagram DM automation setup Google Calendar & Gmail configuration Timezone-safe booking logic FAQ structuring and prompt tuning Branding and tone customization Error handling and escalation logic You can reach me here: Email: [email protected] WhatsApp: +20 106 180 3236
Build a WhatsApp assistant for text, audio & images using GPT-4o & Evolution API
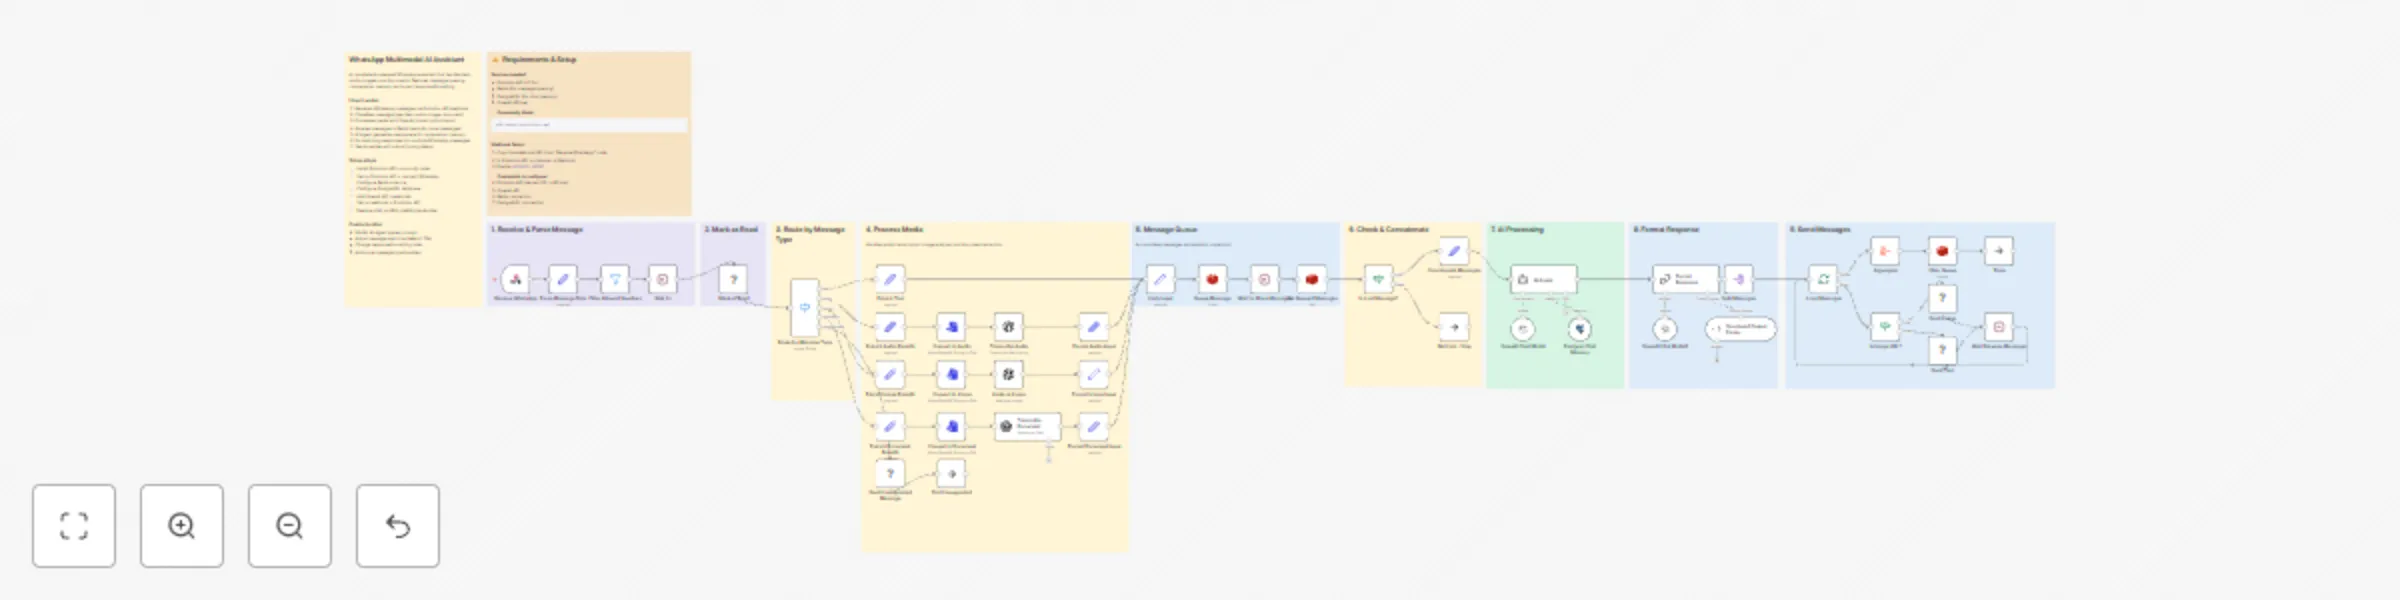
Build an intelligent WhatsApp assistant that automatically responds to customer messages using AI. This template uses the Evolution API community node for WhatsApp integration and OpenAI for natural language processing, with built-in conversation memory powered by Redis to maintain context across messages. > ⚠️ **Self-hosted requirement:** This workflow uses the Evolution API community node, which is only available on self-hosted n8n instances. It will not work on n8n Cloud. ## What this workflow does 1. Receives incoming WhatsApp messages via Evolution API webhook 2. Filters and processes text, audio, and image messages 3. Transcribes audio messages using OpenAI Whisper 4. Analyzes images using GPT-4 Vision 5. Generates contextual responses with conversation memory 6. Sends replies back through WhatsApp ## Who is this for? - Businesses wanting to automate customer support on WhatsApp - Teams needing 24/7 automated responses with AI - Developers building multimodal chat assistants - Companies looking to reduce response time on WhatsApp ## Setup instructions 1. **Evolution API**: Install and configure Evolution API on your server. Create an instance and obtain your API key and instance name. 2. **Redis**: Set up a Redis instance for conversation memory. You can use a local installation or a cloud service like Redis Cloud. 3. **OpenAI**: Get your API key from platform.openai.com with access to GPT and Whisper models. 4. **Webhook**: Configure your Evolution API instance to send webhooks to your n8n webhook URL. ## Customization options - Modify the system prompt in the AI node to change the assistant's personality and responses - Adjust the Redis TTL to control how long conversation history is retained - Add additional message type handlers for documents, locations, or contacts - Integrate with your CRM or database to personalize responses ## Credentials required - Evolution API credentials (self-hosted) - OpenAI API key - Redis connection

AI WhatsApp support with human handoff using Gemini, Twilio, and Supabase RAG
# Quick Overview What it is: An n8n workflow that enables AI-first WhatsApp support with seamless human handoff. Why it’s unique: The AI agent answers queries using RAG (Supabase vector store + Gemini). If a human intervenes, the AI steps down. If there’s no human reply within 2 hours, the AI resumes. Channel constraints: Respects WhatsApp’s 24-hour customer care window and requires approved message templates for out-of-window messages. # How It Works AI-first: Incoming WhatsApp messages are routed to an AI agent (Gemini) with knowledge grounded by a Supabase vector store. **Human-in-the-loop**: When a human responds in the dashboard, AI pauses for 2 hours for that conversation. **Auto-resume**: If no human reply within 2 hours, AI automatically resumes. **Compliance**: Only responds within 24 hours of the user’s last message, or via approved templates when outside this window. ### Architecture (At a Glance) Transport: Twilio WhatsApp; n8n http node. RAG: Supabase (Postgres + embeddings) stores knowledgebase. LLM: Google Gemini (free API key supported). Handoff: Human dashboard (GitHub project) logs and labels AI vs Human responses, and controls AI pause/resume. **Prerequisites** n8n (self-hosted or cloud) with public webhook access. Twilio account with a WhatsApp-enabled number. Supabase project for vector store. Google Gemini API key. Human dashboard: https://github.com/shadrack-ago/whatsapp-dashboard.git Setup Steps (n8n + Integrations) Import workflow in n8n Create new workflow → Import from JSON → Paste the provided JSON. Enable the workflow. Create credentials Twilio: Add TWILIO_ACCOUNT_SID, TWILIO_AUTH_TOKEN, TWILIO_PHONE_NUMBER. Do NOT paste real secrets publicly. Gemini: Add GEMINI_API_KEY. Supabase: Add SUPABASE_URL, SUPABASE_ANON_KEY (or service role where needed), and your table/bucket names. Connect Twilio WhatsApp WhatsApp Business setup in Twilio, or Sandbox for testing. Point Twilio incoming webhook to your n8n webhook URL. Ensure approved templates for any out-of-window messaging. Set environment variables (examples) TWILIO_ACCOUNT_SID=... TWILIO_AUTH_TOKEN=... TWILIO_PHONE_NUMBER=+1... GEMINI_API_KEY=... SUPABASE_URL=... SUPABASE_ANON_KEY=... SUPABASE_TABLE=knowledge_base EMBEDDING_MODEL HUMAN_TIMEOUT_MS=7200000 (2 hours) Human-in-the-loop dashboard Follow the repo guide: https://github.com/shadrack-ago/whatsapp-dashboard.git Run the dashboard and connect it to the same conversation store used by the workflow. Verify that human responses are captured and labeled; confirm AI pause/resume logic. Supabase for RAG Create table(s) for documents and embeddings. Ingest content per this tutorial:[Supabase Tutorial ](https://youtu.be/5uw1wE6niGc?si=hLd8m_PdcH4tts5m) Confirm your n8n nodes query the vector store before calling Gemini. Gemini setup Get API key: [Gemini API](https://aistudio.google.com/api-keys) Set model (e.g., gemini-pro or latest available in your environment). Test Send a WhatsApp message to your Twilio number. Observe AI response. Trigger a human reply via the dashboard → confirm AI pauses for that thread. Wait 2 hours or adjust HUMAN_TIMEOUT_MS to test auto-resume. Customization Providers: You can swap Twilio for Meta’s WhatsApp Cloud API; keep the 24-hour and template rules. Tone/Policies: Adjust system prompts and fallback behaviors in the LLM node. RAG Quality: Tune chunking, TOP_K, and embedding model for better retrieval. Timeouts: Change HUMAN_TIMEOUT_MS to alter handoff duration. WhatsApp Policy Notes 24-hour window: Replies must occur within 24 hours of user’s last message; otherwise use an approved template. Templates: Create and get approval inside Twilio/Meta before sending out-of-window messages. Security & Reliability Secrets: Store all keys in n8n credentials or environment variables. Never commit secrets to repos. Logging: Use the dashboard to audit AI vs Human messages. Rate limits: Add retry/backoff nodes for Twilio and LLM calls. Troubleshooting No replies: Check Twilio webhook URL and n8n workflow is active. Policy blocks: Ensure template use outside 24-hour window. Poor answers: Improve RAG data, increase TOP_K, refine prompts. Handoff not pausing: Verify dashboard is writing the “human active” flag that the workflow reads. Links Human dashboard (Full guide): [GitHub Repo Link](https://github.com/shadrack-ago/whatsapp-dashboard.git)

Handle clinic WhatsApp support with GPT-4o-mini, Pinecone RAG and Gmail alerts
# 🏥 Clinic WhatsApp Customer Service Bot This workflow automates patient communication for medical clinics using the WhatsApp Business API. It supports appointment booking, rescheduling, service inquiries, follow-ups, and document submissions. The workflow includes AI capabilities, appointment management, human escalation logic, memory storage, and CRM synchronization. ## Good to know - Supports text, voice notes, images, and document uploads. - Uses an AI agent powered by GPT-4o-mini with retrieval-augmented generation for accurate answers. - Includes sentiment and frustration detection to trigger human takeover. - Conversation history and lead details are stored for context and follow-up. - Appointment booking includes slot validation to reduce errors and conflicts. ## How it works - The workflow receives WhatsApp messages through a webhook connection. - The AI agent processes the message and identifies the intent: - 📅 Appointment booking or rescheduling - ❓ Service or doctor inquiry - 📎 Document submission (e.g., lab results, insurance) - 🤝 Human support request - If the request is informational, the AI responds using GPT-4o-mini with RAG from Pinecone to ensure clinic-specific accuracy. - If the request relates to booking, the workflow: - Checks availability in Data Tables - Validates slot selection - Confirms, updates, or cancels the appointment - If the user is confused, frustrated, or explicitly asks for a human, automation is paused and a staff member is notified. - Voice messages are transcribed using Whisper API and images are processed using Vision API. - All interactions are logged and synced to Google Sheets for CRM tracking. ## Requirements - WhatsApp Business API access with active credentials - OpenAI API key for GPT-4o-mini, Whisper, and Vision models - Pinecone account for vector storage - Google Sheets and Gmail for logging and notifications - n8n instance (Cloud or self-hosted) - Data Tables enabled for memory, appointments, and lead management

Interactive recruitment customer service with WhatsApp, Google Sheets CRM & notifications
# 👔 Recruitment Office WhatsApp Automation Automate WhatsApp communication for recruitment agencies with an interactive, structured customer experience. This workflow handles pricing inquiries, request submissions, tracking, complaints, and human escalation while maintaining full session tracking and media support. ## Good to know - Uses WhatsApp Interactive List Messages for user selection and navigation. - Includes session-state logic and memory across messages. - Includes a 5-minute cooldown to avoid spam and repeated triggers. - Supports logging for all interaction types including media files. - Includes both a global bot shutdown switch and per-user override. ## How it works - A customer sends a message to the official WhatsApp number. - The workflow replies with an interactive menu containing 8 service options: - 💰 Pricing by nationality (8 supported countries) - 📝 New recruitment request submission - 🔍 Tracking existing applications via Google Sheets lookup - 🔁 Worker transfer link distribution - 🌍 Translation service information - 📄 Required documents and instructions - ⚠️ Complaint submission and routing - 👤 Request a human agent - The workflow retrieves or stores data based on the selection using Google Sheets and Data Tables. - If the customer requests human help or the logic detects uncertainty, the workflow: - Pauses automation for that user - Notifies a designated staff member - All interactions are logged including files, text, timestamps, and selections. ## Features - 📋 Structured WhatsApp service menu - 📄 CRM-style recruitment request logging - ✨ Pricing logic with nationality mapping - 🔍 Lookup-based status tracking - 📎 Support for media uploads (PDF, images, audio, documents) - 🧠 Session tracking with persistent user state - 🤝 Human escalation workflow with internal notifications - 🛑 Anti-spam and cooldown control - 🎚 Bot master switch (global + per-user) ## Technology stack | Component | Usage | |----------|-------| | n8n | Automation engine | | WhatsApp Business API | Messaging and interactive UX | | Google Sheets | CRM and logs | | Data Tables | State management | | JavaScript | Custom logic and routing | ## Requirements - WhatsApp Business API account with active credentials - n8n Cloud or self-hosted instance - Google Sheets for CRM storage - Data Tables enabled for persistent session tracking ## How to use - The workflow uses a Webhook trigger compatible with common WhatsApp API providers. - Modify menu content, pricing, optional steps, and escalation flows as needed. - Link your Google Sheets and replace test sheet IDs with production values. - Configure human escalation to notify team members or departments. ## Customising this workflow - Replace Google Sheets with Airtable, HubSpot, or SQL storage. - Add expiration and reminder messages for missing documents. - Add AI-powered response logic for common questions. - Enable multi-country support (Saudi/UAE/Jordan/Qatar/Kuwait/etc.) - Connect to dashboards for reporting and staff performance analytics.

Automated customer support system with Gemini AI, RAG & security guardrails
## Description This workflow acts as an autonomous Tier 2 Customer Support Agent. It doesn't just answer questions; it manages the entire lifecycle of a support ticket—from triage to resolution with Guardrails to deal with prompt injections, PII information blocking, etc. enabling such threats are blocked and logged in Airtable. Unlike standard auto-responders, this system uses a "Master Orchestrator" architecture to coordinate specialized sub-agents. It creates a safe, human-like support experience by combining RAG (Knowledge Base retrieval) with a safety-first state machine. ## How it works The workflow operates on a strict "Hub and Spoke" model managed by a Master Orchestrator: 1. Security Guardrails (The Gatekeeper) Before the AI even sees the message, a hard-coded security layer scans for Prompt Injection attacks, Profanity, and PII. If a threat is detected, the workflow locks down, logs the incident to Airtable, and stops execution immediately. 2. Orchestration & Triage Once the message passes safety checks, the Master Orchestrator takes over. Its first action is to call the Ticket Analyser Agent. 3. Analysis & Scoring The Ticket Analyser classifies the issue (e.g., "Technical," "Billing") and scores the customer's sentiment. It returns a priority_score to the Master Orchestrator. 4. The Decision Logic (Circuit Breaker) The Master Orchestrator evaluates the score: Escalation: If the customer is "Furious" or the score is high, it bypasses AI drafting and immediately alerts a human manager via Slack. Resolution Path: If the request is standard, it proceeds to the next steps. 5. Knowledge Retrieval (RAG) The Orchestrator calls the Knowledge Worker Agent. This agent searches your Supabase vector store to find specific, verified company policies or troubleshooting steps relevant to the user's issue. 6. Resolution Drafting Armed with the analysis and the retrieved facts, the Orchestrator calls the Resolution Agent. This agent synthesizes a polite, professional email draft. 7. Final Execution The Master Orchestrator reviews the final draft and sends the email via Gmail. ## Set up This is multi-agent system. Please follow these steps to configure the environment: ⚠️ IMPORTANT: This template contains the Main Orchestrator AND the Sub-Agents in a single view. You must separate them for the system to function: Separate the Agents: Copy the nodes for each sub-agent (Ticket Analyser, Knowledge Worker, Resolution Agent) into their own new workflows. Link the Tools: In the Main Orchestrator workflow, open the "Call [Agent Name]" tool nodes and update the Workflow ID to point to the new workflows you just created. Configure Credentials: You will need credentials for Gmail (or your preferred email provider), Slack, Airtable, Supabase (for the vector store), and Google Gemini (or OpenAI). Initialize the Knowledge Base: Open the "One time Document Loader" section in the workflow. Upload your policy document (PDF/Text) to the "Upload your file here" node. Run this branch once to vectorize your documents into Supabase. Setup Airtable: Create a simple table with columns for Sender Email, Incident Type, and Flagged Content to log security threats caught by the guardrails. Customize the Trigger: Update the Gmail Trigger node to watch for your specific support alias (e.g., [email protected]) and ensure it only picks up "Unread" emails. Adjust the Escalation Sensitivity: In the Orchestrator Agent node, you can tweak the "Phase 2" logic to change what triggers a human hand-off (currently set to priority_score >= 0.9). Good to go! 

Build an AI chat agent for your Zendesk knowledge base with GPT-4.1 and InfraNodus GraphRAG
## Build a Better AI Chatbot for Your Zendesk Knowledge Portal ### Simple setup, no vector database needed. Uses GraphRAG to enhance user's prompts and provide high-quality and relevant up-to-date responses from your Zendesk knowledge base. #### Can be embedded on your Zendesk portal, also accesible via a URL. Can be customized and branded in your style. ### See example at [support.noduslabs.com](https://support.noduslabs.com) or a screenshot below:  Also, compare it to the original Zendesk AI chatbot available at our other website [https://infranodus.com](https://infranodus.com) — you will see that the quality of responses in this custom chatbot is much better than in the native Zendesk one, plus you save subscription because you won't need to activate their chat option, which is $25 per agent. --- ### Workflow Overview In this workflow, we use the n8n AI Agent Node with a custom prompt that: 1) First consults an "expert" graph from the [InfraNodus GraphRAG system](https://infranodus.com/docs/graph-rag-knowledge-graph) using the official [InfraNodus GraphRAG node](https://n8n.io/integrations/infranodus-graph-rag/) that will extract a reasoning ontology and a general context about your product from the graph that you create manually or automatically as [described on our support portal](https://support.noduslabs.com/hc/en-us/articles/24079266183196-Building-Expert-Ontology-for-InfraNodus-GraphRAG-n8n-Expert-Node). 2) The augmented user prompt is converted by AI agent node in a Zendesk search query that retrieves the most relevant content using their [search API](https://developer.zendesk.com/api-reference/help_center/help-center-api/search/) via n8n HTTP node. 3. Both the results from the graph and the search results are combined and shown to the user 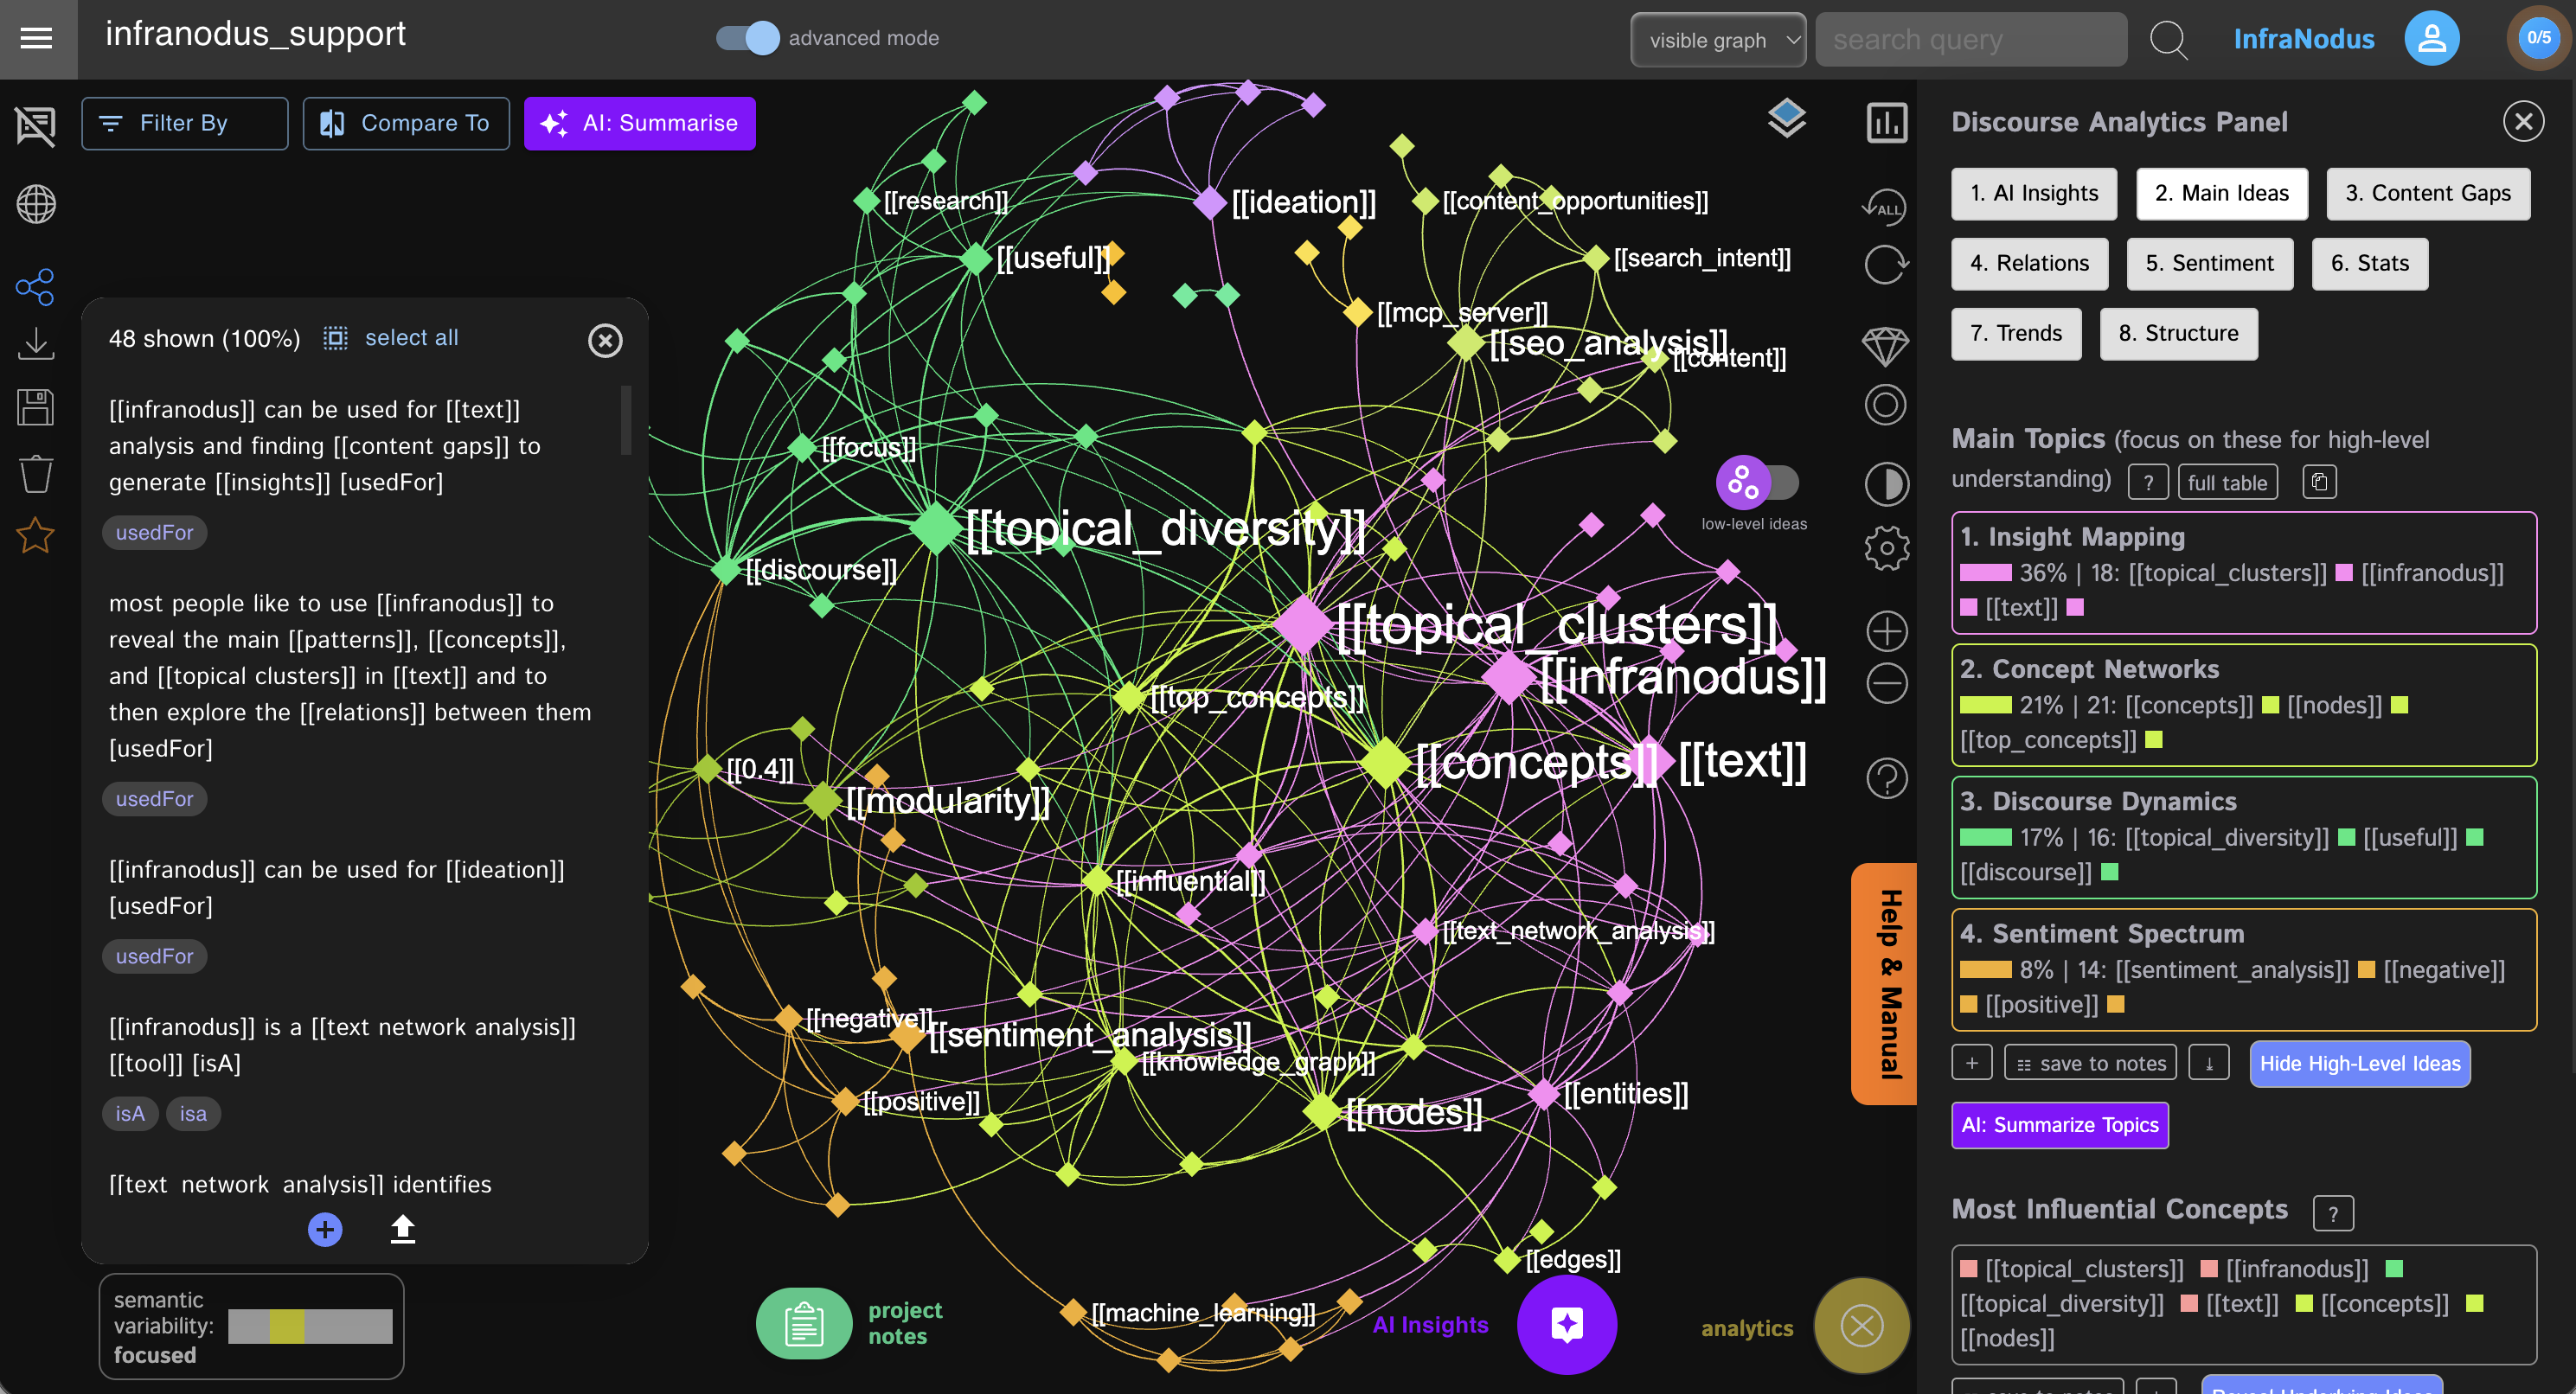 ## How it works 1. Receives a request from a user via a webhook that connects to the custom [n8n chat widget](https://n8n-chat-widget.com). 2. The request goes to the AI Agent node from n8n with a custom prompt (provided in the workflow) that orchestrates the following procedure: 3. Sends the request to the knowledge graph in your InfraNodus account using the official [InfraNodus GraphRAG node](https://n8n.io/integrations/infranodus-graph-rag/) that contains a reasoning ontology represented as a knowledge graph based on your Zendesk knowledge support portal. Read more on [how to generate this ontology here](https://support.noduslabs.com/hc/en-us/articles/24079266183196-Building-Expert-Ontology-for-InfraNodus-GraphRAG-n8n-Expert-Node). 4. Based on the results from InfraNodus, it reformulates the original prompt to include the reasoning logic as well as provide a fuller context to the model. 5. Sends the request to the [Zendesk search API](https://developer.zendesk.com/api-reference/help_center/help-center-api/search/) using the n8n custom HTTP node with an enhanced search query to retrieve high-quality results. 6. Combines Zendesk search results with InfraNodus ontology to generate a final response to the user. 7. Sends the response back to the webhook, which is then picked up by the [n8n chat widget](https://n8n-chat-widget.com) that is shown to the user wherever the widget is embedded (e.g. on your own support portal). ## How to use • Get an **[InfraNodus API key](https://infranodus.com/api-access)** and add it into InfraNodus GraphRAG node. • Edit the **InfraNodus Graph node** to provide the **name of the graph** that you will be using as ontology (you need to **[create it in InfraNodus](https://support.noduslabs.com/hc/en-us/articles/24079266183196-Building-Expert-Ontology-for-InfraNodus-GraphRAG-n8n-Expert-Node) first**. • Edit the **AI Agent (Support Agent) prompt** to modify our custom instructions for your particular use case (do not change it too much as it works quite well and tells the agent what it should do and in what sequence). • Add the **API key for your Zendesk account**. In order to get it, go to your support portal Admin > Apps & Integrations > API Tokens. Usually it's located at [https://noduslabs.zendesk.com/admin/apps-integrations/apis/api-tokens](https://noduslabs.zendesk.com/admin/apps-integrations/apis/api-tokens) where instead of `noduslabs` you need to put the name of your support portal. **Note:** the official n8n Zendesk node does not have an endpoint to search and extract articles from support portal, so we use the custom HTTP node, but you can still connect to it via the Zendesk API key you have installed in your n8n. ## Support & Tutorials If you wan to create your own reasoning ontology graphs, please, refer to this [article on generating your own knowledge graph ontologies](https://support.noduslabs.com/hc/en-us/articles/18301655686172-Generate-Knowledge-Graphs-and-Ontologies-in-Plain-Text). Specifically for this use case: [Building ontology for your n8n AI chat bot](https://support.noduslabs.com/hc/en-us/articles/24079266183196-Building-Expert-Ontology-for-InfraNodus-GraphRAG-n8n-Expert-Node). You may also be interested to watch this video that explains the logic of this approach in detail: [](https://www.youtube.com/watch?v=ueq0RU1HxSo) Our support article for this workflow with real-life example: [Building an embeddable AI chatbot agent for your Zendesk knowledge portal](https://support.noduslabs.com/hc/en-us/articles/24080152180252-Building-an-Embeddable-AI-Chat-for-Zendesk-Knowledge-Support-Portal). **To get support and help, contact us via [support.noduslabs.com](https://support.noduslabs.com)** **Learn more about InfraNodus at [www.infranodus.com](https://www.infranodus.com)**
Retrieve answers from Knowledge Base with InfraNodus GraphRAG chatbot
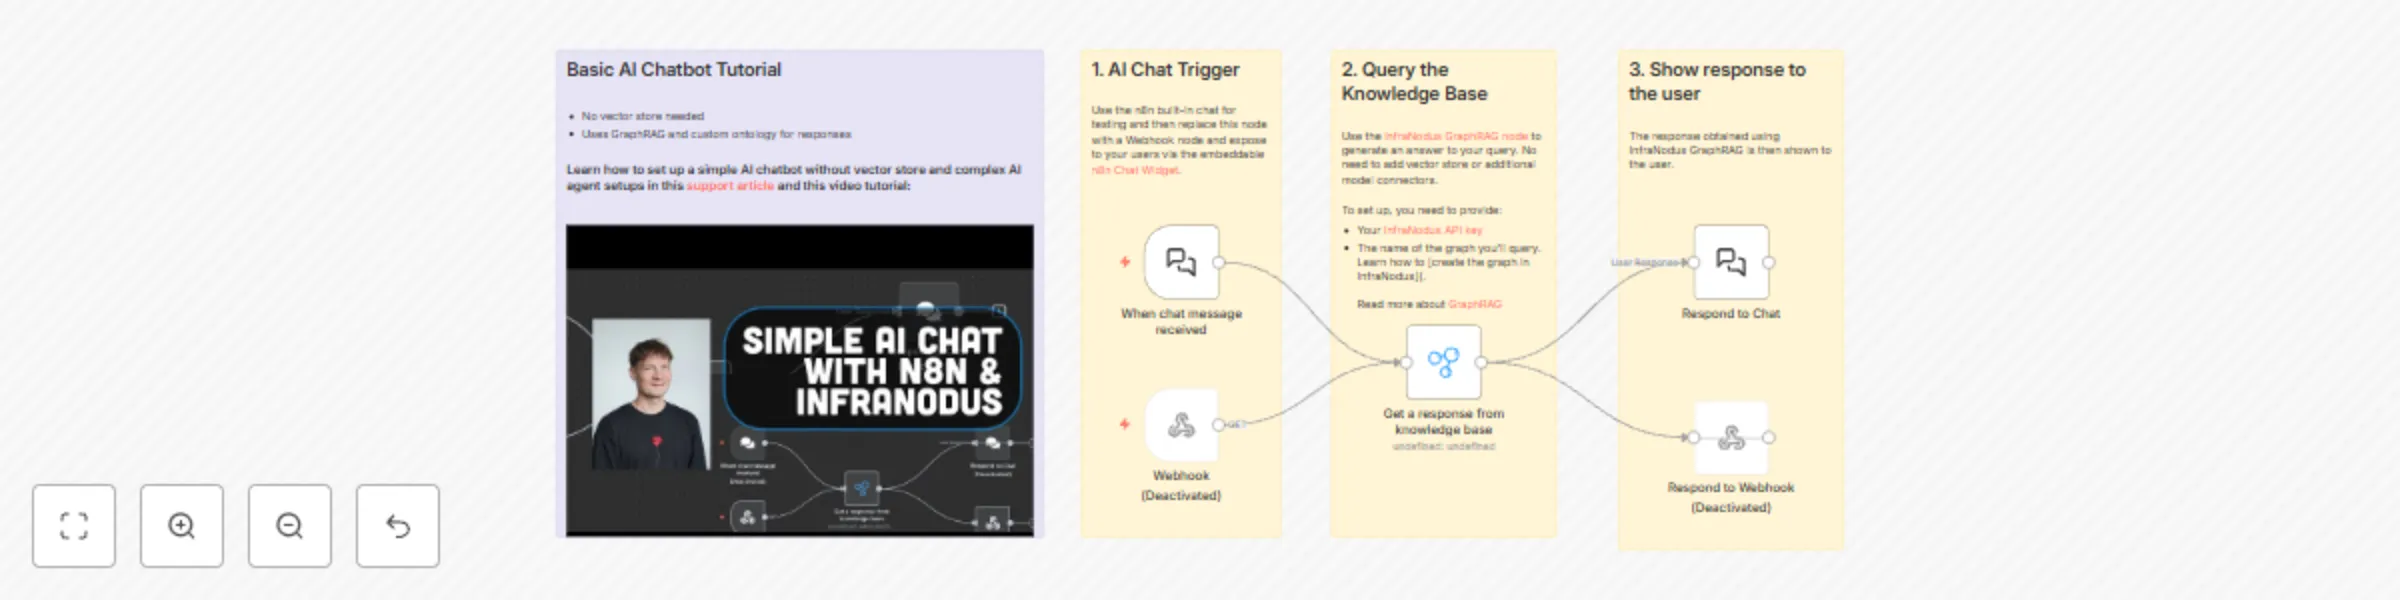
## Basic AI Chatbot that Retrieves Answers From Knowledge Base Using GraphRAG. ### Easiest setup, without vector database, external knowledge base, or OpenAI API keys. All you need is an [InfraNodus graph](https://infranodus.com) with your knowledge. ---- In this workflow, user sends a request to the [InfraNodus GraphRAG system](https://infranodus.com/docs/graph-rag-knowledge-graph) that will extract a reasoning ontology from a graph that you create (or that you can copy from our [repository of public graphs](https://infranodus.com/knowledge-graphs)) and generate a response directly to the user.  ## How it works 1. Receives a request from a user (via n8n or a publicly available URL chat bot if you replace the Chat Trigger with a webhook connected to the embeddable [n8n Chat Widget](https://n8n-chat-widget.com) that you can expose via a URL or add to any website. 2. Sends the request to the knowledge graph in your InfraNodus account that contains a [reasoning ontology represented as a knowledge graph](https://support.noduslabs.com/hc/en-us/articles/24079266183196-Building-Expert-Ontology-for-InfraNodus-GraphRAG-n8n-Expert-Node). You can also use a standard graph — InfraNodus will use its underlying GraphRAG technology to generate the most relevant response. 3. Sends the answer back to the user via chat or webhook (which is then delivered back via [n8n chat widget](https://n8n-chat-widget.com) **Note:** This is a simple example that will work well for occasionally providing responses to users. For a more advanced setup, you might want to build a more sophisticated workflow with AI agent node that would orchestrate among different InfraNodus expert graphs and chat memory, so the context of the conversation can be maintained. See our other workflows for examples. ## How to use • Just get an [InfraNodus API key](https://infranodus.com/api-access) and add API authentication to your InfraNodus GraphRAG node. • In the same InfraNodus GraphRAG Nnode, provide the name of the graph you want to u. Note, these can be two different graphs ife for retrieval. ## Support If you wan to create your own reasoning ontology graphs, please, refer to this [article on generating your own knowledge graph ontologies](https://support.noduslabs.com/hc/en-us/articles/18301655686172-Generate-Knowledge-Graphs-and-Ontologies-in-Plain-Text). You may also be interested to watch this video that explains the logic of this approach in detail: [](https://www.youtube.com/watch?v=qP4KTLBzoWQ) Help article on this specific workflow: [Building expert ontology for InfraNodus GraphRAG n8n expert node](https://support.noduslabs.com/hc/en-us/articles/24079266183196-Building-Expert-Ontology-for-InfraNodus-GraphRAG-n8n-Expert-Node).

Dental clinic appointment & admin system with Supabase, phone integration & AI
## Dental Clinic Automation: Scheduling, Availability & Patient Lookup This workflow automates dental appointment management through a phone-based assistant. It listens for requests like booking, rescheduling, canceling, checking insurance, looking up appointments, and finding available time slots. Each request is processed through a Switch node and then routed to your Supabase database for action. ## How it works Once a request is received, the workflow uses the patient’s phone number to identify them. Then, it: - Booking: Checks for available time, creates or retrieves the patient record, and stores the appointment. - Rescheduling: Confirms the new date, avoids double-booking, and updates the record. - Canceling: Removes the appointment and sends a confirmation. - Insurance: Looks up the member ID and provides a status (accepted or not). - Availability: Finds the doctor’s existing appointments and generates available 60-minute slots. - Appointment & doctor lists: Retrieves and presents clean, structured information for the assistant. Each action ends with a webhook response that the phone system reads back to the patient. ## Setup steps 1. Add your Supabase credentials to the Supabase nodes. 2. Connect your phone/voice system to the webhook URL. 3. Ensure Supabase table and column names match the workflow. 4. Test all actions (booking, rescheduling, canceling, etc.) before going live. ## Customization tips (optional) You can update working hours, appointment durations, or add new services by modifying the availability logic or Switch node routing.

Complete appointment system with Supabase and AI assistants for scheduling & management
## Who’s it for This workflow is designed for organizations or services managing appointments, such as interview scheduling, class enrollments, or client meetings. It’s ideal for users who want to automate appointment creation, rescheduling, cancellation, and data retrieval from a single webhook endpoint. ## How it works / What it does ● Receives incoming appointment requests via a Webhook node. ● Processes requests in the Set Fields node, handling multiple actions: • Set Appointment: Adds a new appointment and assigns an available interviewer. • Reschedule: Changes the appointment date based on availability. • Cancel: Deletes an appointment and frees the interviewer’s slot. • Get List: Returns a user’s list of classes. • Get User Info: Retrieves detailed information about a specific user. All actions follow strict instructions to check tables, update rows, and return structured JSON responses. ## How to set up 1. Add the Webhook node and set the HTTP method to POST. 2. Connect it to the Set Fields node. 3. Configure the Set Fields node with the desired assignments (set_appointment, reschedule, cancel, get_list, get_user_info). 4. Ensure your database tables (interviewers, enrollers) are properly configured and accessible. ## Requirements • n8n environment • Database or table access for interviewers and enrollers • Properly formatted incoming JSON requests with necessary fields (e.g., name, nationality number, preferred date). ## How to customize the workflow • Add or modify assignment actions to handle additional appointment scenarios. • Adjust table names or database connections based on your environment. • Extend JSON responses for custom client-side handling.
Telegram support bot with OpenAI, Pinecone and human expert escalation
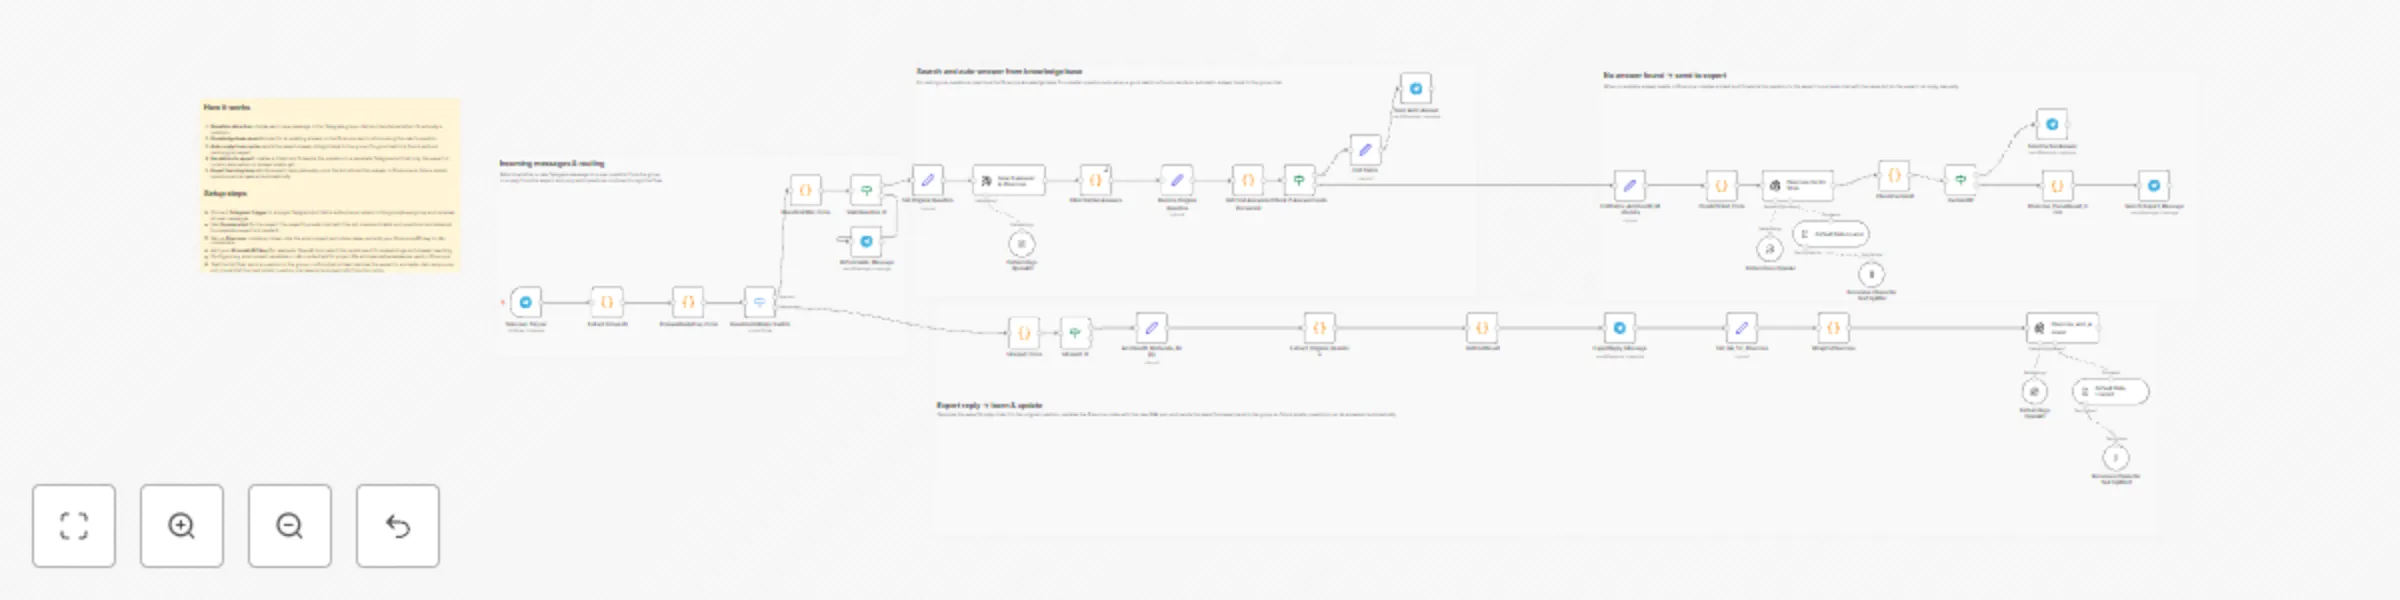
**Template name** Smart AI Support Assistant for Telegram **Short description** Smart AI Support Assistant for Telegram automatically answers repeated questions in your group using a Q&A knowledge base in Pinecone and forwards new or unclear questions to a human expert. **Long description (Description поле)** ## How it works 1. **Question detection** listens to messages in a Telegram group and checks whether each new message is a real question or an expert reply. 2. **Knowledge base search** looks for an existing answer in the Pinecone vector store for valid questions from the group. 3. **Auto‑reply from cache** sends the saved answer straight back to the group when a good match is found, without involving the expert. 4. **Escalation to expert** creates a ticket and forwards unanswered questions to the expert in a private chat with the same bot. 5. **Expert learning loop** saves the expert’s reply to Pinecone so that similar questions are answered automatically in the future. ## Setup steps - Connect **Telegram Trigger** to a single Telegram bot that is added as an admin to the group/supergroup and receives all user messages. - Use **the same bot** for the expert: the expert’s private chat with this bot is where tickets and questions are delivered. - Set up **Pinecone**: create an index, note the environment and index name, and add your Pinecone API key to n8n credentials. - Add your **AI model API key** (for example, OpenAI) and select the model used for embeddings and answer rewriting. - Configure any environment variables or n8n credentials for project IDs and spaces/namespaces used in Pinecone. - Test the full flow: send a question in the group, confirm that a ticket reaches the expert in a private chat, reply once, and check that the next similar question is answered automatically from the cache.

Automated Facebook message response with GPT-4o and Airtable inventory matching
## 📘 Description This workflow automates AI-driven Facebook Messenger product inquiry handling, connecting Facebook DMs with Airtable inventory and returning instant automated replies based on product availability. It runs hourly, fetches new messages, extracts the latest customer query, uses GPT-4o to identify the product and intent, merges this with the Airtable inventory dataset, performs an AI-assisted product match, and replies automatically inside the same Facebook conversation. Invalid or malformed messages are logged to Google Sheets for review. ## ⚙️ What This Workflow Does (Step-by-Step) ▶️ Trigger – Fetch New Facebook Messages (Every Hour) Schedules hourly polling of new conversations from Facebook Messenger. 🟦 Fetch Facebook Conversation List (Graph API) Retrieves conversation threads from the connected Facebook Page. 💬 Fetch Facebook Conversation Messages (Graph API) Loads message details (content, sender, timestamp) for the selected conversation. 📩 Extract Latest Facebook Message (Code) Sorts all messages and picks the latest one → this is the message analyzed by AI. 🔍 Validate Record Structure (IF) Ensures the incoming message has required fields. Valid → AI analysis Invalid → logged to Google Sheets. 📄 Log Invalid Records to Google Sheet Stores malformed or unprocessable messages for audit and correction. 🧠 Configure GPT-4o — Message Classification Model Defines AI model used to extract product details and intent from the customer’s message. 🤖 AI – Extract Product & Customer Intent AI identifies: product name (standardized) customer intent (availability, pricing, inquiry) cleaned query always returns structured JSON No inventory lookup happens here. 📦 Fetch Inventory Records from Airtable Pulls complete product inventory list to cross-match with customer request. 🔁 Merge AI Output With Inventory Dataset Combines: AI-interpreted message data Airtable inventory records This prepares a unified object for product lookup. 📝 Build Combined AI + Inventory Payload (Code) Constructs { ai: {...}, inventory: [...] } for the product-matching AI agent. 🧠 Configure GPT-4o — Product Matching Model Sets strict rules for identifying whether the requested product exists in inventory. 🤖 AI – Match Requested Product in Inventory AI checks: exact / close match to product name whether item exists generates structured JSON reply text + confidence score. 🧹 Parse AI Product Match JSON (Code) Ensures the AI output is valid JSON before making decisions. 🔍 Check If Product Exists (IF) If found → sends “product available” reply If not → sends “product not found” reply. 📨 Send Facebook Reply — Product Found (Graph API) Sends a personalized Messenger reply including matched product details. 📨 Send Facebook Reply — Product Not Found (Graph API) Replies politely informing customer that the product is not available. ## 🧩 Prerequisites - Facebook Graph API access token - Airtable API token - Azure OpenAI GPT-4o credentials - Google Sheets OAuth ## 💡 Key Benefits ✔ Fully automated Facebook DM handling ✔ AI-powered product identification even with typos or unclear wording ✔ Real-time product availability responses ✔ Unified Airtable-driven catalog lookup ✔ Automatic fallback for invalid messages ✔ Zero manual intervention for customer support ## 👥 Perfect For - Ecommerce stores - Catalog-based product businesses - Teams handling large volumes of Facebook DM inquiries - Businesses wanting instant customer replies without agents

Create a Calendly availability API endpoint for real-time scheduling data
## This n8n template implements a Calendly Availability Checker that provides real-time availability information for your Calendly event types via a simple API endpoint ## Who's it for This template is designed for **developers, businesses, and service providers** who need to programmatically check Calendly availability. It's perfect for: - **Web developers** building custom booking interfaces that need real-time availability data - **Chatbot developers** who want to suggest available times to users - **Website builders** who want to display available slots on their site - **Integration developers** who need to check availability before creating bookings - **Businesses** that want to build custom scheduling experiences on top of Calendly - **Service providers** who need availability data for their own applications or dashboards ## How it works / What it does This workflow creates a **RESTful API endpoint** that returns real-time availability information from your Calendly account. The system: 1. **Accepts webhook requests** via POST with optional parameters: - `event_type_uri` (optional) - Specific event type to check - `days_ahead` (optional, default: 7) - Number of days to check ahead 2. **Authenticates with Calendly API** using OAuth2 credentials to access your account 3. **Retrieves user information** to get your Calendly user URI and account details 4. **Lists all active event types** from your Calendly account 5. **Selects the target event type**: - Uses the `event_type_uri` from the request if provided - Otherwise defaults to the first active event type 6. **Fetches available time slots** from Calendly's availability API for the specified date range 7. **Formats the availability data** into a structured response including: - Total number of available slots - Next available slot (formatted and ISO timestamp) - Array of all available slots with formatted times and booking URLs - Slots grouped by day for easy consumption - Complete list of all event types 8. **Returns a comprehensive JSON response** with all availability information ready for integration ## How to set up ### 1. Configure Calendly OAuth2 Credentials - Go to [calendly.com/integrations](https://calendly.com/integrations) - Click "API & Webhooks" - Create an OAuth2 application or use Personal Access Token - In n8n, create a new credential: - Type: "Calendly OAuth2 API" - Follow the OAuth flow to connect your Calendly account - The credential will be used by all HTTP Request nodes in the workflow ### 2. Activate the Workflow - Open the workflow in n8n - Ensure the Calendly OAuth2 credential is properly configured - Activate the workflow to make the webhook endpoint available ### 3. Test the Workflow - Use the "Test workflow" button in n8n to manually trigger it - Or send a POST request to the webhook URL: ```json { "event_type_uri": "optional-event-uri", "days_ahead": 7 } ``` - Verify the response contains availability data - Check that the "Get Current User" node successfully retrieves your account info ### 4. Customize (Optional) - Adjust the default `days_ahead` value in the "Set Configuration" node (currently 7 days) - Modify the date range calculation in "Get Available Times" node - Customize the response format in "Respond with Availability" node - Add filtering logic to select specific event types - Add caching to reduce API calls ## Requirements - **Calendly account** with at least one active event type - **n8n instance** (self-hosted or cloud) - **Calendly OAuth2 API credentials** configured in n8n - **Webhook access** (if using n8n cloud, webhooks are automatically available) ## How to customize the workflow ### Modify Date Range - Edit the "Set Configuration" node to change the default `days_ahead` value - Update the `start_time` and `end_time` calculations in "Get Available Times" node - Currently checks from tomorrow (1 day ahead) to 7 days ahead by default - Adjust the date calculation expressions as needed ### Filter Specific Event Types - Modify the "Select Event Type" node to add filtering logic - Add an IF node to check event type names or slugs - Filter by duration, active status, or custom criteria - Return multiple event types if needed ### Customize Response Format - Edit the "Respond with Availability" node to change the JSON structure - Add or remove fields from the response - Format dates/times differently - Include additional metadata from event types - Add pagination for large slot lists ### Add Caching - Insert a Code node before "Get Available Times" to check cache - Store availability data temporarily to reduce API calls - Set appropriate cache expiration times - Consider using n8n's built-in cache or external storage ### Add Error Handling - Enhance error handling in HTTP Request nodes - Add validation for request parameters - Return meaningful error messages in the response - Handle cases where no event types exist - Handle cases where no availability exists ### Integrate with Other Services - Add nodes to log availability checks to a database - Send availability data to analytics platforms - Trigger notifications when availability changes - Sync availability with external calendars - Build availability dashboards ## Key Features - **RESTful API endpoint** - Simple POST endpoint for checking availability - **Real-time availability** - Fetches current availability directly from Calendly API - **Flexible event type selection** - Supports specific event type or auto-selects first available - **Configurable date range** - Customizable number of days to check ahead - **Comprehensive response format** - Returns formatted and raw availability data - **Multiple data views** - Provides slots as array, grouped by day, and summary statistics - **Event type information** - Includes details about all available event types - **Human-readable formatting** - Formats dates and times for easy display - **Booking URLs included** - Each slot includes direct booking URL - **Error resilience** - Nodes configured with `continueRegularOutput` to handle API errors gracefully ## Use Cases - **Custom booking widgets** - Display available slots on your website without embedding Calendly - **Chatbot integration** - Let AI assistants suggest available times to users - **Mobile app integration** - Check availability before showing booking options in mobile apps - **Multi-calendar systems** - Aggregate availability from multiple Calendly accounts - **Availability dashboards** - Build internal dashboards showing team availability - **Smart scheduling** - Check availability before sending meeting invitations - **Booking confirmation flows** - Verify availability before processing bookings - **Calendar sync verification** - Ensure Calendly availability matches other calendar systems - **Analytics and reporting** - Track availability patterns and booking trends - **Custom scheduling UIs** - Build completely custom scheduling interfaces using availability data ## Data Fields Returned ### User Information - User name, email, scheduling URL - User URI and organization URI ### Event Type Information - Event type name, duration (minutes), URI - Complete list of all active event types with details ### Availability Summary - `has_slots` - Boolean indicating if any slots are available - `total_slots` - Total number of available slots - `next_available` - Human-readable formatted string of next available slot - `next_available_iso` - ISO 8601 timestamp of next available slot ### Available Slots Array Each slot includes: - `start_time` - ISO 8601 timestamp - `formatted` - Human-readable date/time string - `booking_url` - Direct URL to book this specific slot ### Slots by Day - Grouped object with days as keys - Each day contains array of time slots with formatted times and booking URLs - Format: `{ "Monday, Dec 2": [{ time: "10:00 AM", url: "..." }] }` ### Metadata - `checked_at` - ISO timestamp of when availability was checked - `success` - Boolean indicating successful execution ## Workflow Architecture The workflow uses a **linear processing pattern** with data transformation at each step: 1. **Webhook Trigger** → Receives POST requests with optional parameters 2. **Set Configuration** → Extracts and sets default values for `event_type_uri` and `days_ahead` 3. **Get Current User** → Authenticates and retrieves Calendly user information 4. **Extract User Info** → Parses user data to extract URIs and account details 5. **Get Event Types** → Fetches all active event types for the user 6. **Select Event Type** → Chooses target event type (from request or first available) 7. **Get Available Times** → Queries Calendly API for available time slots 8. **Format Availability** → Transforms raw API data into structured, formatted response 9. **Respond with Availability** → Returns comprehensive JSON response to caller ## Example Scenarios ### Scenario 1: Check Default Availability 1. Developer sends POST request to webhook endpoint with empty body 2. Workflow uses default 7-day lookahead period 3. Workflow selects first active event type automatically 4. Returns availability for next 7 days with all slots formatted 5. Developer displays slots in custom booking interface ### Scenario 2: Check Specific Event Type 1. Developer sends POST request with specific `event_type_uri` 2. Workflow uses provided event type instead of default 3. Checks availability for that specific event type only 4. Returns slots grouped by day for easy calendar display 5. Developer shows availability in day-by-day calendar view ### Scenario 3: Extended Date Range 1. Developer sends POST request with `days_ahead: 30` 2. Workflow checks availability for next 30 days 3. Returns comprehensive list of all available slots 4. Developer uses data to show monthly availability view 5. User can see all available times for the next month ### Scenario 4: Chatbot Integration 1. User asks chatbot "When are you available?" 2. Chatbot calls webhook endpoint to get availability 3. Workflow returns next available slot and total count 4. Chatbot responds: "I have 15 slots available. Next available: Monday, Dec 2 at 10:00 AM" 5. Chatbot offers to book the next available slot This template provides a powerful API endpoint for checking Calendly availability, enabling developers to build custom scheduling experiences while leveraging Calendly's robust scheduling infrastructure.
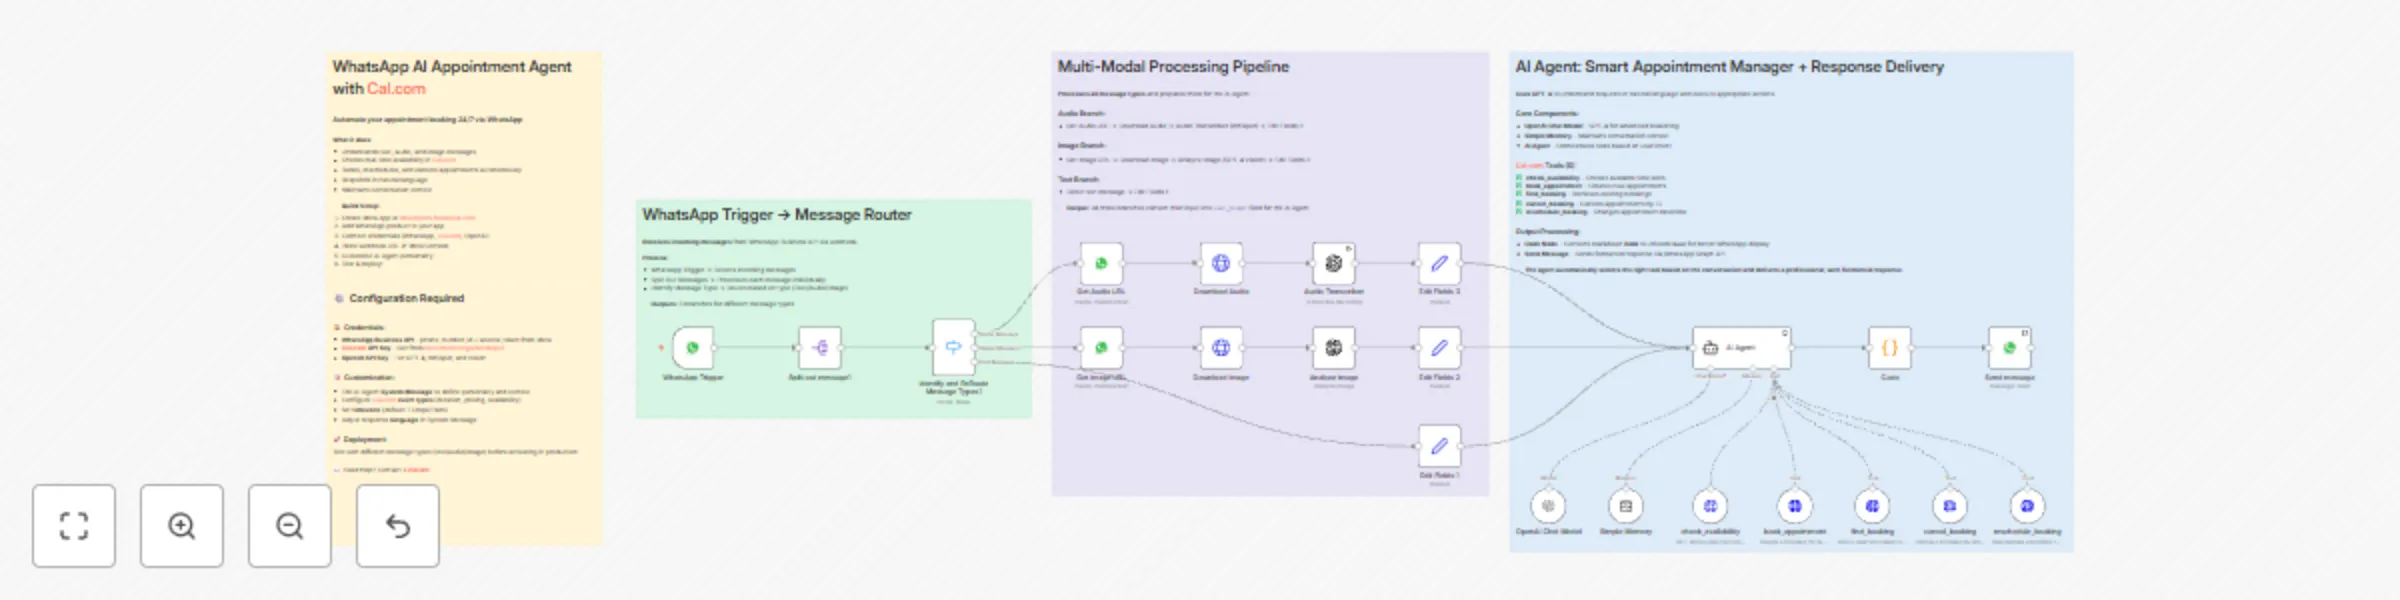
Automate multi-modal appointment booking via WhatsApp using GPT-4 and Cal.com
## Who is this for? This workflow is for **healthcare professionals, consultants, coaches, and service businesses** who want to completely automate their appointment booking system via WhatsApp — without manual intervention for reservations, availability checks, or cancellation management. ## What problem is this workflow solving? / Use case Managing appointments manually via WhatsApp is extremely time-consuming: checking availability, confirmations, rescheduling, cancellations. This workflow **automates the entire process** — from initial request to final confirmation — allowing your clients to book, modify, or cancel appointments 24/7, in natural language, directly via WhatsApp. ## What this workflow does * Processes multi-modal messages (text, audio, images) from WhatsApp Business API * Detects message type and routes to appropriate processing (Whisper for audio, GPT-4 Vision for images) * Uses AI Agent with 5 Cal.com tools to manage complete appointment lifecycle * Checks real-time availability in your Cal.com calendar * Books appointments autonomously without human intervention * Handles cancellations and rescheduling requests * Maintains conversation context with Simple Memory for natural exchanges * Formats responses with Unicode bold for better WhatsApp readability * Sends automated replies directly to the client **The result:** a fully automated 24/7 appointment management system via WhatsApp. ## Setup ### 1. WhatsApp Business API * Connect your WhatsApp Business API account in n8n. * Set up the webhook in Facebook Developer Console (Webhook → Messages → Subscribe). * Add your phone_number_id and access token credentials. ### 2. Cal.com * Create a Cal.com account and configure your calendar. * Generate an API Key from Cal.com settings. * Set up your event types (duration, availability, pricing). * Add your Cal.com API credentials in n8n. ### 3. OpenAI * Get an OpenAI API key (for GPT-4, Whisper, and Vision). * Add your OpenAI credentials in n8n. * The workflow uses GPT-4 for conversation, Whisper for audio transcription, and GPT-4 Vision for image analysis. ### 4. Customize the AI Agent * Edit the System Message to define your agent's personality, tone, and business context. * Adjust timezone in tool parameters (default: Europe/Paris). * Configure event type IDs for different appointment types. ### 5. Test & activate * Test with different message types (text, audio, image) from WhatsApp. * Verify appointments are created correctly in Cal.com. * Switch to production mode and activate the workflow. This workflow helps you build a **fully autonomous AI booking assistant**, transforming WhatsApp into a 24/7 appointment management system. --- ## Need help customizing? Contact me for consulting and support: **[LinkedIn](https://www.linkedin.com/in/st%C3%A9phane-bordas-3439b4179/)** / **[Youtube](https://www.youtube.com/@stephane_bordas)**

Autonomous meeting scheduler with GPT-4o-mini, Telegram, and Google Calendar
This n8n template demonstrates how to build an autonomous AI assistant that handles real business tasks through natural conversation on Telegram. The example shows meeting scheduling with CRM lookup and calendar management, but the architecture supports any business automation you can imagine - simply add tools and the AI learns to use them automatically. Use cases are many: Try automating appointment scheduling, customer support tickets, invoice generation, lead qualification, email management, report generation, data entry, or task coordination! ## Good to know * OpenAI API costs are minimal at ~$0.001 per conversation with GPT-4o-mini * The AI agent makes autonomous decisions and can chain multiple tool calls to complete complex tasks * Conversation context is not persisted between sessions (can be extended with a memory database) * Calendar availability is checked for business hours (9 AM - 4 PM) by default * The workflow assumes contacts are stored in Google Sheets with Name and Email columns * This is production-ready code that can be deployed immediately for real business use ## How it works * User sends a natural language message to the Telegram bot requesting a meeting * The workflow extracts message content, chat ID, and user information * CRM database is loaded from Google Sheets containing contact information * The AI agent analyzes the request and autonomously decides which tools to use * AI searches CRM for contacts, checks Google Calendar availability, and proposes 3 available time slots * User confirms their preferred time through conversational reply * Upon confirmation, the workflow creates a Google Calendar event with both parties invited * A professional confirmation email is automatically sent via Gmail to the meeting attendee * The entire multi-step process executes autonomously through simple conversation ## How to use * Set up a Google Sheet as your CRM with columns: Name, Email, Phone * Create a Telegram bot via BotFather and get your bot token * Import this workflow and connect your credentials (Telegram, OpenAI, Google Sheets, Calendar, Gmail) * Replace placeholder IDs with your actual Google Sheet ID and Calendar ID in the workflow nodes * Activate the workflow to start listening for Telegram messages * Test with: "Schedule a meeting with [contact name] tomorrow at 2 PM" * Customize the AI Agent system prompt to match your scheduling preferences and timezone ## Requirements * Telegram Bot Token (free from BotFather) * OpenAI API account with GPT-4o-mini access * Google Sheets OAuth2 credentials for CRM database access * Google Calendar OAuth2 credentials for availability checking and event creation * Gmail OAuth2 credentials for sending confirmation emails ## Customising this workflow * Add new tools (APIs, databases, services) and the AI automatically learns to use them - no code changes needed * Replace Telegram with Slack, WhatsApp, or SMS for different communication channels * Extend capabilities beyond scheduling: invoice generation, customer support, lead qualification, report generation * Connect external systems like HubSpot, Salesforce, QuickBooks, Asana, or custom APIs * Add conversation memory by integrating a vector database for context-aware multi-turn conversations * Implement approval workflows where AI drafts actions for human review before execution * Build multiple specialized assistants with different tools and expertise for various business functions
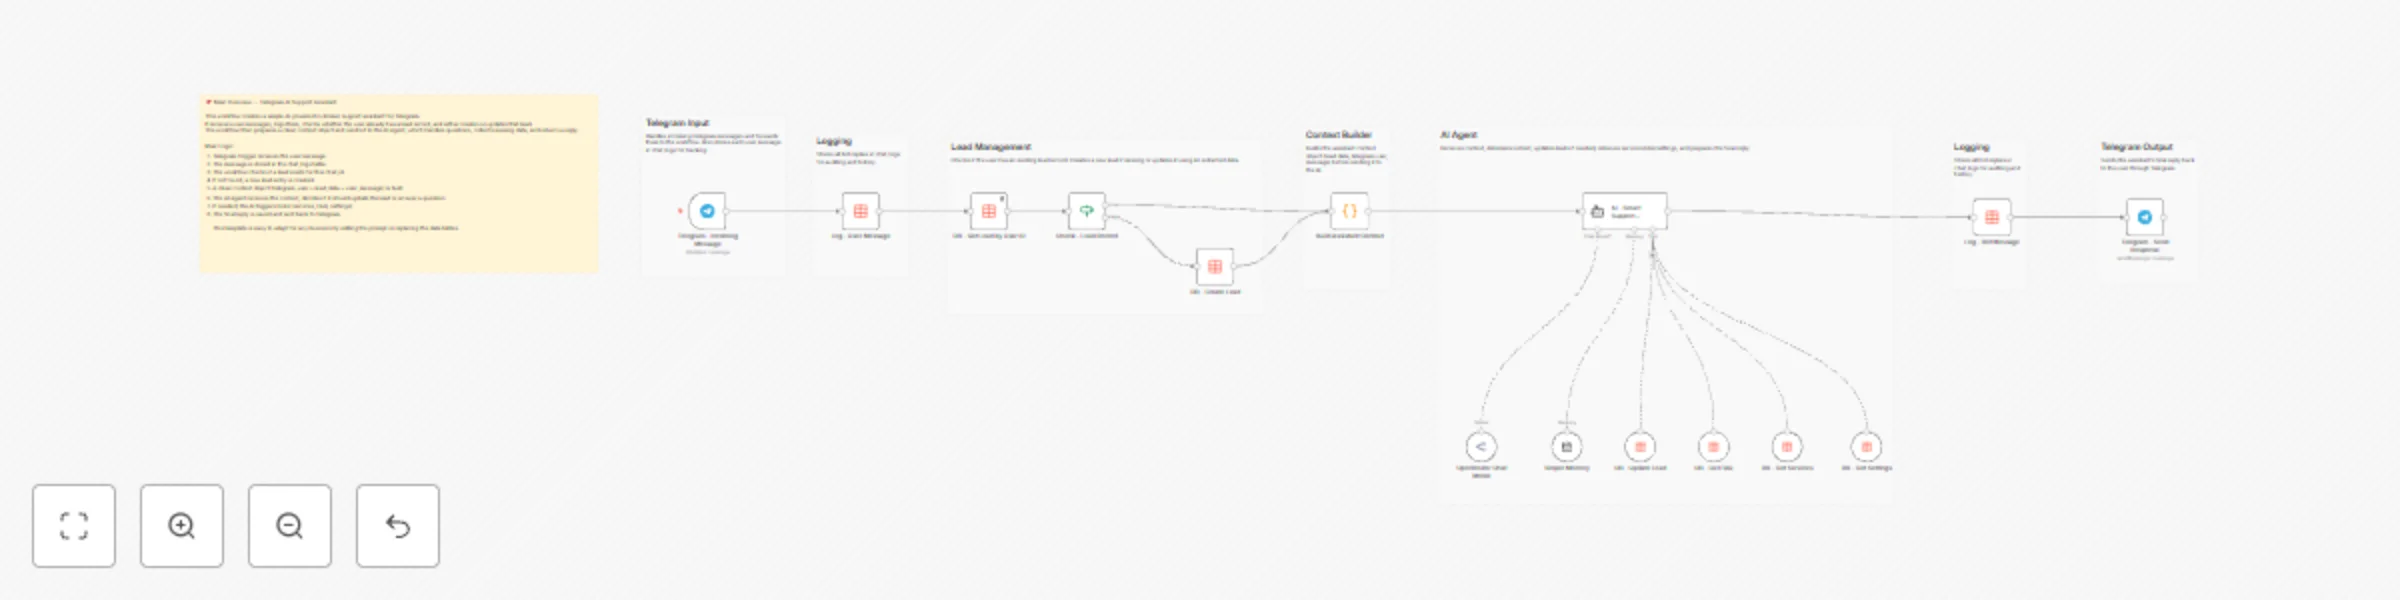
Create an AI-powered Telegram customer support bot with lead management
🧠 AI Telegram Customer Support Assistant + Lead Manager This n8n workflow provides a fully automated AI-driven customer support assistant connected to Telegram, with built-in lead management, knowledge-base querying, and context-aware answers. ⭐ What this workflow does Receives user messages from Telegram Logs all incoming/outgoing messages into a Data Table Checks if a lead exists for the user (via chat_id) Creates new leads automatically if needed Builds an AI-ready context (user info + lead info + latest message) Uses the AI Agent to answer questions using: FAQ database Services table (programs, prices, descriptions) Settings table (agency info) Lead update tool Sends a natural, friendly reply back to Telegram Updates leads in real time (name, phone, email, notes…) 📦 Required Data Tables (to be created by the user) leads Stores all user information (full_name, phone, email, etc.) services List of available programs/services with prices, duration, category. faq Frequently asked questions with answers and optional tags. settings Company/agency details used by the assistant. chat_logs Logs all messages exchanged with users (user + bot). 🔧 Required Credentials Telegram Bot API Key AI Model Credential (OpenAI, OpenRouter, Groq…) No other credentials required. 🚀 How to use it Import the workflow into your n8n instance Create the required Data Tables as defined inside the Sticky Notes Add your credentials (Telegram + AI Model) Customize the prompt to match your business Activate the workflow — you're ready to go! 💡 Suitable for: Travel agencies Customer support chatbots Lead qualification + automation AI knowledge-based assistants Telegram-first businesses