Lead Nurturing Workflows

Automate outbound AI sales calls with double-dial using Airtable and Vapi AI
## 🚀 The Ultimate AI Sales Outbound Engine *Stop wasting hours on manual dialing and listening to ringtones. This workflow transforms your **Airtable** into a high-velocity **AI Call Center** using **Vapi AI***. ### ⚡ TL;DR Automate lead qualification calls, handle voicemails like a pro, and sync every transcript back to your CRM without lifting a finger. ### 🧠 How it Works 1. **The Scout:** Every minute, n8n scans your Airtable for leads marked `TBC`. 2. **The Dialer:** It triggers a personalized **Vapi AI** call, passing along the lead’s name and context. 3. **The Reporter:** Once the call ends, a Webhook catches the data, including the **recording, transcript, and AI summary**. 4. **The Strategist:** * **Success?** Updates the lead to `Called` and logs the summary. * **Voicemail?** Automatically triggers a **double-dial** retry after 1 minute. * **Still nothing?** Schedules a final follow-up for the next day at the **optimal time (`your time`)**. ### 🛠️ Setup Guide * **Airtable:** Create a "Leads" table with fields for `Status`, `Mobile`, `Attempt`, and `Summary`. * **Vapi:** Plug in your Assistant ID and set the Webhook URL to this workflow's address. * **n8n:** Use the **Header Auth** credential for your Vapi API key to keep things secure. ### 💎 Why This Wins * **Aggressive Retries:** Includes a built-in "Double-Dial" strategy to increase connection rates. * **Clean CRM:** No more messy notes; get structured AI summaries for every call. * **Plug-and-Play:** Designed to be easily customized for any industry—from real estate to SaaS.

Automate SDR Outreach: Source Wiza Leads and Personalize Emails with LLMs
## What it does Receives campaign parameters via form, creates a Smartlead campaign, sources qualified leads through Wiza based on your ICP description, researches each prospect with Perplexity AI, generates personalized icebreaker emails and follow-up sequences with OpenRouter LLMs, and uploads everything to Smartlead for automated delivery. ## Who's it for B2B sales teams, marketing agencies, and consultants who want to automate the entire SDR prospecting process from lead sourcing to personalized email delivery. ## Requirements - n8n (self-hosted or cloud) - Smartlead API Key - Wiza Bearer Token - OpenRouter API Key - Perplexity API Key ## How to set up 1. Import workflow JSON into n8n 2. Configure Smartlead, Wiza, OpenRouter, and Perplexity credentials 3. Create Lead Database and Case Study tables in n8n 4. Update the "Business Context" node with your offer 5. Activate workflow and use the campaign form ## How to customize - Adjust ICP translation logic in the "Format Search Parameters" agent - Modify email templates in the "Ice Breaker Email Generator" prompt - Change follow-up sequence timing in the "Build Sequence Templates" code node

Send personalized LinkedIn DMs to profile visitors with ConnectSafely.ai and Google Sheets
# Send Personalized DMs to LinkedIn Profile Visitors ## Who's it for This workflow is built for sales professionals, recruiters, founders, and networkers who want to automatically reach out to people who viewed their LinkedIn profile. Perfect for anyone who knows that profile visitors are warm leads but doesn't have time to manually check who visited, craft personalized messages, and send outreach one by one. If you're doing outbound sales, recruiting talent, building partnerships, or simply want to convert curiosity into conversations, this automation turns passive profile views into active outreach opportunities. ## How it works The workflow automatically identifies LinkedIn profile visitors and sends them personalized messages based on their connection status. **The process flow:** 1. Scheduled trigger runs weekly (or manually) to fetch recent profile visitors 2. ConnectSafely.ai API retrieves all visitors from the past 7 days 3. Splits visitors into individual records for processing 4. Checks Google Sheets to avoid messaging the same person twice 5. Routes based on connection degree: - **1st-degree connections** → Sends a personalized DM - **2nd/3rd-degree connections** → Sends a connection request with message 6. Logs all outreach to Google Sheets for tracking 7. Waits between messages to maintain natural activity patterns 8. Loop continues until all visitors are processed --- ## Setup steps ### Step 1: Configure ConnectSafely.ai API Credentials #### Obtain API Key 1. Create an account at [ConnectSafely.ai](https://connectsafely.ai) 2. Connect your LinkedIn account in the dashboard 3. Navigate to **Settings** → **API Keys** 4. Generate a new API key #### Add Bearer Auth Credential in n8n 1. Go to **Credentials** in n8n 2. Click **Add Credential** → **HTTP Bearer Auth** 3. Name it "ConnectSafely.ai API" 4. Paste your API key 5. Save the credential This credential is used by all three HTTP Request nodes: Fetch Profile Visitors, Send DM, and Send Connection Request. ### Step 2: Configure Google Sheets Integration #### 2.1 Create Your Tracking Sheet Create a new Google Sheet with the following columns: | Column Name | Description | |-------------|-------------| | `Name` | Visitor's full name | | `Linkedin URL` | Visitor's profile URL | | `Status` | Outreach status (DONE) | #### 2.2 Connect Google Sheets Account 1. Go to **Credentials** → **Add Credential** → **Google Sheets OAuth2** 2. Follow the OAuth flow to connect your Google account 3. Grant access to Google Sheets #### 2.3 Update All Google Sheets Nodes There are three Google Sheets nodes that need configuration: 1. **Check if Already Contacted** - Looks up existing contacts 2. **Log DM Sent to Sheet** - Records DMs sent 3. **Log Connection Request to Sheet** - Records connection requests For each node: 1. Open the node 2. Replace `YOUR_GOOGLE_SHEET_ID` with your actual sheet ID (from the URL) 3. Select the correct sheet name 4. Save ### Step 3: Customize Your Message Templates The workflow includes two Code nodes with message templates that you **must customize**: #### For Connected Users (DMs) Open the **"Generate DM for Connected User"** node and update: ```javascript // Sender footer - CUSTOMIZE THIS const footer = `\n\n— Your Name`; // Message bodies - CUSTOMIZE THESE const messages = [ "Noticed you recently checked out my profile... I've been working on [YOUR PRODUCT] — [BRIEF DESCRIPTION].", // Add more variations... ]; ``` #### For New Connections (Connection Requests) Open the **"Generate Message for New Connection"** node and update the same sections with your product/service details. **Tips for good messages:** - Keep under 300 characters for connection requests - Personalize with their name (already included) - Mention something specific about why you're reaching out - Include a clear but soft call-to-action - Have 3-5 variations to avoid repetitive messaging ### Step 4: Adjust the Schedule 1. Open the **Weekly Schedule Trigger** node 2. Adjust based on your profile traffic: - High traffic: Daily - Medium traffic: Every 3 days - Low traffic: Weekly (default) ### Step 5: Test the Workflow 1. Click **Test Workflow** on the Schedule Trigger or add a Manual Trigger 2. Verify: - Profile visitors are fetched correctly - Deduplication works (no existing contacts get messaged) - Connection degree routing works properly - Messages are personalized with visitor names - Google Sheets logs entries correctly --- ## Customization ### Time Range for Visitors Edit the JSON body in the **Fetch Profile Visitors** node: ```json {"timeRange":"past_7_days","start":0,"fetchAll":true} ``` Options: - `past_7_days` - Last week's visitors (default) - `past_30_days` - Last month's visitors - `past_90_days` - Last quarter's visitors ### Message Personalization Both Code nodes support multiple message variations. The workflow randomly selects one for each visitor, making your outreach feel more natural. To add more variations: 1. Open the relevant Code node 2. Add new message strings to the `messages` array 3. Use placeholders like `[YOUR PRODUCT]` and replace with your actual content ### Wait Time Between Messages The **Wait Between Messages** node adds delays between outreach. Adjust the duration to: - Increase if you want more conservative pacing - Decrease if you have premium LinkedIn and higher limits Recommended: 1-5 minutes between messages ### Add More Tracking Fields To track additional data in Google Sheets: 1. Add columns to your sheet (e.g., `Message Sent`, `Connection Degree`, `Date`) 2. Update the Google Sheets nodes to map these new fields 3. Pull data from the workflow context using expressions ### Filter by Company or Title Want to only message visitors from specific companies or with certain titles? 1. Add an **IF** node after **Skip if Already Contacted** 2. Add conditions based on visitor data fields 3. Route non-matching visitors directly to the Wait node --- ## Use Cases - **Sales Prospecting**: Automatically reach out to decision-makers who are researching you before a sales cycle - **Recruiting**: Engage passive candidates who are checking out your profile after seeing job posts - **Founder Networking**: Connect with investors, partners, and potential hires who show interest - **Consulting/Freelance**: Convert profile visitors into discovery calls by reaching out while you're top of mind - **Personal Branding**: Build your network by engaging everyone who takes time to view your profile --- ## Troubleshooting ### Common Issues & Solutions **Issue**: No visitors returned from API - **Solution**: Ensure your LinkedIn account is connected in ConnectSafely.ai dashboard. Also verify you've had recent profile views (check LinkedIn's native viewer count). **Issue**: Duplicate messages being sent - **Solution**: Verify the Google Sheets lookup is working correctly. Check that the `Linkedin URL` column matches exactly what the API returns. Make sure all three Google Sheets nodes point to the same sheet. **Issue**: Messages not sending - **Solution**: Check your ConnectSafely.ai API key is valid. Verify the HTTP Request nodes have the Bearer Auth credential attached. Check the API response for error messages. **Issue**: Wrong message type sent (DM vs Connection Request) - **Solution**: The routing is based on `connectionDegree` field. Verify this field is being returned correctly from the API. Check the **Check if 1st Degree Connection** node conditions. **Issue**: Profile ID extraction failing - **Solution**: The **Extract Profile ID from URL** Code node parses the LinkedIn URL. Check that visitors have valid `navigationUrl` values. **Issue**: Google Sheets not updating - **Solution**: Verify your Google Sheets credential has write access. Check that the sheet ID is correct and the sheet name matches. **Issue**: Rate limit errors - **Solution**: Increase the wait time in the **Wait Between Messages** node. Consider reducing the frequency of the schedule trigger. --- ## Rate Limiting Best Practices LinkedIn monitors automated activity. To stay safe: - **Start slow**: Begin with 10-15 messages per day - **Gradually increase**: Add 5 more per week up to 50/day max - **Use random delays**: The workflow includes built-in waits - **Pause if warned**: If LinkedIn shows any warnings, stop for 24-48 hours - **Keep messages personal**: Avoid spammy, salesy language - **Don't run 24/7**: Schedule during business hours --- ## Costs & Considerations | Service | Cost | |---------|------| | ConnectSafely.ai | Free trial available, then subscription | | Google Sheets | Free | | n8n | Free (self-hosted) or cloud pricing | **No per-message costs** - ConnectSafely.ai subscription includes API access for messaging. --- ## Documentation & Resources ### Official Documentation - **ConnectSafely.ai Docs**: [https://connectsafely.ai/docs](https://connectsafely.ai/docs) - **ConnectSafely.ai API Reference**: Available in dashboard - **Google Sheets API**: [https://developers.google.com/sheets](https://developers.google.com/sheets) ### Support Channels - **Email Support**: [[email protected]](mailto:[email protected]) - **Documentation**: [https://connectsafely.ai/docs](https://connectsafely.ai/docs) - **Custom Workflows**: [Contact us for custom automation](https://connectsafely.ai/contact) --- ## Connect With Us Stay updated with the latest automation tips and LinkedIn strategies: - **LinkedIn**: [linkedin.com/company/connectsafelyai](https://www.linkedin.com/company/connectsafelyai) - **YouTube**: [youtube.com/@ConnectSafelyAI-v2x](https://www.youtube.com/@ConnectSafelyAI-v2x) - **Instagram**: [instagram.com/connectsafely.ai](https://www.instagram.com/connectsafely.ai/) - **Facebook**: [facebook.com/connectsafelyai](https://www.facebook.com/people/ConnectSafelyAI/61582550884724/) - **X (Twitter)**: [x.com/AiConnectsafely](https://x.com/AiConnectsafely) - **Bluesky**: [connectsafelyai.bsky.social](https://bsky.app/profile/connectsafelyai.bsky.social) - **Mastodon**: [mastodon.social/@connectsafely](https://mastodon.social/@connectsafely) --- ## Need Custom Workflows? Looking to build sophisticated LinkedIn automation workflows tailored to your business needs? **[Contact our team](https://connectsafely.ai/contact)** for custom automation development, strategy consulting, and enterprise solutions. We specialize in: - Multi-channel engagement workflows - AI-powered personalization at scale - Lead scoring and qualification automation - CRM integration and data synchronization - Custom reporting and analytics pipelines
Real-time lead response across social channels with Llama AI & Google Sheets
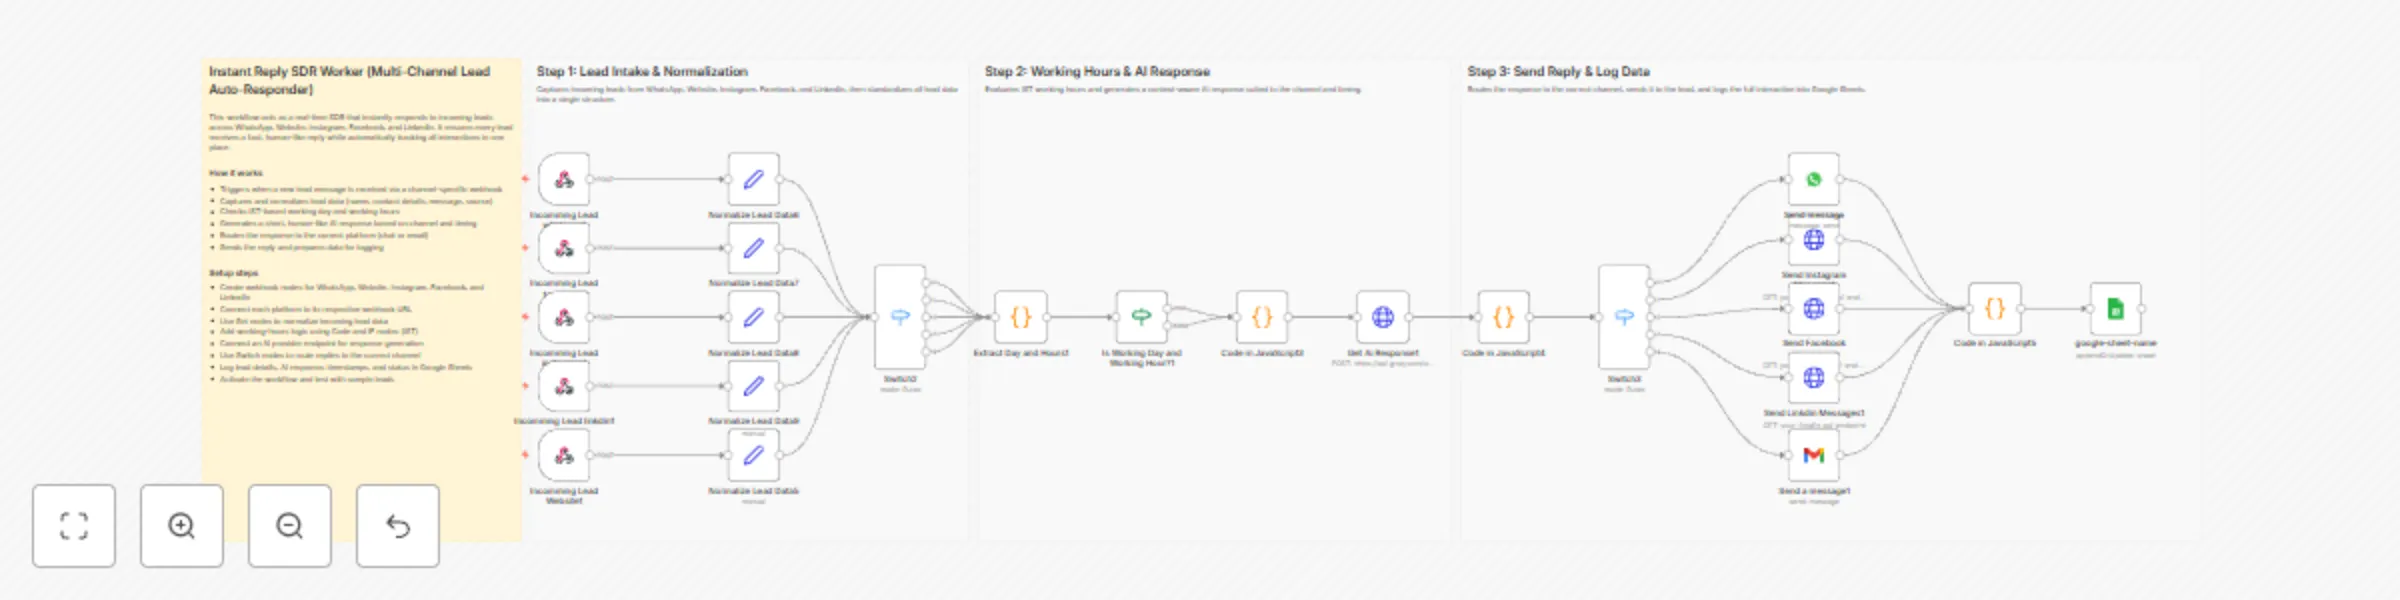
## How it works This workflow acts as an instant SDR that replies to new inbound leads across multiple channels in real time. It first captures and normalizes all incoming lead data into a unified structure. The workflow then evaluates IST working days and hours, generates a context-aware AI response, and routes the reply to the correct channel. Finally, it logs the full interaction, response status, and timing into Google Sheets. ## Step-by-step - **Step 1: Lead intake & normalization** - **Incomming Lead whatsapp1** – Receives new WhatsApp lead messages via webhook. - **Incomming Lead facebook1** – Captures incoming Facebook lead messages. - **Incomming Lead instagram1** – Listens for Instagram lead messages. - **Incomming Lead linkdin1** – Captures LinkedIn lead messages. - **Incomming Lead Website1** – Receives website form submissions. - **Normalize Lead Data6** – Normalizes WhatsApp lead fields. - **Normalize Lead Data7** – Normalizes Facebook lead fields. - **Normalize Lead Data8** – Normalizes Instagram lead fields. - **Normalize Lead Data9** – Normalizes LinkedIn lead fields. - **Normalize Lead Data5** – Normalizes website lead data. - **Switch2** – Merges all normalized leads into a single processing path. - **Step 2: Working hours & AI response** - **Extract Day and Hours1** – Converts timestamps to IST and extracts day and time. - **Is Working Day and Working Hour?1** – Determines whether the lead arrived during business hours. - **Code in JavaScript3** – Builds the AI prompt using lead details and timing context. - **Get Ai Response1** – Generates a short, human-like response. - **Step 3: Send reply & log data** - **Code in JavaScript4** – Combines AI output with normalized lead data. - **Switch3** – Routes the response based on the source channel. - **Send message** – Sends WhatsApp replies. - **Send Instagram Message1** – Sends Instagram responses. - **Send Facebook Messages1** – Sends Facebook replies. - **Send Linkdin Messages1** – Sends LinkedIn responses. - **Send a message1** – Sends email replies for website leads. - **Code in JavaScript5** – Finalizes response status and metadata. - **google-sheet-name** – Appends or updates lead and response data in Google Sheets. ## Why use this? - Replies instantly to leads across all major inbound channels - Keeps all lead data standardized and easy to manage - Automatically respects IST working days and hours - Reduces manual SDR workload without losing response quality - Maintains a complete response log for reporting and follow-up

Recover abandoned onboarding users with personalized emails via Postgres, Gmail & Slack
## How it works This workflow automatically identifies users who started but did not complete the signup process. It runs on a fixed schedule, checks your database for inactive and incomplete users, and validates the results before proceeding. Each user is then processed individually to send a personalized recovery email and enroll them in a follow-up sequence. Finally, the workflow updates the database to avoid duplicate outreach and notifies the sales team in Slack. ## Step-by-step - **Step 1: Run scheduled check and identify abandoned users** - **Schedule Trigger** – Executes the workflow automatically every 24 hours. - **Find Abandoned Users** – Queries Postgres for users marked as incomplete and inactive for over 24 hours. - **If** – Confirms that valid user records exist before continuing. - **Step 2: Process users and send recovery emails** - **Loop Over Items** – Processes users one at a time to avoid rate limits and execution errors. - **PrepareEmail email** – Generates a personalized recovery email using a predefined template. - **Send a message** – Sends the recovery email through Gmail. - **Get a message** – Retrieves the sent email details for tracking and thread reference. - **StartSequence email** – Adds the email to a follow-up sequence for engagement tracking. - **Step 3: Update records and notify the team** - **Update rows in a table** – Marks the user as contacted to prevent duplicate recovery emails. - **Alert Sales Team** – Sends a Slack notification with user details and recovery status. ## Why use this? - Recover users who abandon onboarding without manual follow-ups - Ensure each user receives only one recovery email - Keep your Postgres user data accurate and up to date - Provide sales teams with real-time visibility via Slack alerts - Improve signup completion and activation rates automatically

Sync AI-enriched TimeRex bookings to Google Sheets and Slack with Gemini
# TimeRex AI-Powered Booking Automation ## Description (for n8n template submission) Transform your TimeRex booking management with AI-powered automation. This workflow automatically processes bookings, enriches data with AI insights, and keeps your team informed via Slack—all in real-time. ### What This Workflow Does **🤖 AI-Powered Intelligence** - **Smart Company Detection**: Automatically identifies company names from guest email domains - **Booking Categorization**: Uses Google Gemini to classify bookings (Sales/Support/Interview/Partnership/Media) - **Meeting Brief Generation**: AI creates actionable preparation notes for hosts before each meeting **⚡ Automated Processing** - Receives webhooks from TimeRex for confirmed and cancelled bookings - Validates requests with security token verification - Logs enriched booking data to Google Sheets - Sends detailed Slack notifications with AI-generated insights **🛡️ Security & Reliability** - Token-based webhook authentication - Security alerts for unauthorized access attempts - Automatic cancellation handling with data cleanup ### Use Cases - **Sales Teams**: Automatically categorize leads and prepare meeting briefs - **Recruitment**: Streamline interview scheduling with AI-powered candidate insights - **Customer Success**: Track support meetings and prepare context for calls - **Media Relations**: Manage press interviews with automated briefings ### How It Works 1. TimeRex sends a webhook when a booking is confirmed or cancelled 2. Security token is verified (failed attempts trigger Slack alerts) 3. For confirmed bookings: - Media source is detected from calendar name - Company name is extracted from email domain - AI categorizes the booking purpose - AI generates a meeting preparation brief - Enriched data is saved to Google Sheets - Slack notification is sent with AI insights 4. For cancellations: - Booking is found by Event ID - Row is deleted from Google Sheets - Cancellation alert is sent to Slack ### Setup Instructions 1. **Webhook Configuration** - Copy the webhook URL from the "TimeRex Webhook" node - Paste it in TimeRex Settings → Webhook 2. **Security Token** - Copy your TimeRex security token - Update the `Verify Security Token` node with your token 3. **Google Sheets** - Create a spreadsheet with these columns: `event_id`, `booking_date`, `guest_name`, `guest_email`, `calendar_name`, `meeting_url`, `host_name`, `media_source`, `company_name`, `booking_category`, `ai_meeting_brief`, `created_at` - Update all Google Sheets nodes with your Sheet ID 4. **AI Credentials** - Connect your Google Gemini API credentials to both AI model nodes 5. **Slack** - Connect your Slack account - Select your notification channel in all Slack nodes 6. **Activate** - Turn on the workflow and start receiving AI-enhanced booking notifications! ### Requirements - TimeRex account with webhook access - Google Cloud account (for Sheets & Gemini API) - Slack workspace - n8n instance (self-hosted or cloud) ### Customization Tips - Modify the `Filter by Calendar Type` node to match your calendar naming convention - Adjust AI prompts in the LLM Chain nodes for different categorization or brief styles - Add more media sources to the Media Master sheet for accurate source tracking - Extend the workflow with email confirmations or calendar event creation --- ## Short Description (100 characters max) Automate TimeRex bookings with AI-powered categorization, meeting briefs, and Slack notifications. --- ## Categories - Sales - Productivity - AI - Scheduling --- ## Tags TimeRex, Booking, AI, Google Gemini, Slack, Google Sheets, Automation, Meeting Management, LLM, Scheduling
Predict tenant churn and manage retention with GPT-4, Gmail, Slack and your CRM
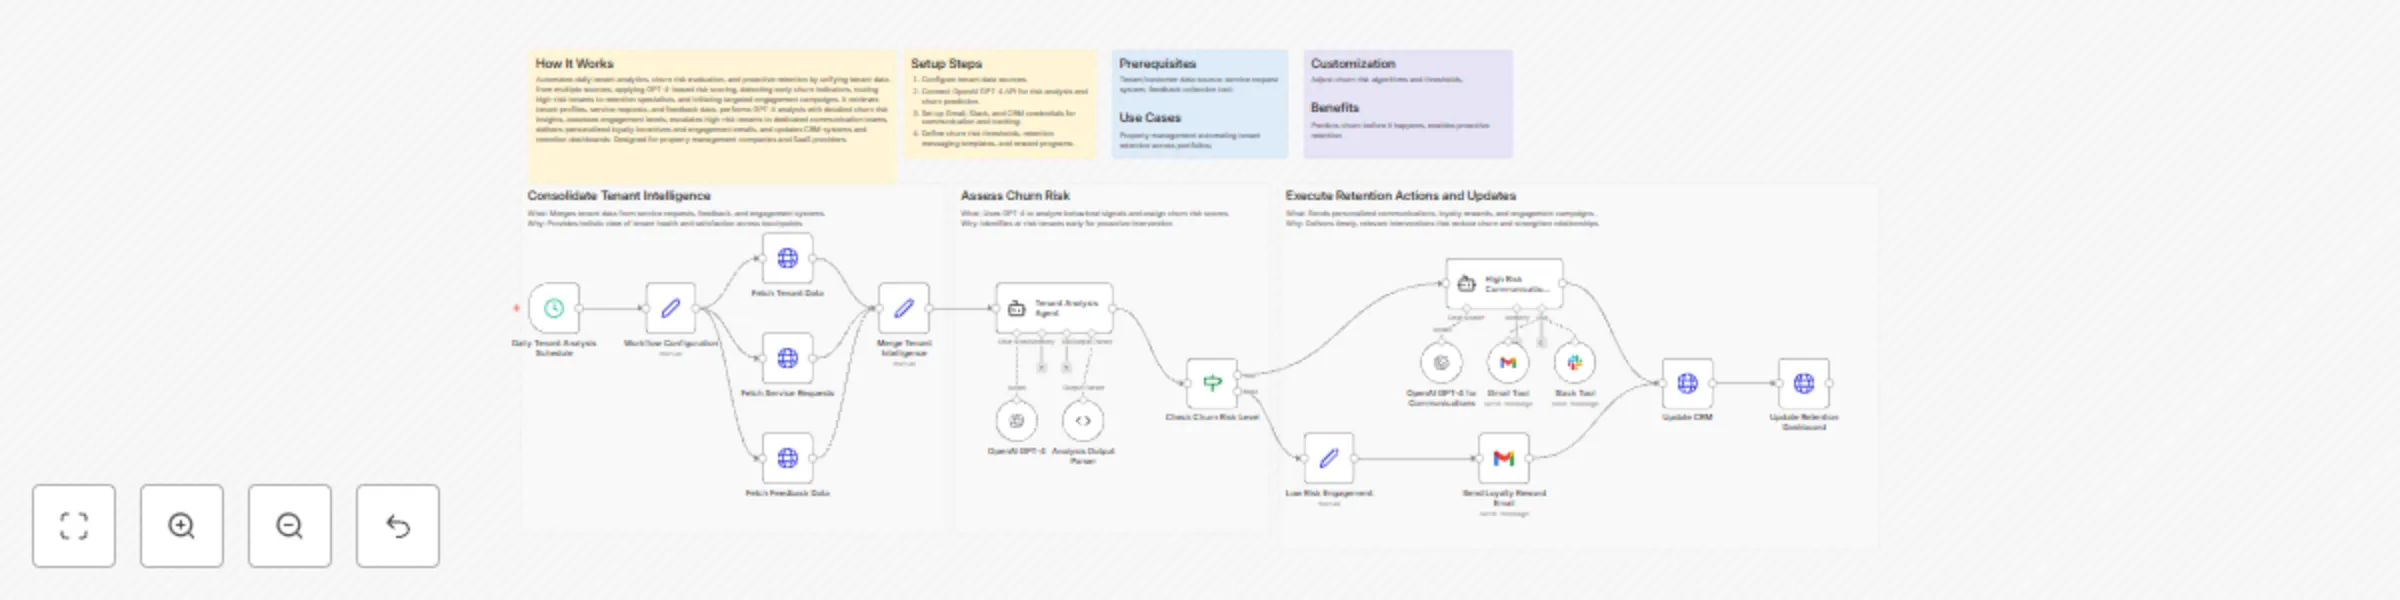
## How It Works Automates daily tenant analytics, churn risk evaluation, and proactive retention by unifying tenant data from multiple sources, applying GPT-4–based risk scoring, detecting early churn indicators, routing high-risk tenants to retention specialists, and initiating targeted engagement campaigns. It retrieves tenant profiles, service requests, and feedback data, performs GPT-4 analysis with detailed churn risk insights, assesses engagement levels, escalates high-risk tenants to dedicated communication teams, delivers personalized loyalty incentives and engagement emails, and updates CRM systems and retention dashboards. Designed for property management companies and SaaS providers. ## Setup Steps 1. Configure tenant data sources. 2. Connect OpenAI GPT-4 API for risk analysis and churn prediction. 3. Set up Gmail, Slack, and CRM credentials for communication and tracking. 4. Define churn risk thresholds, retention messaging templates, and reward programs. ## Prerequisites Tenant/customer data source; service request system; feedback collection tool; ## Use Cases Property management automating tenant retention across portfolios; ## Customization Adjust churn risk algorithms and thresholds, ## Benefits Predicts churn before it happens, enables proactive retention
Automate customer retention with AI risk prediction, Stripe coupons & personalized Gmail
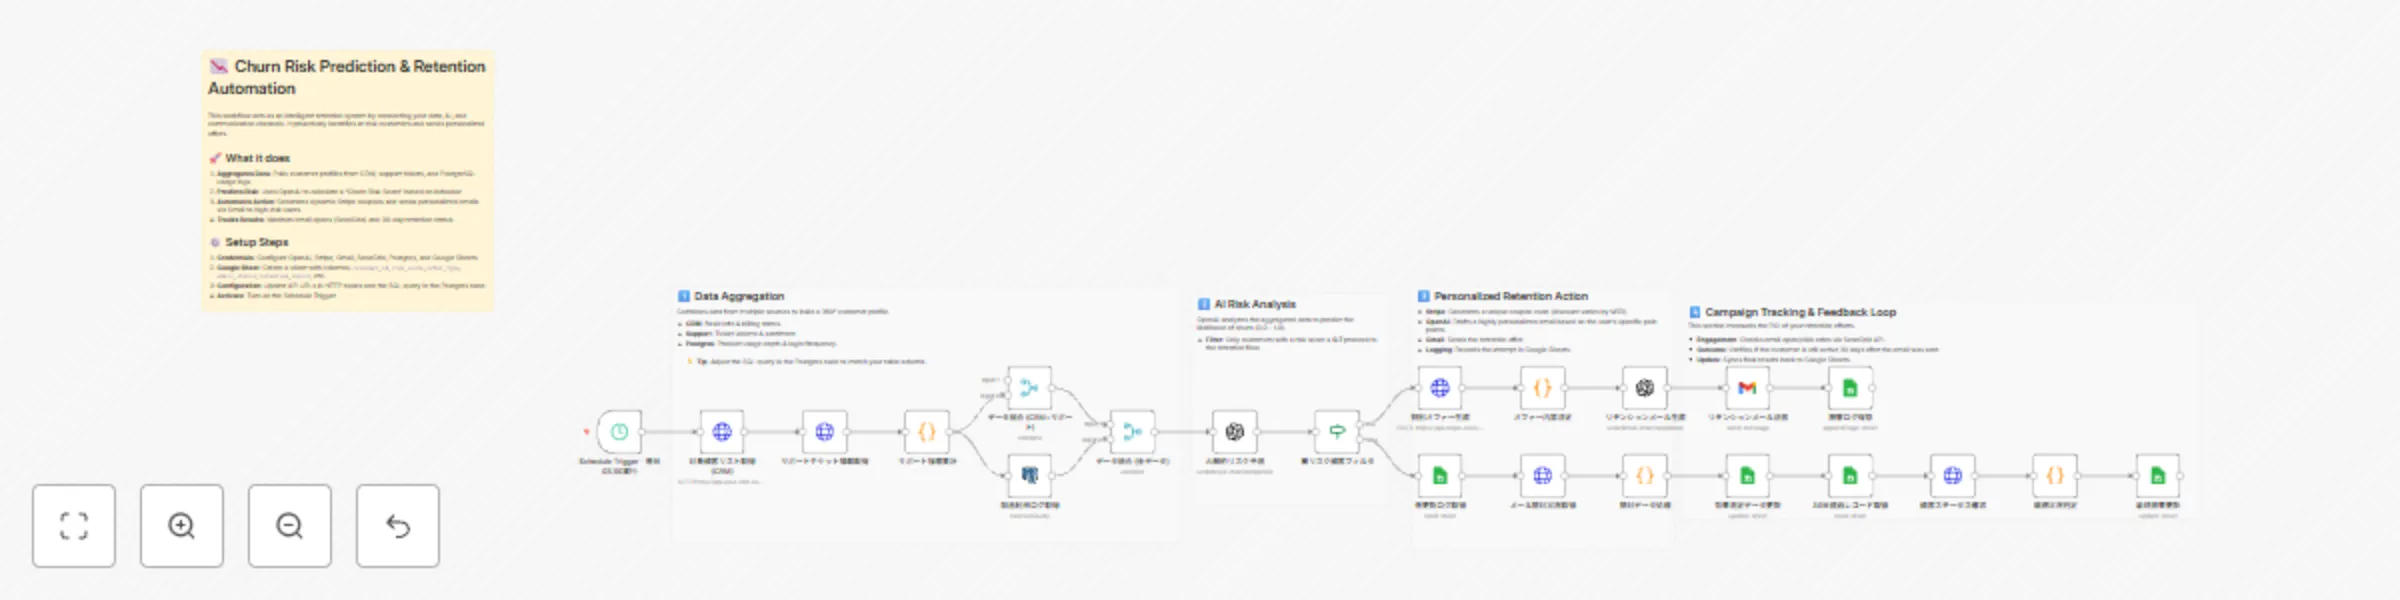
# Predict churn risk from customer data and send retention emails via OpenAI ## 👥 Who’s it for This workflow is designed for **Customer Success Managers**, **Growth Teams**, and **SaaS Business Owners** who want to proactively reduce churn using AI. It automates the analysis of customer health and the delivery of personalized retention offers without manual intervention. ## 🚀 What it does This template acts as an intelligent retention system that connects your data, AI, and communication channels. 1. **Aggregates Data:** Pulls customer profiles from your **CRM**, support ticket history via API, and product usage logs from **PostgreSQL**. 2. **Predicts Risk:** Uses **OpenAI** to analyze the combined data and calculate a "Churn Risk Score" for each customer. 3. **Automates Action:** For customers identified as high-risk (score > 0.7): - Generates a unique, dynamic discount coupon via **Stripe**. - Drafts a highly personalized retention email using OpenAI. - Sends the email via **Gmail**. 4. **Tracks Effectiveness:** Logs all actions to **Google Sheets**. It also checks back (via **SendGrid** and CRM data) to track email opens and verify if the customer was retained after 30 days. ## ⚙️ How to set up 1. **Prepare Google Sheet:** Create a sheet with columns for `customer_id`, `risk_score`, `offer_type`, `email_status`, and `retention_result`. 2. **Configure Credentials:** Set up your credentials for OpenAI, Stripe, Gmail, Google Sheets, SendGrid, and PostgreSQL. 3. **API Endpoints:** Update the **HTTP Request** nodes to point to your specific CRM and Support tool APIs (replace the placeholder URLs). 4. **Customize Logic:** - In the **Postgres node**, adjust the SQL query to match your product's event table. - In the **Code node** (Offer Decision), define your rules for discounts (e.g., "Give 20% off if MRR > $10k"). 5. **Activate:** The workflow is set to run daily at 3:00 AM. Toggle the **Schedule Trigger** to `Active` when ready. ## 📦 Requirements - **n8n** (v1.0 or later) - **OpenAI** API Key - **Google Workspace** (Gmail, Sheets) - **Stripe** Account (for coupon generation) - **SendGrid** Account (for email tracking) - **PostgreSQL** (or similar database) - Access to CRM and Support Tool APIs ## 🎨 How to customize the workflow - **Adjust the AI Prompt:** Edit the **OpenAI node** system message to match your brand's tone of voice. - **Change the Threshold:** Modify the **If node** to target customers with a risk score higher or lower than 0.7. - **Internal Alerts:** Instead of emailing the customer directly, replace the **Gmail node** with a **Slack node** to notify your CSM team to reach out manually. - **Swap Database:** If you use MySQL or Snowflake, simply replace the PostgreSQL node with the corresponding n8n node.
Lead collection with SendPulse and GPT-generated welcome emails/SMS
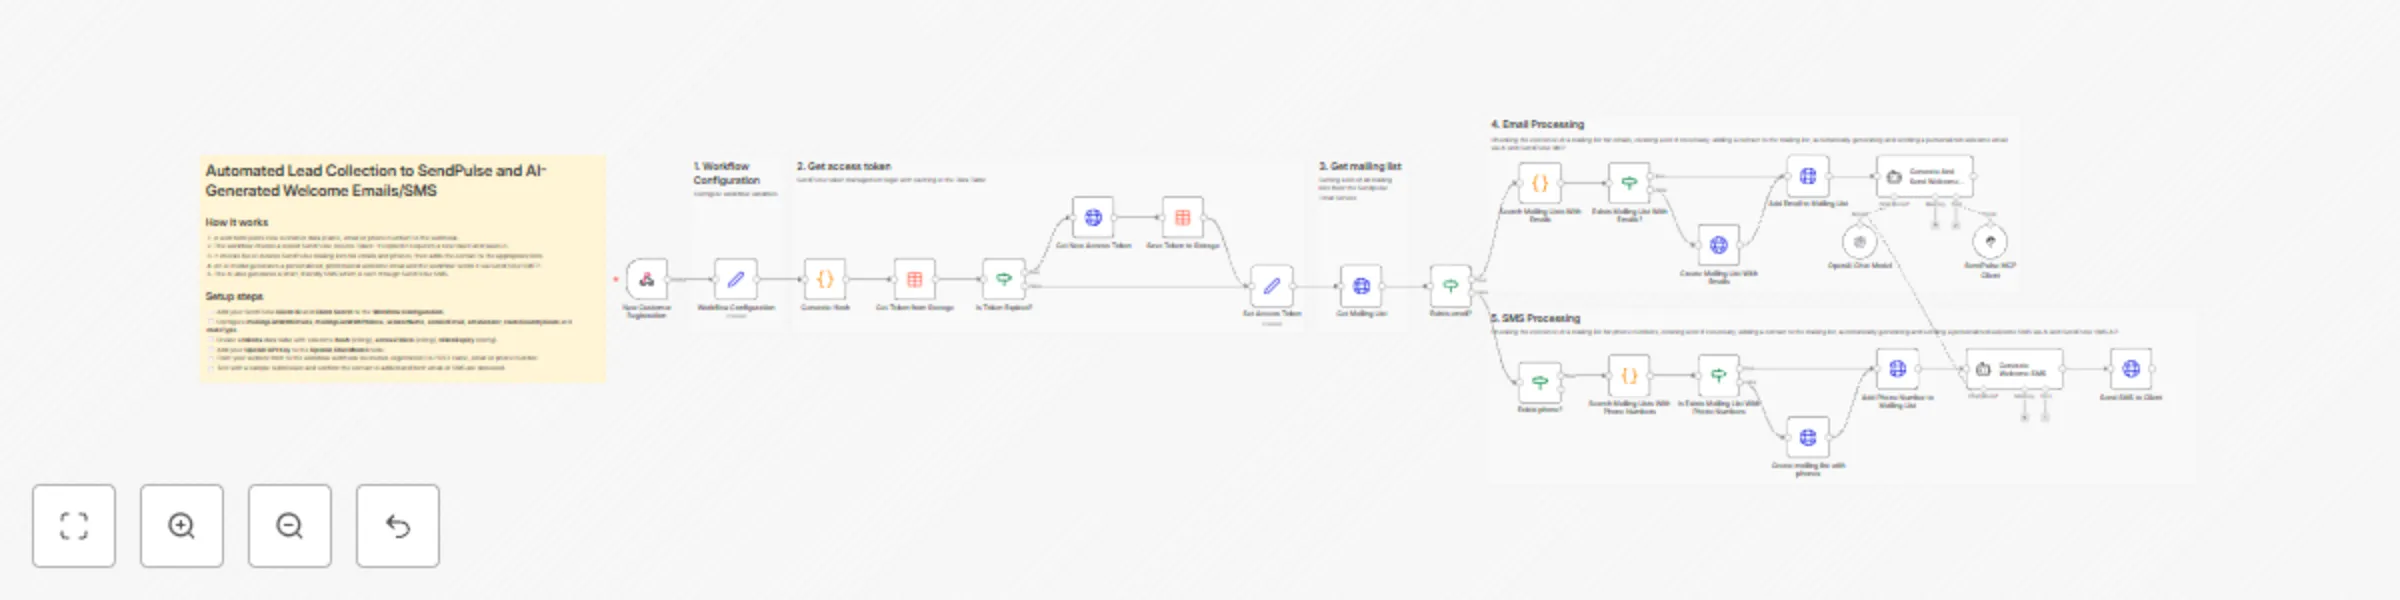
## How it works This n8n template automates lead processing from your website. It receives customer data via a Webhook, stores the customer's contact (email or phone number) in the respective [**SendPulse**](https://sendpulse.com) address books, and uses the [**SendPulse MCP Server**](https://sendpulse.com/knowledge-base/account-settings/mcp-server) to send personalized welcome messages (email or SMS) generated using AI. The template also includes built-in SendPulse token management logic with caching in the Data Table, which reduces the number of unnecessary API requests. [**SendPulse’s MCP server**](https://sendpulse.com/knowledge-base/account-settings/mcp-server) is a tool that helps you manage your account through a chat with an AI assistant. It uses SendPulse API methods to get information and perform actions, such as request statistics, run message campaigns, or update user data. MCP server acts as middleware between your AI assistant and your [**SendPulse account**](https://sendpulse.com). It processes requests through the SendPulse API and sends results back to chat, so you can manage everything without leaving the conversation. Once connected, the MCP server operates as follows: 1. You ask your AI assistant something in chat. 2. It forwards your request to the MCP server. 3. The MCP server calls the API to get data or perform an action. 4. The AI assistant sends the result back to your chat. ## Set up ### Requirements: - An active SendPulse account. - Client ID and Client Secret from your SendPulse account. - An API key from your OpenAI account to power the AI agent. ### Set up steps: 1. Get your **OpenAI API Key** - [https://platform.openai.com/api-keys](https://platform.openai.com/api-keys) 2. Add your **OpenAI API Key** to **OpenAI Chat Model** node in n8n workflow. 3. Get your **Client ID** and **Client Secret** from your SendPulse account - [https://login.sendpulse.com/settings/#api](https://login.sendpulse.com/settings/#api) 4. Add your **Client ID** and **Client Secret** to **Workflow Configuration** node. 5. Add your **Client ID** and **Client Secret** to **SendPulse MCP Client** node as headers **X-SP-ID** і **X-SP-SECRET** in Multiple Headers Auth. 6. In the **Workflow Configuration** node, change the names of the mailing lists, senderName, senderEmail, smsSender, routeCountryCode and routeType fileds as needed. 7. Create a **tokens** table with the columns: **hash** (string), **accessToken** (string), **tokenExpiry** (string) in the Data tables section of your n8n platform account.

Personalized customer retention campaigns with GPT-4o analytics & Gmail
## HOW IT WORKS This workflow automates end-to-end data intelligence processing by ingesting structured data (CSV, JSON), enriching it through multiple AI analysis pathways, and generating actionable insights. Designed for business analysts, data scientists, and operations teams, it solves the problem of manual data enrichment and fragmented analysis by consolidating diverse AI models (GPT-4, LLM analysis, sentiment detection) into a unified pipeline. Data flows from source ingestion → enrichment/validation → branching into three specialized analysis paths (Competitive Intelligence, Sentiment Analysis, Market Insights) → aggregation → result storage (Google Sheets) and notifications (Slack, Gmail). Each path applies distinct AI models for comprehensive intelligence gathering. ## SETUP STEPS 1. Configure OpenAI API key in credentials 2. Set up Google Sheets connection with service account 3. Add Slack webhook for notifications 4. Connect Gmail for automated report distribution 5. Configure NVIDIA API (if using specialized models) 6. Map input data source (CSV upload or API endpoint) 7. Test each branch independently before full deployment ## PREREQUISITES OpenAI API key, Google Sheets access, Slack workspace, Gmail account, basic n8n familiarity. ## USE CASES Market research automation, competitive intelligence monitoring, customer feedback analysis at scale ## CUSTOMIZATION Swap AI models (Claude, Gemini, Llama), add/remove analysis branches, modify output destinations ## BENEFITS Eliminates manual data processing (80% time savings), enables simultaneous multi-perspective analysis

Answer product queries via WhatsApp using OpenAI GPT-4o and PDF knowledge base
# WhatsApp AI Sales Agent using PDF Vector Store This workflow turns your WhatsApp number into an intelligent AI-powered Sales Agent that answers product queries using real data extracted from a PDF brochure. It loads a product brochure via HTTP Request, converts it into embeddings using OpenAI, stores them in an in-memory vector store and allows the AI Agent to provide factual answers to users via WhatsApp. Non-text messages are filtered and only text queries are processed. This makes the workflow ideal for building a lightweight chatbot that understands your product documentation deeply. ### Quick Start: 5-Step Fast Implementation 1. **Insert your WhatsApp credentials** in the _WhatsApp Trigger_ and _WhatsApp Send_ nodes. 2. **Add your OpenAI API Key** to all OpenAI-powered nodes. 3. **Replace the PDF URL** in the _HTTP Request_ node with your own brochure. 4. **Run the Manual Trigger once** to build the vector store. 5. **Activate the workflow** and start chatting from WhatsApp. ## What It Does This workflow converts a product brochure (PDF) into a searchable knowledgebase using LangChain vector embeddings. Incoming WhatsApp messages are processed and if the message is text, the AI Sales Agent uses OpenAI + the vector store to produce accurate, brochure-based answers. The AI responds naturally to customer queries, supports conversation memory across the session and retrieves information directly from the brochure when needed. Non-text messages are filtered out to maintain clean conversational flow. The workflow is fully modular: you can replace the PDF, modify AI prompts, plug into CRM systems or extend it into a broader sales automation pipeline. ## Who’s It For This workflow is ideal for: - Businesses wanting a **WhatsApp-based AI customer assistant**. - Sales teams needing **automated product query handling**. - Companies with **large product catalog PDFs**. - Marketers wanting a **zero-code product brochure chatbot**. - Technical teams experimenting with **LangChain + OpenAI inside n8n**. ## Requirements to Use This Workflow To run this workflow successfully, you need: - An **n8n instance** (cloud or self-hosted). - A **WhatsApp Business API** connection. - An **OpenAI API key**. - A **publicly accessible PDF brochure URL**. - Basic familiarity with n8n node configuration. Optional: - A custom vector store backend (Qdrant, Pinecone) – the template uses in-memory storage. ## How It Works & How To Set Up ### 1. Import the Workflow JSON Upload the workflow JSON provided. ### 2. Configure WhatsApp Trigger - Open **WhatsApp Trigger** - Add your WhatsApp credentials - Set the webhook correctly to match your n8n endpoint ### 3. Configure WhatsApp Response Nodes The workflow uses two WhatsApp send nodes: - **Reply To User** → Sends AI response - **Reply To User1** → Sends “unsupported message” reply Add your WhatsApp credentials to both. ### 4. Replace the PDF Brochure In **get Product Brochure (HTTP Request)**: - Update the `url` parameter with your own PDF ### 5. Run the PDF → Vector Store Setup (One-Time Only) Use the **Manual Trigger** ("When clicking ‘Test workflow’") to: - Download the PDF - Extract text - Split into chunks - Generate embeddings - Store them in **Product Catalogue** vector store > You must run this once after importing the workflow. ### 6. Set OpenAI Credentials Add your OpenAI API Key to the following nodes: - `OpenAI Chat Model` - `OpenAI Chat Model1` - `Embeddings OpenAI` - `Embeddings OpenAI1` ### 7. Review the AI Agent Prompt Inside **AI Sales Agent**, you can edit the system message to match: - Your brand - Your product types - Your tone of voice ### 8. Activate the Workflow Once activated, WhatsApp users can chat with your AI Sales Agent. ## How to Customize Nodes? Here are common customization options: ### Customize the PDF / Knowledgebase Change the URL in **get Product Brochure** or Upload your own file via other nodes. ### Customize AI Behavior Edit the **systemMessage** inside **AI Sales Agent**: - Change personality - Set product rules - Restrict/expand scope ### Change Supported Message Types Modify **Handle Message Types** switch logic to allow: - Image → OCR - Audio → Whisper - Documents → Additional processing ### Modify WhatsApp Message Templates Inside the `textBody` of response nodes. ### Extend or replace Vector Store Swap `vectorStoreInMemory` with: - Qdrant - Pinecone - Redis vector store By updating the vector store node. ## Add-Ons (Optional Enhancements) You can extend this workflow with: ### 1. Multi-language support Add OpenAI translation nodes before agent input. ### 2. CRM Integration Send user queries and chat logs into: - HubSpot - Salesforce - Zoho CRM ### 3. Product Recommendation Engine Use embeddings similarity to suggest products. ### 4. Order Placement Workflow Connect to Stripe or Shopify APIs. ### 5. Analytics Dashboard Log chats into Airtable / Postgres for analysis. ## Use Case Examples Here are some practical uses: 1. **Product Inquiry Chatbot** Customers ask about specs, pricing, or compatibility. 2. **Digital Catalog Assistant** Converts PDF brochures into interactive WhatsApp search. 3. **Sales Support Bot** Reduces load on human sales reps by handling common questions. 4. **Internal Knowledge Bot** Teams access manuals, training documents, or service guides. 5. **Event/Product Launch Assistant** Provides instant details about newly launched items. And many more similar use cases where an AI-powered WhatsApp assistant is valuable. ## Troubleshooting Guide | Issue | Possible Cause | Solution | | ------------------------------------------ | -------------------------------------- | ------------------------------------------------------------- | | WhatsApp messages not triggering workflow | Wrong webhook URL or inactive workflow | Ensure webhook is correct & activate workflow | | AI replies are empty | Missing OpenAI credentials | Add OpenAI API key to all AI nodes | | Vector store not populated | Manual trigger not executed | Run the _Test Workflow_ trigger once | | PDF extraction returns blank text | PDF is image-based | Use OCR before text splitting | | “Unsupported message type” always triggers | Message type filter misconfigured | Check conditions in _Handle Message Types_ | | AI not using brochure data | VectorStore tool not linked properly | Check connections between Embeddings → VectorStore → AI Agent | ## Need Help with Support & Extensions? If you need help setting up, customizing or extending this workflow, feel free to reach out to our n8n automation developers at WeblineIndia. We can help with - Custom WhatsApp automation workflows - AI-powered product catalog systems - Integrating CRM, ERP or eCommerce platforms - Building advanced LangChain-powered n8n automations - Deploying scalable vector stores (Qdrant/Pinecone) - And so much more.
Recover Shopify abandoned carts with email, SMS, WhatsApp & Facebook retargeting
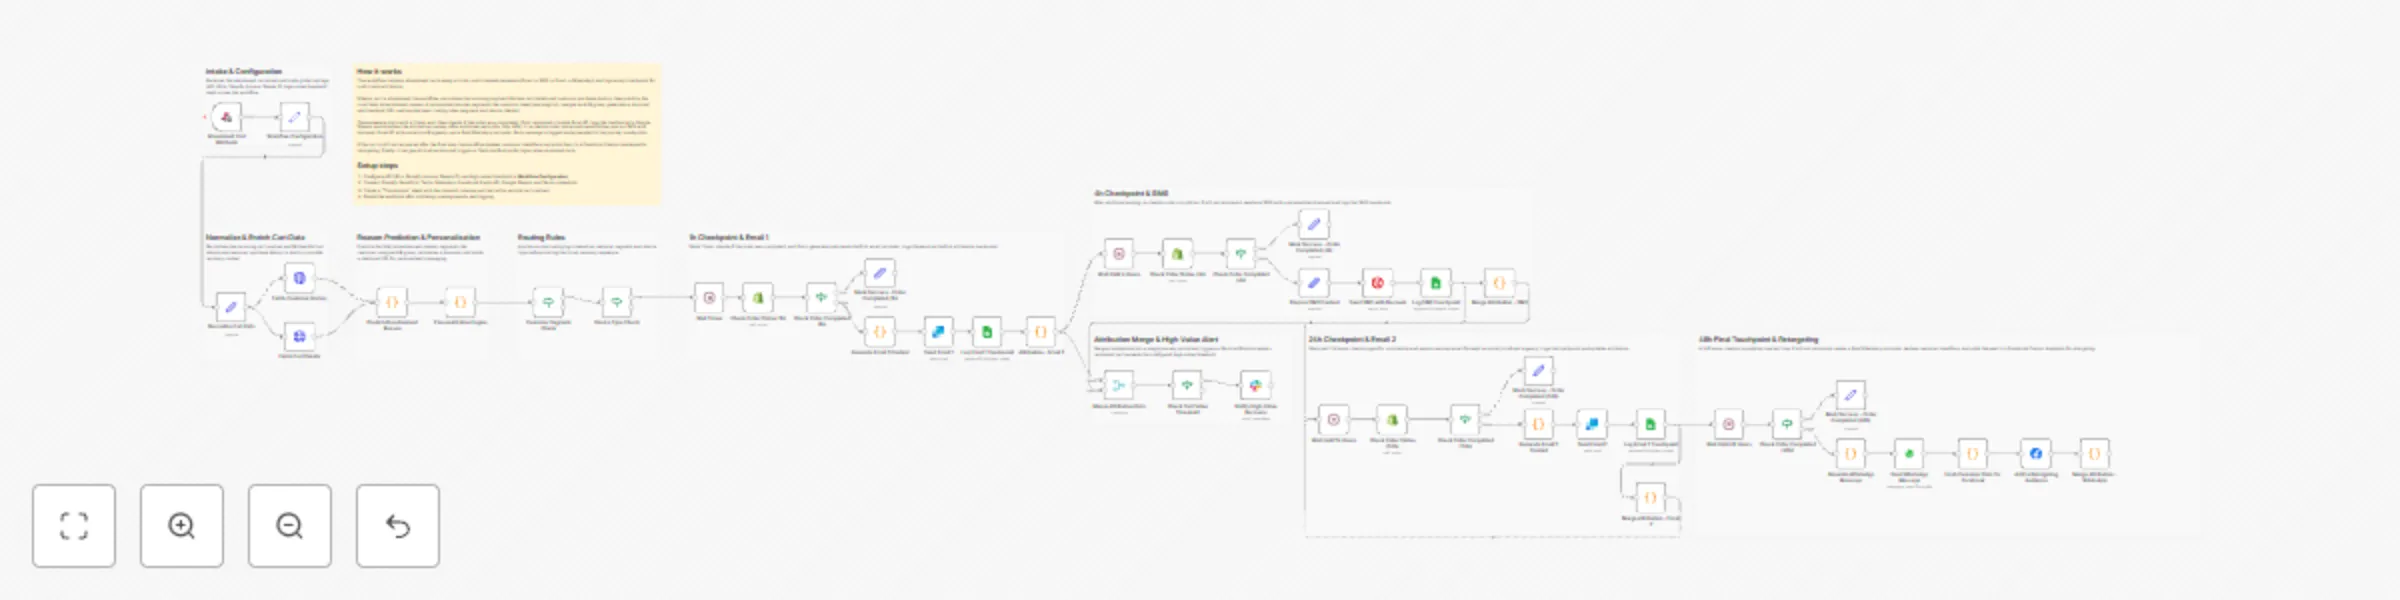
This workflow is a complete, production-ready solution for recovering abandoned carts in Shopify stores using a multi-channel, multi-touch approach. It automates personalized follow-ups via Email, SMS, and WhatsApp, tracks every customer interaction for multi-touch attribution, and enables advanced retargeting and analytics. **Key features:** - Multi-step, timed recovery sequence (Email → SMS → Email → WhatsApp) - Customer segmentation (new, returning, VIP) and A/B testing - Dynamic discounting and personalized messaging - Touchpoint logging to Google Sheets for attribution analysis - Facebook Custom Audience retargeting for unrecovered carts - Slack notifications for high-value cart recoveries --- ## What does this workflow do? 1. **Listens for abandoned cart events** from Shopify (or any e-commerce platform) via webhook. 2. **Normalizes and enriches cart data** by fetching full cart details and customer purchase history. 3. **Predicts the likely reason for abandonment** (e.g., price sensitivity, checkout complexity, technical issues) using rule-based logic. 4. **Segments the customer** (new, returning, VIP), assigns an A/B test group, and generates a personalized discount and checkout URL. 5. **Runs a timed, multi-channel recovery sequence:** - **1 hour after abandonment:** Checks if the order is completed. If not, sends a personalized Email #1 and logs the touchpoint. - **4 hours after abandonment:** Checks again. If not recovered, sends an SMS with a discount code and logs the touchpoint. - **24 hours after abandonment:** Checks again. If not recovered, sends Email #2 (with social proof/urgency) and logs the touchpoint. - **48 hours after abandonment:** Final check. If not recovered, sends a WhatsApp reminder and logs the touchpoint. 6. **If the cart is still not recovered:** Hashes customer identifiers and adds them to a Facebook Custom Audience for retargeting. 7. **Logs every touchpoint** (email, SMS, WhatsApp) to a Google Sheet for multi-touch attribution analysis. 8. **Sends a Slack notification** if a high-value cart is recovered. --- ## Why is this workflow useful? - **Boosts recovery rates:** By using multiple channels and personalized timing, you maximize the chance of recovering lost sales. - **Improves attribution:** Every customer interaction is logged, so you can analyze which channels and messages drive conversions. - **Enables advanced retargeting:** Unrecovered carts are automatically added to a Facebook Custom Audience for paid retargeting. - **Saves time:** Fully automated, with easy configuration for your store, messaging, and analytics. - **Scalable and extensible:** Easily adapt the sequence, add more channels, or integrate with other tools. --- ## How to install and configure ### 1. Prerequisites - n8n instance (v2.0.2+ recommended) - Shopify store with API access - Accounts and API credentials for: - SendGrid (email) - Twilio (SMS) - WhatsApp Business API - Google Sheets (service account) - Facebook Graph API (for Custom Audiences) - Slack (for notifications) ### 2. Setup steps 1. **Import the workflow** into your n8n instance. 2. **Configure the “Workflow Configuration” node:** - Set your Shopify domain, API URLs, Google Sheets ID, and high-value threshold. 3. **Connect all required credentials** in the respective nodes: - Shopify, SendGrid, Twilio, WhatsApp, Google Sheets, Facebook Graph API, Slack. 4. **Create a Google Sheet** named “Touchpoints” with columns: `cart_id`, `customer_id`, `touchpoint_type`, `timestamp`, `channel`, `ab_group`. 5. **Set up the webhook** in your Shopify store (or e-commerce platform) to trigger the workflow on cart abandonment. 6. **Test the workflow** with a sample abandoned cart event to ensure emails, SMS, WhatsApp, and logging work as expected. 7. **Enable the workflow** in n8n for live operation. --- ## Node-by-node breakdown - **Abandoned Cart Webhook:** Receives abandoned cart events. - **Workflow Configuration:** Stores global settings (API URLs, Shopify domain, Google Sheets ID, high-value threshold). - **Normalize Cart Data:** Cleans and standardizes incoming cart data. - **Fetch Cart Details / Fetch Customer History:** Enriches data with full cart and customer info. - **Predict Abandonment Reason:** Uses business logic to guess why the cart was abandoned. - **Personalization Engine:** Segments the customer, assigns A/B group, calculates discount, and builds checkout URL. - **Customer Segment Check / Device Type Check:** Applies routing logic for personalized messaging. - **Wait / Check Order Status / Generate & Send Messages:** Timed sequence for Email, SMS, and WhatsApp, with order status checks at each step. - **Log Touchpoint (Google Sheets):** Records every message sent for attribution. - **Attribution Merge:** Combines all touchpoints into a single journey for analysis. - **Hash Customer Data for Facebook / Add to Retargeting Audience:** Adds unrecovered carts to a Facebook Custom Audience. - **Check Cart Value Threshold / Notify High-Value Recovery:** Sends Slack alerts for high-value recoveries. --- ## Customization tips - Adjust wait times and message content to fit your brand and audience. - Add or remove channels (e.g., push notifications, phone calls) as needed. - Expand the Google Sheet for deeper analytics (e.g., add UTM parameters, campaign IDs). - Integrate with your CRM or analytics platform for end-to-end tracking. --- ## Troubleshooting - Make sure all API credentials are set and tested. - Check Google Sheets permissions for the service account. - Test each channel (email, SMS, WhatsApp) individually before going live. - Review the workflow execution logs in n8n for errors or failed steps.
Automated post-purchase emails for Gumroad with Notion CRM and Gemini AI
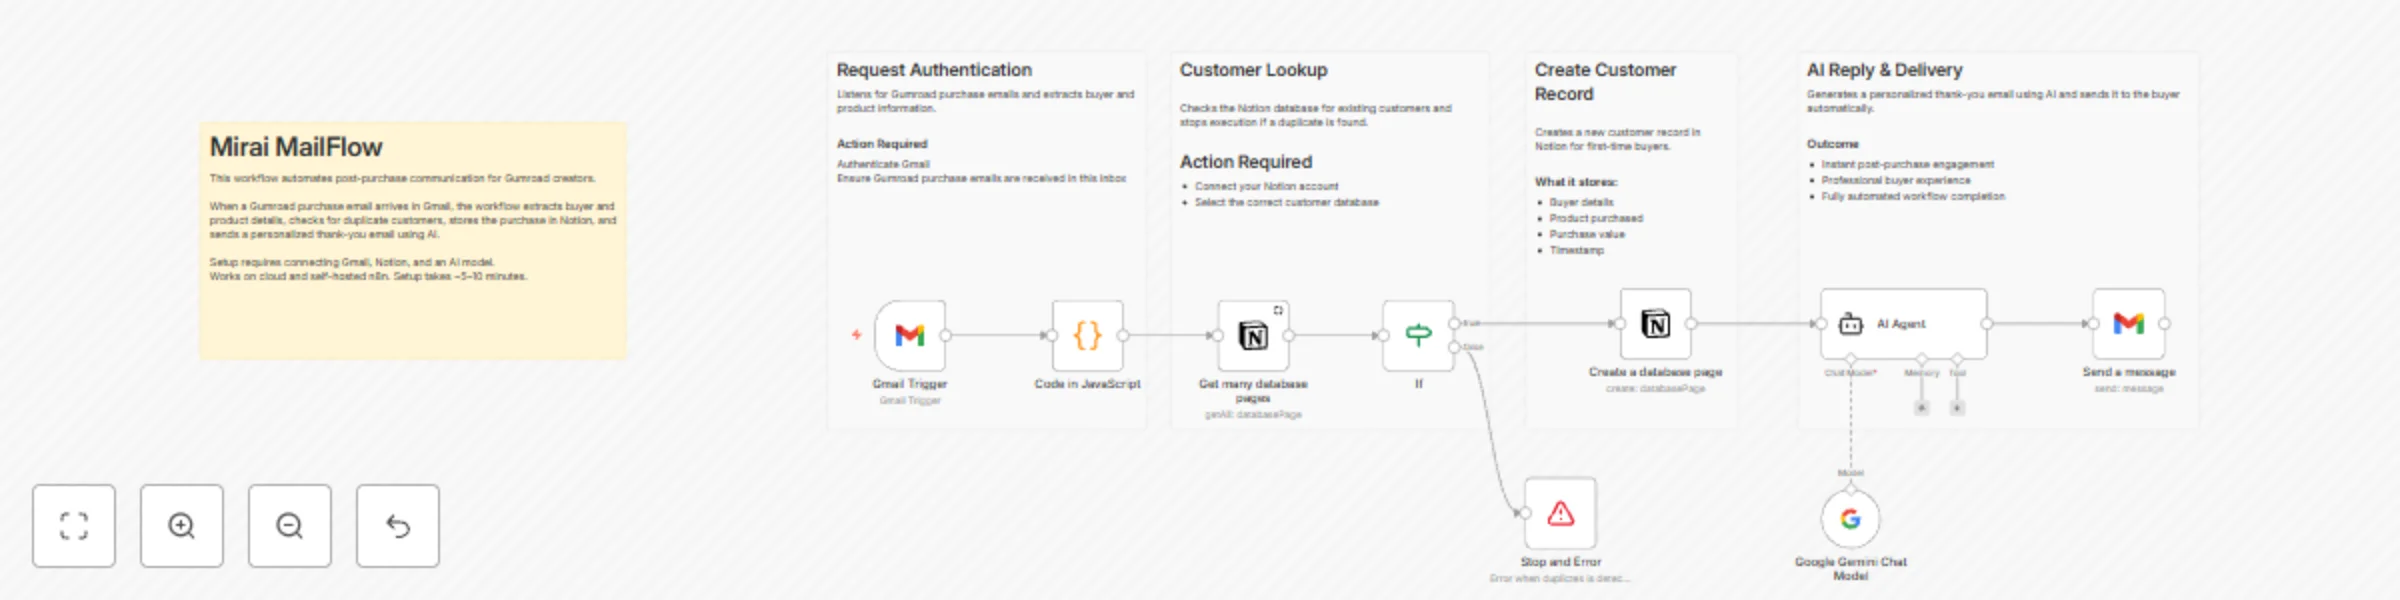
## Mirai MailFlow – Gumroad Personalized Autoreply This n8n template automates post-purchase communication for Gumroad creators by sending AI-powered personalized thank-you emails and logging customer data into Notion. It helps creators engage buyers instantly while keeping a clean customer CRM — fully hands-free. **Use cases** - Automatically send personalized thank-you emails after every Gumroad purchase - Maintain a lightweight customer CRM in Notion - Reduce manual email follow-ups for digital product sales - Improve buyer experience and post-purchase engagement - Build a foundation for creator support, upsells, or onboarding flows **Good to know** This workflow connects to a few external services, so credentials must be configured before running the template. It works on both n8n Cloud and self-hosted instances, and setup typically takes 5 minutes. ### Requirements - n8n Cloud or self-hosted instance - Gmail account (OAuth connected) to receive and send emails - Notion account with a customer database - Google Gemini API key for AI-generated email content ### Customising this workflow - Replace Gmail with Slack, Telegram, or WhatsApp for message delivery - Swap Google Gemini with OpenAI or Claude for different writing styles - Add follow-up emails, upsells, or discount links - Extend the Notion database into a full creator CRM - Use it as a base for Gumroad analytics, support automation, or AI creator tools

Send welcome WhatsApp messages to new HubSpot contacts with Beex templates
## Summary This workflow listens for HubSpot contact creation events via a webhook, standardizes the data, and sends a WhatsApp message using a predefined first contact template from Beex. ## How It Works 1. **Configure Webhook**: The workflow is triggered when HubSpot fires the `On Contact Created` event. 2. **Get Contact**: Retrieves the contact's ID and extracts relevant data from the HubSpot event. 3. **Validate Contact**: Filters contacts to ensure they meet the requirements in this case, having valid (non-null) email and phone numbers. 4. **Set Fields**: Transforms the HubSpot data by selecting only relevant fields, renaming them for clarity, and preparing them for the template. Key tasks include extracting the `phone_number` and `country_code` (removing the "+" symbol) and setting the `associated_values` as required by the template. The exact template name must be specified manually in this node. 5. **Send Template**: Sends a welcome message via WhatsApp using the template configured in Beex. This node requires a `Queue ID`, which is generated based on the template configuration in Beex (see the setup section below for details). ## Setup Instructions 1. **Install Beex Nodes**: Before importing the template, install the Beex trigger and node packages using the following package name: ``` n8n-nodes-beex ``` 2. **Configure HubSpot Credentials**: Set up your HubSpot connection with the following: - Access Token (typically from a private app) - Read permissions for **Contacts** objects - Configured webhook URL (usually from a private application) - *Note: The webhook URL can be found in the initial node. Make sure to distinguish between test mode and production mode.*  3. **Configure Beex Credentials**: For Beex users with platform access (for trial requests, contact [email protected]): - Navigate to **Platform Settings** → **API Key & Callback**. - Copy your API key and paste it into the Beex node (Send Template) in n8n.  4. **Configure Template in Beex**: - On the Beex platform, go to the *Connections* section in the side menu and select *Templates*. - Select an identifier (a number through which the WhatsApp template will be sent to your contacts). - Click to request a new template. - Enter a **Template Name** and **Display Name**. The "Template Name" is what you'll reference in your workflow's Set Fields node. - Complete any additional required fields. - Configure the template message content. Note that associated values are wrapped in `{{1}}`, which corresponds to the configurable parameter set in the Set Fields node.  - Optionally, add buttons to the template. - Once the template request is submitted, wait for approval. After approval, associate the template with a campaign and queue to obtain the **Queue ID** needed for the Send Template node. ## Requirements - **HubSpot**: An account with a private application token and read permissions for **Contacts** objects. - **HubSpot**: A private application with a configured webhook. - **Beex**: An account with permissions to send templates. - **Beex**: A properly configured and approved template with an associated Queue ID. ## Customization Options - **Additional Filtering**: You can add a filter immediately after the webhook that receives the contact creation event to limit the sources from which you obtain new contacts (for example, contacts from a specific HubSpot form). - **Get Contact**: For this workflow, the contact's first name is used in the template. If your template requires additional associated values, you can retrieve more properties from the HubSpot node by adding them to the properties list. - **Contact Filtering**: Add filters to control which contacts should trigger the WhatsApp template based on your business logic. - **Set Fields**: Use this node to further customize and transform the data received from HubSpot. For example, you can standardize phone numbers by region or add custom logic for field mapping. - **Send Template**: The WhatsApp template is fully customizable within Beex. Refer to the template configuration section to ensure all associated values are properly mapped.
Generate personalized deal content recommendations with Zoho CRM, GPT-4o-mini & Gmail
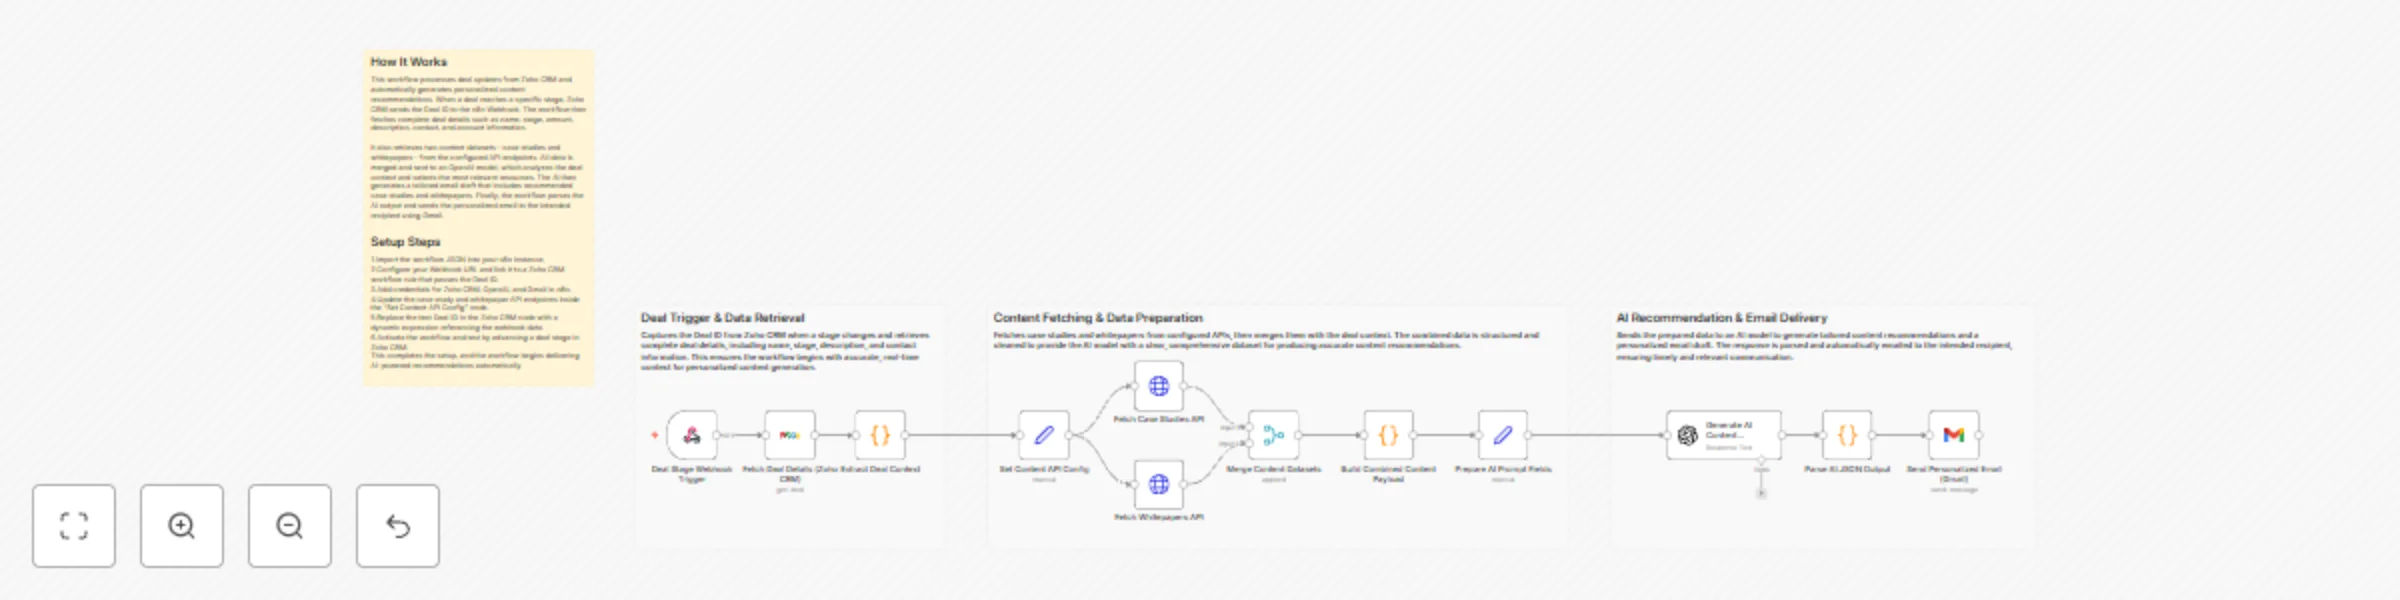
# AI-Powered Deal Content Recommendation and Personalization (Zoho CRM + OpenAI + Gmail + n8n) This workflow automates personalized content recommendations for Zoho CRM deals by analyzing deal details, fetching relevant case studies and whitepapers and generating an AI-crafted email tailored to each prospect. It triggers when Zoho CRM sends a Deal ID to the n8n Webhook, processes contextual data, generates recommendations and emails the results automatically. ### 🚀 Quick Start: “5-Step Instant Setup” 1. Import this workflow into n8n. 2. Connect Zoho CRM workflow rule to the Webhook URL and pass the Deal ID. 3. Add Zoho CRM, OpenAI and Gmail credentials in n8n. 4. Update the API URLs for case studies and whitepapers. 5. Activate the workflow and test by updating a deal stage in Zoho CRM. ## What It Does This workflow enables intelligent content automation by bridging Zoho CRM deal activity with AI-driven contextual recommendations. When a deal advances to a specific stage, Zoho CRM sends its Deal ID to the n8n Webhook. The workflow retrieves the complete deal details — including stage, amount, description, contact and account information — and uses them to determine the prospect’s needs. It then fetches two content datasets (case studies and whitepapers) from configured API endpoints. The combined dataset is structured and passed to an OpenAI model that analyzes the deal’s industry, pain points and stage to select the most relevant content. The AI generates an email draft featuring these recommendations, which is parsed and automatically delivered via Gmail. This eliminates manual research, speeds up sales follow-ups and ensures prospects receive focused and valuable resources at the right time. ## Who’s It For * Sales teams working in Zoho CRM. * Pre-sales and solution consultants. * Marketing teams maintaining content libraries. * CRM admins building smart sales workflows. * Companies selling B2B products or services with long sales cycles. ## Requirements to Use This Workflow - An active **n8n** instance (cloud or self-hosted) - **Zoho CRM OAuth2** credentials - **OpenAI API key** (for GPT-4o-mini or equivalent model) - **Gmail OAuth2** credentials - Two API sources providing: - Case studies - Whitepapers - A Zoho CRM workflow rule capable of sending Deal ID to the Webhook ## How It Works & How To Set Up ### 1. Configure the Webhook Trigger - Copy the Webhook URL from n8n. - In Zoho CRM → Workflow Rules → Create Rule → choose “Deal Stage Updated.” - Set Webhook to send the Deal ID to n8n. ### 2. Fetch Deal Details - The workflow uses the Deal ID received from the Webhook to fetch deal data from Zoho CRM. - Ensure your Zoho CRM credentials are connected in n8n. ### 3. Prepare Content API Configuration - Open the “Set Content API Config” node. - Replace placeholder URLs with your actual API endpoints for case studies and whitepapers. ### 4. Retrieve Content Assets - The workflow queries your APIs and collects both datasets. - This ensures updated, relevant assets are always used. ### 5. Structure All Data - Deal information, case studies and whitepapers are merged into one contextual payload. - This payload is optimized for the AI model. ### 6. Generate AI Recommendations - The OpenAI node analyzes the complete dataset. - It returns recommended case studies, recommended whitepapers and a personalized email draft. ### 7. Parse AI Output - AI responses are parsed from code-block format into clean JSON for downstream usage. ### 8. Send the Email - Gmail node sends the personalized email using the AI-generated content. - Edit the recipient address as needed for production. ## How To Customize Nodes ### Deal Data Extraction Add or remove fields inside the “Extract Deal Context” node based on your CRM schema. ### Content API Sources Update URLs or switch to internal CMS, Airtable or Google Sheets. ### AI Prompt Customization Modify tone, selection logic or output formatting in the OpenAI node prompt. ### Email Delivery Replace Gmail with Outlook, Zoho Mail, SMTP or Slack notifications. ### Filtering Logic Add rule-based filtering before sending data to AI—for example, industry, region or deal size. ## Add-Ons & Enhancements * Add Slack notifications for sales reps. * Store AI recommendations in Zoho CRM Notes. * Log outputs to Google Sheets for analytics. * Add follow-up reminders using n8n Wait nodes. * Add multi-language support. * Expand with product brochures or pricing sheets. ## Use Case Examples 1. **Industry-Specific Nurturing** Automatically send the best content based on a deal’s industry. 2. **ROI-Focused Prospects** Provide ROI-driven case studies when deal description includes keywords like “cost”, “budget” or “ROI.” 3. **Accelerated Qualification** Deliver targeted materials during the qualification stage to increase deal momentum. 4. **Sales Playbook Automation** Map deal stages to recommended content without manual intervention. 5. **Dynamic Content Libraries** Allow marketing teams to update content sources without touching the workflow. ## Troubleshooting Guide | Issue | Possible Cause | Solution | | ----------------------------------- | ---------------------------- | ----------------------------------------------- | | Workflow not triggering | Zoho CRM not calling Webhook | Re-check Webhook URL in Zoho CRM | | Deal data missing | Wrong field sent by Webhook | Ensure Zoho sends the correct Deal ID | | AI returns no JSON | Incorrect prompt format | Ensure prompt instructs AI to respond with JSON | | Email not sent | Gmail credential expired | Reconnect Gmail OAuth | | Case study or whitepaper list empty | API URL incorrect or offline | Verify API endpoints in configuration node | | Merge node missing inputs | One API failed | Check HTTP request nodes | ## Need Help? If you need assistance customizing this workflow, enhancing recommendation logic, integrating additional systems or building similar automation solutions, **WeblineIndia** is here to help. Our expert [n8n workflow automation developers](https://www.weblineindia.com/hire-n8n-developers/) can extend this workflow with scoring models, personalization engines, CRM integrations and advanced AI features.
Capture and nurture AI agency leads with Google Gemini, Outlook and Sheets
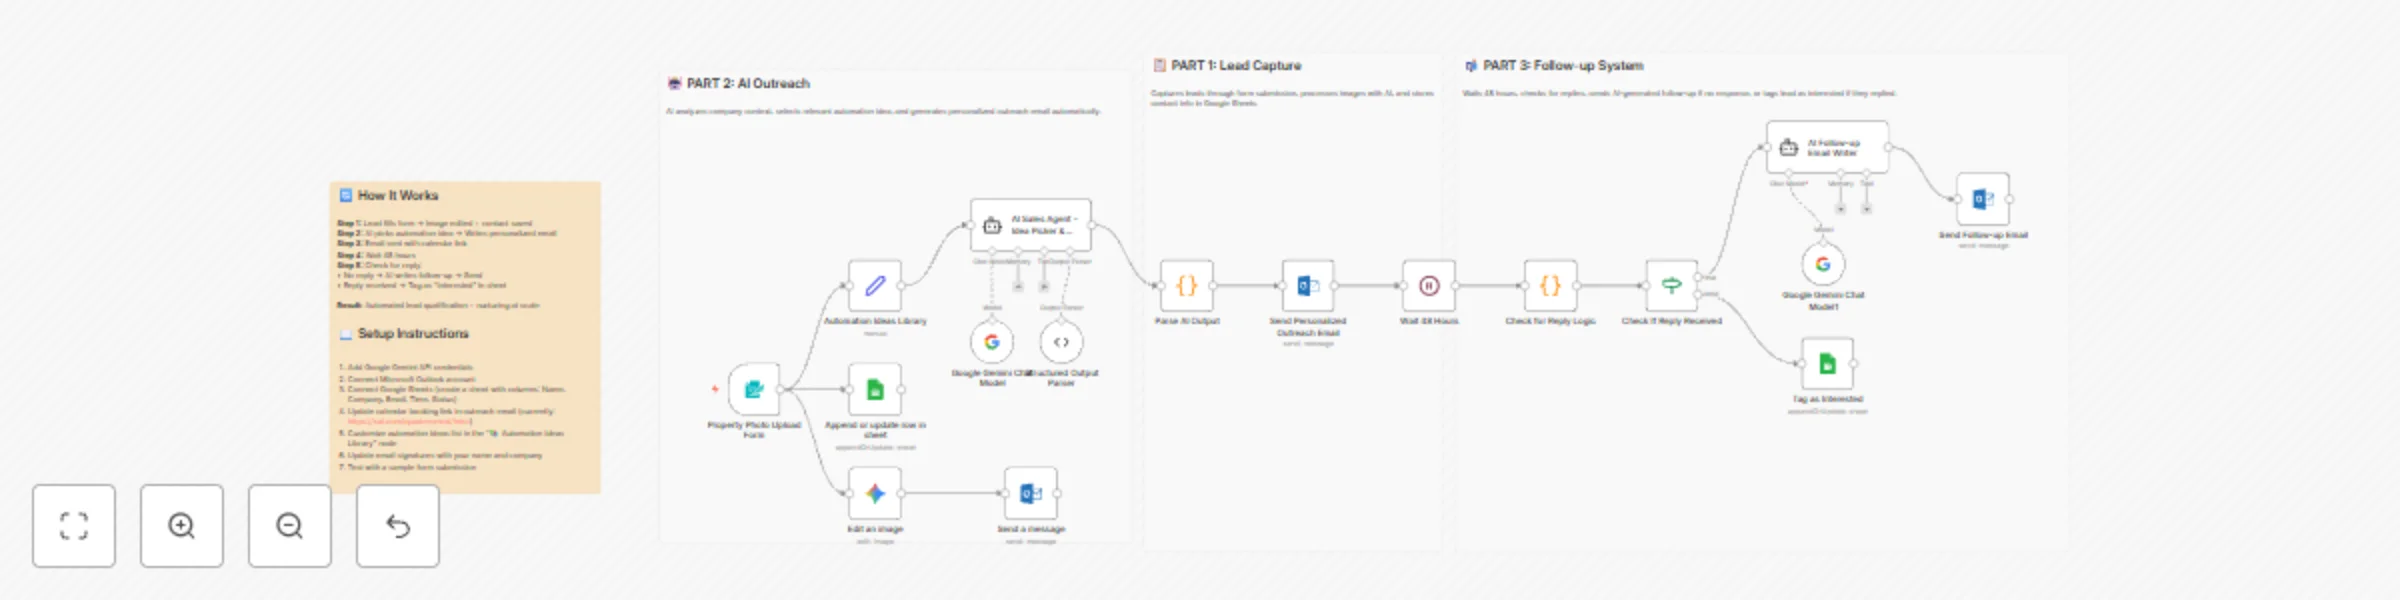
# AI Agent Lead Funnel for AI Agencies ## An End-to-End Automation That Turns Demos Into Booked Calls This n8n workflow is a **full inbound → outbound hybrid funnel** designed for AI agencies. It captures warm leads through instant AI value, then automatically follows up with **personalized, context-aware outreach and reminders** until the lead either replies or books a call. No cold scraping. No manual follow-ups. Just leverage + timing. --- ## 🚀 How the Workflow Works --- ## 📋 PART 1 — Lead Capture & Instant Value ### **1 — Share High-Impact AI Image Edits** You post before/after examples using the **NanoBanna / Gemini image-editing model** on social platforms. Each post includes a link to a lightweight form. The visual results do the selling for you. --- ### **2 — Lead Submits Image & Details** The form collects: - Image upload - Edit instructions - Name - Email - Company name This filters for **high-intent prospects only**. --- ### **3 — AI Edits the Image Instantly** Once submitted, the workflow: - Sends the image + instructions to the AI image editor - Preserves lighting and camera angle unless specified - Generates a polished result in seconds --- ### **4 — Result Delivered via Email** The edited image is emailed directly to the user with: - A friendly confirmation message - Soft positioning for future work This establishes trust before any sales motion happens. --- ### **5 — Lead Is Logged Automatically** All lead data is saved to Google Sheets: - Name - Company - Email - Timestamp This becomes your **live CRM of warm inbound leads**. --- ## 🤖 PART 2 — AI-Driven Personalized Outreach ### **6 — AI Analyzes the Lead** An AI sales agent: - Looks at the company name + context - Reviews a library of proven automation ideas - Either selects the best fit **or creates a simple custom one** --- ### **7 — AI Writes a Personalized Outreach Email** The agent generates a short email that: - Mentions a **specific automation already built** - States you can help implement it quickly - Invites them to book a call via your calendar No marketing fluff. No generic pitches. Every email feels hand-written. --- ### **8 — Outreach Email Is Sent Automatically** The email is sent from your inbox (Outlook, Gmail, SMTP, etc.) and includes: - Their name - Their company - A clear calendar booking link --- ## 📬 PART 3 — Smart Follow-Up System ### **9 — Wait 48 Hours** The workflow pauses to give the lead time to respond naturally. --- ### **10 — Check for a Reply** After 48 hours: - If the lead replied → they are tagged as **Interested** - If no reply → continue to follow-up (Current reply detection is placeholder logic and can be swapped for a live inbox listener.) --- ### **11 — AI Writes a Polite Follow-Up** If there’s no response, an AI agent writes: - A short, non-pushy follow-up - Referencing the original automation idea - Under 60 words --- ### **12 — Follow-Up Email Is Sent** The follow-up goes out automatically and keeps the conversation alive without manual effort. --- ## 📈 Why This Workflow Converts So Well ### **Instant Value First** Leads experience AI results before being pitched anything. ### **Context-Aware Outreach** Every email is personalized based on the lead, not a template. ### **Built-In Persistence** The system follows up automatically — no leads fall through the cracks. ### **Fully Automated** Once live, this workflow handles: - Lead capture - AI delivery - Outreach - Follow-ups - CRM updates You just keep posting content. --- ## 🔧 Setup Requirements To deploy this workflow, connect: - **Google Gemini API** (image editing + agents) - **Email provider** - Outlook - Gmail - SMTP - **Google Sheets** - Columns: Name, Company, Email, Time, Status - **Calendar booking link** - Example: `https://cal.com/your-link` All credentials are modular and easily swappable. --- ## 🎯 Summary This n8n automation turns attention into action by: 1. Delivering immediate AI value 2. Following up with relevant, personalized ideas 3. Nudging leads toward a booked call — automatically It’s not just a lead funnel. It’s an **AI sales assistant that runs 24/7**.
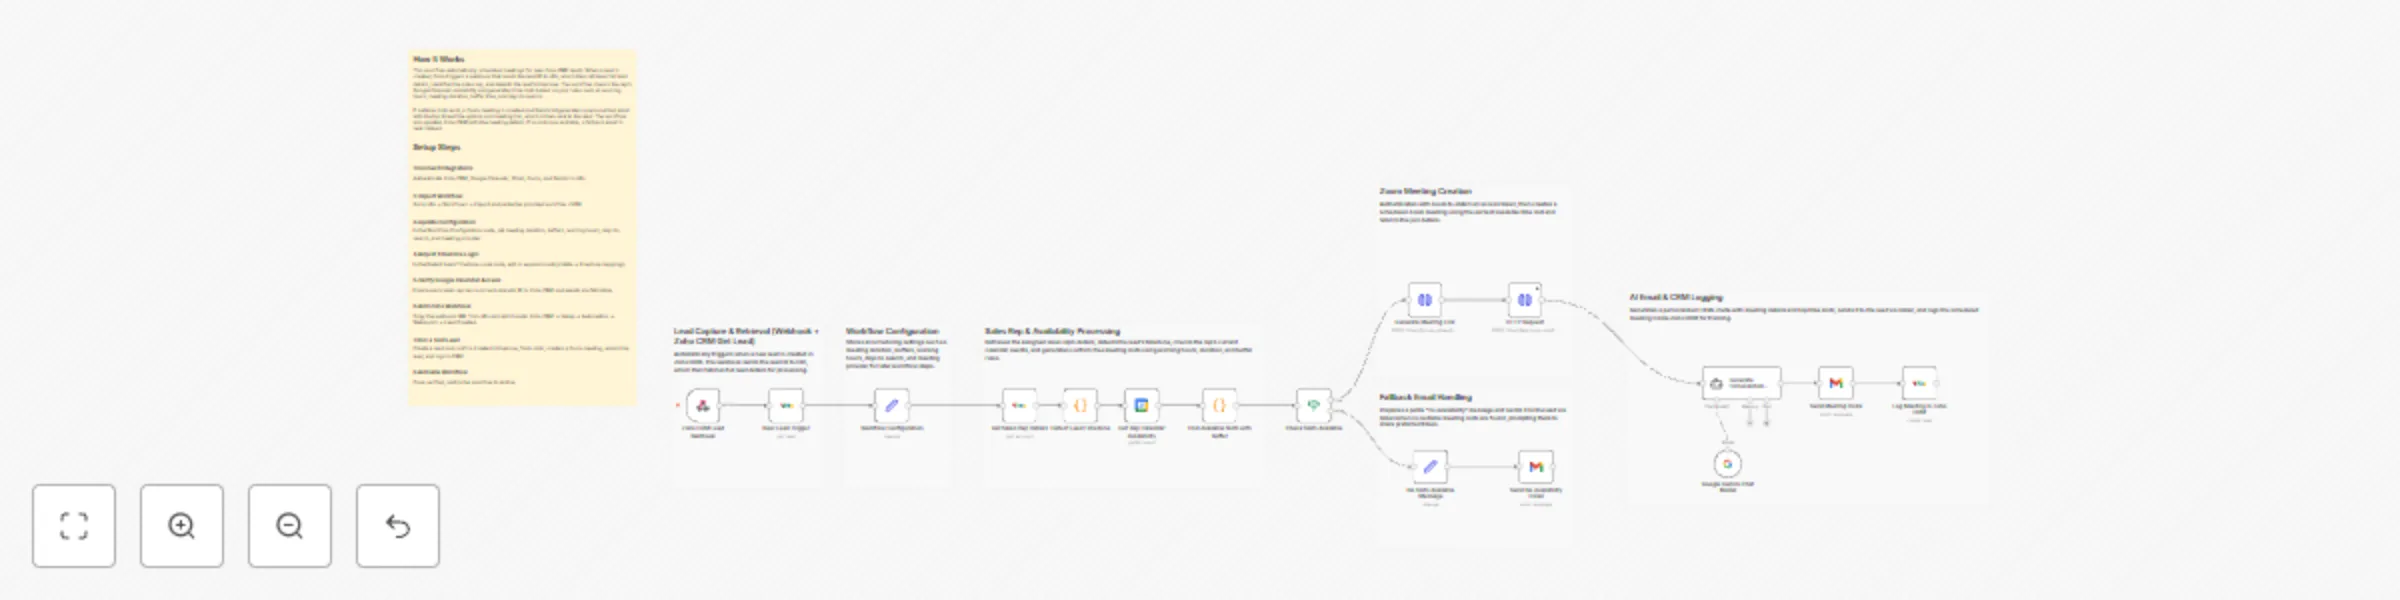
Automate lead meeting scheduling with Zoho CRM, Google Calendar & Gemini AI
# Zoho CRM - Smart Meeting Scheduler This workflow automatically schedules meetings for new Zoho CRM leads by detecting their timezone, checking the sales rep’s Google Calendar, generating conflict-free time slots, creating a Zoom meeting and sending a personalized AI-generated email to the lead. If no slots are available, it sends a fallback message to the lead without updating Zoho CRM. When a meeting is created, all details are logged inside Zoho CRM for visibility. ### ⚡ Quick Implementation Steps (Fast Start Guide) - Import the workflow JSON into n8n. - Configure Zoho CRM, Google Calendar, Gmail, Zoom OAuth and Gemini AI credentials. - Update meeting duration, working hours, buffer time and search window. - Set email recipient to the lead’s email instead of test/static values. - Add the webhook URL to Zoho CRM → Automation → Webhooks. - Test with a new lead and activate the workflow. ## 📘 What It Does This workflow automates scheduling for new Zoho CRM leads. As soon as a lead is created, it retrieves full lead and owner details, detects the lead’s timezone and checks the assigned sales rep’s upcoming Google Calendar events. This helps identify when the rep is available. Using your settings—working hours, meeting duration, buffer before/after and days to evaluate—the system generates valid meeting time slots with no conflicts. If suitable slots exist, it authenticates with Zoom and creates a meeting for the earliest option, then generates a polished HTML invitation using Gemini AI and emails it to the lead. This ensures a fast, smart and personalized lead engagement process. If no slots exist, the workflow sends a fallback email informing the lead that no availability is open in the next few days. In this branch, Zoho CRM is not updated, because no meeting was scheduled. ## 🎯 Who’s It For This workflow is perfect for: - Sales teams managing high inbound volume - CRM managers automating lead qualification & engagement - SaaS companies scheduling demos automatically - Agencies booking consultation calls - Any team struggling with timezone-based scheduling manually ## 🔧 Requirements to Use This Workflow ### Platform Requirements - n8n (Cloud or self-hosted) ### Required Integrations - Zoho CRM OAuth2 - Google Calendar OAuth2 - Gmail OAuth2 - Zoom OAuth (account-level) - Gemini AI / Google PaLM API ### Required Lead Fields - Email (mandatory for sending the invite) - Country / State (for timezone detection) - Lead Owner (to fetch rep details) ## 🔄 How It Works 1. Zoho CRM Webhook triggers when a new lead is created. 2. Workflow fetches full lead and owner details. 3. Detects the lead’s timezone using country/state mapping. 4. Fetches the sales rep’s availability from Google Calendar. 5. Generates valid time slots based on working hours, buffers and meeting duration. ### If slots exist: - Authenticate with Zoom - Create a Zoom meeting - Generate personalized HTML invite using Gemini AI - Send email to the lead - Log meeting details in Zoho CRM ### If no slots exist: - Generate fallback message - Send fallback email to the lead - *(Zoho CRM is NOT updated in this path)* ## 🛠️ Setup Steps (Configuration Guide) ### 1. Import Workflow Go to: **n8n → Workflows → Import** and upload the JSON file. ### 2. Add Required Credentials Configure the following inside n8n: - Zoho CRM OAuth - Google Calendar OAuth - Gmail OAuth - Zoom OAuth - Gemini AI API key ### 3. Update Workflow Configuration Node Set: - Meeting duration - Buffer before/after - Working hours - Days to look ahead - Default meeting provider (Zoom) ### 4. Fix Email Recipient In **Send Meeting Invite** node, set: sendTo = {{$('Detect Lead Timezone').item.json.Email}} yaml Copy code ### 5. Update Google Calendar Email/ID Ensure the calendar ID matches the sales rep’s Google Calendar. ### 6. Add Webhook in Zoho CRM Navigate to: **Setup → Automation → Webhooks → Create Webhook → Lead Created** Paste the webhook URL from n8n. ### 7. Test the Automation Verify: - Correct timezone detection - Calendar availability check - Zoom meeting creation - AI email sent to the lead - Zoho CRM updated **only when meeting is created** ### 8. Activate Workflow Enable the workflow for live operation. ## 🧩 How To Customize Nodes ### 1. Adjust Meeting Logic Modify the Workflow Configuration node to change: - Slot duration - Buffer time - Working hour ranges - Days to consider ### 2. Expand Timezone Detection Edit the **Detect Lead Timezone** node to add new countries/states. ### 3. Personalize Email Content Update the prompt inside the **Generate Personalized Invite** node. ### 4. Add New Regions Duplicate timezone logic for new regions (Australia, Middle East, etc.) ### 5. Replace Zoom Swap Zoom with Google Meet, Microsoft Teams or Zoho Meeting. ## ➕ Add-Ons (Optional Enhancements) - Auto-book calendar events when lead confirms a slot - WhatsApp notifications via Twilio or Gupshup - Slack/Email internal alerts for reps - Follow-up reminder emails - Log lead activity to Google Sheets - Attach downloadable ICS calendar file ## 💼 Use Case Examples - SaaS demo scheduling - Consultation & discovery calls - Global timezone-based sales teams - Onboarding/support calls - Event follow-up scheduling (And many more…) ## 🩻 Troubleshooting Guide | Issue | Possible Cause | Solution | |-------|----------------|----------| | Lead not receiving email | Gmail OAuth expired / wrong email field | Reconnect Gmail OAuth & fix sendTo value | | Wrong time slots | Incorrect timezone detection | Update mapping in Detect Lead Timezone | | Zoom meeting not created | Invalid/expired Zoom OAuth | Reconnect Zoom credentials | | CRM not updated after fallback email | Expected behavior | No CRM update when slots don’t exist | | Workflow not triggering | Missing Zoho webhook | Re-add webhook | | Empty AI email | Gemini key incorrect | Reconfigure Gemini credentials | ## 🤝 Need Help? If you want assistance setting up, customizing or extending this workflow, the [n8n automation team](/hire-n8n-developers/) at **WeblineIndia** is here to help. We specialize in: - Advanced automation workflows - Multi-timezone scheduling systems - CRM-integrated AI communication - Custom Zoho + n8n development - End-to-end automation architecture 👉 **Contact WeblineIndia for expert workflow development and enhancements.**

Automate personalized lead responses with website scraping, GPT-4o, and Airtable CRM
This n8n template automatically processes inbound form leads, researches their company via their website, and uses AI to write and send a highly personalized "speed to lead" email instantly. It also tracks subsequent appointment bookings to keep your CRM up to date. Use cases are focused on high velocity sales: Perfect for agency owners, founders, and sales teams who need to respond to new leads in seconds while maintaining a high quality, personal touch. ## Good to know At the time of writing, this template is optimized for GPT-4o to ensure the highest quality personalization. This template was originally designed using a Lovable form, but it works with any form builder (Typeform, Webflow, WordPress) that can send data via a webhook. ## How it works * The workflow starts when a new lead submits your contact form via the Webhook node. * It immediately checks your Airtable CRM to ensure the lead is new and not a duplicate. * The system scrapes the provided website URL and uses custom code to clean the HTML data. * AI analyzes the cleaned website data to generate a concise summary of the business. * A second AI step uses this summary and the lead's goals to draft and send a personalized email via Gmail. * The lead data and website summary are logged into your Airtable base. * A parallel flow monitors your inbox for booking confirmations and updates the CRM automatically. ## How to use * Create the necessary Base and Table in Airtable to store your leads. * Connect your website form to the Webhook URL in the workflow. * Update the OpenAI node prompts with your specific email signature and phone number. * Run a test submission to ensure the website scraper is capturing data correctly. ## Requirements * Airtable account * OpenAI account (GPT-4o model recommended) * Gmail account ## Customising this workflow You can easily adapt this for different communication channels. Try swapping the Gmail node for a Slack notification to alert your team of high value leads, or connect it to HubSpot instead of Airtable for enterprise CRM management.
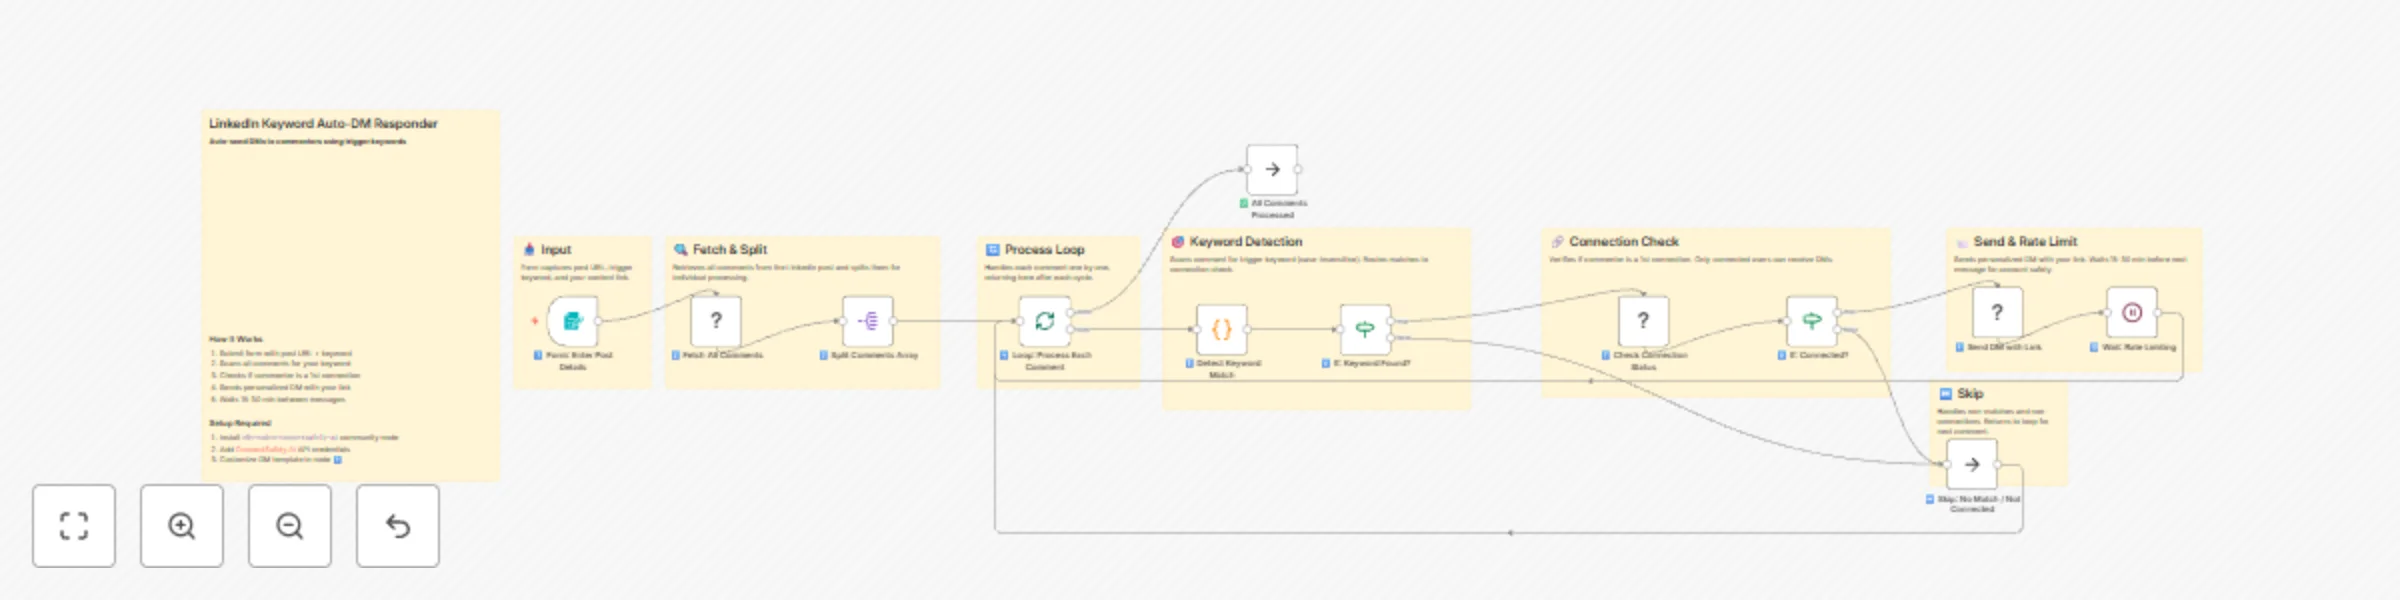
Auto-send DMs to LinkedIn keyword commenters with ConnectSafely.AI
# Auto-Send DMs to LinkedIn Commenters Who Type a Specific Keyword using ConnectSafely.AI API ## Who's it for This workflow is built for content creators, coaches, course sellers, and marketers who use the "comment X to get the link" engagement strategy on LinkedIn. Perfect for anyone who wants to deliver lead magnets, code samples, templates, or resources automatically without spending hours manually DMing every commenter. If you're tired of the manual grind—reading comments, checking connections, copy-pasting messages—this automation handles the entire fulfillment process while you focus on creating more content. Works especially well for viral posts where comment volume makes manual responses impossible. ## How it works The workflow monitors your LinkedIn post for specific keyword triggers and automatically sends personalized DMs to commenters who request your content. **The process flow:** 1. You submit your post URL, trigger keyword, and resource link via a simple form 2. Fetches all comments from the specified LinkedIn post via ConnectSafely.ai API 3. Loops through each comment individually for processing 4. Detects if the comment contains your trigger keyword (case-insensitive) 5. Checks if the commenter is a 1st-degree connection (required for DMs) 6. Sends a personalized direct message with their name and your resource link 7. Applies random rate limiting (15-30 minutes) between messages for account safety 8. Continues until all matching comments are processed The rate limiting and connection checks are built-in to protect your LinkedIn account from automation detection. --- ## Setup steps ### Step 1: Get Your ConnectSafely.ai API Key #### Obtain API Key 1. Sign up at [ConnectSafely.ai](https://connectsafely.ai) 2. Log into your dashboard 3. Navigate to **Settings** → **API Keys** 4. Generate a new API key and copy it #### Add Credential in n8n 1. Go to **Credentials** in n8n 2. Click **Add Credential** → Search for **ConnectSafely API** 3. Paste your API key 4. Save the credential This credential is used by all ConnectSafely nodes in the workflow. ### Step 2: Connect Your LinkedIn Account 1. In your ConnectSafely.ai dashboard, click **Connect LinkedIn** 2. Follow the authorization flow 3. Ensure your account shows as "Connected" with a green status 4. Your LinkedIn is now accessible via the API ### Step 3: Import and Configure the Workflow 1. Download the workflow JSON file 2. In n8n, go to **Workflows** → **Import from File** 3. Select the downloaded JSON 4. Open each ConnectSafely node and select your credential from the dropdown ### Step 4: Test the Workflow 1. Click the **Test Workflow** button in n8n 2. Copy the form URL that appears in the Form Trigger node 3. Open the URL in a new browser tab 4. Fill in the form: - **LinkedIn Post URL**: Full URL of your post with comments - **Trigger Keyword**: The word commenters type (e.g., "code", "link", "example") - **Content Link**: The URL you want to send them - **Your Name**: For the message signature 5. Submit and watch the execution **Pro Tip**: Test with your own post first where you've left a test comment containing the keyword. ### Step 5: Activate for Production 1. Review the test execution to ensure messages sent correctly 2. Toggle the workflow to **Active** 3. Use the form URL whenever you post new "comment for link" content 4. The workflow processes comments and sends DMs automatically --- ## Customization ### Message Template Edit the **Send DM with Link** node to customize your message: ``` Hey {{name}}! 👋 Thanks for your comment on my post! As promised, here's the link you requested: 👉 {{link}} If you have any questions or want more resources like this, just let me know! Best, {{your_name}} ``` **Variables available:** - `{{ $('Loop: Process Each Comment').item.json.authorName }}` - Commenter's name - `{{ $('Form: Enter Post Details').item.json['Content Link to Send'] }}` - Your resource link - `{{ $('Form: Enter Post Details').item.json['Your Name (for signature)'] }}` - Your name ### Multiple Keywords Edit the **Detect Keyword Match** code node to check for multiple trigger words: ```javascript // Multiple keyword detection const keywords = ['code', 'example', 'template', 'link', 'send']; const commentLower = commentText.toLowerCase(); const isMatch = keywords.some(keyword => commentLower.includes(keyword.toLowerCase()) ); return [{ json: { isKeywordMatch: isMatch, commentText } }]; ``` ### Rate Limiting Adjustment Edit the **Wait: Rate Limiting** node to change delays: | Risk Level | Wait Time | Formula | |------------|-----------|---------| | 🟢 Safest | 30-60 min | `Math.floor(Math.random() * (3600 - 1800 + 1)) + 1800` | | 🟡 Moderate (Default) | 15-30 min | `Math.floor(Math.random() * (1800 - 900 + 1)) + 900` | | 🔴 Faster (Risky) | 5-15 min | `Math.floor(Math.random() * (900 - 300 + 1)) + 300` | **Warning**: Shorter delays increase the risk of LinkedIn flagging your account. ### Add Connection Requests (Optional) To also send connection requests to non-connected commenters: 1. Add a **ConnectSafely LinkedIn** node after the "If: Connected?" FALSE path 2. Set operation to `sendConnectionRequest` 3. Map the `publicIdentifier` from the loop 4. Add a personalized connection message --- ## Use Cases - **Lead Magnet Distribution**: Automatically deliver PDFs, guides, or checklists to everyone who comments - **Code Sample Sharing**: Share GitHub repos, code snippets, or template files to developers who request them - **Course Previews**: Send free lesson links or course previews to interested commenters - **Template Giveaways**: Distribute Notion templates, spreadsheets, or design files - **Webinar Registrations**: Send signup links to commenters interested in your events - **Community Building**: Deliver exclusive Discord/Slack invite links to engaged followers - **Podcast Promotion**: Share episode links or show notes with interested listeners - **Newsletter Growth**: Send subscription links with a teaser of your best content --- ## Troubleshooting ### Common Issues & Solutions **Issue**: No comments returned from post - **Solution**: Verify the post URL is correct and complete (should include the full linkedin.com/posts/... URL) - **Solution**: Ensure the post is public or you're the post author - **Solution**: Check that the post actually has comments **Issue**: "Cannot send message" errors - **Solution**: You can only DM 1st-degree connections on LinkedIn; non-connections are automatically skipped - **Solution**: The commenter may have messaging disabled in their settings **Issue**: Messages not being sent - **Solution**: Verify your ConnectSafely.ai credentials are valid and connected - **Solution**: Check that your LinkedIn account is properly connected in ConnectSafely dashboard - **Solution**: Review the execution log for specific error messages **Issue**: Keyword not matching comments - **Solution**: Keywords are case-insensitive, but check spelling - **Solution**: Ensure the keyword appears exactly in the comment (partial matches work) - **Solution**: Test with a simple, unique keyword first **Issue**: Workflow seems slow - **Solution**: This is intentional! The 15-30 minute delays between messages protect your account - **Solution**: Large batches (50+ comments) will take several hours to complete safely **Issue**: LinkedIn account warnings - **Solution**: Stop the workflow immediately - **Solution**: Wait 24-48 hours before resuming - **Solution**: Increase rate limiting delays when you restart - **Solution**: Reduce daily volume **Issue**: Duplicate messages sent - **Solution**: Don't run the workflow multiple times on the same post - **Solution**: Consider adding a Google Sheets node to track processed commenters --- ## Safety Best Practices ### LinkedIn Account Protection | Do ✅ | Don't ❌ | |-------|---------| | Use random delays (built-in) | Send messages without delays | | Process 20-30 comments per batch | Process 100+ comments at once | | Run during business hours | Run 24/7 continuously | | Stop if you see warnings | Ignore LinkedIn restrictions | | Keep messages helpful | Send salesy/spammy content | | Respond to genuine requests | Use for cold outreach | ### Daily Limits (Approximate) | Account Type | Recommended Max DMs/Day | |--------------|------------------------| | Free Account | 30-50 | | Premium | 50-80 | | Sales Navigator | 80-100 | *These are conservative estimates. LinkedIn doesn't publish exact limits.* --- ## Documentation & Resources ### Official Documentation - **ConnectSafely.ai Docs**: [https://connectsafely.ai/docs](https://connectsafely.ai/docs) - **API Reference**: Available in ConnectSafely.ai dashboard - **n8n Form Trigger**: [https://docs.n8n.io/integrations/builtin/core-nodes/n8n-nodes-base.formtrigger/](https://docs.n8n.io/integrations/builtin/core-nodes/n8n-nodes-base.formtrigger/) - **n8n Code Node**: [https://docs.n8n.io/integrations/builtin/core-nodes/n8n-nodes-base.code/](https://docs.n8n.io/integrations/builtin/core-nodes/n8n-nodes-base.code/) ### Support Channels - **Email Support**: [[email protected]](mailto:[email protected]) - **Documentation**: [https://connectsafely.ai/docs](https://connectsafely.ai/docs) - **Custom Workflows**: [Contact us for custom automation](https://connectsafely.ai/contact) --- ## Connect With Us Stay updated with the latest automation tips, LinkedIn strategies, and platform updates: - **LinkedIn**: [linkedin.com/company/connectsafelyai](https://www.linkedin.com/company/connectsafelyai) - **YouTube**: [youtube.com/@ConnectSafelyAI-v2x](https://www.youtube.com/@ConnectSafelyAI-v2x) - **Instagram**: [instagram.com/connectsafely.ai](https://www.instagram.com/connectsafely.ai/) - **Facebook**: [facebook.com/connectsafelyai](https://www.facebook.com/profile.php?id=61582550884724) - **X (Twitter)**: [x.com/AiConnectsafely](https://x.com/AiConnectsafely) - **Bluesky**: [connectsafelyai.bsky.social](https://bsky.app/profile/connectsafelyai.bsky.social) - **Mastodon**: [mastodon.social/@connectsafely](https://mastodon.social/@connectsafely) --- ## Need Custom Workflows? Looking to build sophisticated LinkedIn automation workflows tailored to your business needs? **[Contact our team](https://connectsafely.ai/contact)** for custom automation development, strategy consulting, and enterprise solutions. We specialize in: - Multi-channel engagement workflows - AI-powered personalization at scale - Lead scoring and qualification automation - CRM integration and data synchronization - Custom reporting and analytics pipelines
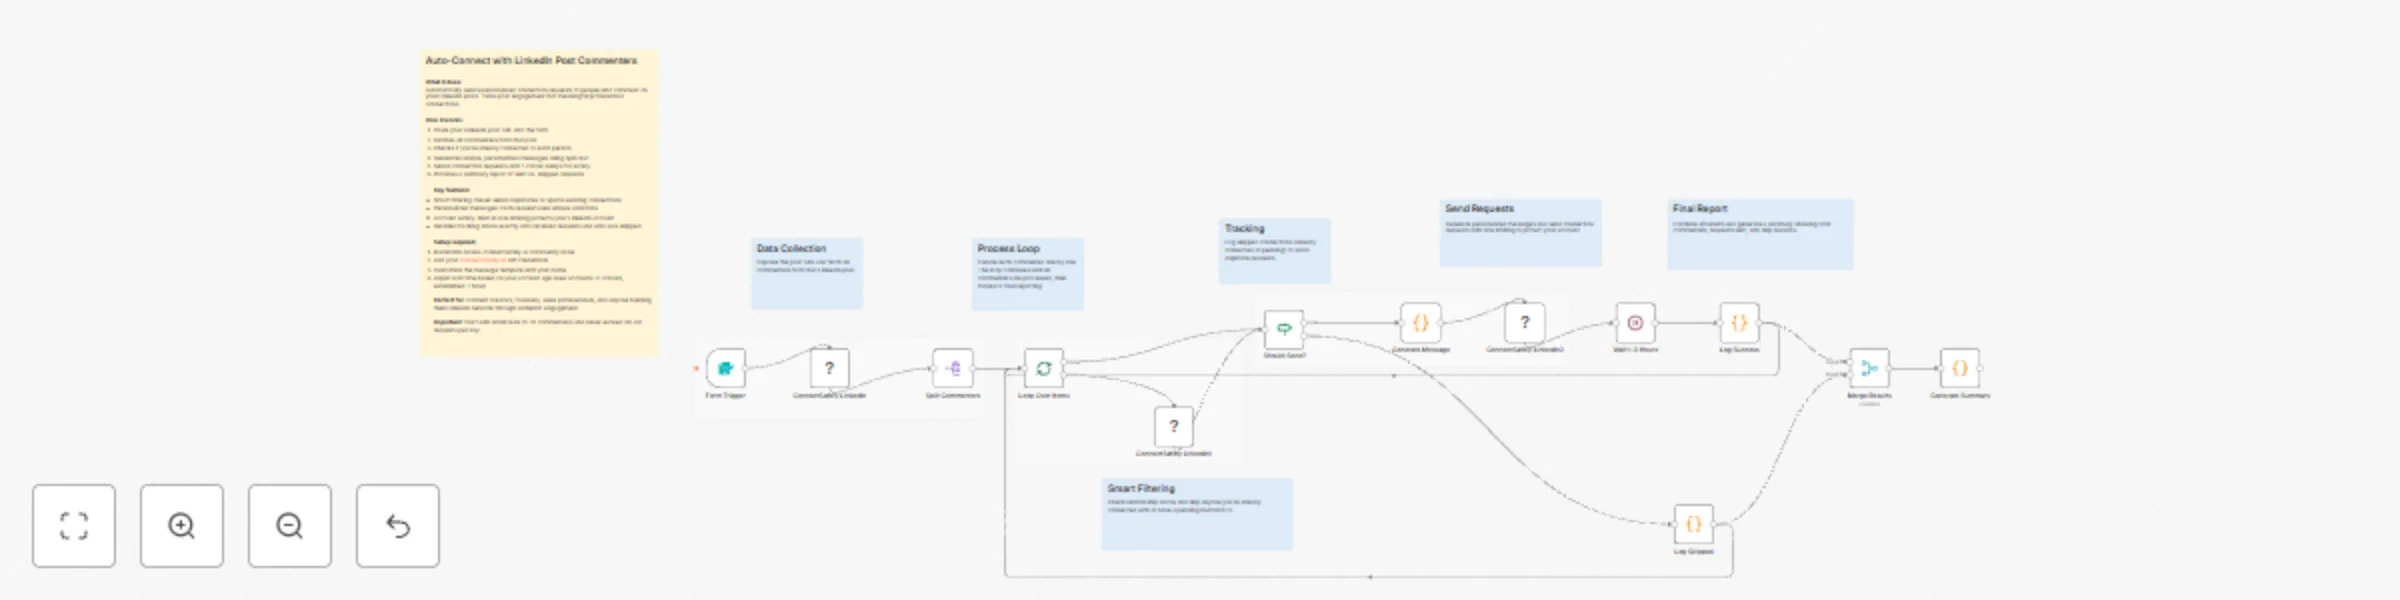
Send personalized connection requests to LinkedIn post commenters with ConnectSafely.ai
# Send Connection Requests to LinkedIn Post Commenters - Automated Outreach with Personalized Messages using ConnectSafely.AI ## Who's it for This workflow is built for content creators, founders, sales professionals, and LinkedIn thought leaders who want to convert post engagement into real connections. Perfect for anyone who creates content that attracts comments but doesn't have time to manually connect with every person who engages. If you're publishing LinkedIn content regularly and want to build your network with warm leads (people already interested in what you're saying), this automation handles the tedious work of sending personalized connection requests while you focus on creating more content. ## How it works The workflow automates the entire connection request process by combining intelligent filtering with personalized messaging through ConnectSafely.ai's API. **The process flow:** 1. Displays a web form where you paste your LinkedIn post URL 2. Fetches all comments from the specified post via ConnectSafely.ai API 3. Splits commenters into individual items for sequential processing 4. Loops through each commenter one at a time 5. Checks relationship status (already connected? pending request?) 6. Filters out existing connections and pending invitations 7. Generates unique personalized messages using spin text variations 8. Sends connection request with the personalized message 9. Waits 1-2 hours between requests for rate limiting 10. Loops back to process the next commenter until complete The smart filtering ensures you never send duplicate requests or spam existing connections. --- ## Setup steps ### Step 1: Install ConnectSafely.ai Community Node #### Install the Package 1. Go to **Settings** → **Community Nodes** in your n8n instance 2. Search for `n8n-nodes-connectsafely.ai` 3. Click **Install** 4. **IMPORTANT**: Restart n8n completely after installation **Alternative (Command Line):** ```bash npm install n8n-nodes-connectsafely.ai ``` **Documentation:** [https://connectsafely.ai/n8n-docs](https://connectsafely.ai/n8n-docs) ### Step 2: Configure ConnectSafely.ai API Credentials #### Obtain API Key 1. Log into [ConnectSafely.ai Dashboard](https://connectsafely.ai/dashboard) 2. Navigate to **Settings** → **API Keys** 3. Generate a new API key 4. Copy your **Account ID** from the Accounts section #### Add Credentials in n8n 1. Go to **Credentials** in n8n 2. Click **Add Credential** → **ConnectSafely API** 3. Paste your API key 4. Save the credential This credential is used by all ConnectSafely nodes in the workflow. ### Step 3: Configure the Form Trigger The workflow uses a Form Trigger to capture your LinkedIn post URL: | Field | Configuration | |-------|---------------| | Form Title | 🔗 LinkedIn Post Engagement Automation | | Form Description | Enter your LinkedIn post URL below to automatically send personalized connection requests | | Field Label | LinkedIn Post URL | | Placeholder | https://www.linkedin.com/posts/your-post-url... | | Required | Yes | **To get your form URL:** 1. Click **Test Workflow** button 2. Copy the webhook URL that appears 3. Open this URL in your browser to access the form ### Step 4: Customize Your Connection Message Edit the spin text template in the **Generate Personalized Message** code node: ```javascript const template = `{Thanks for|Really appreciate|Awesome to see|Loved seeing|Grateful for} {you|you taking a moment to|you recently} {liking|engaging with|reacting to|showing interest in|checking out} {my|our|the} {post|recent post|latest content piece|content|update} on {this topic|that topic|the subject}. {Would love to|Happy to|Let's definitely|Open to|Excited to} connect {and|so we can|to} {exchange ideas|share insights|continue the conversation|explore potential collaborations|stay connected professionally}. {Always enjoy connecting with|Always excited to meet|Love meeting|Great connecting with} {like-minded people|professionals in the space|people exploring similar topics|others in this domain}. {Cheers|Best regards|Thanks again|Looking forward|Talk soon|Warm regards}, YourName `; ``` **Spin Text Syntax:** - Use `{option1|option2|option3}` for random variations - Each request gets a unique combination - Keep total message under 300 characters (LinkedIn limit) ### Step 5: Configure Rate Limiting The **Wait (Rate Limiting)** node controls the delay between connection requests: | Setting | Recommended Value | Description | |---------|-------------------|-------------| | Wait Time | 1-2 hours | Time between each connection request | | Unit | Hours | Keeps your account safe from spam detection | **Pro Tip**: Start with 2-hour delays for new accounts, reduce to 1 hour once your account is warmed up. ### Step 6: Test the Workflow 1. Click **Test Workflow** to get the form URL 2. Open the form URL in your browser 3. Paste a LinkedIn post URL with comments 4. Submit the form 5. Verify each step: - Comments are fetched correctly - Relationship check returns status - Messages generate with variations - Connection request sends successfully **First Run Tips:** - Start with a post that has 5-10 comments - Test during off-hours - Monitor closely for any errors --- ## Customization ### Message Personalization The workflow automatically includes the commenter's name in the greeting: ```javascript customMessage: "Hi {{ $('🔄 Loop Over Items').item.json.authorName }},\n\n{{ $json.generatedMessage }}" ``` Add more personalization by referencing the comment text: ```javascript // Access the actual comment they left const theirComment = $('🔄 Loop Over Items').item.json.commentText; ``` ### Filter Logic Edit the **Should Send Request?** IF node conditions: **Current Logic (Both must be TRUE):** - `connected` = false (not already connected) - `invitationSent` = false (no pending request) **Additional Filters You Can Add:** - Filter by connection degree (2nd vs 3rd degree) - Filter by profile completeness - Filter by follower count ```javascript // Example: Only connect with 2nd degree connections $json.connectionDegree === "DISTANCE_2" ``` ### Rate Limiting Adjustments | Account Status | Recommended Delay | Daily Limit | |----------------|-------------------|-------------| | New Account | 2 hours | 10-12 requests | | Warmed Up (1-2 weeks) | 1 hour | 20-24 requests | | Established (1+ month) | 45 minutes | 30-35 requests | --- ## Use Cases - **Content Creator Growth**: Convert every engaged follower into a connection automatically - **Thought Leadership**: Build relationships with people who resonate with your ideas - **Sales Prospecting**: Connect with warm leads who already showed interest in your content - **Community Building**: Expand your network with like-minded professionals - **Event Promotion**: Connect with commenters before launching webinars or courses - **Recruiting**: Reach candidates who engage with your company culture posts --- ## Troubleshooting ### Common Issues & Solutions **Issue**: ConnectSafely node not appearing after install - **Solution**: Completely restart n8n (not just refresh). Kill the process and start again. **Issue**: "Invalid Profile ID" error - **Solution**: The workflow uses `publicIdentifier` (username), not the full URL. Verify the mapping is correct. **Issue**: Connection request fails with "already connected" - **Solution**: The relationship check should filter these out. Verify the IF node conditions are set correctly. **Issue**: Messages appear identical - **Solution**: Check that the spin text syntax uses `{option1|option2}` format with the pipe character, not commas. **Issue**: Workflow stops after first person - **Solution**: Ensure the Wait node connects back to the Loop node, and the Loop node has `Reset: FALSE` configured. **Issue**: Form URL not appearing - **Solution**: You must click "Test Workflow" first to generate the webhook URL. **Issue**: Rate limiting warnings from LinkedIn - **Solution**: Increase the wait time between requests. Start with 2-hour delays and ensure your account is warmed up. --- ## Documentation & Resources ### Official Documentation - **ConnectSafely.ai Docs**: [https://connectsafely.ai/docs](https://connectsafely.ai/docs) - **n8n Package Docs**: [https://connectsafely.ai/n8n-docs](https://connectsafely.ai/n8n-docs) - **API Reference**: Available in ConnectSafely.ai dashboard ### Support Channels - **Email Support**: [[email protected]](mailto:[email protected]) - **Documentation**: [https://connectsafely.ai/docs](https://connectsafely.ai/docs) - **Custom Workflows**: [Contact us for custom automation](https://connectsafely.ai/contact) --- ## Connect With Us Stay updated with the latest automation tips, LinkedIn strategies, and platform updates: - **LinkedIn**: [linkedin.com/company/connectsafelyai](https://www.linkedin.com/company/connectsafelyai) - **YouTube**: [youtube.com/@ConnectSafelyAI-v2x](https://www.youtube.com/@ConnectSafelyAI-v2x) - **Instagram**: [instagram.com/connectsafely.ai](https://www.instagram.com/connectsafely.ai/) - **Facebook**: [facebook.com/connectsafelyai](https://www.facebook.com/profile.php?id=61582550884724) - **X (Twitter)**: [x.com/AiConnectsafely](https://x.com/AiConnectsafely) - **Bluesky**: [connectsafelyai.bsky.social](https://bsky.app/profile/connectsafelyai.bsky.social) - **Mastodon**: [mastodon.social/@connectsafely](https://mastodon.social/@connectsafely) --- ## Need Custom Workflows? Looking to build sophisticated LinkedIn automation workflows tailored to your business needs? **[Contact our team](https://connectsafely.ai/contact)** for custom automation development, strategy consulting, and enterprise solutions. We specialize in: - Multi-channel engagement workflows - AI-powered personalization at scale - Lead scoring and qualification automation - CRM integration and data synchronization - Custom reporting and analytics pipelines
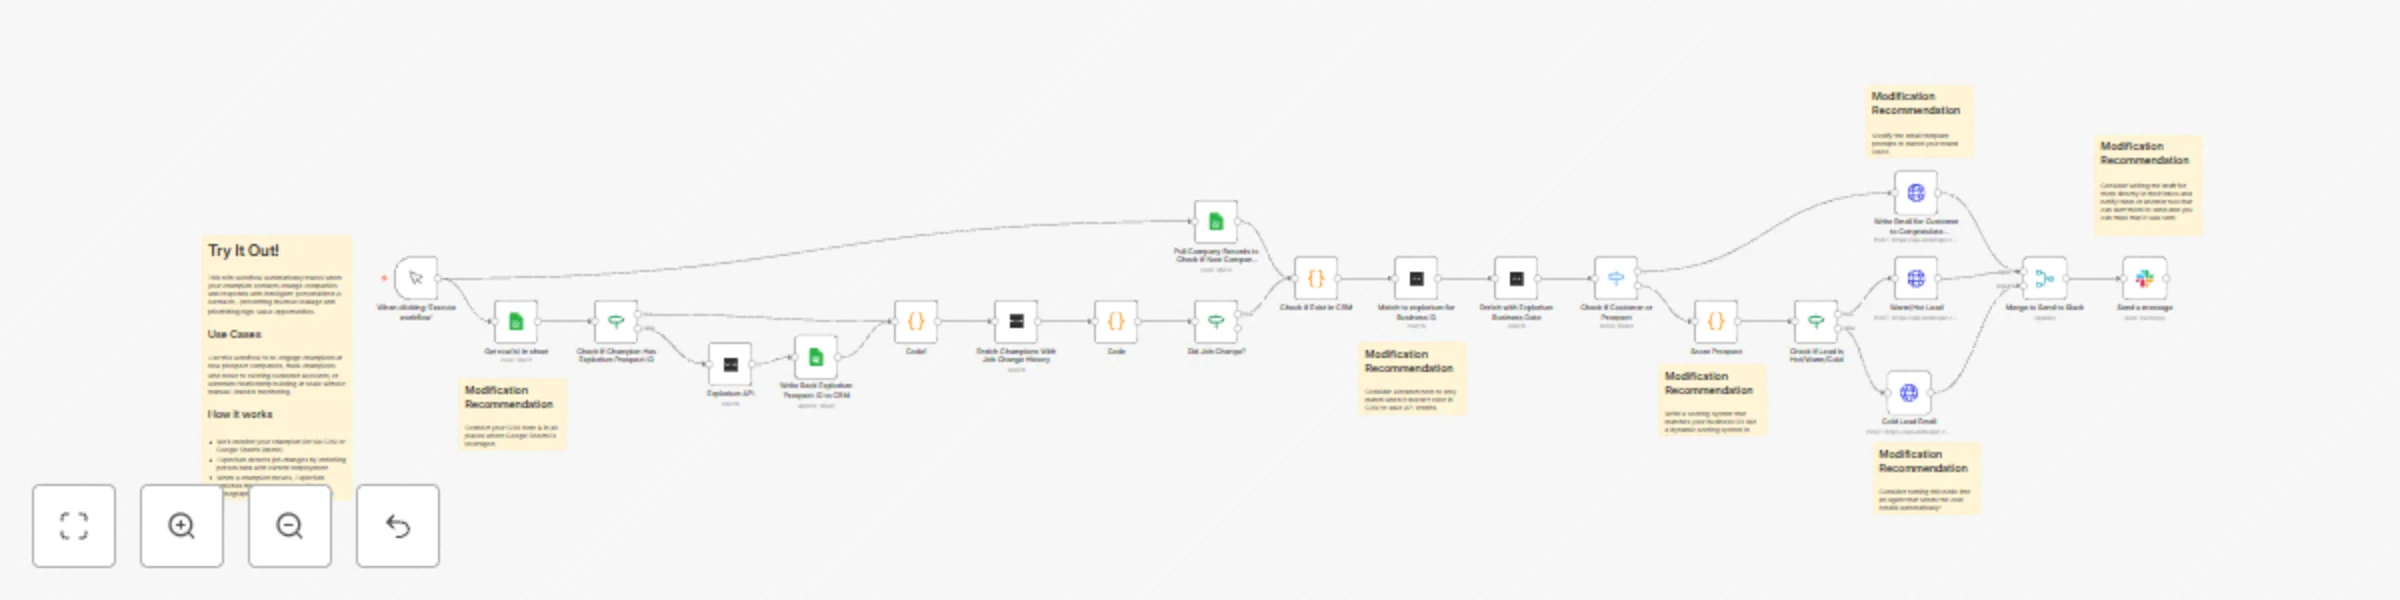
Automate champion migration detection & personalized outreach with Explorium & Claude
# Champion Migration Tracker Automatically detect when your champion contacts change companies and respond with intelligent, personalized AI outreach before your competitors do. ## THE PROBLEM When champions move to new companies, sales teams lose track and miss high-value opportunities. Manual LinkedIn monitoring doesn't scale, and by the time you notice, the relationship has gone cold. ## THE SOLUTION This workflow automates champion migration tracking end-to-end, combining Explorium's data intelligence with Claude AI agents to maintain relationships and prioritize opportunities. ## HOW IT WORKS ### 1. Automated Job Change Detection - Uses Explorium person enrichment to detect when champions move companies - Eliminates manual LinkedIn monitoring - Triggers immediately when employment changes ### 2. Intelligent Company Enrichment - Enriches new companies with Explorium data: firmographics, funding, tech stack, hiring velocity - Checks if company already exists in your CRM (Customer vs Prospect) - Identifies open opportunities and account owners ### 3. Multi-Dimensional Opportunity Scoring (0-100) - **ICP Fit (40%)**: Company size, funding stage, revenue, tech stack alignment - **Relationship Strength (40%)**: Past deals influenced, relationship warmth, CRM status - **Timing (20%)**: Days at new company, recent funding/acquisition signals - Results in Hot/Warm/Cold priority classification ### 4. Smart Routing by Context - **Customers**: Notify account manager with congratulations message - **Hot Prospects (75+ score)**: Draft detailed strategic outreach for rep review ### 5. AI-Powered Personalization - Claude AI agents generate contextually relevant emails - References past relationship, deals influenced, and company intelligence - Adapts tone and content based on opportunity priority and CRM status ## DEMO SETUP (Google Sheets) This demo uses Google Sheets for simplicity. **For production use, replace with your actual CRM:** - Salesforce - HubSpot - Pipedrive - Any CRM with n8n integration ### Important Fields to Consider: **Champions:** - `champion_id`, `name`, `email`, `company`, `title`, `last_checked_date` - `relationship_strength` (Hot/Warm/Cold), `last_contact_date`, `deals_influenced` - `relationship_notes`, `isChampion` (TRUE/FALSE), `linkedin_url`, `explorium_prospect_id` **Companies:** - `company_ID`, `companyName`, `domain`, `relationship_type` (Customer/Prospect/None) - `open_opportunity` (TRUE/FALSE), `opportunity_stage`, `account_owner`, `account_owner_email` - `contractValue`, `notes`, `ExploriumBusinessID` ## REQUIRED CREDENTIALS 1. **Anthropic API Key** - Powers Claude AI agents for email generation 2. **Explorium API Key** - Provides person and company enrichment data 3. **Google Sheets** or **Your CRM** (production) - Data source and logging ## SETUP INSTRUCTIONS 1. **Connect Credentials** in n8n Settings → Credentials 2. **Update Data Sources**: Replace Google Sheets nodes with your CRM nodes (or create demo sheets with structure above) 3. **Configure Scoring**: Adjust ICP scoring criteria in "Score Company" node to match your ideal customer profile 4. **Test with Sample Data**: Run with 2-3 test champions to verify routing and email generation 5. **Schedule Trigger**: Set to run daily or weekly based on your needs ## CUSTOMIZATION TIPS **Scoring Weights**: Adjust the 40/40/20 weighting in the scoring node to prioritize what matters most to your business **Tech Stack Matching**: Update the `relevantTech` array with tools your champions likely use **Email Tone**: Modify Claude prompts to match your brand voice (formal, casual, technical, etc.) **Routing Logic**: Add additional branches for specific scenarios (e.g., churned customers, enterprise accounts) **Agentic Experience: Consider adding an agent that sends the email for Cold prospects automatically. **Integrations**: Add Slack notifications, CRM updates, or calendar booking links to the output ## BUSINESS VALUE - **Prevent Revenue Leakage**: Never lose track of champion relationships - **Prioritize Intelligently**: Focus on opportunities with highest potential - **Scale Relationship Building**: Automate what used to require manual effort - **Act Before Competitors**: Reach out while champions are still settling into new roles - **Data-Driven Decisions**: Quantifiable scores replace gut feelings ## USE CASES - **Sales Teams**: Re-engage champions at new prospect companies - **Customer Success**: Track champions who move to existing accounts - **Account-Based Marketing**: Identify high-fit accounts through champion networks - **Revenue Operations**: Automate champion tracking at scale ## NOTES - **Production Recommendation**: Replace Google Sheets with your production CRM for real-time data - **Privacy**: All API keys are credential-referenced (not hardcoded) for security - **Explorium Credits**: Person + company enrichment uses ~2-3 credits per champion
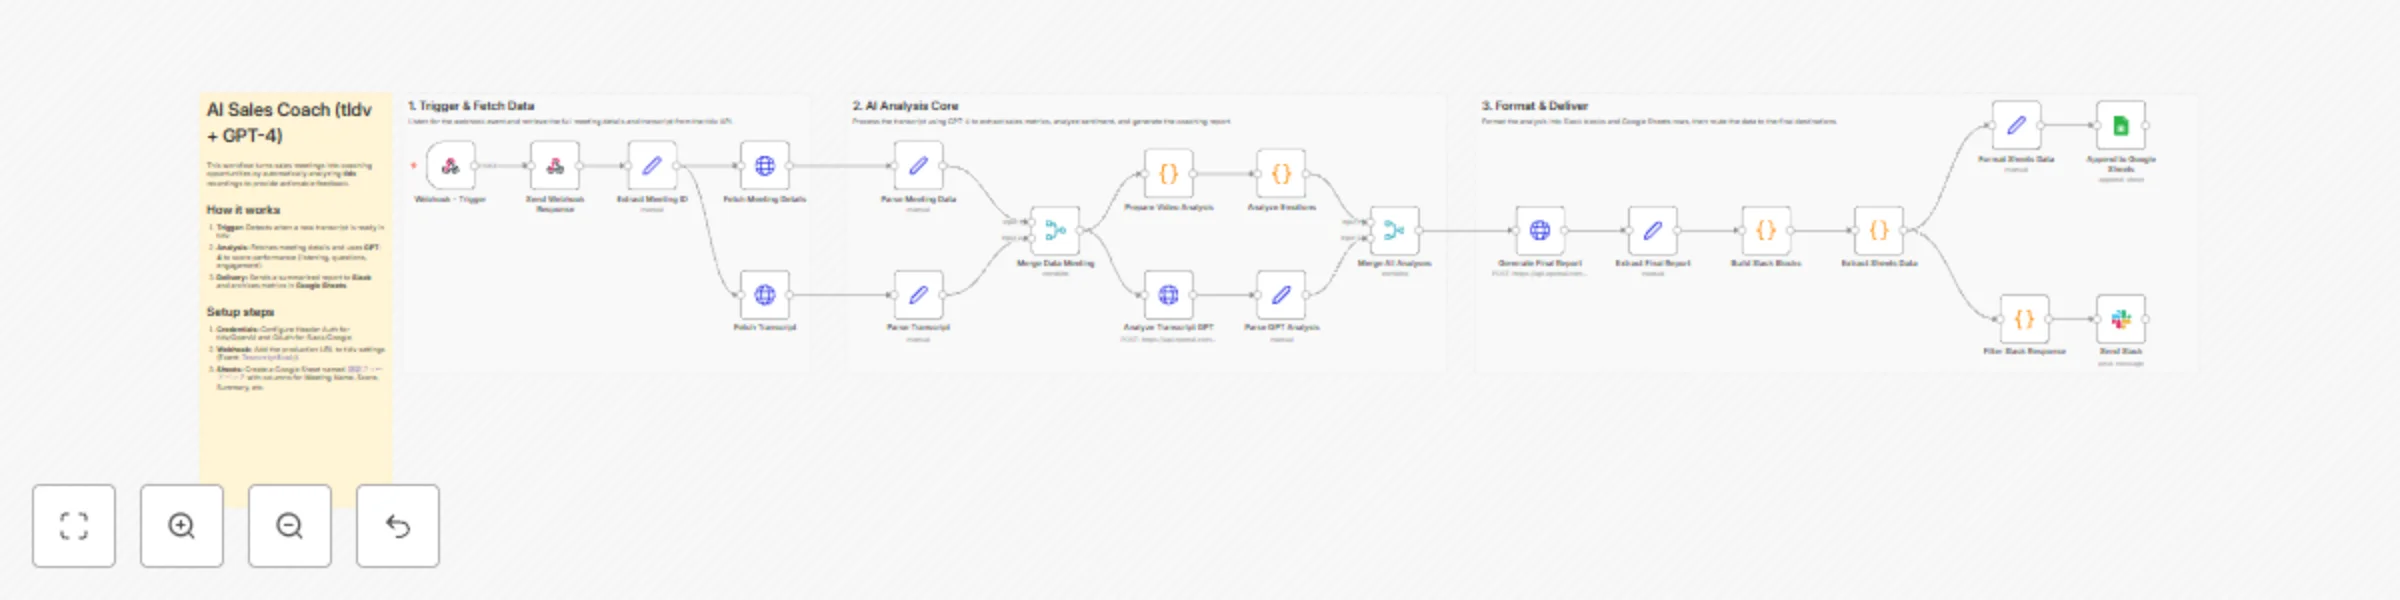
Analyze sales calls with GPT-4 and deliver coaching feedback via Slack & Sheets
## About This Template Turn every sales meeting into a coaching opportunity. This workflow automatically analyzes **tldv** meeting recordings using **OpenAI (GPT-4)** to provide instant, actionable feedback to your sales team. It acts as a virtual sales coach, evaluating key performance metrics like listening skills, question quality, and customer engagement without requiring a manager to listen to every call. ## How It Works 1. **Trigger:** The workflow starts automatically when a meeting transcript is ready in tldv (via Webhook). 2. **Data Retrieval:** It fetches the full meeting details and transcript from the tldv API. 3. **AI Analysis:** GPT-4 analyzes the conversation to score the sales rep's performance (e.g., Speaking vs. Listening balance, Clarity, Next Steps). 4. **Delivery:** * **Slack:** Sends a summary notification and a detailed markdown report to the team channel. * **Google Sheets:** Archives the scores and meeting data for long-term tracking. ## Who It’s For * **Sales Managers:** To monitor team performance and identify coaching needs at scale. * **Account Executives:** To get immediate feedback on their calls and self-correct. * **Sales Enablement:** To track KPI trends over time. ## Requirements * **n8n** (Cloud or Self-hosted) * **tldv (Business Plan)** for API/Webhook access * **OpenAI API Key** (GPT-4 access recommended) * **Slack** Workspace * **Google Sheets** ## Setup Steps 1. **Credentials:** Configure "Header Auth" for tldv (`x-api-key`) and OpenAI (`Authorization`). Connect OAuth for Slack and Google Sheets. 2. **Webhook:** Copy the Production URL from the first node (Webhook) and add it to your tldv **Settings > Integrations > Webhooks** (select Event: `TranscriptReady`). 3. **Google Sheets:** Create a sheet (e.g., named `Sales Feedback`) with columns for `Meeting Name`, `Score`, `Summary`, etc. * *Note: Be sure to update the Google Sheets node in the workflow to match your specific Sheet Name and Column headers.*
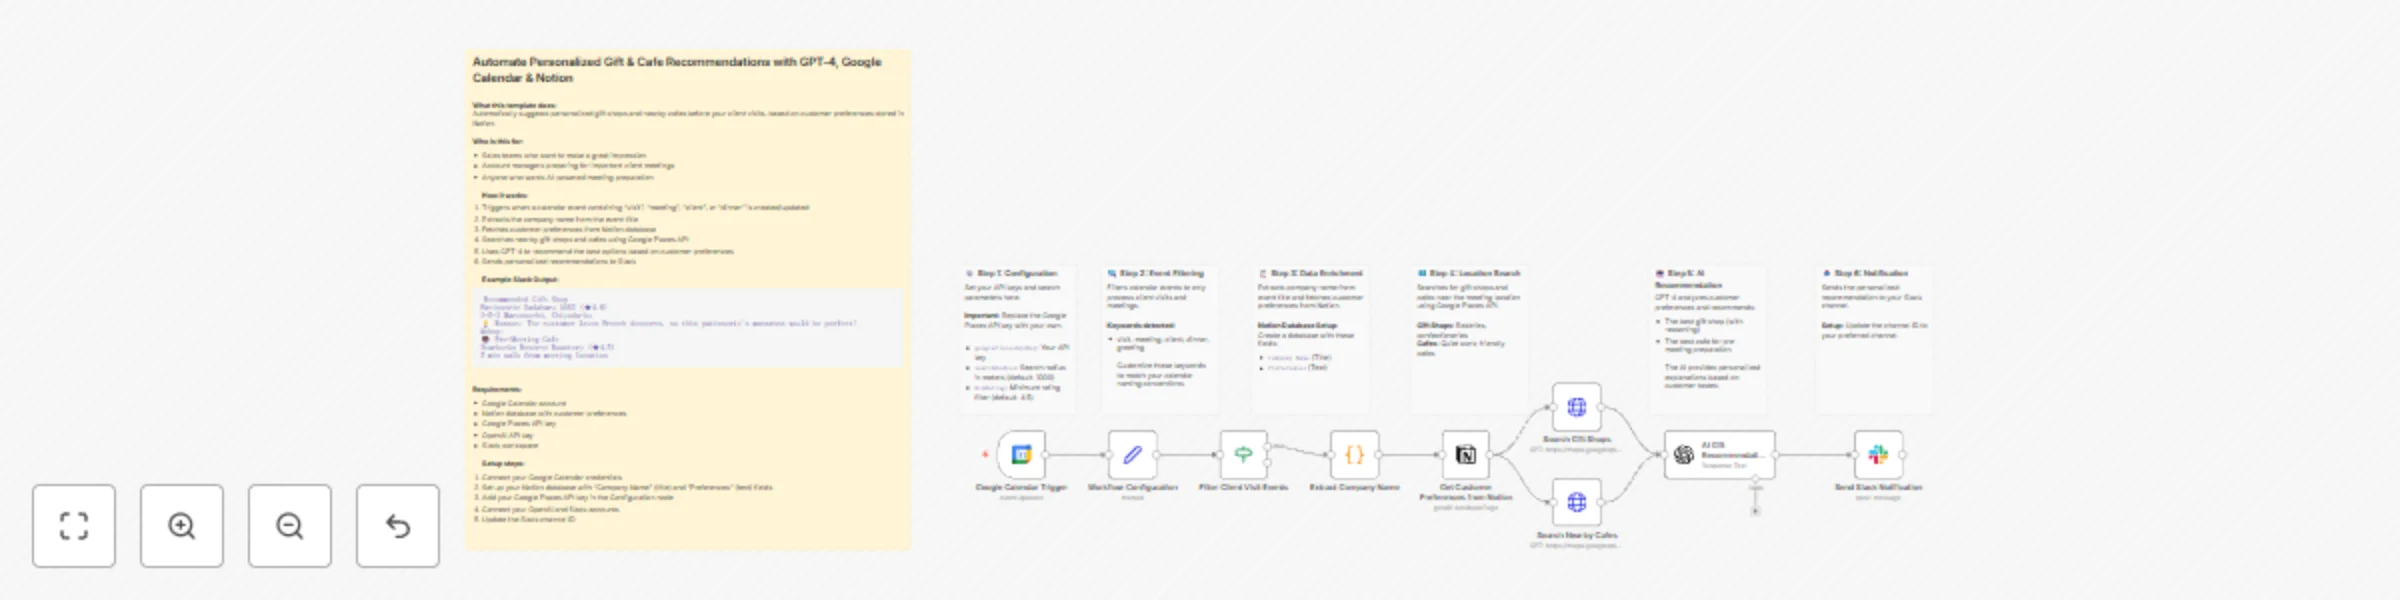
Personalize client meeting prep with GPT-4, Google Calendar, Notion & Places API to Slack
Who is this for This template is perfect for sales professionals, account managers, and business development teams who want to make memorable impressions on their clients. It automates the tedious task of researching gift shops and preparation spots before important meetings. What it does This workflow automatically prepares personalized recommendations for client visits by monitoring your Google Calendar, enriching data from Notion, and using AI to select the perfect options. How it works Trigger: Activates when a calendar event containing keywords like "visit," "meeting," "client," or "dinner" is created or updated Extract: Parses company name from the event title Enrich: Fetches customer preferences from your Notion database Search: Google Places API finds nearby gift shops and quiet cafes Analyze: GPT-4 recommends the best options based on customer preferences Notify: Sends a personalized message to Slack with recommendations Example Slack Output Here's what the final notification looks like: 🎁 Recommended Gift Shop Patisserie Sadaharu AOKI (★4.6) 3-5-2 Marunouchi, Chiyoda-ku 💡 Reason: The customer loves French desserts, so this patisserie's macarons would be perfect! ☕ Pre-Meeting Cafe Starbucks Reserve Roastery (★4.5) 5 min walk from meeting location Set up steps Setup time: approximately 15 minutes Google Calendar: Connect your Google Calendar account and select your calendar Notion Database: Create a customer database with "Company Name" (title) and "Preferences" (text) fields Google Places API: Get an API key from Google Cloud Console and add it to the Configuration node OpenAI: Connect your OpenAI account for AI-powered recommendations Slack: Connect your Slack workspace and update the channel ID in the final node Requirements Google Calendar account Notion account with a customer database Google Places API key (requires Google Cloud account) OpenAI API key Slack workspace with bot permissions How to customize Search radius: Adjust the searchRadius parameter in the Configuration node (default: 1000 meters) Event keywords: Modify the Filter node conditions to match your calendar naming conventions Notification channel: Change the Slack channel ID to your preferred channel
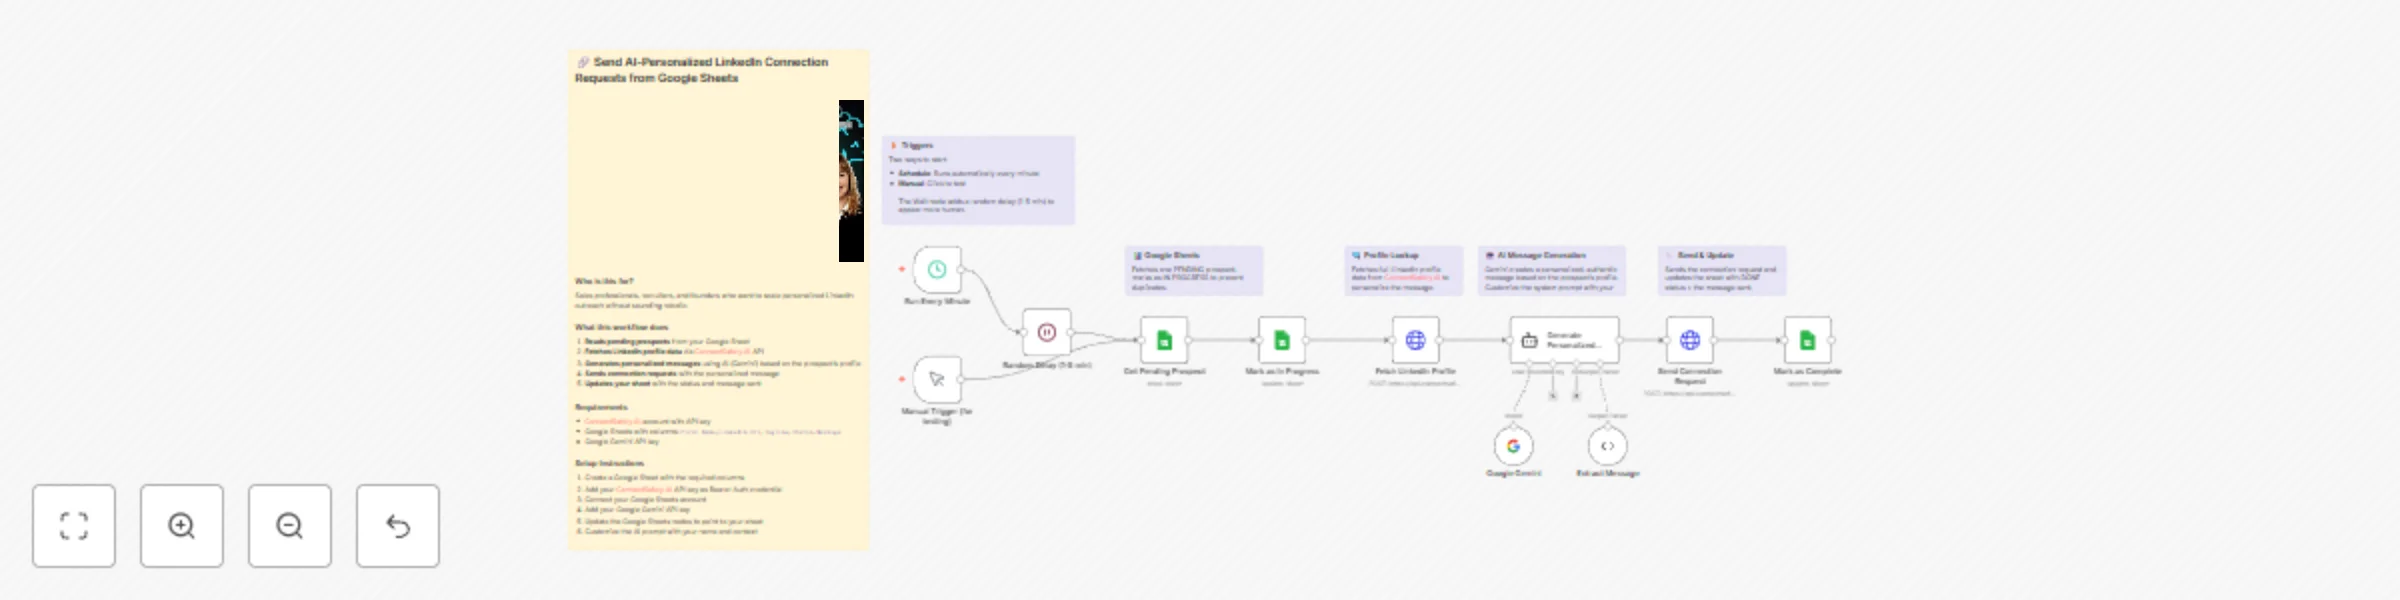
Send AI-personalized LinkedIn connection requests from Google Sheets with Gemini
# Send AI-personalized LinkedIn connection requests from Google Sheets using ConnectSafely.AI API ## Who's it for This workflow is built for sales professionals, recruiters, founders, and growth marketers who want to scale their LinkedIn outreach without sacrificing personalization. Perfect for anyone tired of sending generic connection requests that get ignored, or manually crafting individual messages for hundreds of prospects. If you're running ABM campaigns, building a sales pipeline, recruiting talent, or expanding your professional network, this automation handles the heavy lifting while keeping your outreach authentic and human. ## How it works The workflow automates personalized LinkedIn connection requests by combining Google Sheets prospect tracking with AI-powered message generation through ConnectSafely.ai's API. **The process flow:** 1. Reads pending prospects from your Google Sheet 2. Immediately marks them "IN PROGRESS" to prevent duplicate sends 3. Fetches complete LinkedIn profile data via ConnectSafely.ai API 4. Generates a personalized, authentic message using Google Gemini AI 5. Sends the connection request with your custom message 6. Updates your sheet with "DONE" status and stores the message sent Random delays between requests mimic human behavior and maintain LinkedIn compliance. --- Watch the complete step-by-step implementation guide: [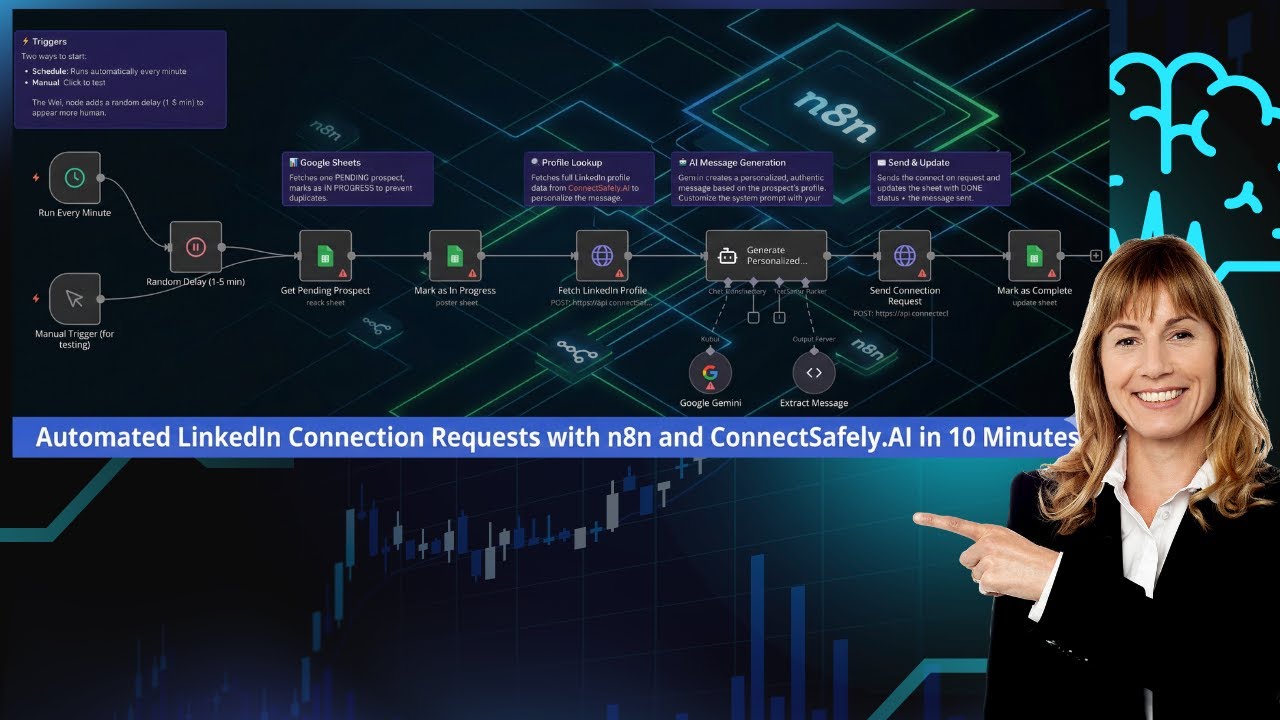](https://www.youtube.com/watch?v=ZCnXr3-W8xs) --- ## Setup steps ### Step 1: Prepare Your Google Sheet Structure your Google Sheet with the following columns: | Column Name | Description | Required | |------------|-------------|----------| | `First Name` | Contact's first name | Optional | | `LinkedIn Url` | LinkedIn profile URL or username | Yes | | `Tagline` | Contact's headline/title | Optional | | `Status` | Processing status (PENDING/IN PROGRESS/DONE) | Yes | | `Message` | Stores the AI-generated message sent | Yes | **Sample Data Format:** ``` First Name: John LinkedIn Url: https://www.linkedin.com/in/johndoe Tagline: VP of Sales at TechCorp Status: PENDING Message: (left empty - will be filled by workflow) ``` **Pro Tip**: Use LinkedIn Sales Navigator export or a prospecting tool to populate your sheet with qualified leads. ### Step 2: Configure ConnectSafely.ai API Credentials #### Obtain API Key 1. Log into [ConnectSafely.ai Dashboard](https://connectsafely.ai/dashboard) 2. Navigate to **Settings** → **API Keys** 3. Generate a new API key #### Add Bearer Auth Credential in n8n 1. Go to **Credentials** in n8n 2. Click **Add Credential** → **Header Auth** or **Bearer Auth** 3. Paste your ConnectSafely.ai API key 4. Save the credential This credential is used by both the "Fetch LinkedIn Profile" and "Send Connection Request" HTTP nodes. ### Step 3: Configure Google Sheets Integration #### 3.1 Connect Google Sheets Account 1. Go to **Credentials** → **Add Credential** → **Google Sheets OAuth2** 2. Follow the OAuth flow to connect your Google account 3. Grant access to Google Sheets #### 3.2 Configure "Get Pending Prospect" Node 1. Open the **Get Pending Prospect** node 2. Select your Google Sheets credential 3. Enter your **Document ID** (from the sheet URL) 4. Select the **Sheet Name** 5. Add a filter: - **Lookup Column**: `Status` - **Lookup Value**: `PENDING` 6. Enable **Return First Match Only** under Options #### 3.3 Configure "Mark as In Progress" Node 1. Open the **Mark as In Progress** node 2. Select the same document and sheet 3. Configure column mapping: - **Matching Column**: `row_number` - **Status**: `IN PROGRESS` #### 3.4 Configure "Mark as Complete" Node 1. Open the **Mark as Complete** node 2. Select the same document and sheet 3. Configure column mapping: - **Matching Column**: `row_number` - **Status**: `DONE` - **Message**: `{{ $('Generate Personalized Message').item.json.message }}` ### Step 4: Configure Google Gemini AI #### Get Gemini API Key 1. Go to [Google AI Studio](https://aistudio.google.com/) 2. Create or select a project 3. Generate an API key #### Add Gemini Credential in n8n 1. Go to **Credentials** → **Add Credential** → **Google Gemini (PaLM) API** 2. Paste your API key 3. Save the credential #### Connect to Google Gemini Node 1. Open the **Google Gemini** node 2. Select your Gemini credential ### Step 5: Customize the AI Prompt The **Generate Personalized Message** node contains the system prompt that controls how messages are written. Customize it for your personal brand: 1. Open the **Generate Personalized Message** node 2. Find the **System Message** in Options 3. Replace the placeholder text: ``` MY CONTEXT: [CUSTOMIZE THIS: Add your name, role, and what you're looking for in connections] ``` With your actual information, for example: ``` MY CONTEXT: I'm Sarah, founder of a B2B SaaS startup. I'm interested in connecting with other founders, VCs, and sales leaders to exchange ideas and explore potential partnerships. ``` 4. Update the sign-off instruction from `"- [YOUR NAME]"` to your actual name ### Step 6: Test the Workflow 1. Add a test prospect to your Google Sheet with `Status: PENDING` 2. Click the **Manual Trigger (for testing)** node 3. Click **Test Workflow** 4. Verify: - Profile data is fetched correctly - AI generates an appropriate message - Connection request is sent - Sheet updates to `DONE` with the message stored --- ## Customization ### Message Personalization Edit the system prompt in the **Generate Personalized Message** node to adjust: - **Tone**: Formal, casual, or industry-specific language - **Length**: Modify character limits (LinkedIn allows up to 300 characters) - **Focus**: Emphasize mutual connections, shared interests, or achievements - **Sign-off**: Change the signature format to match your brand ### Timing Adjustments - **Schedule Trigger**: Currently set to run every minute. Adjust the interval in the **Run Every Minute** node - **Random Delay**: The **Random Delay (1-5 min)** node adds 1-5 minutes of random wait time. Modify the formula `{{ Math.floor(Math.random() * 4) + 1 }}` to change the range ### Rate Limiting Best Practices - Start with 10-20 connection requests per day - Gradually increase over 2-3 weeks - Never exceed 100 requests per day - Consider pausing on weekends --- ## Use Cases - **Sales Prospecting**: Connect with decision-makers at target accounts with personalized outreach - **Recruiting**: Reach out to passive candidates with messages that reference their specific experience - **Founder Networking**: Build relationships with fellow entrepreneurs, investors, and advisors - **Event Follow-up**: Send personalized connection requests to conference attendees and speakers - **Partnership Development**: Connect with potential partners by referencing their company achievements --- ## Troubleshooting ### Common Issues & Solutions **Issue**: AI generating messages over 300 characters - **Solution**: Add explicit character count requirement in the system prompt; the current prompt specifies 200-250 characters **Issue**: "Profile not found" errors from ConnectSafely.ai - **Solution**: Ensure LinkedIn URLs are complete (include `https://www.linkedin.com/in/`) **Issue**: Generic-sounding AI messages - **Solution**: Enhance the system prompt with more specific context about your background and goals **Issue**: Duplicate connection requests sent - **Solution**: Verify "Mark as In Progress" node runs before "Fetch LinkedIn Profile"; check that `row_number` column exists in your sheet **Issue**: Google Sheets not updating - **Solution**: Confirm `row_number` column exists and the matching column is correctly configured **Issue**: Bearer Auth errors - **Solution**: Verify your ConnectSafely.ai API key is valid and has proper permissions --- ## Documentation & Resources ### Official Documentation - **ConnectSafely.ai Docs**: [https://connectsafely.ai/docs](https://connectsafely.ai/docs) - **API Reference**: Available in ConnectSafely.ai dashboard - **Google Gemini API**: [https://ai.google.dev/docs](https://ai.google.dev/docs) ### Support Channels - **Email Support**: [[email protected]](mailto:[email protected]) - **Documentation**: [https://connectsafely.ai/docs](https://connectsafely.ai/docs) - **Custom Workflows**: [Contact us for custom automation](https://connectsafely.ai/contact) --- ## Connect With Us Stay updated with the latest automation tips, LinkedIn strategies, and platform updates: - **LinkedIn**: [linkedin.com/company/connectsafelyai](https://www.linkedin.com/company/connectsafelyai) - **YouTube**: [youtube.com/@ConnectSafelyAI-v2x](https://www.youtube.com/@ConnectSafelyAI-v2x) - **Instagram**: [instagram.com/connectsafely.ai](https://www.instagram.com/connectsafely.ai/) - **Facebook**: [facebook.com/connectsafelyai](https://www.facebook.com/profile.php?id=61582550884724) - **X (Twitter)**: [x.com/AiConnectsafely](https://x.com/AiConnectsafely) - **Bluesky**: [connectsafelyai.bsky.social](https://bsky.app/profile/connectsafelyai.bsky.social) - **Mastodon**: [mastodon.social/@connectsafely](https://mastodon.social/@connectsafely) --- ## Need Custom Workflows? Looking to build sophisticated LinkedIn automation workflows tailored to your business needs? **[Contact our team](https://connectsafely.ai/contact)** for custom automation development, strategy consulting, and enterprise solutions. We specialize in: - Multi-channel engagement workflows - AI-powered personalization at scale - Lead scoring and qualification automation - CRM integration and data synchronization - Custom reporting and analytics pipelines