AI Chatbot Workflows
Build a Telegram AI assistant with MemMachine, OpenAI, and voice support
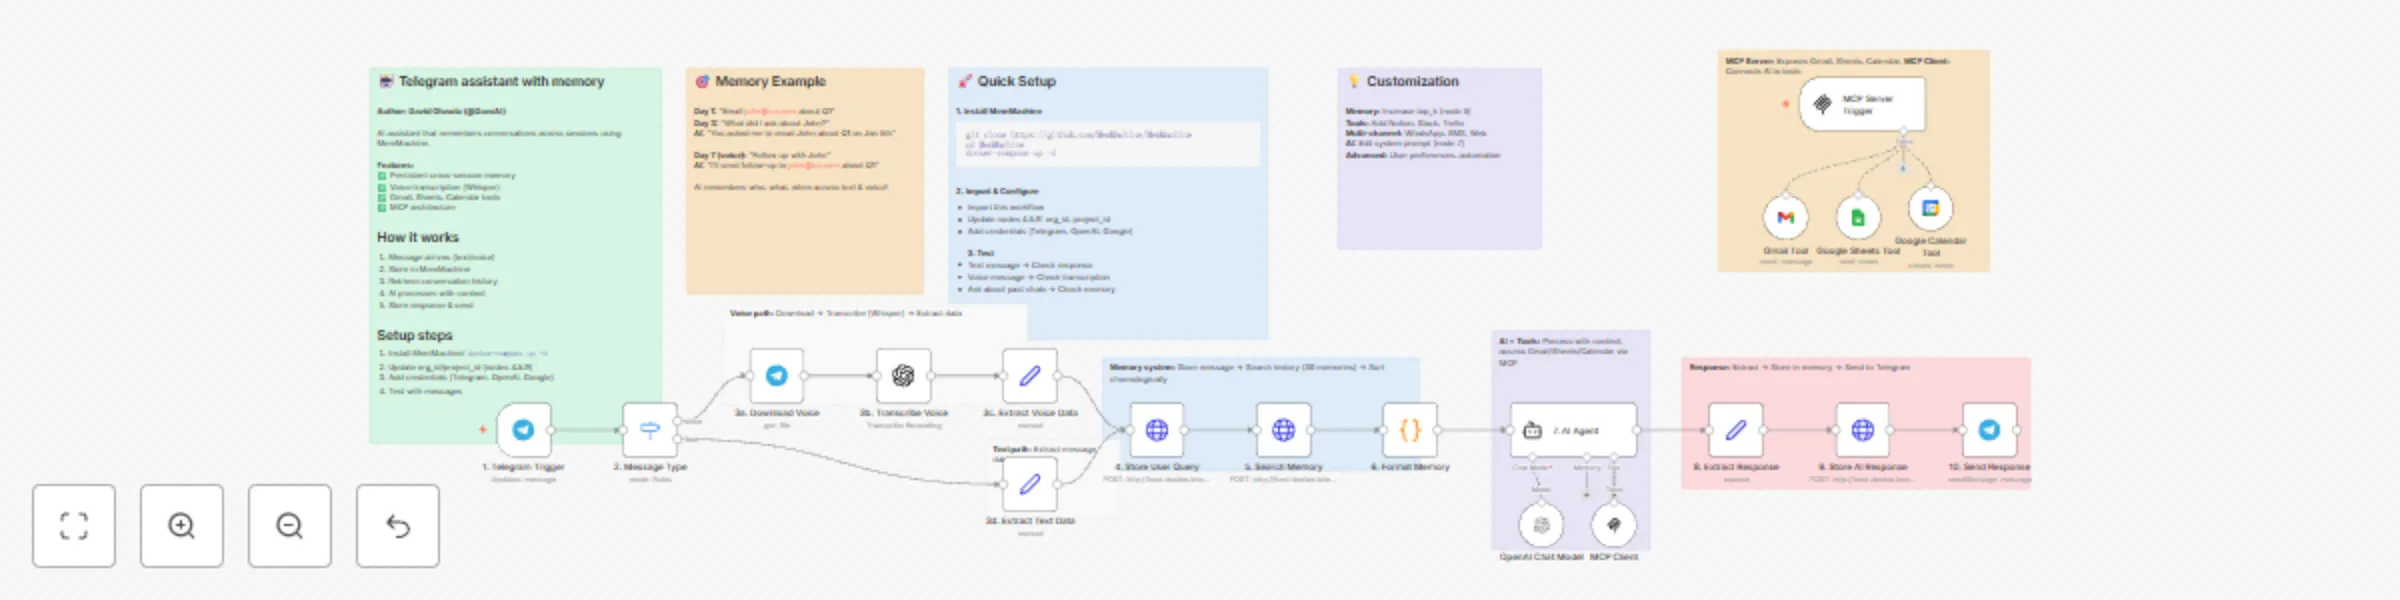
# Build a Telegram assistant with MemMachine and voice support An AI assistant that NEVER forgets using MemMachine for persistent cross-session memory, with voice transcription support and productivity tools. **⚠️ Important Deployment Note:** This workflow is designed for **self-hosted n8n** instances. If you're using n8n Cloud, you'll need to deploy MemMachine to a cloud server and update the HTTP Request URLs in nodes 4, 5, and 9. ## What This Template Does This workflow creates an intelligent personal assistant that maintains perfect memory across all conversations, whether you message today or weeks from now. It supports both text and voice messages, automatically transcribes voice using OpenAI Whisper, and provides tools for Gmail, Google Sheets, and Google Calendar. ## Key Features - 🧠 **Perfect Memory** - Remembers every conversation using MemMachine - 🎤 **Voice Transcription** - Supports voice messages via OpenAI Whisper - 📧 **Gmail Integration** - Send and read emails - 📊 **Google Sheets** - Read and write spreadsheet data - 📅 **Google Calendar** - Create and manage events - 🔧 **MCP Tools** - Extensible tool architecture - 💬 **Smart Context** - References past conversations naturally ## Real-World Example **Day 1 - Text Message:** - User: "Send an email to [email protected] about the Q1 report" - AI: *Uses Gmail tool* "Email sent to John about the Q1 report!" **Day 3 - Voice Message:** - 🎤 User: "What did I ask you to do for John?" - AI: "On January 5th, you asked me to email John about the Q1 report, which I sent." **Day 7 - Text Message:** - User: "Follow up with John" - AI: "I'll send a follow-up email to [email protected] about the Q1 report that we discussed on Jan 5th." The AI remembers who John is, what you discussed, and when it happened - all without you having to repeat yourself! ## How It Works ### Message Flow **For Text Messages:** 1. Telegram Trigger receives message 2. Extract user data and message text 3. Store message in MemMachine 4. Search conversation history (last 30 memories) 5. AI processes with full context + tools 6. Store AI response for future reference 7. Send reply to user **For Voice Messages:** 1. Telegram Trigger receives voice message 2. Download voice file 3. OpenAI Whisper transcribes to text 4. Extract transcribed text and user data 5. Store in MemMachine (same as text flow) 6. Process with AI + tools 7. Send reply to user ## Requirements ### Services & Credentials - **MemMachine** - Open-source memory system (self-hosted via Docker) - **Telegram Bot Token** - From @BotFather - **OpenAI API Key** - For AI responses and voice transcription - **Gmail OAuth** - For email integration (optional) - **Google Sheets OAuth** - For spreadsheet access (optional) - **Google Calendar OAuth** - For calendar management (optional) ### Installation ## MemMachine Setup ```bash # Clone and start MemMachine git clone https://github.com/MemMachine/MemMachine cd MemMachine docker-compose up -d # Verify it's running curl http://localhost:8080/health ``` ## Workflow Configuration ### Deployment Options This workflow supports two deployment scenarios: **Option 1: Self-Hosted n8n (Recommended)** - Both n8n and MemMachine run locally - Best for: Personal use, development, testing - Setup: 1. Run MemMachine: `docker-compose up -d` 2. Use `http://host.docker.internal:8080` in HTTP Request nodes (if n8n in Docker) 3. Or use `http://localhost:8080` (if n8n installed directly) **Option 2: n8n Cloud** - n8n hosted by n8n.io, MemMachine on your cloud server - Best for: Production, team collaboration - Setup: 1. Deploy MemMachine to cloud (DigitalOcean, AWS, GCP, etc.) 2. Expose MemMachine via HTTPS with SSL certificate 3. Update HTTP Request URLs in nodes 4, 5, 9 to: `https://your-memmachine-domain.com` 4. Ensure firewall allows n8n Cloud IP addresses ### Configuration Steps 1. **Import this template** into your n8n instance 2. **Update MemMachine URLs** (nodes 4, 5, 9): - **Self-hosted n8n in Docker**: `http://host.docker.internal:8080` - **Self-hosted n8n (direct install)**: `http://localhost:8080` - **n8n Cloud**: `https://your-memmachine-domain.com` 3. **Set Organization IDs** (nodes 4, 5, 9): - Change `your-org-id` to your organization name - Change `your-project-id` to your project name 4. **Add Credentials:** - Telegram Bot Token (node 1) - OpenAI API Key (nodes 4, 7) - Gmail OAuth (Gmail Tool node) - Google Sheets OAuth (Sheets Tool node) - Google Calendar OAuth (Calendar Tool node) ## Use Cases ### Personal Productivity - "Remind me what I worked on last week" - "Schedule a meeting with the team next Tuesday" - "Email Sarah about the proposal" ### Customer Support - AI remembers customer history - References past conversations - Provides contextual support ### Task Management - Track tasks across days/weeks - Remember project details - Follow up on action items ### Email Automation - "Send that email to John" (remembers John's email) - "What emails did I send yesterday?" - "Draft an email to the team" ### Calendar Management - "What's on my calendar tomorrow?" - "Schedule a meeting with Alex at 3pm" - "Cancel my 2pm meeting" ## Customization Guide ### Extend Memory Capacity In **Node 5 (Search Memory)**, adjust: ```json "top_k": 30 // Increase for more context (costs more tokens) ``` ### Modify AI Personality In **Node 7 (AI Agent)**, edit the system prompt to: - Change tone/style - Add domain-specific knowledge - Include company policies - Set behavioral guidelines ### Add More Tools Connect additional n8n tool nodes to the AI Agent: - Notion integration - Slack notifications - Trello/Asana tasks - Database queries - Custom API tools ### Multi-Channel Memory Create similar workflows for: - WhatsApp (same MemMachine instance) - SMS via Twilio (same memory database) - Web chat widget (shared context) All channels can share the same memory by using consistent `customer_email` identifiers! ## Memory Architecture ### Storage Structure Every message is stored with: ```json { "content": "message text", "producer": "[email protected]", "role": "user" or "assistant", "metadata": { "customer_email": "[email protected]", "channel": "telegram", "username": "john_doe", "timestamp": "2026-01-07T12:00:00Z" } } ``` ### Retrieval & Formatting 1. **Search** - Finds relevant memories by customer email 2. **Sort** - Orders chronologically (oldest to newest) 3. **Format** - Presents last 20 messages to AI 4. **Context** - AI uses history to inform responses ## Cost Estimate - **MemMachine**: Free (self-hosted via Docker) - **OpenAI API**: - Text responses: ~$0.001 per message (GPT-4o-mini) - Voice transcription: ~$0.006 per minute (Whisper) - **n8n**: Free (self-hosted) or $20/month (cloud) - **Google APIs**: Free tier available **Monthly estimate for 1,000 messages (mix of text/voice):** - OpenAI: $5-15 - Google APIs: $0 (within free tier) - Total: $5-15/month ## Troubleshooting ### Deployment Issues **n8n Cloud: Can't connect to MemMachine** - Ensure MemMachine is publicly accessible via HTTPS - Check firewall rules allow n8n Cloud IPs - Verify SSL certificate is valid - Test endpoint: `curl https://your-domain.com/health` **Self-Hosted: Can't connect to MemMachine** - Check Docker is running: `docker ps` - Verify URL matches your setup - Test endpoint: `curl http://localhost:8080/health` ### Voice not transcribing - Verify OpenAI API key is valid - Check API key has Whisper access - Test with short voice message first ### AI not remembering - Verify `org_id` and `project_id` match in nodes 4, 5, 9 - Check `customer_email` is consistent - Review node 5 output (are memories retrieved?) ### Tools not working - Verify OAuth credentials are valid - Check required API scopes/permissions - Test tools individually first ## Advanced Features ### Cloud Deployment Guide (For n8n Cloud Users) If you're using n8n Cloud, follow these steps to deploy MemMachine: **1. Choose a Cloud Provider** - DigitalOcean (Droplet: $6/month) - AWS (EC2 t3.micro) - Google Cloud (e2-micro) - Render.com (easiest, free tier available) **2. Deploy MemMachine** For DigitalOcean/AWS/GCP: ```bash # SSH into your server ssh root@your-server-ip # Install Docker curl -fsSL https://get.docker.com -o get-docker.sh sh get-docker.sh # Clone and start MemMachine git clone https://github.com/MemMachine/MemMachine cd MemMachine docker-compose up -d ``` **3. Configure HTTPS (Required for n8n Cloud)** ```bash # Install Caddy for automatic HTTPS apt install caddy # Create Caddyfile cat > /etc/caddy/Caddyfile << 'CADDYEND' your-domain.com { reverse_proxy localhost:8080 } CADDYEND # Start Caddy systemctl start caddy ``` **4. Update Workflow** - In nodes 4, 5, 9, change URL to: `https://your-domain.com` - Remove the `/api/v2/memories` part is already in the path **5. Security Best Practices** - Use environment variables for org_id and project_id - Enable firewall: `ufw allow 80,443/tcp` - Regular backups of MemMachine data - Monitor server resources ### Semantic Memory MemMachine automatically extracts semantic facts from conversations for better recall of important information. ### Chronological Context Memories are sorted by timestamp, not relevance, to maintain natural conversation flow. ### Cross-Session Persistence Unlike session-based chatbots, this assistant remembers across days, weeks, or months. ### Multi-Modal Input Seamlessly handles both text and voice, storing transcriptions alongside text messages. ## Template Information **Author:** David Olusola **Version:** 1.0.0 **Created:** January 2026 ## Support & Resources - **MemMachine Documentation**: https://github.com/MemMachine/MemMachine - **n8n Community**: https://community.n8n.io - **OpenAI Whisper**: https://platform.openai.com/docs/guides/speech-to-text ## Contributing Found a bug or have an improvement? Contribute to the template or share your modifications with the n8n community! --- **Start building your perfect-memory AI assistant today!** 🚀

Build a prospecting list with LeadIQ and save it to Airtable CRM
## **Who this is for** B2B companies, including: - Founders - Marketing and sales professionals - Recruiters involved in people search and B2B outreach With this workflow: - No more manual list building - No time spent researching what each company does - No manual CRM work — all found data is saved to a spreadsheet automatically ## **What it does** This workflow helps you quickly **build a list of prospects for outreach** using the **LeadIQ** provider. It collects: - Full name - LinkedIn profile - Company website and description - Emails (when available in the LeadIQ database) You can start contacting people via LinkedIn manually right away. You simply **provide a natural language prompt**, for example: *“Founder at a software engineering firm, 11–50 employees, based in New York, using AI technologies.”* The embedded AI agent transforms your input into a GraphQL query, which is then used to pull leads from the database. 📹 Video walkthrough: [Click Here](https://vimeo.com/1151100805) **Benefits:** - LeadIQ is an affordable database, with a cost per lead of approximately $0.03–$0.05 USD, depending on your plan and volume - No credit card or paid plan is required to start using the LeadIQ API — just sign up and access the API - The API includes 50 free credits, which is enough to test the workflow - The workflow enriches company details from the open web (company description, HQ address) - No need to manually configure filters — use a simple natural language prompt - All data is saved automatically to Airtable CRM (using their standard CRM template from the template library) ⚠️ **Important:** This workflow is not ideal if email addresses are the only data you need, as LeadIQ does not always provide emails. It works best when you need: - A curated list of people based on specific criteria - Their LinkedIn profiles - Automated saving of leads to a database You can later enrich email data using other paid databases by pulling records from Airtable. ## How to customize the workflow 1. Sign up for **LeadIQ**: https://leadiq.com - Obtain the API string called “**Secret Base64 API key**” 2. Add the API key to all **HTTP** nodes: - Method: POST - URL: https://api.leadiq.com/graphql - Enable “**Send Headers**” and add: ``` Authorization: Basic <your API string here> Content-Type: application/json ``` 3. Sign up for Airtable - Find the template: *Left panel → Templates & apps → Marketing → “Sales CRM”* 4. In Airtable, generate an API key: - Builder Hub → Developers → Personal access token - Add your Sales CRM database to the token scope 5. Set the correct base and sheet in all Airtable nodes 6. Use the Code node called “Manage number of leads” to control how many records are pulled from the database - Default value: 1 (to save LeadIQ credits) - To change it, edit: ``` input.limit = 1; ``` Replace 1 with the desired number of leads 7. Launch the workflow using the “Open Chat” trigger node - Enter a prompt containing the criteria below **Prompt structure:** 📌 **Contact-level criteria (optional)** - **Job titles**: “Founder” - **Roles**: “Entrepreneurship”, “Business Development”, “Information Technology”, “Legal”, “Accounting”, etc. - **Seniority**: Executive, VP, Director, Manager, Senior Individual Contributor, Other - **Location (city and country only)**: “New York, United States” 📌 **Company-level criteria (optional)** - **Employee count range**: “1–10”, “50–200”, or terms like “small startup”, “SMB”, “mid-market”, “enterprise” - **Industry**: “Business Consulting and Services”, “IT Services and IT Consulting”, etc. - **Technologies**: “AI”, “HubSpot” (may not always work if the database has limited overlap) - **Revenue range (in millions USD)**: “0–1M”, “1–10M”, etc. (availability may vary) The workflow includes **two AI agents** that map your natural language input to the closest existing database filters, so you can write prompts in your own words. ## Email enrichment note The lower part of the workflow (“**Enrichment: Search Data & Email**”) attempts to pull emails from the LeadIQ database for existing leads. Not every lead has an email available, so this step is **optional and limited**. ## Workflow updates I will continue to add new functionality and improve this workflow, including: - Additional enrichment sources - New lead databases - Email sending infrastructure The latest version will always be available on my [Patreon](https://www.patreon.com/growspireagency)

Analyze crypto markets with CoinGecko MCP and C1
## Analyze crypto markets with interactive graphs using CoinGecko and C1 by Thesys This n8n template can answer questions about **real-time prices, market moves, trending coins, and token details** with **interactive UI in real time** (cards, charts, buttons) instead of plain text using C1 by Thesys. Data is fetched through the **CoinGecko Free MCP tool**. ### [Check out a working demo of this template here](https://www.thesys.dev/n8n?url=https://www.thesys.dev/n8n?url=https%3A%2F%2Fasd2224.app.n8n.cloud%2Fwebhook%2F51638b0c-7765-4fa8-9b95-a0422128e203%2Fchat). ### What this workflow does 1. A user sends a message in the **n8n Chat** UI (public chat trigger). 2. The **AI Agent** interprets the request. 3. The agent calls **CoinGecko Free MCP** to fetch market data (prices, coins, trending, etc.). 4. The model responds through **C1 by Thesys** with a **streaming, UI** answer. ### Example prompts you can try right away Copy/paste any of these into the chat: - “What’s the current price of Bitcoin and Ethereum?” - “Give me today’s market summary: total market cap, BTC dominance, top gainers/losers.” - “Compare ETH vs SOL over 30 days with a chart.” > Note: This template is for information and visualization, not financial advice. ### How it works 1. User sends a prompt 2. C1 model based on prompt will use CoinGecko MCP to fetch live data 3. C1 Model generates a UI Schema Response 4. Schema is rendered as UI using Thesys GenUI SDK on the frontend ### Setup Make sure you have the following: #### 1️⃣ Thesys API Key You’ll need an API key to authenticate and use Thesys services. 👉 Get your key [here](https://console.thesys.dev/keys) ### What is C1 by Thesys? C1 by [Thesys](https://www.thesys.dev/) is an API middleware that augments LLMs to respond with **interactive UI (charts, buttons, forms)** in real time instead of text. ### Facing setup issues? #### If you get stuck or have questions: - #### 💬 Join the [Thesys Community](https://discord.com/invite/Pbv5PsqUSv) - #### 📧 Email support: [email protected]

Automate outbound AI sales calls with double-dial using Airtable and Vapi AI
## 🚀 The Ultimate AI Sales Outbound Engine *Stop wasting hours on manual dialing and listening to ringtones. This workflow transforms your **Airtable** into a high-velocity **AI Call Center** using **Vapi AI***. ### ⚡ TL;DR Automate lead qualification calls, handle voicemails like a pro, and sync every transcript back to your CRM without lifting a finger. ### 🧠 How it Works 1. **The Scout:** Every minute, n8n scans your Airtable for leads marked `TBC`. 2. **The Dialer:** It triggers a personalized **Vapi AI** call, passing along the lead’s name and context. 3. **The Reporter:** Once the call ends, a Webhook catches the data, including the **recording, transcript, and AI summary**. 4. **The Strategist:** * **Success?** Updates the lead to `Called` and logs the summary. * **Voicemail?** Automatically triggers a **double-dial** retry after 1 minute. * **Still nothing?** Schedules a final follow-up for the next day at the **optimal time (`your time`)**. ### 🛠️ Setup Guide * **Airtable:** Create a "Leads" table with fields for `Status`, `Mobile`, `Attempt`, and `Summary`. * **Vapi:** Plug in your Assistant ID and set the Webhook URL to this workflow's address. * **n8n:** Use the **Header Auth** credential for your Vapi API key to keep things secure. ### 💎 Why This Wins * **Aggressive Retries:** Includes a built-in "Double-Dial" strategy to increase connection rates. * **Clean CRM:** No more messy notes; get structured AI summaries for every call. * **Plug-and-Play:** Designed to be easily customized for any industry—from real estate to SaaS.
Adjust morning alarms based on weather and train delays using Google Gemini
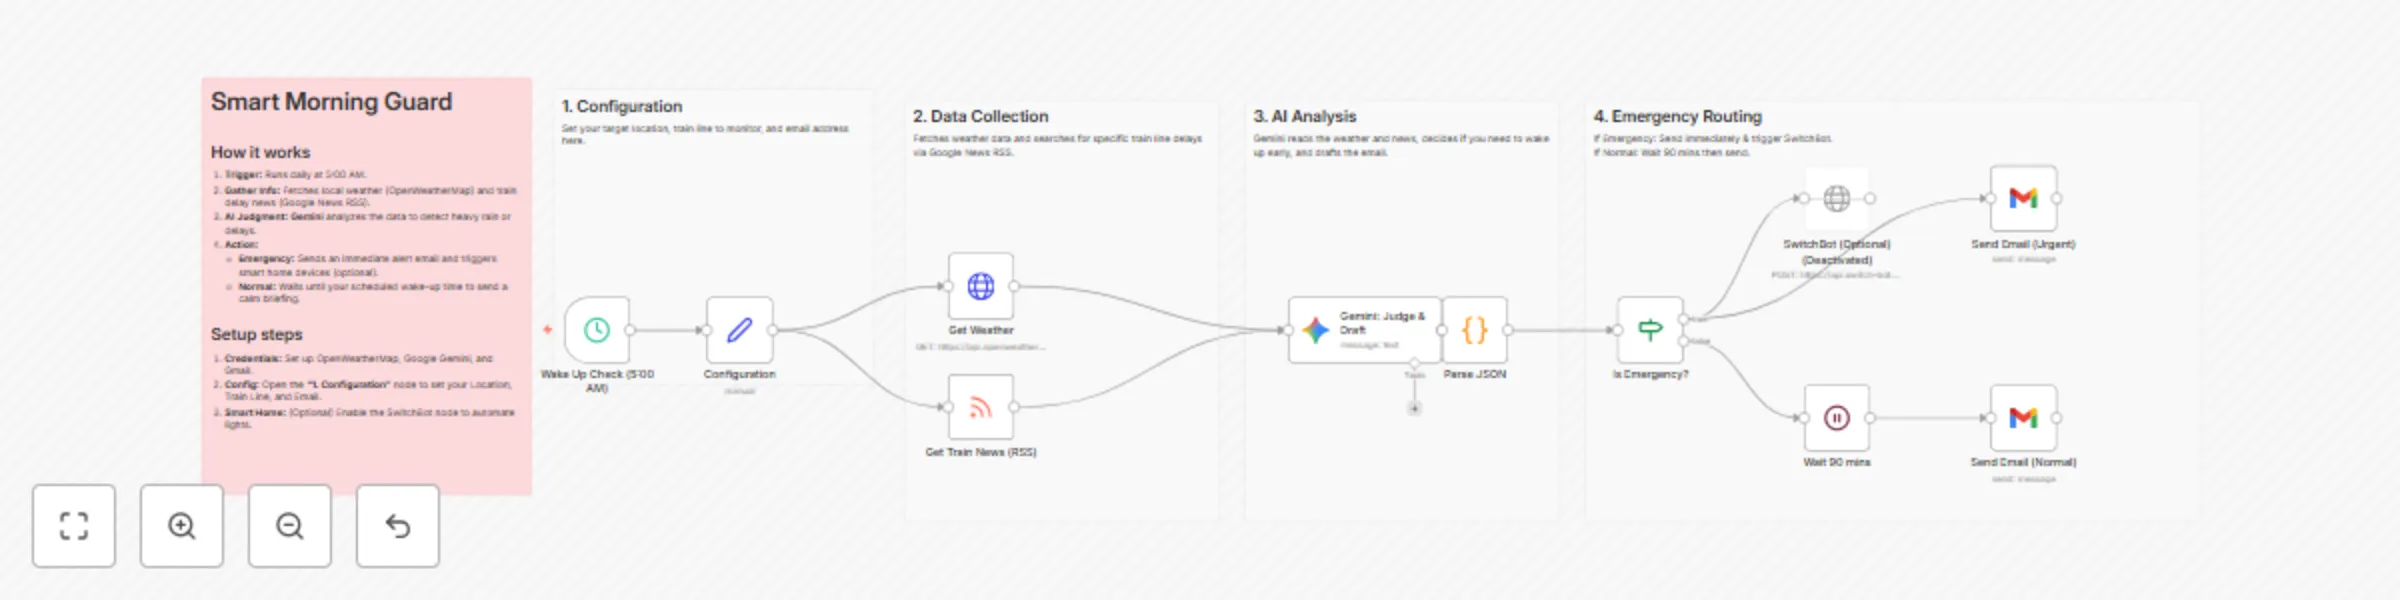
**Description:** An intelligent alarm system that wakes you up early only when necessary. 🛡️🤖 This workflow monitors your local weather and train status every morning at 5:00 AM. It uses Google Gemini to analyze the situation. If there is heavy rain or a train delay, it sends an emergency alert immediately (and can trigger smart home devices). If everything is normal, it waits until your usual wake-up time to send a calm briefing. ## Key Features: AI Context Awareness: Uses Gemini to intelligently judge "Emergency" situations based on weather descriptions and news headlines. Dynamic Notification: Emergency Mode: Immediate Email alert + Optional SwitchBot trigger (e.g., turn on lights). Normal Mode: Delays notification until your scheduled wake-up time (90 mins later). Targeted Monitoring: Searches specific train lines via Google News RSS. ## How it works: Trigger: Runs daily at 5:00 AM. Fetch: Gets weather from OpenWeatherMap and train news from Google News RSS. Judge: Gemini analyzes the data. Action: Routes the notification based on the status (Emergency/Normal). ## Setup Requirements: Credentials: OpenWeatherMap API, Google Gemini API, Gmail. Config: Open the "1. Configuration" node to set your Location, Train Line, and Email.
Track meal nutrition from meal photos with LINE, Google Gemini and Google Sheets
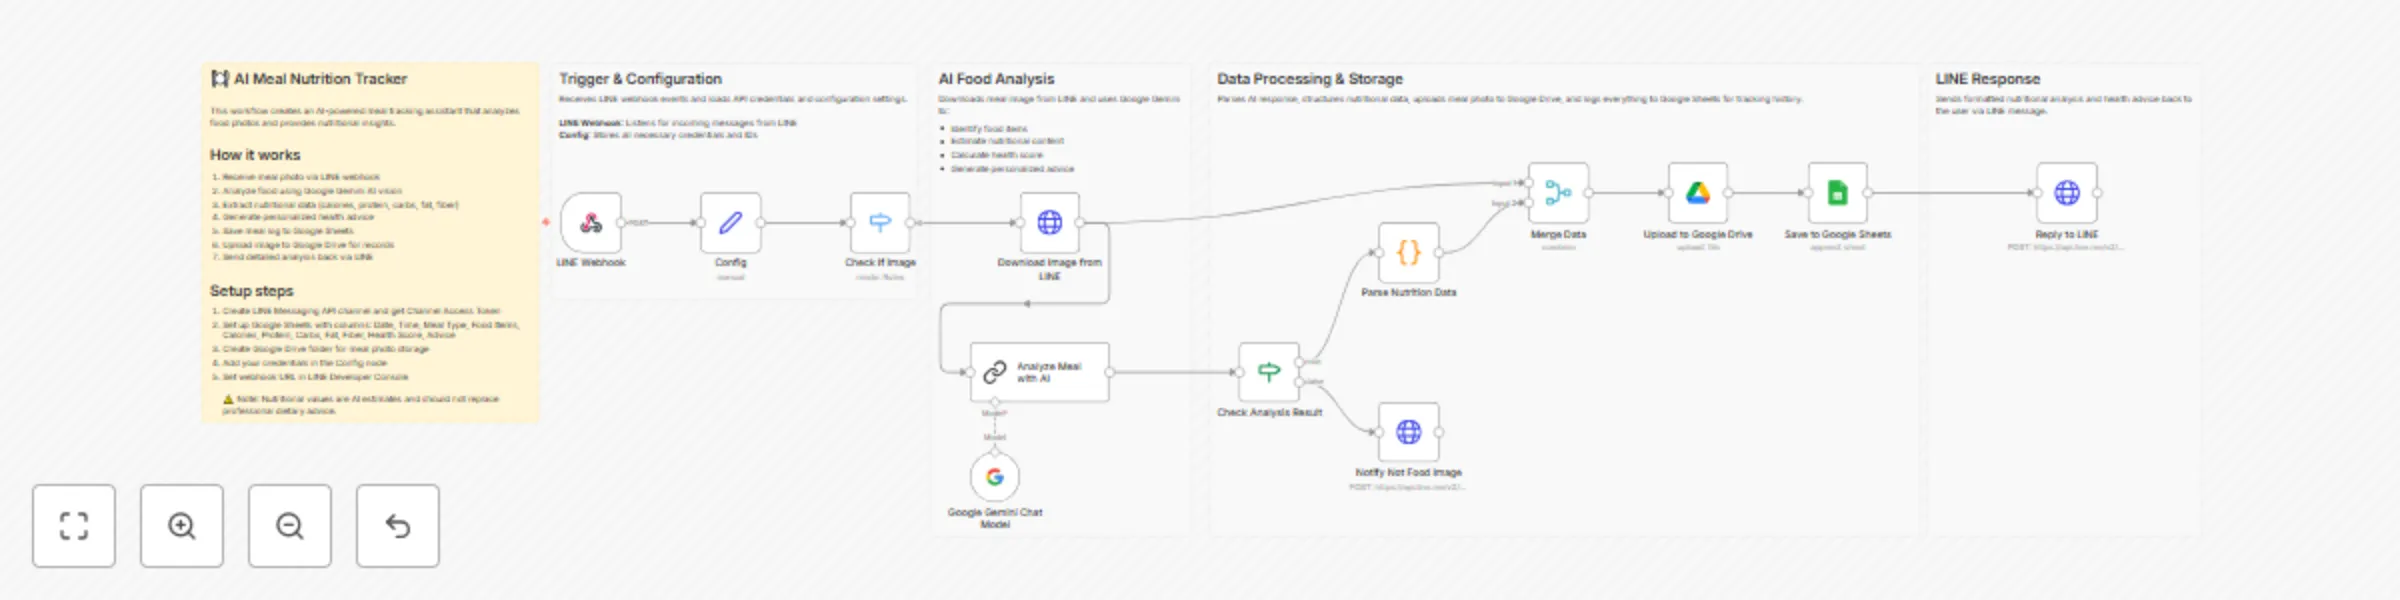
# AI Meal Nutrition Tracker with LINE and Google Sheets ## Who's it for This workflow is designed for health-conscious individuals, fitness enthusiasts, and anyone who wants to track their daily food intake without manual calorie counting. It is best suited for users who want a simple, AI-powered meal logging system that analyzes food photos one at a time and provides instant nutritional feedback via LINE. ## What it does This workflow processes a single meal photo sent via LINE, analyzes it using Google Gemini AI to identify foods and estimate nutritional content, and stores the data in Google Sheets for tracking. The workflow focuses on simplicity and encouragement: it receives a meal image, performs AI-based food recognition, estimates calories and macronutrients, calculates a health score, provides personalized advice, and replies with a detailed nutritional breakdown on LINE. ## How it works 1. A single meal photo is sent to the LINE bot. 2. The workflow is triggered via a LINE webhook. 3. The image file is downloaded and sent to Google Gemini AI for food analysis. 4. The AI identifies foods and estimates nutritional values (calories, protein, carbs, fat, fiber). 5. A health score (1-10) is calculated with personalized improvement tips. 6. The data is appended to Google Sheets for meal history tracking. 7. The image is uploaded to Google Drive for reference. 8. A formatted nutritional report with advice is sent back as a LINE reply. This workflow is intentionally designed to handle **one image per execution**. ## Requirements To use this workflow, you will need: - A LINE Messaging API account - A Google Gemini API key - A Google account with access to Google Sheets and Google Drive - A Google Sheets document with the following column names: - Date - Time - Meal Type - Food Items - Calories - Protein (g) - Carbs (g) - Fat (g) - Fiber (g) - Health Score - Advice - Image URL ## Important limitations - This workflow **does not support multiple images sent in a single message**. - Sending images in quick succession may trigger multiple executions and lead to unexpected results. - Only the first image in an event payload is processed. - Nutritional values are **AI estimates** based on visual analysis and typical serving sizes. - Accuracy depends on image quality, lighting, and food visibility. - This tool should **not replace professional dietary advice**. These limitations are intentional to keep the workflow simple and easy to understand. ## How to set up 1. Create a LINE Messaging API channel and obtain a Channel Access Token. 2. Generate a Google Gemini API key. 3. Update the Config node with your LINE token, Google Sheets ID, Google Drive folder ID, and daily calorie goal. 4. Configure credentials for LINE, Google Gemini, Google Sheets, and Google Drive. 5. Register the n8n webhook URL in your LINE channel settings. 6. Activate the workflow in n8n and test it with a single meal photo. ## How to customize - Modify the AI prompt in the "Analyze Meal with AI" node to support different languages or dietary frameworks (keto, vegan, etc.). - Adjust the daily calorie goal in the Config node to match individual needs. - Add additional nutritional fields such as sodium, sugar, or vitamins. - Replace Google Sheets with a fitness app API or database. - Integrate with other services to send daily/weekly nutrition summaries. --- **Note:** This workflow was tested using real meal photos sent individually via the LINE Messaging API. Nutritional estimates are approximations and may vary from actual values. For accurate dietary tracking, consult a registered dietitian.

Find jobs on Indeed via Telegram using BrowserAct and Gemini
# Find specific jobs on Indeed using Telegram, BrowserAct & Gemini This workflow transforms your Telegram bot into an intelligent job hunting assistant. Simply tell the bot what you are looking for (e.g., "Marketing Manager in Austin"), and it will automatically scrape real-time job listings from Indeed, format them into a clean, easy-to-read list, and send them directly to your chat. ## Target Audience Job seekers, recruiters, and career coaches who want to automate the job search process. ## How it works 1. **Receive Request**: You send a message to your Telegram bot describing the job you want (e.g., "I need a Python developer job in London"). 2. **Extract Parameters**: An **AI Agent** analyzes your message to extract the key details: `Job Role` and `Location`. If you don't specify a location, it defaults to a preset value (e.g., "Brooklyn"). 3. **Scrape Indeed**: **BrowserAct** executes a background task to search Indeed.com using your specific criteria and extracts relevant job data (Title, Company, Pay, Link). 4. **Format Data**: A second **AI Agent** processes the raw job list. It cleans up the text, adds emojis for readability, and formats the output into Telegram-friendly HTML. 5. **Deliver Alerts**: The workflow splits the formatted list into individual messages (to respect character limits) and sends them to your **Telegram** chat. ## How to set up 1. **Configure Credentials**: Connect your **Telegram**, **BrowserAct**, **Google Gemini**, and **OpenRouter** accounts in n8n. 2. **Prepare BrowserAct**: Ensure the **Indeed Smart Job Scout** template is saved in your BrowserAct account. 3. **Configure Telegram**: Create a bot via BotFather and add the API token to your Telegram credentials. 4. **Activate**: Turn on the workflow. 5. **Test**: Send a message like "Find marketing jobs in Chicago" to your bot. ## Requirements * **BrowserAct** account with the **Indeed Smart Job Scout** template. * **Telegram** account (Bot Token). * **Google Gemini** account. * **OpenRouter** account (or compatible LLM credentials). ## How to customize the workflow 1. **Change Default Location**: Edit the system prompt in the **Analyze user Input** agent to change the fallback location from "Brooklyn" to your preferred city. 2. **Filter Results**: Add logic to the **Generate response** agent to filter out jobs with low ratings or missing salary info. 3. **Add More Boards**: Update the BrowserAct template to scrape LinkedIn or Glassdoor in addition to Indeed. ## Need Help? * [How to Find Your BrowserAct API Key & Workflow ID](https://www.youtube.com/watch?v=pDjoZWEsZlE) * [How to Connect n8n to BrowserAct](https://www.youtube.com/watch?v=RoYMdJaRdcQ) * [How to Use & Customize BrowserAct Templates](https://www.youtube.com/watch?v=CPZHFUASncY) --- ### Workflow Guidance and Showcase Video * #### [Indeed Smart Job Scout: The Ultimate n8n Workflow for Job Channels](https://youtu.be/X8GQS8nF9j0)

Create an AI image remix and design bot for Telegram with BrowserAct and Gemini
# AI Image Remix & Design Bot for Telegram with BrowserAct & Gemini This workflow transforms your Telegram bot into an intelligent creative assistant. It can chat conversationally, fetch trending image prompts from PromptHero for inspiration, or perform a deep "remix" of any photo you upload by analyzing its composition and regenerating it with high-fidelity prompt engineering. ## Target Audience Digital artists, designers, content creators, and hobbyists looking for AI-assisted inspiration and image generation. ## How it works 1. **Traffic Control**: The workflow starts with a **Telegram Trigger** and immediately splits traffic: new messages go one way, while interactive button clicks (like "Regenerate") go another. 2. **Intent Classification**: An **AI Agent** analyzes text inputs to decide if the user wants to "Chat" (small talk) or "Start" a creative session (fetch inspiration). 3. **Inspiration Mode**: If "Start" is detected, **BrowserAct** scrapes trending prompts from PromptHero and saves them to a Google Sheet. 4. **Visual Forensics**: If the user uploads an image, an **AI Vision Agent** (using OpenRouter/Gemini) analyzes it in extreme detail (lighting, composition, subjects) and saves the description. 5. **Master Prompt Engineering**: Specialized AI Agents expand these inputs (either scraped prompts or image descriptions) into massive, detailed prompts using the "Rule of Multiplication." 6. **Production**: **Google Gemini** generates the new image, which is sent back to Telegram with interactive buttons to "Regenerate" or move to the "Next" idea. ## ⚠️ Complex Workflow This workflow is complex. Please **proceed using the tutorial video**. ## How to set up 1. **Configure Credentials**: Connect your **Telegram**, **Google Sheets**, **BrowserAct**, **Google Gemini**, and **OpenRouter** accounts in n8n. 2. **Prepare BrowserAct**: Ensure the **Image Remix & Design Bot** template is saved in your BrowserAct account. 3. **Setup Google Sheet**: Create a Google Sheet with four tabs: `PromptHero`, `Current State`, `UserImage`, and `Current Image`. 4. **Connect Sheet**: Open all **Google Sheets** nodes in the workflow and paste your spreadsheet ID. 5. **Configure Telegram**: Ensure your bot is created via BotFather and the API token is added to the Telegram credentials. 6. **Activate**: Turn on the workflow. ## Requirements * **BrowserAct** account with the **Image Remix & Design Bot** template. * **Telegram** account (Bot Token). * **Google Sheets** account. * **Google Gemini** account. * **OpenRouter** account (or compatible LLM credentials). ## How to customize the workflow 1. **Change Art Style**: Modify the system prompt in the **Generate Image** agents to enforce a specific style (e.g., "Cyberpunk," "Watercolor," or "Photorealistic"). 2. **Add More Sources**: Update the **BrowserAct** template to scrape prompts from other sites like Civitai or Midjourney feed. 3. **Switch Image Model**: Replace the Gemini image generation node with **Stable Diffusion** or **DALL-E 3** if you prefer different aesthetics. ## Need Help? * [How to Find Your BrowserAct API Key & Workflow ID](https://www.youtube.com/watch?v=pDjoZWEsZlE) * [How to Connect n8n to BrowserAct](https://www.youtube.com/watch?v=RoYMdJaRdcQ) * [How to Use & Customize BrowserAct Templates](https://www.youtube.com/watch?v=CPZHFUASncY) --- ### Workflow Guidance and Showcase Video * #### [How To create stateful n8n Workflows | AI Image Remix Bot with n8n & BrowserAct & Telegram 🎨](https://youtu.be/GqeKd9aYjW4)

Monitor competitor ad activity via Telegram with BrowserAct and Gemini
# Monitor competitor ad activity via Telegram using BrowserAct & Gemini Turn your Telegram bot into a covert marketing intelligence tool. This workflow allows you to send a company name to a bot, which then scrapes active ad campaigns, analyzes the strategy using AI, and delivers a strategic verdict directly to your chat. ## Target Audience Digital marketers, dropshippers, e-commerce business owners, and ad agencies looking to track competitor activity without manual searching. ## How it works 1. **Receive Command**: The workflow starts when you send a message to your Telegram bot (e.g., "Check ads for Nike" or "Spy on Higgsfield"). 2. **Extract Brand**: An **AI Agent** (using Google Gemini) processes the natural language text to extract the specific company or brand name. 3. **Scrape Ad Data**: A **BrowserAct** node executes a background task (using the "Competitor Ad Activity Monitor" template) to search ad libraries (like Facebook or Google) for active campaigns. 4. **Analyze Strategy**: A second **AI Agent** acts as a "Senior Marketing Analyst." It reviews the scraped data to count active ads, identify key hooks, and determine if the competitor is scaling or inactive. 5. **Deliver Report**: The bot sends a formatted HTML scorecard to **Telegram**, including the ad count, best ad copy, and a strategic verdict (e.g., "ADVERTISE NOW" or "WAIT"). ## How to set up 1. **Configure Credentials**: Connect your **Telegram**, **BrowserAct**, and **Google Gemini** accounts in n8n. 2. **Prepare BrowserAct**: Ensure the **Competitor Ad Activity Monitor** template is saved in your BrowserAct account. 3. **Configure Telegram**: Ensure your bot is created via BotFather and the API token is added to the Telegram credentials. 4. **Activate**: Turn on the workflow. 5. **Test**: Send a company name to your bot to generate a report. ## Requirements * **BrowserAct** account with the **Competitor Ad Activity Monitor** template. * **Telegram** account (Bot Token). * **Google Gemini** account. ## How to customize the workflow 1. **Adjust Analysis Logic**: Modify the system prompt in the **Generate response** agent to change how the "Verdict" is calculated (e.g., prioritize video ads over image ads). 2. **Add More Sources**: Update the BrowserAct template to scrape TikTok Creative Center or LinkedIn Ads. 3. **Change Output**: Replace the Telegram output with a **Slack** or **Discord** node to send reports to a team channel. ## Need Help? * [How to Find Your BrowserAct API Key & Workflow ID](https://www.youtube.com/watch?v=pDjoZWEsZlE) * [How to Connect n8n to BrowserAct](https://www.youtube.com/watch?v=RoYMdJaRdcQ) * [How to Use & Customize BrowserAct Templates](https://www.youtube.com/watch?v=CPZHFUASncY) --- ### Workflow Guidance and Showcase Video * #### [Automated Ad Intelligence: How to Outsmart Your Competitors (n8n + BrowserAct)](https://youtu.be/ZV8ERteG_04)

Create WooCommerce products via Telegram bot with Google Gemini AI
**How it Works?** 1. User Answers Questions Prompted by the Telegram Bot 2. Data Tables are updated to with relevant step of the process and a chat id 3. Upon Approval, the Title, Description and Slug are created and then Product is created on WooCommerce via API request. 4. Data Tables are reset and user is prompted to create another product. **Setup Steps:** (25 Minutes) 1. Create a Telegram bot via @botfather on telegram 2. Setup 2 Data Tables with names WooCommerce Product Manager & User_Images 3. Add your Preffered LLM Credentials and set credentials in telegram node 4. In TelegramGroupMedia node and EditFields 1 node, add your bot token to replace {{your bot token}} 5. Voila! Your Workflow is now configured.

Manage your Shopify store via AI assistant with OpenAI and MCP server
## Who it's for This **n8n workflow** is designed for Shopify store owners and e-commerce managers who want to automate their store operations through an intelligent AI assistant. The workflow creates a conversational interface that can manage products, process orders, and provide store analytics through natural language commands. ## Features - **Intelligent AI Assistant**: Powered by OpenAI with specialized system prompts for e-commerce operations - **Shopify Integration**: Complete MCP (Model Context Protocol) server implementation for seamless Shopify operations - **Product Management**: Create, update, search, retrieve, and delete products automatically - **Order Processing**: Create, update, retrieve, and manage orders including fulfillment status - **Context-Aware Automation**: Uses conversation history and Shopify data to minimize user input requirements ## Requirements - **Shopify Access Token**: For accessing Shopify store data and operations - **OpenAI API Credentials**: For powering the AI assistant - **Notification Service Credentials**: `Discord Bot API`, `Telegram Bot API`, `Rapiwa API (for WhatsApp)`, `Gmail OAuth2` #### Configure Credentials - **Shopify Access Token**: Configure with proper permissions for your store - **OpenAI API**: Set up with appropriate model access (gpt-4.1-mini or similar) - **Notification Services**: Configure each service with proper API keys and target IDs ## Important Notes - **MCP Server Setup**: The workflow includes a Shopify MCP Server that must be properly configured for production use - **Tool Selection**: The MCP Client includes specific Shopify tools that can be enabled/disabled based on requirements - **System Prompt**: The AI assistant is configured with specialized e-commerce guidelines that can be customized - **Confirmation Requirements**: Irreversible actions like deletions will require confirmation - **Rate Limiting**: The workflow includes appropriate delays to prevent API rate limiting - **Notification Content**: All notifications include a standard success message that can be customized ## Production Deployment for MCP Server `To deploy this workflow in production` ## Support & Help - **WhatsApp**: [Chat on WhatsApp](https://wa.me/8801322827799) - **Discord**: [SpaGreen Community](https://discord.gg/SsCChWEP) - **Facebook Group**: [SpaGreen Support](https://www.facebook.com/groups/spagreenbd) - **Website**: [https://spagreen.net](https://spagreen.net) - **Developer Portfolio**: [Codecanyon SpaGreen](https://codecanyon.net/user/spagreen/portfolio)

Send sales forecast charts and answer Q&A on WhatsApp with OpenAI
## How It Works ***Top Branch Workflow*** **1. The Data Scientist:** - **Ingest:** Pulls historical sales data from Google Sheets. - **Math Engine:** Runs 7 statistical algorithms (e.g., Seasonal Naive, Linear Trend, Regression). It backtests them against your history and scientifically selects the winner with the lowest error rate. **2. The Data Analyst:** - **Interpret:** The AI Agent takes the mathematical output and translates it into business insights, assigning confidence scores based on error margins. - **Report:** Generates a visual trend chart (PNG) and sends a complete briefing to your phone. ***Bottom Branch Workflow*** **3. The Consultant:** AI Agent 2 handles the follow-up questions. It pulls the latest analysis context and checks historical rate data to give an informed answer. - **Recall:** When you ask a question via WhatsApp, the bot retrieves the saved forecast state. - **Answer:** It acts as an on-demand analyst, comparing current forecasts against historical actuals to give you instant answers. ## Setup Steps 1) Google Sheet: Prepare columns: Year, Month, Sales. Map the Sheet ID in the "Workflow Configuration" node. 2) Forecast Engine: No config needed. It automatically detects seasonality vs. linear trends. 3) Database: Create a table latest_forecast to store the JSON output. 4) Credentials: Connect Google Sheets, OpenAI, and WhatsApp ## Use Cases & Benefits **For Business Owners:** Gain enterprise-grade forecasting on autopilot. Always have a sophisticated financial outlook running in the background 24/7. **For Sales Leaders:** Get immediate visibility into future revenue trends. Bypass the wait for end-of-month manual reports and get a strategic "pulse check" delivered instantly to your phone. 🤖***Virtual Data Team:*** Instantly add the capabilities of a Data Scientist and Data Analyst to your business or division. It works alongside your existing team to handle the heavy lifting, or stands in as your dedicated automated department. 🧠***Precision & Trust:*** Combines the best of both worlds: rigorous, deterministic code for the math (no hallucinations) and advanced AI for the strategic explanation. You get numbers you can trust with context you can use. ⚡***Decision-Ready Insights:*** Stop digging through dashboards. High-level intelligence is pushed directly to you on WhatsApp, allowing you to make faster, data-driven decisions from anywhere. ## 📬 Want to Customize This? [[email protected]]([email protected])

Run AI-powered market research with Groq, OpenAI, Documentero and Gmail
## Description This n8n template demonstrates how to build an AI-powered Market Research Assistant using a multi-agent workflow. It helps you get a 360-degree view of a product idea or research topic by analysing: * Customer insights and pain points * Market size and macro/micro-economic trends * Competitive landscape and alternatives The workflow mirrors how product managers and strategy teams conduct discovery — by breaking down research into parallel workstreams and then synthesizing insights into a single narrative. ## How it works 1. Planner Agent The main agent receives your research topic as input and defines: * Research objective * Key areas of focus (Customer, Market, Competition) * Assumptions and constraints 2. Parallel Research Agents Based on the planner’s output, three specialist agents run in parallel: * Customer Insights Agent Researches public sources such as articles and forums to infer customer behaviour, pain points, and existing tools. * Market Scan Agent Analyses macro-economic and micro-economic trends, estimates TAM/SAM/SOM, and highlights key risks and assumptions. * Competitor Insights Agent Identifies existing competitors and substitutes and summarises how they are positioned in the market. 3. Synthesis Agent The outputs from all research agents are consolidated and analysed by a synthesis agent, which produces a market discovery memo. 4. Final Output The discovery memo is generated as a document and sent to your email. ## How to use * Trigger the workflow via the chat message node. * Provide your research topic or product idea, along with optional context such as target market. * The workflow runs automatically and delivers a structured discovery memo to your inbox. ## Setup Steps * API credentials for: * Groq or OpenAI (LLM) * Documentero (document generation) * A configured Documentero template * Gmail OAuth or email credentials for delivery of memo
Automate post-meeting tasks with Fireflies, GPT-4o & ClickUp
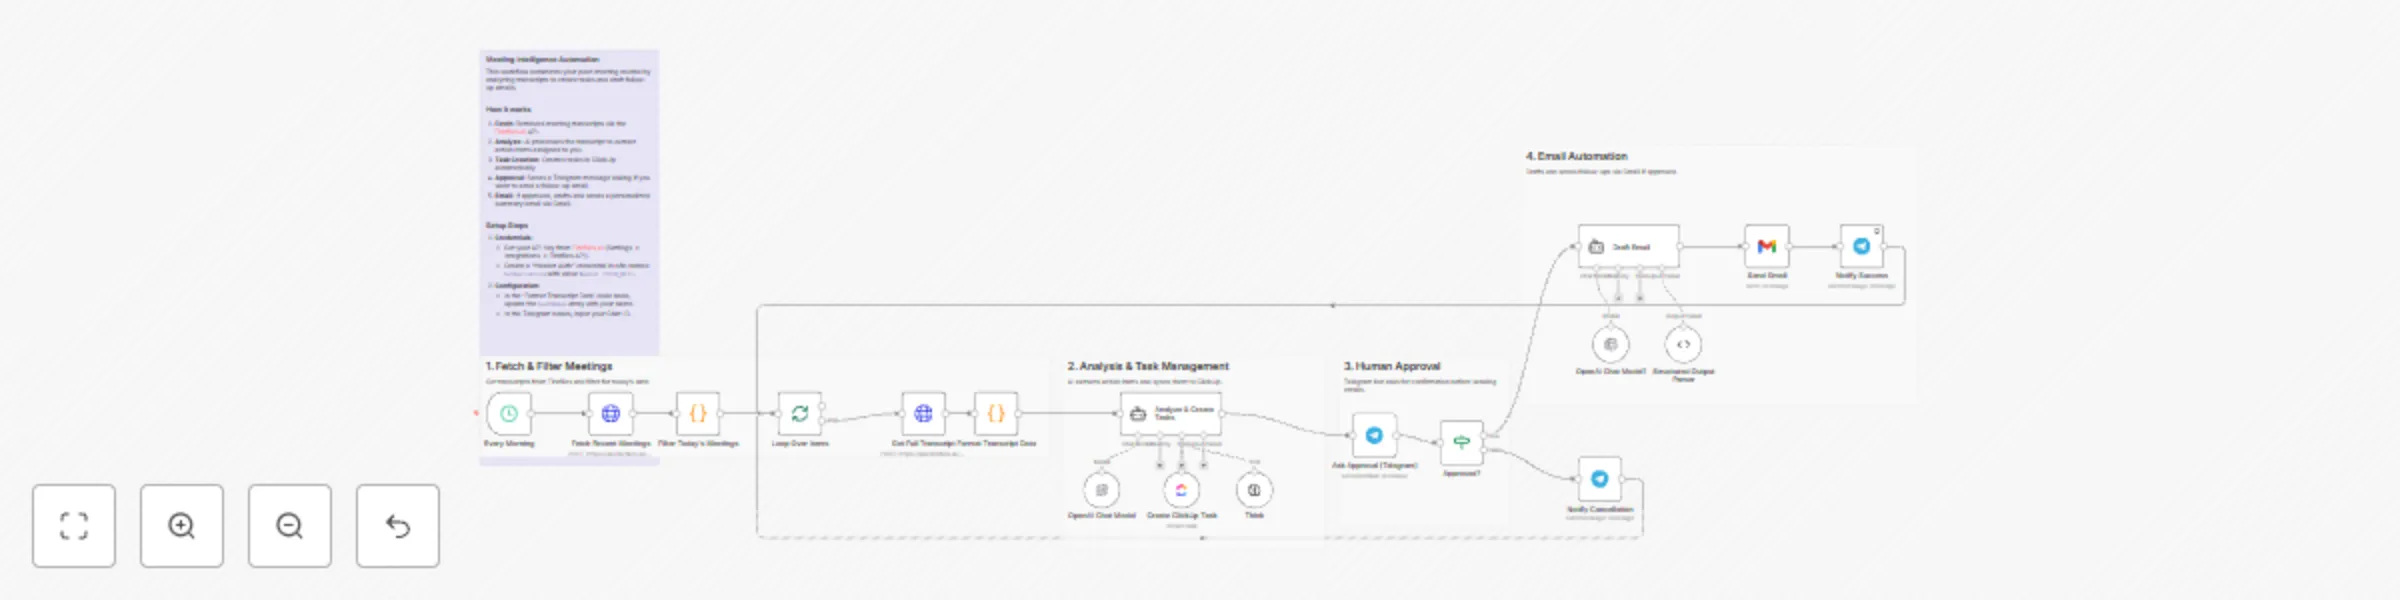
## AI Meeting Assistant: Sync Fireflies Transcripts to ClickUp & Gmail Act as your personal executive assistant with this high-level automation designed to handle the most tedious post-meeting tasks. This workflow ensures that no action item is forgotten and that participants receive professional follow-ups without you having to lift a finger. ## Who is this for? - Busy executives and managers who have back-to-back meetings. - Project managers who need to sync action items directly into ClickUp. - Sales teams who want to automate professional follow-up emails based on meeting context. ## How it works 1. **Fetch Transcripts:** The workflow runs on a schedule and retrieves your latest meeting data directly from the Fireflies.ai API using HTTP nodes. 2. **Intelligent Filtering:** A JavaScript node filters the list to process only today's meetings. 3. **AI Task Extraction:** An AI Agent (using GPT-4o-mini) analyzes the transcript to find tasks specifically assigned to the host. It then uses the ClickUp tool to create these tasks with priorities and descriptions. 4. **Human-in-the-Loop:** To ensure quality, the workflow sends a summary to your Telegram. It asks for approval before sending any external emails. 5. **Automated Follow-up:** Once approved, a second AI Agent drafts a concise, professional email summary and sends it via Gmail to the external participants. ## Requirements - **Fireflies.ai Account:** You need an API Key (Settings -> Integrations -> Fireflies API). - **OpenAI API Key:** To power the AI Agents. - **ClickUp Workspace:** To manage the generated tasks. - **Telegram Bot:** For the approval notifications. - **Gmail Account:** For sending the follow-up emails. ## How to set up 1. **Fireflies API Key:** Create a **Header Auth** credential in n8n. Set the Name to `Authorization` and the Value to `Bearer YOUR_API_KEY_HERE`. 2. **Configure Credentials:** Add your credentials for OpenAI, ClickUp, Telegram, and Gmail. 3. **ClickUp Configuration:** In the "Create ClickUp Task" node, select your specific Workspace, Space, and List from the dropdown menus. 4. **Identity Setup:** Open the "Format Transcript Data" code node. Update the `hostNames` array with your name and aliases (e.g., `['Host', 'My Name']`) so the AI correctly identifies you. 5. **Telegram Chat ID:** Enter your Chat ID in the Telegram nodes to receive the approval prompts.

Compare LLM token costs across 350+ models with OpenRouter
### This n8n template lets you run prompts against 350+ LLM models and see exactly what each request costs with real-time pricing from OpenRouter Use cases are many: Compare costs across different models, plan your AI budget, optimize prompts for cost efficiency, or track expenses for client billing! ## Good to know - OpenRouter charges a platform fee on top of model costs. See [OpenRouter Pricing](https://openrouter.ai/pricing) for details. - You need an OpenRouter account with API credits. Free signup available with some free models included. - Pricing data is fetched live from OpenRouter's API, so costs are always up-to-date. ## How it works 1. All available models are fetched from OpenRouter's API when you start. 2. You select a model and enter your prompt via the form (or just use the chat). 3. The prompt is sent to OpenRouter and the response is captured. 4. Token usage (input/output) is extracted from the response using a LangChain Code node. 5. Real-time pricing for your selected model is fetched from OpenRouter. 6. The exact cost is calculated and displayed alongside your AI response. ## How to use - **Chat interface**: Quick testing - just type a prompt and get the response with costs. - **Form interface**: Select from all available models via dropdown, enter your prompt, and get a detailed cost breakdown. - Click **"Show Details"** on the result form to see the full breakdown (input tokens, output tokens, cost per type). ## Requirements - OpenRouter account with API key ([Get one here](https://openrouter.ai/settings/keys)) ## Customising this workflow - Add a database node to log all requests and costs over time - Connect to Google Sheets for cost tracking and reporting - Extend with LLM-as-Judge evaluation to also check response quality

Create an all-in-one Discord assistant with Gemini, Llama Vision & Flux images
This n8n template demonstrates how to build **O'Carla**, an advanced all-in-one Discord AI assistant. It intelligently handles natural conversations, professional image generation, and visual file analysis within a single server integration. Use cases are many: Deploy a smart community manager that remembers past interactions, an on-demand artistic tool for your members, or an AI that can "read" and explain uploaded documents and images! ## Good to know * **API Costs:** Each interaction costs vary depending on the model used (Gemini vs. OpenRouter). Check your provider's dashboard for updated pricing. * **Infrastructure:** This workflow requires a separate Discord bot script (e.g., Node.js) to forward events to the n8n Webhook. It is recommended to host the bot using **PM2** for 24/7 uptime. ## How it works 1. **Webhook Trigger:** Receives incoming data (text and attachments) from your Discord bot. 2. **Intent Routing:** The workflow uses conditional logic to detect if the user wants an image (via keyword `gambar:`), a vision analysis (via attachments), or a standard chat. 3. **Multi-Model Intelligence:** * **Gemini 2.5:** Powers rapid and high-quality general chat reasoning. * **Llama 3.2 Vision (via OpenRouter):** Specifically used to describe and analyze images or text-based files. * **Flux (via Pollinations):** Uses a specialized AI Agent to refine prompts and generate professional-grade images. 4. **Contextual Memory:** A 50-message buffer window ensures O'Carla maintains the context of your conversation based on your Discord User ID. 5. **Clean UI Output:** Generated image links are automatically shortened via **TinyURL** to keep the Discord chat interface tidy. ## How to use 1. Connect your **Google Gemini** and **OpenRouter** API keys in the respective nodes. 2. Replace the Webhook URL in your bot script with this workflow's **Production Webhook URL**. 3. Type `gambar: [your prompt]` in Discord to generate images. 4. Upload an image or file to Discord to trigger the AI Vision analysis. ## Requirements * n8n instance (Self-hosted or Cloud). * Google Gemini API Key. * OpenRouter API Key. * Discord Bot Token and hosting environment. ## Customising this workflow O'Carla is highly flexible. You can change her personality by modifying the **System Message** in the Agent nodes, adjust the memory window length, or swap the LLM models to specialized ones like Claude 3.5 or GPT-4o.
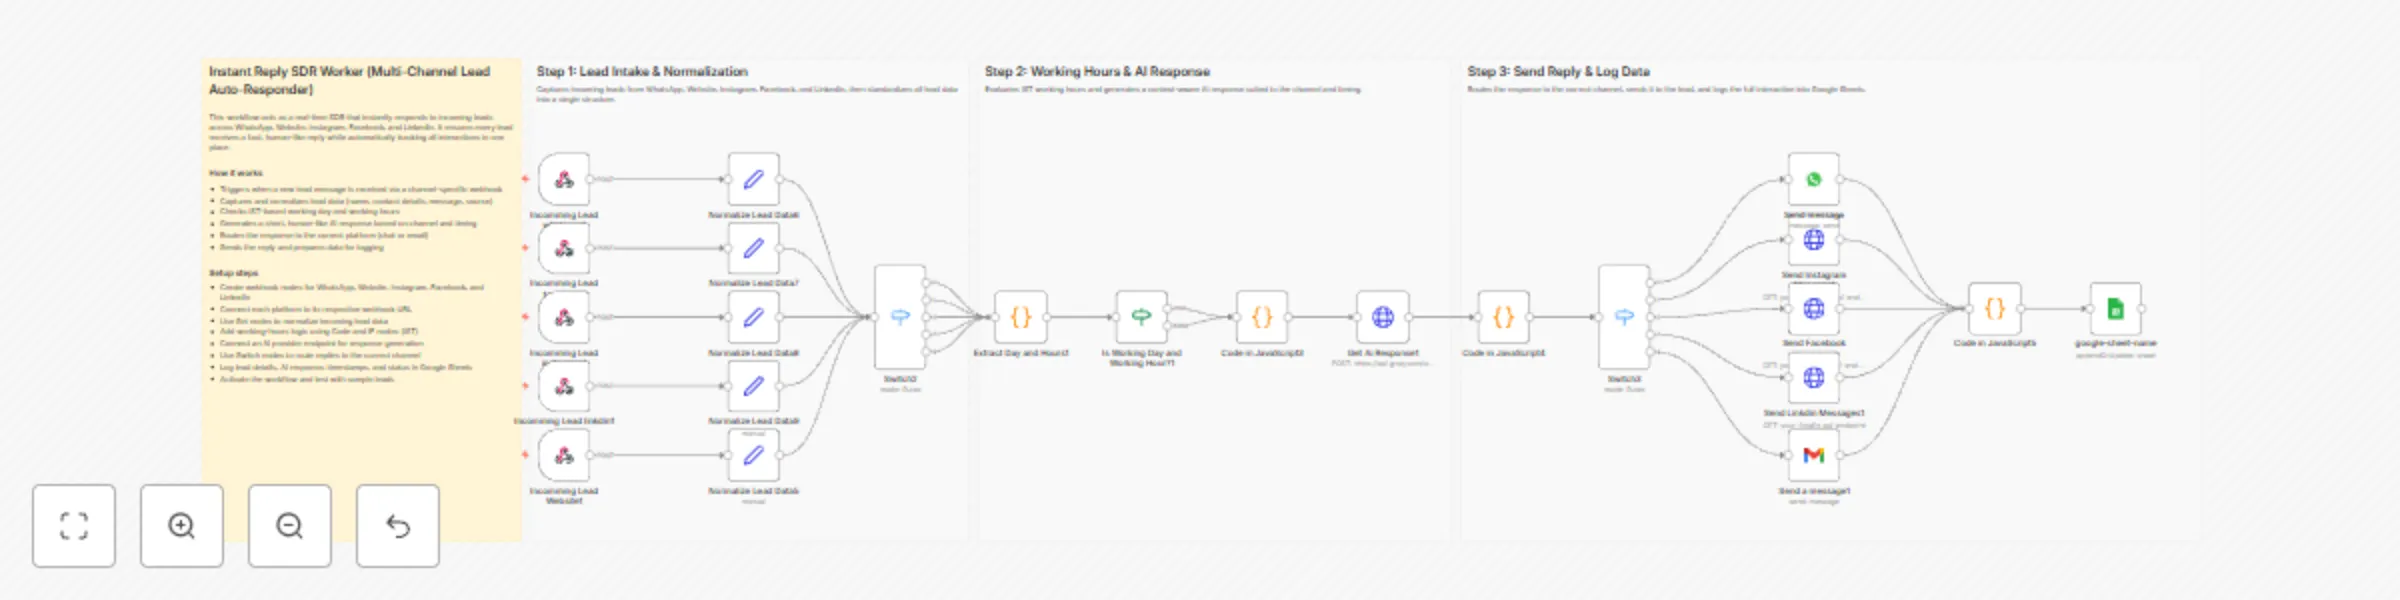
Real-time lead response across social channels with Llama AI & Google Sheets
## How it works This workflow acts as an instant SDR that replies to new inbound leads across multiple channels in real time. It first captures and normalizes all incoming lead data into a unified structure. The workflow then evaluates IST working days and hours, generates a context-aware AI response, and routes the reply to the correct channel. Finally, it logs the full interaction, response status, and timing into Google Sheets. ## Step-by-step - **Step 1: Lead intake & normalization** - **Incomming Lead whatsapp1** – Receives new WhatsApp lead messages via webhook. - **Incomming Lead facebook1** – Captures incoming Facebook lead messages. - **Incomming Lead instagram1** – Listens for Instagram lead messages. - **Incomming Lead linkdin1** – Captures LinkedIn lead messages. - **Incomming Lead Website1** – Receives website form submissions. - **Normalize Lead Data6** – Normalizes WhatsApp lead fields. - **Normalize Lead Data7** – Normalizes Facebook lead fields. - **Normalize Lead Data8** – Normalizes Instagram lead fields. - **Normalize Lead Data9** – Normalizes LinkedIn lead fields. - **Normalize Lead Data5** – Normalizes website lead data. - **Switch2** – Merges all normalized leads into a single processing path. - **Step 2: Working hours & AI response** - **Extract Day and Hours1** – Converts timestamps to IST and extracts day and time. - **Is Working Day and Working Hour?1** – Determines whether the lead arrived during business hours. - **Code in JavaScript3** – Builds the AI prompt using lead details and timing context. - **Get Ai Response1** – Generates a short, human-like response. - **Step 3: Send reply & log data** - **Code in JavaScript4** – Combines AI output with normalized lead data. - **Switch3** – Routes the response based on the source channel. - **Send message** – Sends WhatsApp replies. - **Send Instagram Message1** – Sends Instagram responses. - **Send Facebook Messages1** – Sends Facebook replies. - **Send Linkdin Messages1** – Sends LinkedIn responses. - **Send a message1** – Sends email replies for website leads. - **Code in JavaScript5** – Finalizes response status and metadata. - **google-sheet-name** – Appends or updates lead and response data in Google Sheets. ## Why use this? - Replies instantly to leads across all major inbound channels - Keeps all lead data standardized and easy to manage - Automatically respects IST working days and hours - Reduces manual SDR workload without losing response quality - Maintains a complete response log for reporting and follow-up

Capture and score multi-channel leads with GPT-4, Gmail and Google Sheets
Complete AI-powered sales system Automates lead capture, qualification, and follow-up from multiple channels. AI INTELLIGENCE: Automatic GPT-4 analysis Detects: sentiment, urgency, intent, budget signals Identifies pain points and interests Generates personalized responses LEAD SCORING ENGINE: Score 0-100 based on 10+ variables: Channel (Referral +30, LinkedIn +25, WhatsApp +20, Web Form +15, Email +10) Positive sentiment (+15) High urgency (+25) Purchase intent (+30) High budget (+20) Decision maker (+20) Engagement (+5 per interaction, max 25) MULTI-CHANNEL INPUT: Gmail (incoming emails) Webhook for web forms Webhook for WhatsApp/Telegram All normalized to unified format SMART ROUTER - 5 FLOWS: Schedule Demo: Hot lead with Calendly CTA Send Info: Informative response Create Task: Slack notification for call Nurturing: Cold lead, value-driven email Disqualify: Invalid lead AUTO CRM: Detects new vs existing leads Stores last 10 interactions history Updates score and stage automatically Complete interaction log HOT LEAD ALERTS (Score 70+): Instant Slack notification with lead data, company, score, stage, intent, urgency, pain points, and AI summary. AUTO-NURTURING (Daily 10AM): Filters leads with score 20-60 No contact in 3+ days AI personalized follow-up emails Max 10 per day WEEKLY REPORT (Monday 9AM): Total and new leads Active hot leads count Average score Distribution by stage and channel SETUP: Google Sheets with 3 tabs: Leads, Interactions, Tasks OpenAI API Key Gmail connected Slack channels: #sales, #errors IDEAL FOR: B2B Startups Digital agencies Consulting firms SaaS companies Any business with multi-channel leads Replaces HubSpot, Pipedrive, Close.io - 100% customizable, no monthly fees.

Manage recruitment tasks in Slack with Recrutei ATS & GPT-4 Agent
## Overview: Recrutei ATS - Ultimate Internal AI Agent This workflow transforms Slack into a powerful command center for recruitment. Using an AI Agent (LangChain) integrated with the Recrutei ATS API and MCP, your team can manage candidates, vacancies, tags and a lot more directly through Slack messages. ## Key Features * **Natural Language Processing:** Use GPT-4 to interpret complex requests like "Find candidates for the Python role and tag them as 'Senior'". * **Candidate Management:** Create prospects, disqualify candidates, or move them between pipeline stages. * **Vacancy Insights:** Add and read comments on vacancies directly from the chat. * **Tagging System:** Create, list, and delete tags dynamically. ## Setup Instructions 1. **Slack Trigger:** Connect your Slack account and invite the bot to your desired channel. 2. **OpenAI:** Configure your API Key. This agent uses GPT-4o-mini (or GPT-4) for high-reasoning capabilities. 3. **HTTP Request Tools:** Every "Tool" node (Pink nodes) needs your Recrutei API Token. * Replace the `Authorization` header with your `Bearer YOUR_TOKEN`. * Update the Base URL if necessary. 4. **Slack Post:** Ensure the bot has permissions to write in the channel.

Compare product prices on Amazon and Jumia with Decodo, OpenAI and Telegram
## What Problem Does It Solve? - We’ve all been there: you want to check if a product is cheaper on Amazon or Jumia, but opening a dozen tabs is a pain. - Building a bot to do this usually fails because big e-commerce sites love to block scrapers with CAPTCHAs. - This workflow fixes that headache by: - Taking a product name from a chat message. - Using **Decodo** to handle the hard part—searching Google and scraping the product pages without getting blocked. - Using AI to read the messy HTML and pull out just the price and product name. - Sending a clean "Best Price" summary back to the user instantly. ## How to Configure It ### Telegram Setup - Create a bot with BotFather and paste your token into the Telegram node. - Make sure your webhook is set up so the bot actually "hears" the messages. ### Decodo - This is the engine that makes the workflow reliable. - You'll need to add your **Decodo API key** in the credentials. - We used Decodo here specifically because it handles the proxies and browser fingerprinting for you—so your Amazon requests actually go through instead of failing. ### AI Setup - Plug in your OpenAI API key (or swap the node for Claude/Gemini if you prefer). - The system prompt is already set up to ignore ads and find the real price, but feel free to tweak the tone. ## How It Works 1. **Trigger:** You text the bot a product name (e.g., "Sony XM5"). 2. **Search:** The workflow asks **Decodo** to Google that specific term on sites like Amazon.eg. 3. **Scrape:** It grabs the URLs and passes them back to Decodo to fetch the page content safely. 4. **Extract:** The AI reads through the text, finds the lowest price, and ignores the clutter. 5. **Reply:** The bot texts you back with the best deal found. ## Customization Ideas - **Go wider:** Edit the search query to check other stores like Noon or Carrefour. - **Track trends:** Connect a Google Sheet to log what people are searching for—great for market research. If you need any help [Get In Touch](https://www.linkedin.com/in/abdallaelshikh0/)
Automate employee leave approvals with GPT, Gmail & Calendar integration
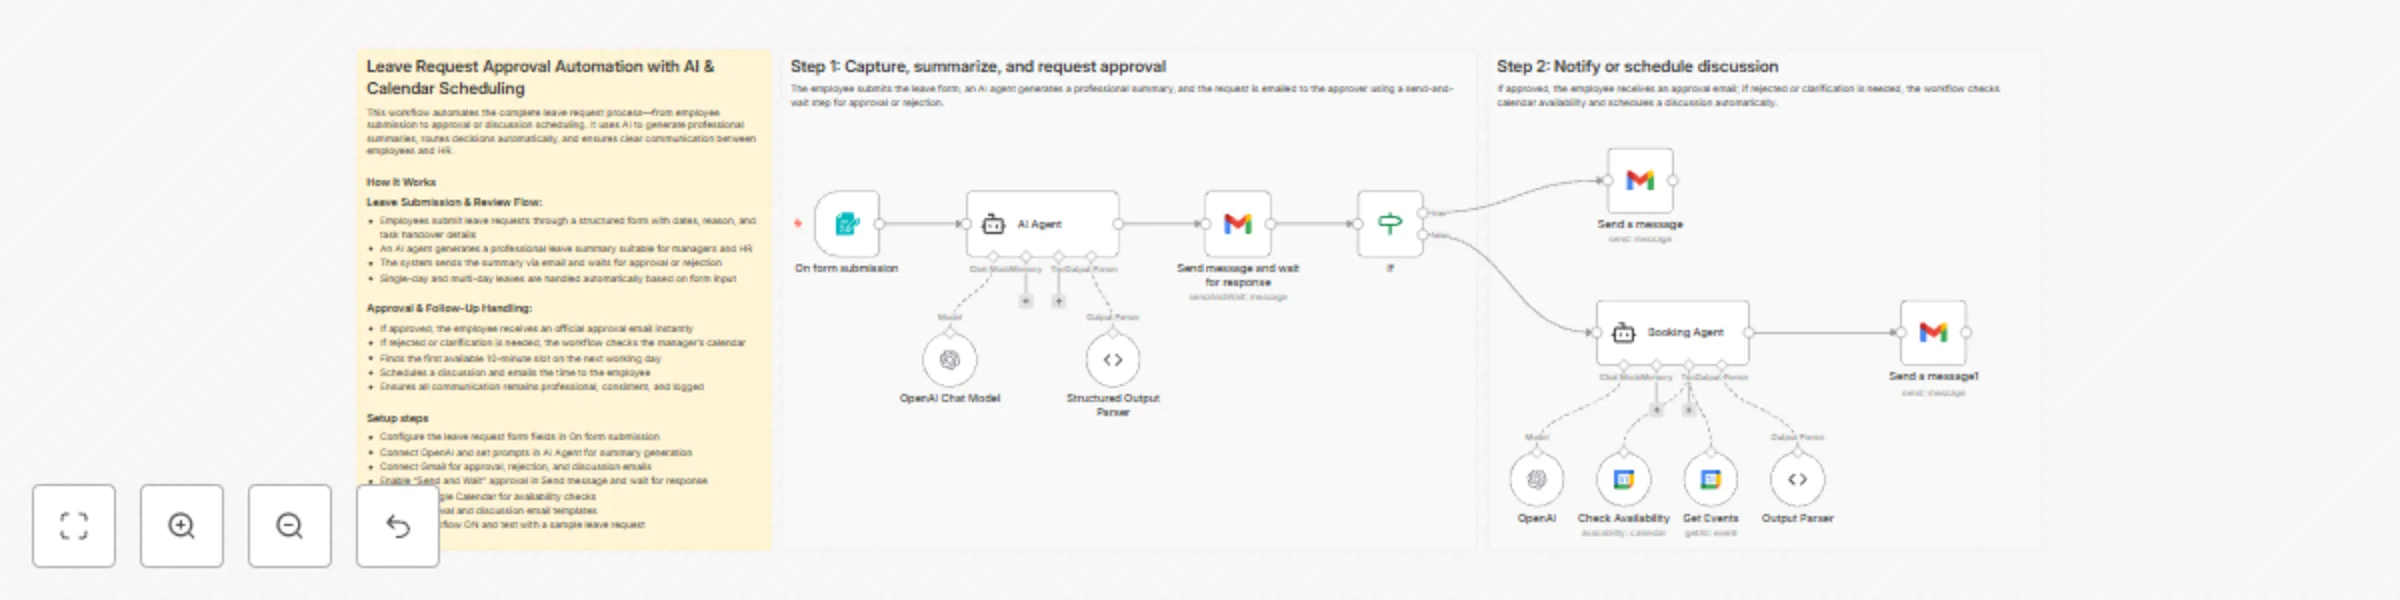
## How it works This workflow automates the complete employee leave approval process from submission to final resolution. Employees submit leave requests through a form, which are summarized professionally using AI and sent for approval via email. The workflow waits for the approver’s response and then either sends an approval confirmation or schedules a clarification discussion automatically. All communication is handled consistently with no manual follow-ups required. ## Step-by-step - **Step 1: Capture leave request, generate summary, and request approval** - **On form submission** – Captures employee details, leave dates, reason, and task handover information. - **AI Agent** – Generates a professional, manager-ready summary of the leave request. - **OpenAI Chat Model** – Provides the language model used to generate the summary. - **Structured Output Parser** – Extracts the email subject and HTML body from the AI response. - **Send message and wait for response** – Emails the summary to the approver and pauses the workflow until approval or rejection. - **If** – Routes the workflow based on the approval decision. - **Step 2: Notify employee or schedule discussion automatically** - **Approved path** - **Send a message** – Sends an official leave approval email to the employee. - **Clarification or rejection path** - **Booking Agent** – Determines the next business day and finds the first available 10-minute slot. - **OpenAI** – Applies scheduling logic to select the earliest valid slot. - **Get Events** – Fetches existing calendar events to avoid conflicts. - **Check Availability** – Confirms free time within working hours. - **Output Parser** – Extracts the final meeting start time. - **Send a message1** – Emails the employee with the scheduled discussion details. ## Why use this? - Eliminate manual approval follow-ups and email back-and-forth - Ensure consistent, professional communication for every leave request - Automatically handle both approvals and clarification scenarios - Reduce manager effort with AI-generated summaries - Schedule discussions without manual calendar coordination
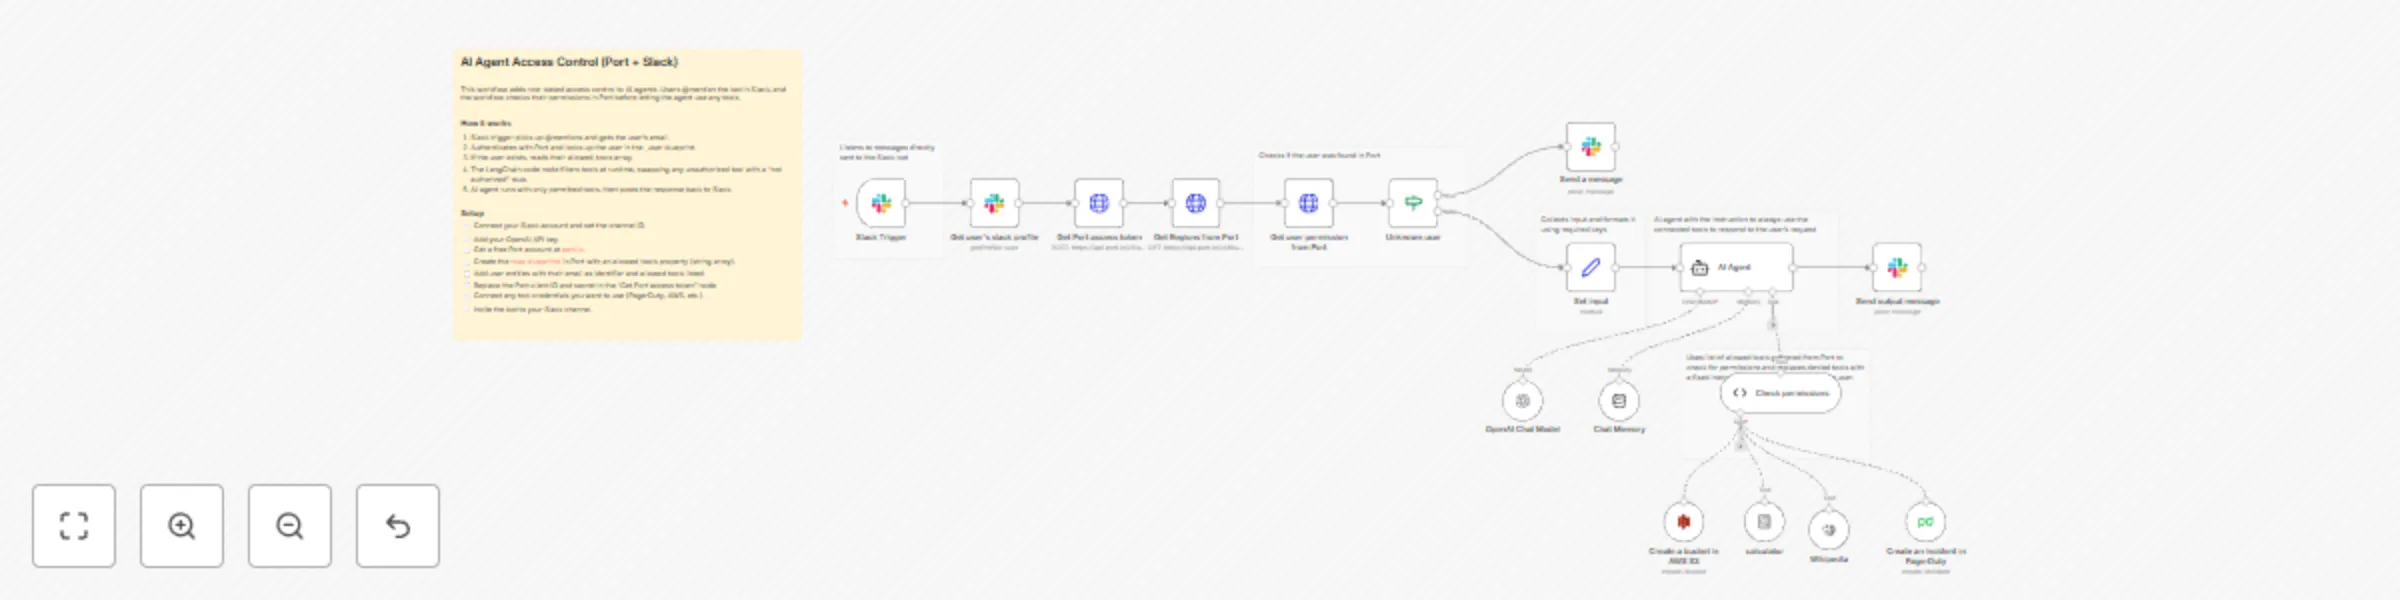
Control AI agent tool access with Port RBAC and Slack mentions
## RBAC for AI agents with n8n and Port This workflow implements role-based access control for AI agent tools using Port as the single source of truth for permissions. Different users get access to different tools based on their roles, without needing a separate permission database. For example, developers might have access to PagerDuty and AWS S3, while support staff only gets Wikipedia and a calculator. The workflow checks each user's permissions in Port before letting the agent use any tools. For the full guide with blueprint setup and detailed configuration, see [RBAC for AI Agents with n8n and Port](https://docs.port.io/guides/all/implement-rbac-for-ai-agents-with-n8n-and-port/) in the Port documentation. ## How it works The n8n workflow orchestrates the following steps: - Slack trigger — Listens for @mentions and extracts the user ID from the message. - Get user profile — Fetches the user's Slack profile to get their email address. - Port authentication — Requests an access token from the Port API using client credentials. - Permission lookup — Queries Port for the user entity (by email) and reads their allowed_tools array. - Unknown user check — If the user doesn't exist in Port, sends an error message and stops. - Permission filtering — The "Check permissions" node compares each connected tool against allowed_tools and replaces unauthorized ones with a stub that returns "You are not authorized to use this tool." - AI agent — Runs with only permitted tools, using GPT-4 and chat memory. - Response — Posts the agent output back to the Slack channel. ## Setup - [ ] Connect your Slack account and set the channel ID in the trigger node - [ ] Add your OpenAI API key - [ ] Register for free on [Port.io](https://www.port.io) - [ ] Create the rbacUser blueprint in Port (see [full guide](https://docs.port.io/guides/all/implement-rbac-for-ai-agents-with-n8n-and-port/) for blueprint setup) - [ ] Add user entities using email as the identifier - [ ] Replace YOUR_PORT_CLIENT_ID and YOUR_PORT_CLIENT_SECRET in the "Get Port access token" node - [ ] Connect credentials for any tools you want to use (PagerDuty, AWS, etc.) - [ ] Update the channel ID in the Slack nodes - [ ] Invite the bot to your Slack channel - [ ] You should be good to go! ## Prerequisites - You have a Port account and have completed the onboarding process. - You have a working n8n instance (self-hosted) with LangChain nodes available. - Slack workspace with bot permissions to receive mentions and post messages. - OpenAI API key for the LangChain agent. - Port client ID and secret for API authentication. - (Optional) PagerDuty, AWS, or other service credentials for tools you want to control. ⚠️ This template is intended for Self-Hosted instances only.

AI news digest: Summarize top stories with GPT-4o and DALL-E for Telegram
**Title:** Create daily AI news digest and send to Telegram **Description:** Stay ahead of the rapidly evolving artificial intelligence landscape without the information overload. This workflow acts as your personal AI news editor, automatically curating, summarizing, and visualizing the top stories of the day, delivered directly to your Telegram. It goes beyond simple RSS aggregation by using an AI Agent to rewrite headlines and summaries into a digestible format and includes a "Chat Mode" where you can ask follow-up questions about the news directly within the n8n interface. ## Who is it for - **AI Enthusiasts & Researchers:** Keep up with the latest papers and releases without manually checking multiple sites. - **Tech Professionals:** Get a morning briefing on industry trends to start your day informed. - **Content Creators:** Find trending topics for newsletters or social media posts effortlessly. ## How it works 1. **News Aggregation:** Every morning at 8:00 AM, the workflow fetches RSS feeds from top tech sources (Google News AI, The Verge, and TechCrunch). 2. **Smart Filtering:** A Code node aggregates the articles, removes duplicates, and ranks them by recency to select the top 5 stories. 3. **AI Summarization:** An AI Agent (powered by OpenAI) analyzes the selected stories and writes a concise, engaging summary for each. 4. **Visual Generation:** DALL-E generates a unique, futuristic header image based on the day's news context. 5. **Delivery:** The digest is formatted with Markdown and emojis, then sent to your specified Telegram chat. 6. **Interactive Chat:** A separate branch allows you to chat with an AI Agent via the n8n Chat interface to discuss the news or ask general AI questions. ## How to set up 1. **Configure Credentials:** * Set up your **OpenAI API** credential. * Set up your **Telegram API** credential. 2. **Get Telegram Chat ID:** * Create a bot with `@BotFather` on Telegram. * Send a message to your bot. * Use `@userinfobot` to find your numeric Chat ID. 3. **Update Workflow Settings:** * Open the `Workflow Configuration` node. * Paste your Chat ID into the `telegramChatId` value field. 4. **Activate:** Toggle the workflow to "Active" to enable the daily schedule. ## Requirements - **n8n Version:** Must support LangChain nodes. - **OpenAI Account:** API Key with access to GPT-4o-mini (or preferred model) and DALL-E 3. - **Telegram Account:** To create a bot and receive messages. ## How to customize - **Change News Sources:** Edit the RSS URLs in the `Workflow Configuration` node to track different topics (e.g., Crypto, Finance, Sports). - **Adjust Personality:** Modify the system prompt in the `AI News Summarizer Agent` node to change the tone of the summaries (e.g., "explain it like I'm 5" or "highly technical"). - **Change Schedule:** Update the `Daily 8 AM Trigger` node to your preferred time zone and frequency.

AI chatbot for Max Messenger with voice recognition (GigaChat +SaluteSpeech)
**Name:** AI Chatbot for Max Messenger with Voice Recognition (GigaChat + Sber) **Description:** ### How it works This workflow powers an intelligent, conversational AI bot for Max messenger that can understand and respond to both **text and voice messages**. The bot uses GigaChat AI with built-in memory, allowing it to remember the conversation history for each unique user and answer follow-up questions. Voice messages are transcribed using Sber SmartSpeech. It's a complete solution for creating an engaging, automated assistant within your Max bot, using Russian AI services. ### Step-by-step * **Max Trigger:** The workflow starts when the **Max Trigger** node receives a new message sent to your Max bot. * **Access Control:** The **Check User** node verifies the sender's user ID against an allowed list. This prevents unauthorized users from accessing your bot. * **Access Denied Response:** If the user is not authorized, the **Access Denied** node sends a polite rejection message. * **Message Type Routing:** The **Text/Attachment** (Switch) node checks if the message contains plain text or has attachments (voice, photo, file). * **Attachment Processing:** If an attachment is detected, the **Download Attachment** (HTTP Request) node retrieves it, and the **Attachment Router** (Switch) node determines its type (voice, photo, or file). * **Voice Transcription:** For voice messages, the workflow gets a Sber access token via **Get Access Token** (HTTP Request), merges it with the audio file, and sends it to **Get Response** (HTTP Request) which uses Sber SmartSpeech API to transcribe the audio to text. * **Input Unification:** The **Voice to Prompt** node converts transcribed text into a prompt, while **Text to Prompt** does the same for plain text messages. Both paths merge at the **Combine** node. * **AI Agent Processing:** The unified prompt is passed to the **AI Agent**, powered by **GigaChat Model** and using **Simple Memory** to retain the last 10 messages per user (using Max `user_id` as the session key). * **Response Delivery:** The AI-generated response is sent back to the user via the **Send Message** node. ### Set up steps Estimated set up time: 15 minutes 1. **Get Max bot credentials:** Visit https://business.max.ru/ to create a bot and obtain API credentials. Add these credentials to **Max Trigger**, **Send Message**, and **Access Denied** nodes. 2. **Add GigaChat credentials:** Register for GigaChat API access and add your credentials to the **GigaChat Model** node. 3. **Add Sber credentials:** Obtain Sber SmartSpeech API credentials and add them to **Get Access Token** and **Get Response** nodes (HTTP Header Auth). 4. **Configure access control:** Open the **Check User** node and change the `user_id` value (currently 50488534) to your own Max user ID. This ensures only you can use the bot during testing. 5. **Customize bot personality:** Open the **AI Agent** node and edit the system message to change the bot's name, behavior, and add your own contact information or links. 6. **Test the bot:** Activate the workflow and send a text or voice message to your Max bot to verify it responds correctly. ### Notes This workflow is specifically designed for Russian-speaking users and uses Russian AI services (GigaChat and Sber SmartSpeech) as alternatives to OpenAI. Make sure you have valid API access to both services before setting up this workflow.