s3110
Workflows by s3110
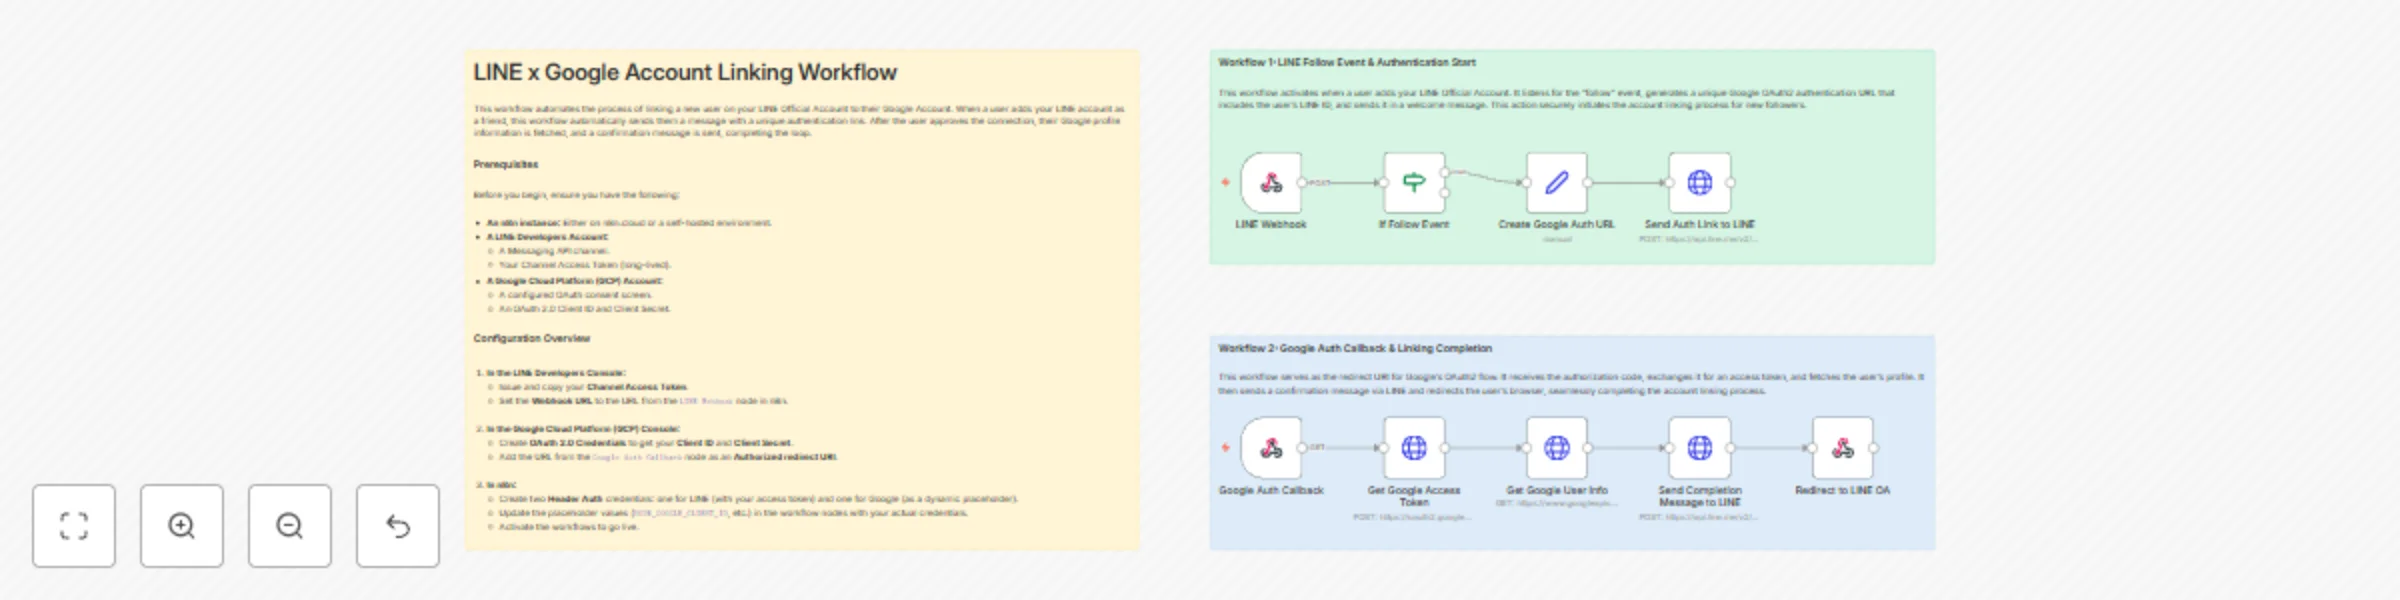
Automate LINE & Google account linking with OAuth2 authentication
# LINE x Google Account Linking Workflow This workflow automates the process of linking a new user on your LINE Official Account to their Google Account. When a user adds your LINE account as a friend, this workflow automatically sends them a message with a unique authentication link. After the user approves the connection, their Google profile information is fetched, and a confirmation message is sent, completing the loop. ## Prerequisites Before you begin, ensure you have the following: * **An n8n instance:** Either on n8n.cloud or a self-hosted environment. * **A LINE Developers Account:** * A Messaging API channel. * Your Channel Access Token (long-lived). * **A Google Cloud Platform (GCP) Account:** * A configured OAuth consent screen. * An OAuth 2.0 Client ID and Client Secret. ## Setup Instructions Follow these steps to configure the workflow. ### Step 1: Configure LINE Developers Console 1. Log in to the [LINE Developers Console](https://developers.line.biz/console/). 2. Navigate to your provider and select your **Messaging API channel**. 3. Go to the **Messaging API** tab. 4. Issue a **Channel access token (long-lived)** and copy the value. 5. In the **Webhook URL** field, paste the Test URL from the `LINE Webhook` node in your n8n workflow. 6. Enable **Use webhook**. ### Step 2: Configure Google Cloud Platform (GCP) 1. Log in to the [Google Cloud Console](https://console.cloud.google.com/) and select your project. 2. Navigate to **APIs & Services** > **OAuth consent screen**. Configure it if you haven't already, ensuring you add your own Google account as a test user. 3. Go to **APIs & Services** > **Credentials**. 4. Click **+ CREATE CREDENTIALS** and select **OAuth 2.0 Client ID**. 5. For **Application type**, choose **Web application**. 6. Under **Authorized redirect URIs**, click **+ ADD URI** and paste the Test URL from the `Google Auth Callback` node in your n8n workflow. 7. Click **Create**. Copy your **Client ID** and **Client Secret**. ### Step 3: Configure the n8n Workflow Import the workflow JSON into your n8n canvas and follow these steps to set it up. #### 1. Configure n8n Credentials First, set up the credentials that the HTTP Request nodes will use. * **For the LINE Messaging API:** 1. In n8n, go to **Credentials** > **Add credential**. 2. Search for and select **Header Auth**. 3. Set `Name` to `Authorization`. 4. Set `Value` to `Bearer YOUR_LINE_CHANNEL_ACCESS_TOKEN` (replace with the token from Step 1). 5. Save the credential with a memorable name like "LINE Messaging API Auth". * **For the Google API (Dynamic Token):** 1. Create another **Header Auth** credential. 2. Set `Name` to `Authorization`. 3. For `Value`, enter a placeholder like `Bearer dummy_token`. This will be replaced dynamically by the workflow. 4. Save the credential with a name like "Google API Dynamic Token". #### 2. Update Node Parameters Now, update the parameters in the following nodes: * **`Create Google Auth URL` node:** * In the `value` field, replace `YOUR_N8N_WEBHOOK_URL_FOR_GOOGLE` with the webhook URL of the `Google Auth Callback` node. * Replace `YOUR_GOOGLE_CLIENT_ID` with the Client ID from GCP (Step 2). * **`Get Google Access Token` node:** * In the `jsonBody` field, replace `YOUR_GOOGLE_CLIENT_ID`, `YOUR_GOOGLE_CLIENT_SECRET`, and `YOUR_N8N_WEBHOOK_URL_FOR_GOOGLE` with your actual GCP credentials and callback URL. * **`Get Google User Info` node:** * For **Authentication**, select `Header Auth`. * For **Credential for Header Auth**, choose the "Google API Dynamic Token" credential you created. * **Important:** Click **Add Option** > **Header To Append**. Set the `Name` to `Authorization` and the `Value` to the following expression to use the token from the previous step: `Bearer {{ $node["Get Google Access Token"].json["access_token"] }}`. * **`Send Auth Link to LINE` & `Send Completion Message to LINE` nodes:** * For **Credential for Header Auth**, choose the "LINE Messaging API Auth" credential. * **`Redirect to LINE OA` node:** * In the `redirectURL` parameter, replace `YOUR_LINE_OFFICIAL_ACCOUNT_ID` with your LINE OA's ID (e.g., `@123abcde`). ### Step 4: Activate and Test 1. Save the workflow by clicking the **Save** button. 2. **Activate** the workflow using the toggle in the top-right corner. 3. On your phone, add your LINE Official Account as a friend. You should receive a message with a link. 4. Follow the link to authorize with your Google account. After successful authorization, you should receive a completion message in LINE and be redirected. > **Note:** When you are ready for production, remember to replace the "Test" webhook URLs in the LINE and GCP consoles with the "Production" URLs from the n8n webhook nodes.
Japanese document translation quality checker with DeepL & Google Drive to Slack
## Title Japanese Document Translation Quality Checker with DeepL & Google Drive to Slack ## Who’s it for Localization teams, QA reviewers, and operations leads who need a fast, objective signal on Japanese document translation quality without manual checks. ## What it does / How it works This workflow watches a Google Drive folder for new Japanese documents, exports the text, translates JA→EN with DeepL, then back-translates EN→JA. It compares the original and back-translation to estimate a quality score and summarizes differences. A Google Docs report is generated, and a Slack message posts the score, difference count, and report link—so teams can triage quickly. ## How to set up 1. Connect credentials for Google Drive, DeepL, and Slack. 2. Point the Google Drive Trigger to your “incoming JP docs” folder. 3. In the **Workflow Configuration (Set)** node, fill `targetFolder` (report destination) and `slackChannel`. 4. Run once, then activate and drop a test doc. ## Requirements n8n (Cloud or self-hosted), Google Drive, DeepL, and Slack credentials; two Drive folders (incoming, reports). ## How to customize the workflow Tune the diff logic (character → token/line level, normalization rules), adjust score thresholds and Slack formatting, or add reviewer routing/Jira creation for low-score cases. Always avoid hardcoded secrets; keep user-editable variables in the Set node.
Analyze USD/JPY rates with AI and Tavily news search for email reporting
Who’s it for Traders, operations teams, and finance-minded founders who want a low-maintenance USD/JPY monitor that blends live pricing with short, news-aware AI commentary—delivered straight to email on a reliable cadence. How it works / What it does On a fixed schedule (every 4 hours), the workflow fetches the latest USD→JPY spot rate, enriches it with recent market context via a search tool, and asks an AI agent to produce a concise, structured take (trend, key drivers, and a buy/sell/neutral stance with rationale). The final summary is sent by email so stakeholders can skim, log, or forward without opening n8n. The design favors clarity (renamed nodes, sticky notes) and safety (no hardcoded secrets). How to set up Open Set (Fields) — Configure me and enter your Tavily API key and notification email. In Send results via Gmail, attach your email credential (or swap to SMTP/another provider). (Optional) Point LLM provider (configure) to your preferred model/vendor. Enable the schedule or adjust the interval to match your cadence. Requirements Tavily (or compatible) Search API key Email credential in n8n (Gmail or SMTP) An n8n instance with internet access How to customize the workflow Change the schedule frequency or trading window. Swap the rate source, add indicators (MA/RSI), or log to Sheets/DB. Extend the AI prompt and output schema for risk flags or position sizing. Add Slack/Telegram delivery or dashboards for team visibility. Disclaimer (community nodes) If you use community/experimental nodes, publish as self-hosted only and include a static workflow image at the top of your listing.