Ludwig
Workflows by Ludwig
Bypass Cloudflare Turnstile for web scraping with 2captcha
*This workflow contains community nodes that are only compatible with the self-hosted version of n8n.* ## Bypass Cloudflare Turnstile for Web Scraping with n8n ### How It Works This workflow automatically solves Cloudflare Turnstile CAPTCHAs for legitimate web scraping and automation tasks. It extracts the Turnstile sitekey from target webpages, submits solving requests to [2captcha](https://2captcha.com/?from=26496602), and returns bypass tokens that can be used in automated form submissions or data collection workflows. ### Set Up Steps 1. [Create a 2captcha Account](https://2captcha.com/?from=26496602): Sign up and get your API clientKey for CAPTCHA solving. 2. Import the Workflow into n8n: Add the workflow to your n8n instance. 3. Configure Authentication: Set up custom HTTP authentication with your clientKey in the credential settings. 4. Test the Workflow: Run with the demo URL to verify Turnstile detection and solving works correctly. 5. Replace the sample destination_url with your target website and start automating! Setup should take just a few minutes with your API credentials ready. ### Getting Started Once configured, the workflow can extract sitekeys from any Turnstile-protected webpage and return solved tokens for seamless automation. The [API documentation](https://2captcha.com/api-docs/cloudflare-turnstile?from=26496602) provides additional technical details for advanced use cases. ### Customizing the Workflow The workflow targets a demo page for testing. To adapt it, simply update the destination_url variable with your target website. You can also modify the sitekey extraction logic for sites that implement Turnstile differently, or integrate this as a subworkflow into larger scraping operations. ### API Reference Uses the TurnstileTaskProxyless task type with REST-based HTTPS communication. Each solve costs approximately $0.002 USD and typically completes within 30-90 seconds depending on queue load.
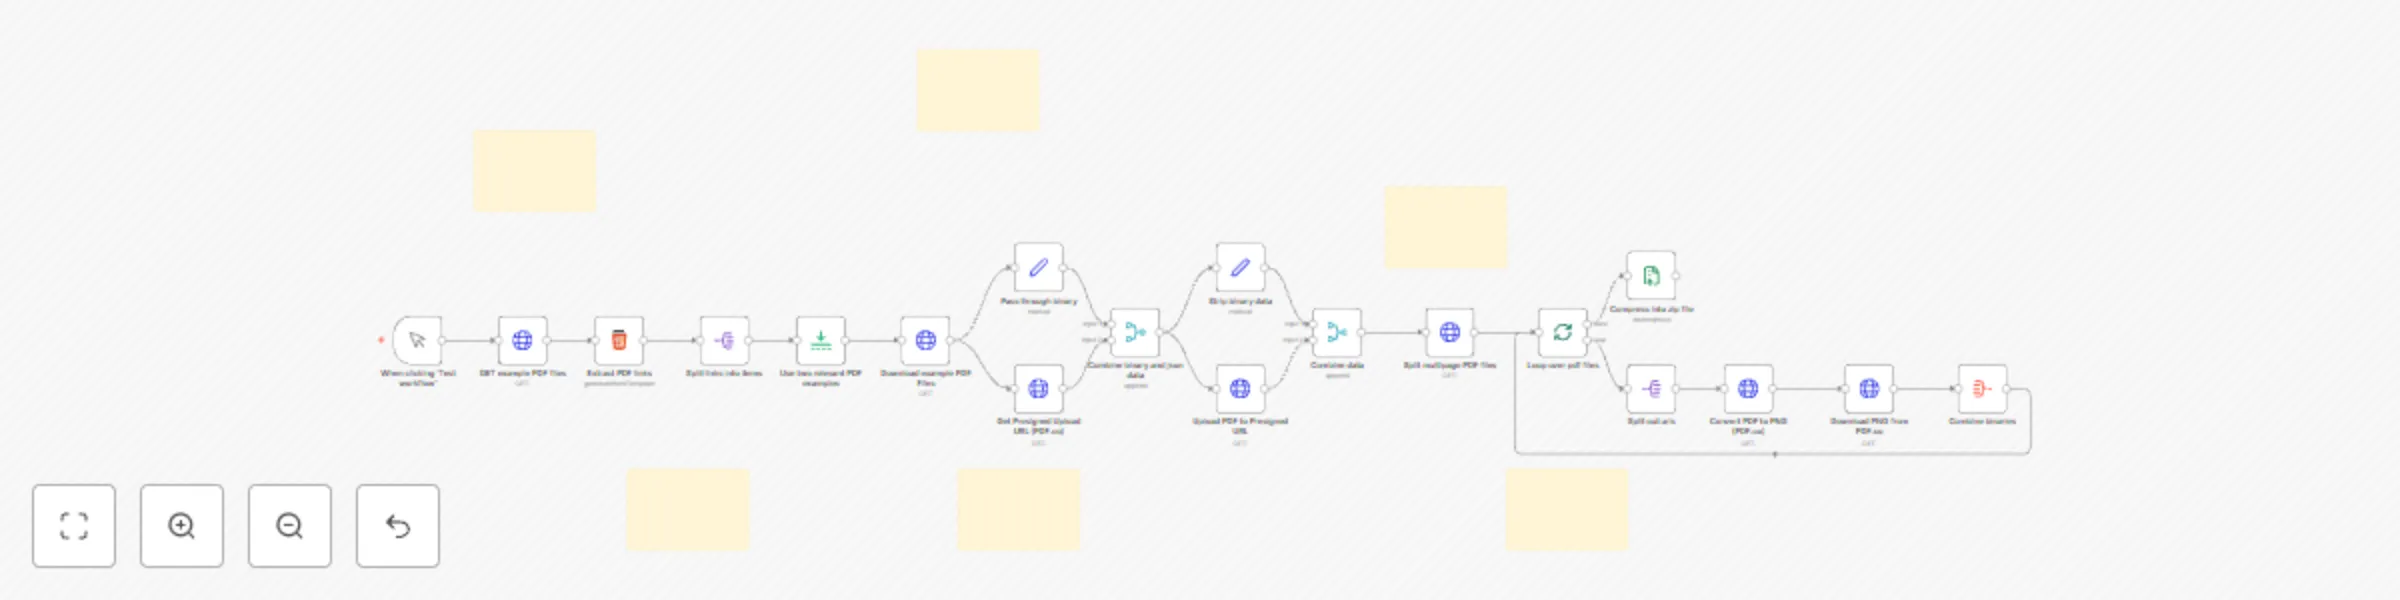
Convert PDF to PNG with PDF.co API (multi-page support)
# Page2Image: Convert PDF to PNG Workflow (Multi-Page Support) ## How It Works This workflow automatically converts each page of a multi-page PDF into high-quality PNG images. It uses the [PDF.co API](https://developer.pdf.co/api/introduction/index.html) in the background to process the PDF and generate individual images for every page. The entire process is streamlined, making it ideal for converting documents quickly and efficiently. ## Set Up Steps 1. Create a PDF.co Account: [Sign up for a PDF.co account](https://www.pdf.co/) and get your API Key. This will be required for authentication. 2. Import the Workflow into n8n: Add the workflow to your n8n instance. 3. Enter Your API Key: In the workflow, enter your PDF.co API Key to authenticate the process. 4. Test the Workflow: Run the workflow, and check that each page of the sample PDFs has been converted to a PNG image. 5. Replace the sample PDFs with your own PDFs and get started automatically converting your PDFs to images! Setup should take just a few minutes, assuming you already have your PDF.co API Key. ## Getting Started This workflow requires PDF.co’s API for converting PDF pages into PNG images. You’ll need an active PDF.co account and your unique API Key. Once you have that, just plug it into the workflow, and you’re ready to convert multi-page PDFs into PNGs instantly! ## Customizing the Workflow The workflow currently uses sample PDF files to demonstrate the conversion process. To make it work for your use case, replace the sample PDF logic with your own logic to retrieve PDFs. Whether the PDFs are uploaded, fetched from a URL, or pulled from a storage service, just plug your retrieval method into the workflow, and it will handle the conversion seamlessly. ## API Reference The PDF.co Web API is REST-based, ensuring secure and efficient communication. All requests are transmitted over HTTPS to protect your data. To use the API, you simply authenticate with your API Key and make requests to initiate the conversion. For this workflow, your API Key allows seamless communication with PDF.co to convert PDF pages into images.
n8n subworkflow dependency graph & auto-tagging
## How it Works As n8n instances scale, teams often lose track of sub-workflows—who uses them, where they are referenced, and whether they can be safely updated. This leads to inefficiencies like unnecessary copies of workflows or reluctance to modify existing ones. This workflow solves that problem by: 1. Fetching all workflows and identifying which ones execute others. 2. Verifying that referenced subworkflows exist. 3. Building a caller-subworkflow dependency graph for visibility. 4. Automatically tagging sub-workflows based on their parent workflows. 5. Providing a chart visualization to highlight the most-used sub-workflows.  ## Set Up Steps *Estimated time: ~10–15 minutes* 1. Set up n8n API credentials to allow access to workflows and tags. 2. Replace instance_url with your n8n instance URL. 3. Run the workflow to analyze dependencies and generate the graph. 4. Review and validate assigned tags for sub-workflows. 5. (Optional) Enable pie chart visualization to see the most-used sub-workflows. This workflow is essential for enterprise teams managing large n8n instances, preventing workflow duplication, reducing uncertainty around dependencies, and allowing safe, informed updates to sub-workflows.
Test webhooks in n8n without changing WEBHOOK_URL (PostBin & BambooHR example)
## **Using PostBin to Test Webhooks Without Changing WEBHOOK_URL** ### **How it Works** Many new n8n users struggle with testing webhooks when running n8n on localhost, as external services cannot reach `localhost`. This workflow introduces a technique using PostBin, which provides a temporary, publicly accessible URL to receive webhook requests. 1. Generates a temporary webhook endpoint via PostBin. 2. Uses this endpoint in place of `localhost` to test webhooks. 3. Captures and displays the incoming webhook request data. 4. Enables debugging and iterating without modifying the `WEBHOOK_URL` environment variable. ### **Set Up Steps** - **Estimated time:** ~5–10 minutes 1. **Create a PostBin instance** to generate a publicly accessible webhook URL. 2. **Copy the PostBin URL** and use it as the webhook destination in n8n. 3. **Trigger the webhook** from an external service or manually. 4. **Inspect the request payload** in PostBin to verify data reception. --- ## **(EXAMPLE) Using PostBin for Webhook Testing in a BambooHR Integration** ### **How it Works** In this example, we apply the PostBin technique to a BambooHR integration. Instead of manually configuring a webhook in BambooHR, this workflow automates webhook registration using the BambooHR API. The workflow: 1. Uses the BambooHR API to programmatically register the PostBin URL as a webhook. 2. Retrieves the most recent webhook calls made by BambooHR to the PostBin URL. 3. (Optional) Sends a personalized Slack message for new employees using OpenAI. ### **Set Up Steps** - **Estimated time:** ~15–20 minutes 1. **Set up PostBin** using the steps from the first section. 2. **Log into BambooHR** to generate an API key for authentication. 3. **Run the workflow** to register the PostBin URL as a webhook in BambooHR via the API. 4. **Retrieve recent webhook calls** from PostBin to validate data reception. 5. (Optional) **Send a Slack notification** using the processed data.
BambooHR AI-powered company policies and benefits chatbot
## How it works This workflow enables companies to provide instant HR support by automating responses to employee queries about policies and benefits: 1. Retrieves company policies, benefits, and HR documents from BambooHR. 2. Uses AI to analyze and answer employee questions based on company records. 3. Identifies the most relevant contact person for escalations. 4. Seamlessly integrates with company systems to provide real-time HR assistance. ## Set up steps: *Estimated time: ~20 minutes* 1. Connect your BambooHR account to allow policy retrieval. 2. Configure AI parameters and access control settings. 3. (Optional) Set up the employee lookup tool for personalized responses. 4. Test the chatbot to ensure accurate responses and seamless integration. ## Benefits This workflow is perfect for HR teams looking to enhance employee support while reducing manual inquiries. ### Outperform BambooHR's "Ask BambooHR" Chatbot **#1. Superior specificity of replies to general inquiries**   **#2. More appropriate escalations when responding to sensitive employee concerns**  
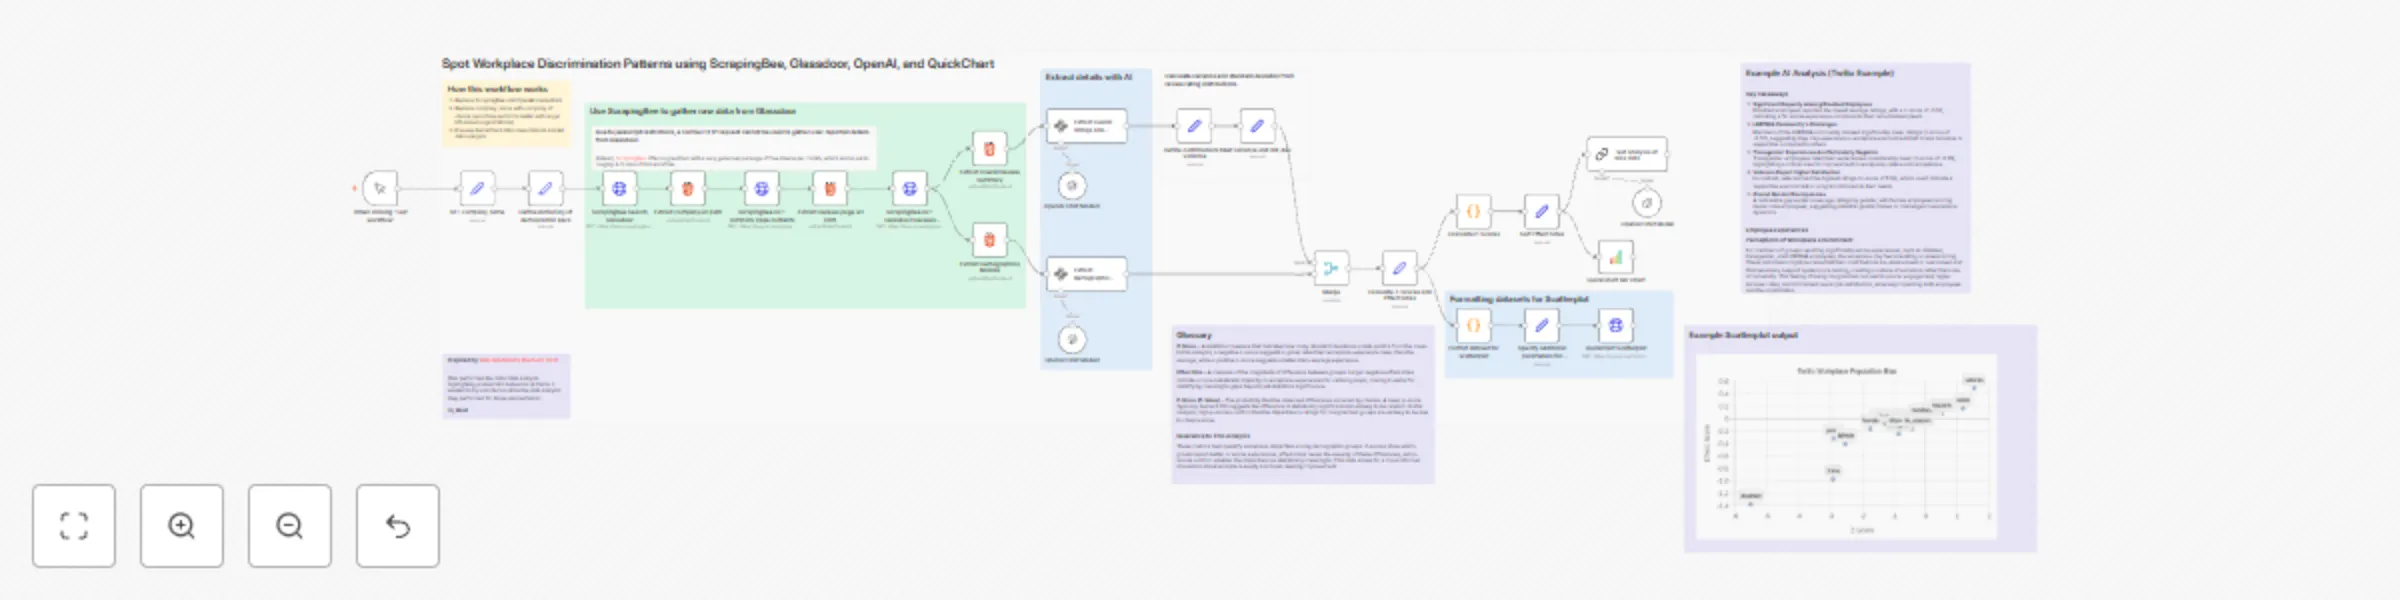
Spot workplace discrimination patterns with AI
 ## How It Works: • Scrapes company review data from Glassdoor using ScrapingBee. • Extracts demographic-based ratings using AI-powered text analysis. • Calculates workplace disparities with statistical measures like z-scores, effect sizes, and p-values. • Generates visualizations (scatter plots, bar charts) to highlight patterns of discrimination or bias. ### Example Visualizations:  ## Set Up Steps: *Estimated time: ~20 minutes.* • Replace ScrapingBee and OpenAI credentials with your own. • Input the company name you want to analyze (best results with large U.S.-based organizations). • Run the workflow and review the AI-generated insights and visual reports. This workflow empowers users to identify potential workplace discrimination trends, helping advocate for greater equity and accountability. #### Additional Credit: [Wes Medford](https://medium.com/@wryanmedford/an-open-letter-to-twilios-leadership-f06f661ecfb4) For algorithms and inspiration
Auto-tag blog posts in WordPress with AI
## How it works: This workflow automates tagging for WordPress posts using AI: 1. Fetch blog post content and metadata. 2. Generate contextually relevant tags using AI. 3. Verify existing tags in WordPress and create new ones if necessary. 4. Automatically update posts with accurate and optimized tags. ## Set up steps: *Estimated time: ~15 minutes.* 1. Configure the workflow with your WordPress API credentials. 2. Connect your content source (e.g., RSS feed or manual input). 3. Adjust tag formatting preferences in the workflow settings. 4. Run the workflow to ensure proper tag creation and assignment. This workflow is perfect for marketers and content managers looking to streamline their content categorization and improve SEO efficiency.
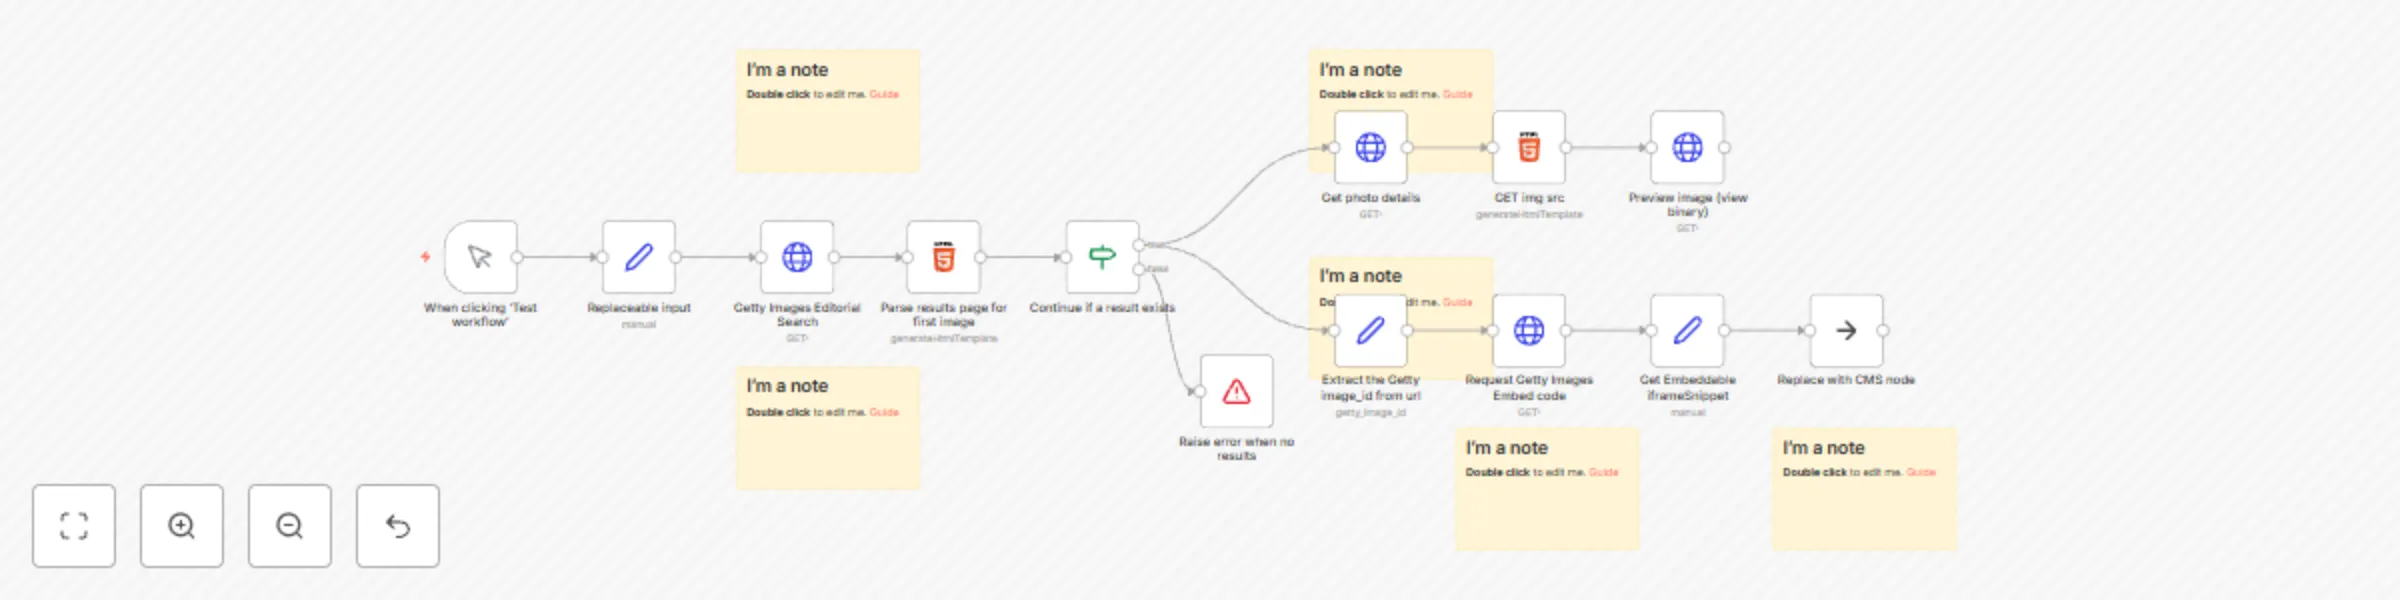
Programmatically retrieve embeddable Getty Images
## How it works: This workflow empowers marketers and content creators to seamlessly include Getty Images in their posts, provided they adhere to Getty Images' guidelines: 1. Enter a search phrase and select criteria for Getty Images' editorial collection. 2. Retrieve the latest images that match your input parameters. 3. Extract embeddable links for use in your content. 4. Automate this previously manual process to save time and maintain compliance. ## Set up steps: *Estimated time: ~10 minutes.* 1. Configure the input node with your desired search terms and criteria. 2. Link the workflow to your preferred CMS or storage solution. 3. Perform a test run to ensure proper retrieval and embedding of images. 4. Review Getty Images' usage guidelines for compliance before publishing. This solution is ideal for independent news channels and small publications looking for a legal, automated way to use Getty Images on their websites without incurring costs.