Jez
Workflows by Jez
Process documents & build semantic search with OpenAI, Gemini & Qdrant
## 🎯 Overview This n8n workflow automates the process of ingesting documents from multiple sources (Google Drive and web forms) into a Qdrant vector database for semantic search capabilities. It handles batch processing, document analysis, embedding generation, and vector storage - all while maintaining proper error handling and execution tracking. ## 🚀 Key Features - **Dual Input Sources**: Accepts files from both Google Drive folders and web form uploads - **Batch Processing**: Processes files one at a time to prevent memory issues and ensure reliability - **AI-Powered Analysis**: Uses Google Gemini to extract metadata and understand document context - **Vector Embeddings**: Generates OpenAI embeddings for semantic search capabilities - **Automated Cleanup**: Optionally deletes processed files from Google Drive (configurable) - **Loop Processing**: Handles multiple files efficiently with Split In Batches nodes - **Interactive Chat Interface**: Built-in chatbot for testing semantic search queries against indexed documents ## 📋 Use Cases - **Knowledge Base Creation**: Build searchable document repositories for organizations - **Document Compliance**: Process and index legal/regulatory documents (like Fair Work documents) - **Content Management**: Automatically categorize and store uploaded documents - **Research Libraries**: Create semantic search capabilities for research papers or reports - **Customer Support**: Enable instant answers to policy and documentation questions via chat interface ## 🔧 Workflow Components ### Input Methods 1. **Google Drive Integration** - Monitors a specific folder for new files - Processes existing files in batch mode - Supports automatic file conversion to PDF 2. **Web Form Upload** - Public-facing form for document submission - Accepts PDF, DOCX, DOC, and CSV files - Processes multiple file uploads in a single submission ### Processing Pipeline 1. **File Splitting**: Separates multiple uploads into individual items 2. **Document Analysis**: Google Gemini extracts document understanding 3. **Text Extraction**: Converts documents to plain text 4. **Embedding Generation**: Creates vector embeddings via OpenAI 5. **Vector Storage**: Inserts documents with embeddings into Qdrant 6. **Loop Control**: Manages batch processing with proper state handling ### Key Nodes - **Split In Batches**: Processes files one at a time with `reset: false` to maintain state - **Google Gemini**: Analyzes documents for context and metadata - **Langchain Vector Store**: Handles Qdrant insertion with embeddings - **HTTP Request**: Direct API calls for custom operations - **Chat Interface**: Interactive chatbot for testing vector search queries ## 🛠️ Technical Implementation ### Batch Processing Logic The workflow uses a clever looping mechanism: - `Split In Batches` with `batchSize: 1` ensures single-file processing - `reset: false` maintains loop state across iterations - Loop continues until all files are processed ### Error Handling - All nodes include `continueOnFail` options where appropriate - Execution logs are preserved for debugging - File deletion only occurs after successful insertion ### Data Flow ``` Form Upload → Split Files → Batch Loop → Analyze → Insert → Loop Back Google Drive → List Files → Batch Loop → Download → Analyze → Insert → Delete → Loop Back ``` ## 📊 Performance Considerations - **Processing Time**: ~20-30 seconds per file - **Batch Size**: Set to 1 for reliability (configurable) - **Memory Usage**: Optimized for files under 10MB - **API Costs**: Uses OpenAI embeddings (text-embedding-3-large model) ## 🔐 Required Credentials 1. **Google Drive OAuth2**: For file access and management 2. **OpenAI API**: For embedding generation 3. **Qdrant API**: For vector database operations 4. **Google Gemini API**: For document analysis ## 💡 Implementation Tips 1. **Start Small**: Test with a few files before processing large batches 2. **Monitor Costs**: Track OpenAI API usage for embedding generation 3. **Backup First**: Consider archiving instead of deleting processed files 4. **Check Collections**: Ensure Qdrant collection exists before running ## 🎨 Customization Options - **Change Embedding Model**: Switch to `text-embedding-3-small` for cost savings - **Adjust Chunk Size**: Modify text splitting parameters for different document types - **Add Metadata**: Extend the Gemini prompt to extract specific fields - **Archive vs Delete**: Replace delete operation with move to "processed" folder ## 📈 Real-World Application This workflow was developed to process business documents and legal agreements, making them searchable through semantic queries. It's particularly useful for organizations dealing with large volumes of regulatory documentation that need to be quickly accessible and searchable. ### Chat Interface Testing The integrated chatbot interface allows users to: - Query processed documents using natural language - Test semantic search capabilities in real-time - Verify document indexing and retrieval accuracy - Ask questions about specific topics (e.g., "What are the pay rates for junior employees?") - Get instant AI-powered responses based on the indexed content ## 🌟 Benefits - **Automation**: Eliminates manual document processing - **Scalability**: Handles individual files or bulk uploads - **Intelligence**: AI-powered understanding of document content - **Flexibility**: Multiple input sources and processing options - **Reliability**: Robust error handling and state management ## 👨💻 About the Creator **Jeremy Dawes** is the CEO of [Jezweb](https://www.jezweb.com.au), specializing in AI and automation deployment solutions. This workflow represents practical, production-ready automation that solves real business challenges while maintaining simplicity and reliability. ## 📝 Notes - The workflow intelligently handles the n8n form upload pattern where multiple files create a single item with multiple binary properties (Files_0, Files_1, etc.) - The Split In Batches pattern with `reset: false` is crucial for proper loop execution - Direct API integration provides more control than pure Langchain implementations ## 🔗 Resources - [Qdrant Documentation](https://qdrant.tech/documentation/) - [OpenAI Embeddings](https://platform.openai.com/docs/guides/embeddings) - [n8n Documentation](https://docs.n8n.io/) - [Jezweb](https://www.jezweb.com.au) - AI & Automation Solutions --- *This workflow demonstrates practical automation that bridges document management with modern AI capabilities, creating intelligent document processing systems that scale with your needs.*
Discover business leads with Gemini, Brave Search and web scraping
*This workflow contains community nodes that are only compatible with the self-hosted version of n8n.* Uncover new business leads with this AI-Powered Prospect Discovery Agent! This n8n workflow acts as a specialized intelligent assistant that, given a business type and location, uses multiple search strategies to identify a list of potential prospect companies and their websites. Stop manually trawling through search results! This agent automates the initial phase of lead generation by: * Understanding your target business profile (type, location, keywords). * Strategically using web search tools (Brave Search, Google Gemini Search) to find relevant businesses. * Performing quick validations to confirm relevance. * Returning a clean, structured JSON list of prospect names and their website URLs. **How it Works:** The workflow is built around an AI agent powered by Google Gemini. This agent is equipped with tools like: * **Brave Web Search:** For broad initial sourcing of potential business candidates. * **Google Gemini Search:** For advanced, context-aware discovery and finding businesses mentioned in various online sources. * **Brave Local Search (Selective):** For quick verification of local presence or finding website URLs for identified names. * **Jina AI Web Page Scraper (Very Selective):** For extremely rapid relevance checks on uncertain websites by scanning page content for keywords. The agent's system prompt guides it to use these tools efficiently to build a list of prospects without getting bogged down in deep research on any single one at this discovery stage. **Use Cases:** * **Lead Generation:** Automatically generate lists of potential clients based on industry and location. * **Market Research:** Identify key players or types of businesses in a specific geographical area. * **Sales Development:** Provide SDRs with initial lists of companies to research further. * **Called as a Sub-Workflow:** Designed to be easily integrated as a "tool" into more complex orchestrating AI agents (e.g., a BNI Pitch Planner that first needs to identify who to target). **Setup:** 1. **Import the workflow.** 2. **Configure Credentials:** You'll need n8n credentials for: * Google Gemini (for the Chat model and the Gemini Search/Vertex AI Search tool). * Brave Search (e.g., via Smithery MCP, or adapt if you have direct API access). * Jina AI (for the web scraper). Assign these to the respective nodes. 3. **Review System Prompt:** The `prospect_discovery_agent` node contains a detailed system prompt. You can fine-tune this to adjust its search strategies or the strictness of its matching. 4. **Inputs:** This workflow is triggered by an "Execute Workflow Trigger" node (`prospect_discovery_workflow`). It expects the following inputs: * `business_type` (string): e.g., "artisan bakery" * `location_query` (string): e.g., "Portland, Oregon" * `desired_num_prospects` (number): e.g., 5 * `additional_keywords` (string, optional): e.g., "organic, gluten-free" **To Use (as a Sub-Workflow/Tool):** This workflow is typically called by another n8n workflow (e.g., using a "Tool Workflow" node from the Langchain nodes). The calling workflow would provide the inputs listed above. The "Prospect Discovery" workflow will then execute and its final node (the `prospect_discovery_agent`) will output a JSON array of found prospects, like: ```json [ { "business_name": "Rose Petal Bakery", "website_url": "https://rosepetalbakerypdx.com" }, { "business_name": "The Daily Bread Artisans", "website_url": "https://dailybreadpdx.com" } ] ``` If no prospects are found, it returns an empty array `[]`. This template provides a powerful and focused tool for automating the initial stages of prospect identification.
Ai-powered local event finder with multi-tool search
## Summary This n8n workflow implements an AI-powered "Local Event Finder" agent. It takes user criteria (like event type, city, date, and interests), uses a suite of search tools (Brave Web Search, Brave Local Search, Google Gemini Search) and a web scraper (Jina AI) to find relevant events, and returns formatted details. The entire agent is exposed as a single, easy-to-use MCP (Multi-Capability Peer) tool, making it simple to integrate into other workflows or applications. This template cleverly combines the MCP server endpoint and the AI agent logic into a **single n8n workflow file** for ease of import and management. ## Key Features * **Intelligent Multi-Tool Search:** Dynamically utilizes web search, precise local search, and advanced Gemini semantic search to find events. * **Detailed Information via Web Scraping:** Employs Jina AI to extract comprehensive details directly from event web pages. * **Simplified MCP Tool Exposure:** Makes the complex event-finding logic available as a single, callable tool for other MCP-compatible clients (e.g., Roo Code, Cline, other n8n workflows). * **Customizable AI Behavior:** The core AI agent's behavior, tool usage strategy, and output formatting can be tailored by modifying its System Prompt. * **Modular Design:** Uses distinct nodes for LLM, memory, and each external tool, allowing for easier modification or extension. ## Benefits * **Simplifies Client-Side Integration:** Offloads the complexity of event searching and data extraction from client applications. * **Provides Richer Event Data:** Goes beyond simple search links to extract and format key event details. * **Flexible & Adaptable:** Can be adjusted to various event search needs and can incorporate new tools or data sources. * **Efficient Processing:** Leverages specialized tools for different aspects of the search process. ## Nodes Used * `MCP Trigger` * `Tool Workflow` * `Execute Workflow Trigger` * `AI Agent` * `Google Gemini Chat Model` (ChatGoogleGenerativeAI) * `Simple Memory` (Window Buffer Memory) * `MCP Client` (for Brave Search tools via Smithery) * `Google Gemini Search Tool` * `Jina AI Tool` ## Prerequisites * An active n8n instance. * **Google AI API Key:** For the Gemini LLM (`Google Gemini Chat Model` node) and the `Google Gemini Search Tool`. Ensure your key is enabled for these services. * **Jina AI API Key:** For the `jina_ai_web_page_scraper` node. A free tier is often available. * **Access to a Brave Search MCP Provider (Optional but Recommended):** * This template uses `MCP Client` nodes configured for Brave Search via a provider like Smithery. You'll need an account/API key for your chosen Brave Search MCP provider to configure the `smithery brave search` credential. * Alternatively, you could adapt these to call Brave Search API directly if you manage your own access, or replace them with other search tools. ## Setup Instructions 1. **Import Workflow:** Download the JSON file for this template and import it into your n8n instance. 2. **Configure Credentials:** * **Google Gemini LLM:** * Locate the `Google Gemini Chat Model` node. * Select or create a "Google Gemini API" credential (named `Google Gemini Context7` in the template) using your Google AI API Key. * **Google Gemini Search Tool:** * Locate the `google_gemini_event_search` node. * Select or create a "Gemini API" credential (named `Gemini Credentials account` in the template) using your Google AI API Key (ensure it's enabled for Search/Vertex AI). * **Jina AI Web Scraper:** * Locate the `jina_ai_web_page_scraper` node. * Select or create a "Jina AI API" credential (named `Jina AI account` in the template) using your Jina AI API Key. * **Brave Search (via MCP):** * You'll need an MCP Client HTTP API credential to connect to your Brave Search MCP provider (e.g., Smithery). * Create a new "MCP Client HTTP API" credential in n8n. Name it, for example, `smithery brave search`. * Configure it with the Base URL and any required authentication (e.g., API key in headers) for your Brave Search MCP provider. * Locate the `brave_web_search` and `brave_local_search` MCP Client nodes in the workflow. * Assign the `smithery brave search` (or your named credential) to both of these nodes. 3. **Activate Workflow:** Ensure the workflow is active. 4. **Note MCP Trigger Path:** * Locate the `local_event_finder` (MCP Trigger) node. * The `Path` field (e.g., `0ca88864-ec0a-4c27-a7ec-e28c5a900697`) combined with your n8n webhook base URL forms the endpoint for client calls. * Example Endpoint: `YOUR_N8N_INSTANCE_URL/webhooks/PATH-TO-MCP-SERVER` ## Customization * **AI Behavior:** Modify the "System Message" parameter within the `event_finder_agent` node to change the AI's persona, its strategy for using tools, or the desired output format. * **LLM Model:** Swap the `Google Gemini Chat Model` node with another compatible LLM node (e.g., OpenAI Chat Model) if desired. You'll need to adjust credentials and potentially the system prompt. * **Tools:** Add, remove, or replace tool nodes (e.g., use a different search provider, add a weather API tool) and update the `event_finder_agent`'s system prompt and tool configuration accordingly. * **Scraping Depth:** Be mindful of the `jina_ai_web_page_scraper`'s usage due to potential timeouts. The system prompt already guides the LLM on this, but you can adjust its usage instructions.
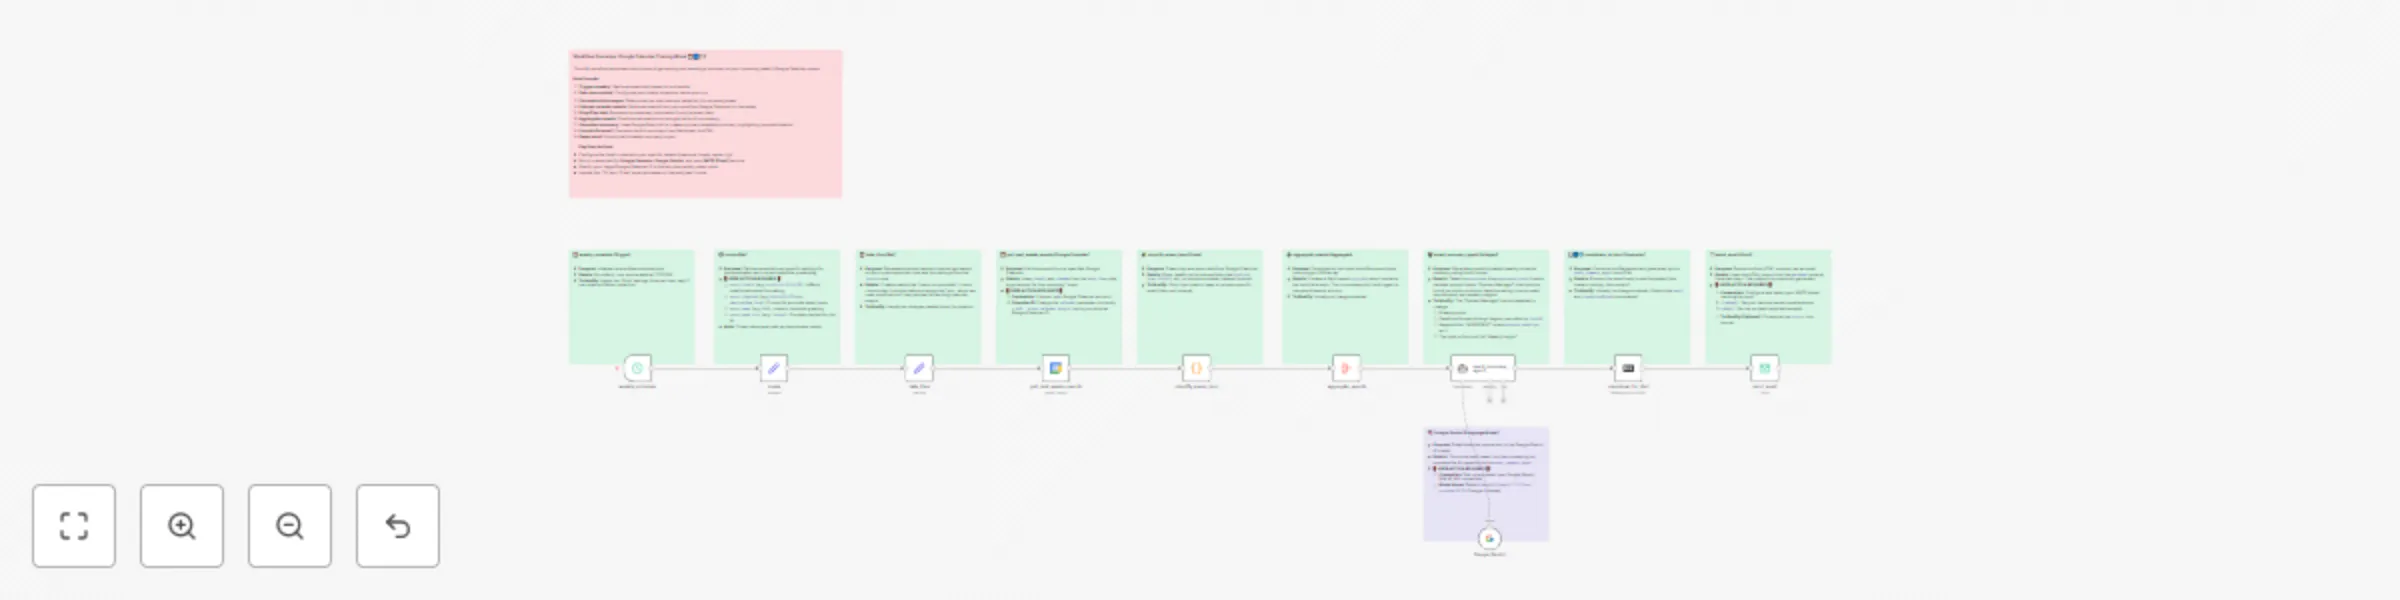
Automated weekly Google Calendar summary via email with AI ✨🗓️📧
# Workflow: Automated Weekly Google Calendar Summary via Email with AI ✨🗓️📧 **Get a personalized, AI-powered summary of your upcoming week's Google Calendar events delivered straight to your inbox!** This workflow automates the entire process, from fetching events to generating an intelligent summary and emailing it to you. ## 🌟 Overview This n8n workflow connects to your Google Calendar, retrieves events for the upcoming week (Monday to Sunday, based on the day the workflow runs), uses Google Gemini AI to create a well-structured and insightful summary, and then emails this summary to you. It's designed to help you start your week organized and aware of your commitments. **Key Features:** * **Automated Weekly Summary:** Runs on a schedule (default: weekly) to keep you updated. * **AI-Powered Insights:** Leverages Google Gemini to not just list events, but to identify important ones and offer a brief weekly outlook. * **Personalized Content:** Uses your specified timezone, locale, name, and city for accurate and relevant information. * **Clear Formatting:** Events are grouped by day and displayed chronologically with start and end times. Important events are highlighted. * **Email Delivery:** Receive your schedule directly in your inbox in a clean HTML format. * **Customizable:** Easily adapt to your specific calendar, AI preferences, and email settings. ## ⚙️ How It Works: Step-by-Step The workflow consists of the following nodes, working in sequence: 1. **`weekly_schedule` (Schedule Trigger):** * **What it does:** Initiates the workflow. * **Default:** Triggers once a week at 12:00 PM. You can adjust this to your preference (e.g., Sunday evening or Monday morning). 2. **`locale` (Set Node):** * **What it does:** **This is a crucial node for you to configure!** It sets user-specific parameters like your preferred language/region (`users-locale`), timezone (`users-timezone`), your name (`users-name`), and your home city (`users-home-city`). These are used throughout the workflow for correct date/time formatting and personalizing the AI prompt. 3. **`date-time` (Set Node):** * **What it does:** Dynamically generates various date and time strings based on the current execution time and the `locale` settings. This is used to define the precise 7-day window (from the current day to 7 days ahead, ending at midnight) for fetching calendar events. 4. **`get_next_weeks_events` (Google Calendar Node):** * **What it does:** Connects to your specified Google Calendar and fetches all events within the 7-day window calculated by the `date-time` node. * **Requires:** Google Calendar API credentials and the ID of the calendar you want to use. 5. **`simplify_evens_json` (Code Node):** * **What it does:** Runs a small JavaScript snippet to clean up the raw event data from Google Calendar. It removes several fields that aren't needed for the summary (like `htmlLink`, `etag`, `iCalUID`), making the data more concise for the AI. 6. **`aggregate_events` (Aggregate Node):** * **What it does:** Takes all the individual (and now simplified) event items and groups them into a single JSON array called `eventdata`. This is the format the AI agent expects for processing. 7. **`Google Gemini` (LM Chat Google Gemini Node):** * **What it does:** This node is the connection point to the Google Gemini language model. * **Requires:** Google Gemini (or PaLM) API credentials. 8. **`event_summary_agent` (Agent Node):** * **What it does:** This is where the magic happens! It uses the `Google Gemini` model and a detailed system prompt to generate the weekly schedule summary. * **The Prompt Instructs the AI to:** * Start with a friendly greeting. * Group events by day (Monday to Sunday) for the upcoming week, using the user's timezone and locale. * Format event times clearly (e.g., `09:30 AM - 10:30 AM: Event Summary`). * Identify and prefix "IMPORTANT:" to events with keywords like "urgent," "deadline," "meeting," etc., in their summary or description. * Conclude with a 1-2 sentence helpful insight about the week's schedule. * Process the input `eventdata` (the JSON array of calendar events). 9. **`Markdown` (Markdown to HTML Node):** * **What it does:** Converts the text output from the `event_summary_agent` (which is generated in Markdown format for easy structure) into HTML. This ensures the email body is well-formatted with proper line breaks, lists, and emphasis. 10. **`send_email` (Email Send Node):** * **What it does:** Sends the final HTML summary to your specified email address. * **Requires:** SMTP (email sending) credentials and your desired "From" and "To" email addresses. ## 🚀 Getting Started: Setup Instructions Follow these steps to get the workflow up and running: 1. **Import the Workflow:** * Download the workflow JSON file. * In your n8n instance, go to "Workflows" and click the "Import from File" button. Select the downloaded JSON file. 2. **Configure Credentials:** You'll need to set up credentials for three services. In n8n, go to "Credentials" on the left sidebar and click "Add credential." * **Google Calendar API:** * Search for "Google Calendar" and create new credentials using OAuth2. Follow the authentication flow. * Once created, select these credentials in the `get_next_weeks_events` node. * **Google Gemini (PaLM) API:** * Search for "Google Gemini" or "Google PaLM" and create new credentials. You'll typically need an API key from Google AI Studio or Google Cloud. * Once created, select these credentials in the `Google Gemini` node. * **SMTP / Email:** * Search for your email provider (e.g., "SMTP," "Gmail," "Outlook") and create credentials. This usually involves providing your email server details, username, and password/app password. * Once created, select these credentials in the `send_email` node. 3. **‼️ IMPORTANT: Customize User Settings in the `locale` Node:** * Open the `locale` node. * Update the following values in the "Assignments" section: * `users-locale`: Set your locale string (e.g., `"en-AU"` for English/Australia, `"en-US"` for English/United States, `"de-DE"` for German/Germany). This affects how dates, times, and numbers are formatted. * `users-timezone`: Set your timezone string (e.g., `"Australia/Sydney"`, `"America/New_York"`, `"Europe/London"`). This is critical for ensuring event times are displayed correctly for your location. * `users-name`: Enter your name (e.g., `"Bob"`). This is used to personalize the email greeting. * `users-home-city`: Enter your home city (e.g., `"Sydney"`). This can be used for additional context by the AI. 4. **Configure the `get_next_weeks_events` (Google Calendar) Node:** * Open the node. * In the "Calendar" parameter, you need to specify which calendar to fetch events from. * The default might be a placeholder like `c_4d9c2d4e139327143ee4a5bc4db531ffe074e98d21d1c28662b4a4d4da898866@group.calendar.google.com`. * Change this to your primary calendar (often your email address) or the specific Calendar ID you want to use. You can find Calendar IDs in your Google Calendar settings. 5. **Configure the `send_email` Node:** * Open the node. * Set the `fromEmail` parameter to the email address you want the summary to be sent *from*. * Set the `toEmail` parameter to the email address(es) where you want to *receive* the summary. * You can also customize the `subject` line if desired. 6. **(Optional) Customize the AI Prompt in `event_summary_agent`:** * If you want to change how the AI summarizes events (e.g., different keywords for important events, a different tone, or specific formatting tweaks), you can edit the "System Message" within the `event_summary_agent` node's parameters. 7. **(Optional) Adjust the Schedule in `weekly_schedule`:** * Open the `weekly_schedule` node. * Modify the "Rule" to change when and how often the workflow runs (e.g., a specific day of the week, a different time). 8. **Activate the Workflow:** * Once everything is configured, toggle the "Active" switch in the top right corner of the workflow editor to ON. ## 📬 What You Get You'll receive an email (based on your schedule) with a subject like "Next Week Calendar Summary : [Start Date] - [End Date]". The email body will contain: * A friendly greeting. * Your schedule for the upcoming week (Monday to Sunday), with events listed chronologically under each day. * Event times displayed in your local timezone (e.g., `09:30 AM - 10:30 AM: Team Meeting`). * Priority events clearly marked (e.g., `IMPORTANT: 02:00 PM - 03:00 PM: Project Deadline Review`). * A brief, insightful observation about your week's schedule. ## 🛠️ Troubleshooting & Notes * **Timezone is Key:** Ensure your `users-timezone` in the `locale` node is correct. This is the most common source of incorrect event times. * **Google API Permissions:** When setting up Google Calendar and Gemini credentials, make sure you grant the necessary permissions. * **AI Output Varies:** The AI-generated summary can vary slightly each time. The prompt is designed to guide it, but LLMs have inherent creativity. * **Calendar Event Details:** The quality of the summary (especially for identifying important events) depends on how detailed your calendar event titles and descriptions are. Including keywords like "meeting," "urgent," "prepare for," etc., in your events helps the AI. ## 💬 Feedback & Contributions Feel free to modify and enhance this workflow! If you have suggestions, improvements, or run into issues, please share them in the n8n community. Happy scheduling!
Intelligent web & local search with Brave Search API and Google Gemini MCP Server
## Summary This n8n workflow implements an AI-powered agent that intelligently uses the Brave Search API (via an external MCP service like Smithery) to perform both web and local searches. It understands natural language queries, selects the appropriate search tool, and exposes this enhanced capability as a single, callable MCP tool. ## Key Features * 🤖 **Intelligent Tool Selection:** AI agent decides between Brave's web search and local search tools based on user query context. * 🌐 **MCP Microservice:** Exposes complex search logic as a single, easy-to-integrate MCP tool (`call_brave_search_agent`). * 🧠 **Powered by Google Gemini:** Utilizes the `gemini-2.5-flash-preview-05-20` LLM for advanced reasoning. * 🗣️ **Conversational Memory:** Remembers context within a single execution flow. * 📝 **Customizable System Prompt:** Tailor the AI's behavior and responses. * 🧩 **Modular Design:** Connects to external Brave Search MCP tools (e.g., from Smithery). ## Benefits * 🔌 **Simplified Integration:** Easily add advanced, AI-driven search capabilities to other applications or agent systems. * 💸 **Reduced Client-Side LLM Costs:** Offloads complex prompting and tool orchestration to n8n, minimizing token usage for client-side LLMs. * 🔧 **Centralized Logic:** Manage and update search strategies and AI behavior in one place. * 🚀 **Extensible:** Can be adapted to use other search tools or incorporate more complex decision-making. ## Nodes Used * `@n8n/n8n-nodes-langchain.mcpTrigger` (MCP Server Trigger) * `@n8n/n8n-nodes-langchain.toolWorkflow` * `@n8n/n8n-nodes-langchain.agent` (AI Agent) * `@n8n/n8n-nodes-langchain.lmChatGoogleGemini` (Google Gemini Chat Model) * `n8n-nodes-mcp.mcpClientTool` (MCP Client Tool - for Brave Search) * `@n8n/n8n-nodes-langchain.memoryBufferWindow` (Simple Memory) * `n8n-nodes-base.executeWorkflowTrigger` (Workflow Start - for direct execution/testing) ## Prerequisites * An active n8n instance (v1.22.5+ recommended). * A Google AI API key for using the Gemini LLM. * Access to an external MCP service that provides Brave Search tools (e.g., a Smithery account configured with their Brave Search MCP). This includes the MCP endpoint URL and any necessary authentication (like an API key for Smithery). ## Setup Instructions 1. **Import Workflow:** Download the `Brave_Search_Smithery_AI_Agent_MCP_Server.json` file and import it into your n8n instance. 2. **Configure LLM Credential:** * Locate the **'Google Gemini Chat Model'** node. * Select or create an n8n credential for "Google Palm API" (used for Gemini), providing your Google AI API key. 3. **Configure Brave Search MCP Credential:** * Locate the **'brave_web_search'** and **'brave_local_search'** (MCP Client) nodes. * Create a new n8n credential of type "MCP Client HTTP API". * **Name:** e.g., `Smithery Brave Search Access` * **Base URL:** Enter the URL of your Brave Search MCP endpoint from your provider (e.g., `https://server.smithery.ai/@YOUR_PROFILE/brave-search/mcp`). * **Authentication:** If your MCP provider requires an API key, select "Header Auth". Add a header with the name (e.g., `X-API-Key`) and value provided by your MCP service. * Assign this newly created credential to both the 'brave_web_search' and 'brave_local_search' nodes. 4. **Note MCP Trigger Path:** * Open the **'Brave Search MCP Server Trigger'** node. * Copy its unique 'Path' (e.g., `/cc8cc827-3e72-4029-8a9d-76519d1c136d`). You will combine this with your n8n instance's base URL to get the full endpoint URL for clients. ## How to Use This workflow exposes an MCP tool named `call_brave_search_agent`. External clients can call this tool via the URL derived from the 'Brave Search MCP Server Trigger'. **Example Client MCP Configuration (e.g., for Roo Code):** ```json "n8n-brave-search-agent": { "url": "https://YOUR_N8N_INSTANCE/mcp/cc8cc827-3e72-4029-8a9d-76519d1c136d/sse", "alwaysAllow": [ "call_brave_search_agent" ] } ``` *Replace `YOUR_N8N_INSTANCE` with your n8n's public URL and ensure the path matches your trigger node.* **Example Request:** Send a `POST` request to the trigger URL with a JSON body: ```json { "input": { "query": "best coffee shops in London" } } ``` The agent will stream its response, including the summarized search results. ## Customization * **AI Behavior:** Modify the System Prompt within the **'Brave Search AI Agent'** node to fine-tune its decision-making, response style, or how it uses the search tools. * **LLM Choice:** Replace the **'Google Gemini Chat Model'** node with any other compatible LLM node supported by n8n. * **Search Tools:** Adapt the workflow to use different or additional search tools by modifying the MCP Client nodes and updating the AI Agent's system prompt and tool definitions. ## Further Information * GitHub Repository: https://github.com/jezweb/n8n * The workflow includes extensive sticky notes for in-canvas documentation. ## Author Jeremy Dawes (Jezweb)
Documentation Lookup AI Agent using Context7 and Gemini
**This n8n workflow template uses community nodes and is only compatible with the self-hosted version of n8n.** This workflow demonstrates how to build and expose a sophisticated n8n AI Agent as a single, callable tool using the Multi-Agent Collaboration Protocol (MCP). It allows external clients or other AI systems to easily query software library documentation via Context7, without needing to manage the underlying tool orchestration or complex conversational logic. **Core Idea:** Instead of building complex agentic loops on the client-side (e.g., in Python, a VS Code extension, or another AI development environment), this workflow offloads the entire agent's reasoning and tool-use process to n8n. The client simply sends a natural language query (like "How do I use Flexbox in Tailwind CSS?") to an SSE endpoint, and the n8n agent handles the rest. **Key Features & How It Works:** 1. **Public MCP Endpoint:** * The main workflow uses the `Context7 MCP Server Trigger` node to create an SSE endpoint. This makes the agent accessible to any MCP-compatible client. * The path for the endpoint is kept long and random for basic 'security by obscurity'. 2. **Tool Workflow as an Interface:** * A `Tool Workflow` node (named `call_context7_ai_agent` in this example) is connected to the MCP Server Trigger. This node defines the single "tool" that external clients will see and call. 3. **Dedicated AI Agent Sub-Workflow:** * The `call_context7_ai_agent` tool invokes a separate sub-workflow which contains the actual AI logic. * This sub-workflow starts with a `Context7 Workflow Start` node to receive the user's `query`. * A `Context7 AI Agent` node (using Google Gemini in this example) is the brain, equipped with: * A system prompt to guide its behavior. * `Simple Memory` to retain context for each execution (using `{{ $execution.id }}` as the session key). * Two specialized Context7 MCP client tools: * `context7-resolve-library-id`: To convert library names (e.g., 'Next.js') into Context7-specific IDs. * `context7-get-library-docs`: To fetch documentation using the resolved ID, with options for specific topics and token limits. 4. **Seamless Tool Use:** The AI Agent autonomously decides when and how to use the `resolve-library-id` and `get-library-docs` tools based on the user's query, handling the multi-step process internally. **Benefits of This Approach:** * **Simplified Client Integration:** Clients interact with a single, powerful tool, sending a simple query. * **Reduced Client-Side Token Consumption:** The detailed prompts, tool descriptions, and conversational turns are managed server-side by n8n, saving tokens on the client (especially useful if the client is another LLM). * **Centralized Agent Management:** Update your agent's capabilities, tools, or LLM model within n8n without any changes needed on the client side. * **Modularity for Agentic Systems:** Perfect for building complex, multi-agent systems where this n8n workflow can act as a specialized "expert" agent callable by others (e.g., from environments like Smithery). * **Cost-Effective:** By using a potentially less expensive model (like Gemini Flash) for the agent's orchestration and leveraging the free tier or efficient pricing of services like Context7, you can build powerful solutions economically. **Use Cases:** * Providing an intelligent documentation lookup service for coding assistants or IDE extensions. * Creating specialized AI "micro-agents" that can be consumed by larger AI applications. * Building internal knowledge base query systems accessible via a simple API-like interface. **Setup:** * Ensure you have the necessary n8n credentials for Google Gemini (or your chosen LLM) and the Context7 MCP client tools. * The `Path` in the `Context7 MCP Server Trigger` node should be unique and secure. * Clients connect to the "Production URL" (SSE endpoint) provided by the trigger node. This workflow is a great example of how n8n can serve as a powerful backend for building and deploying modular AI agents. I've made a video to try and explain this a bit too https://www.youtube.com/watch?v=dudvmyp7Pyg