David Olusola
Workflows by David Olusola
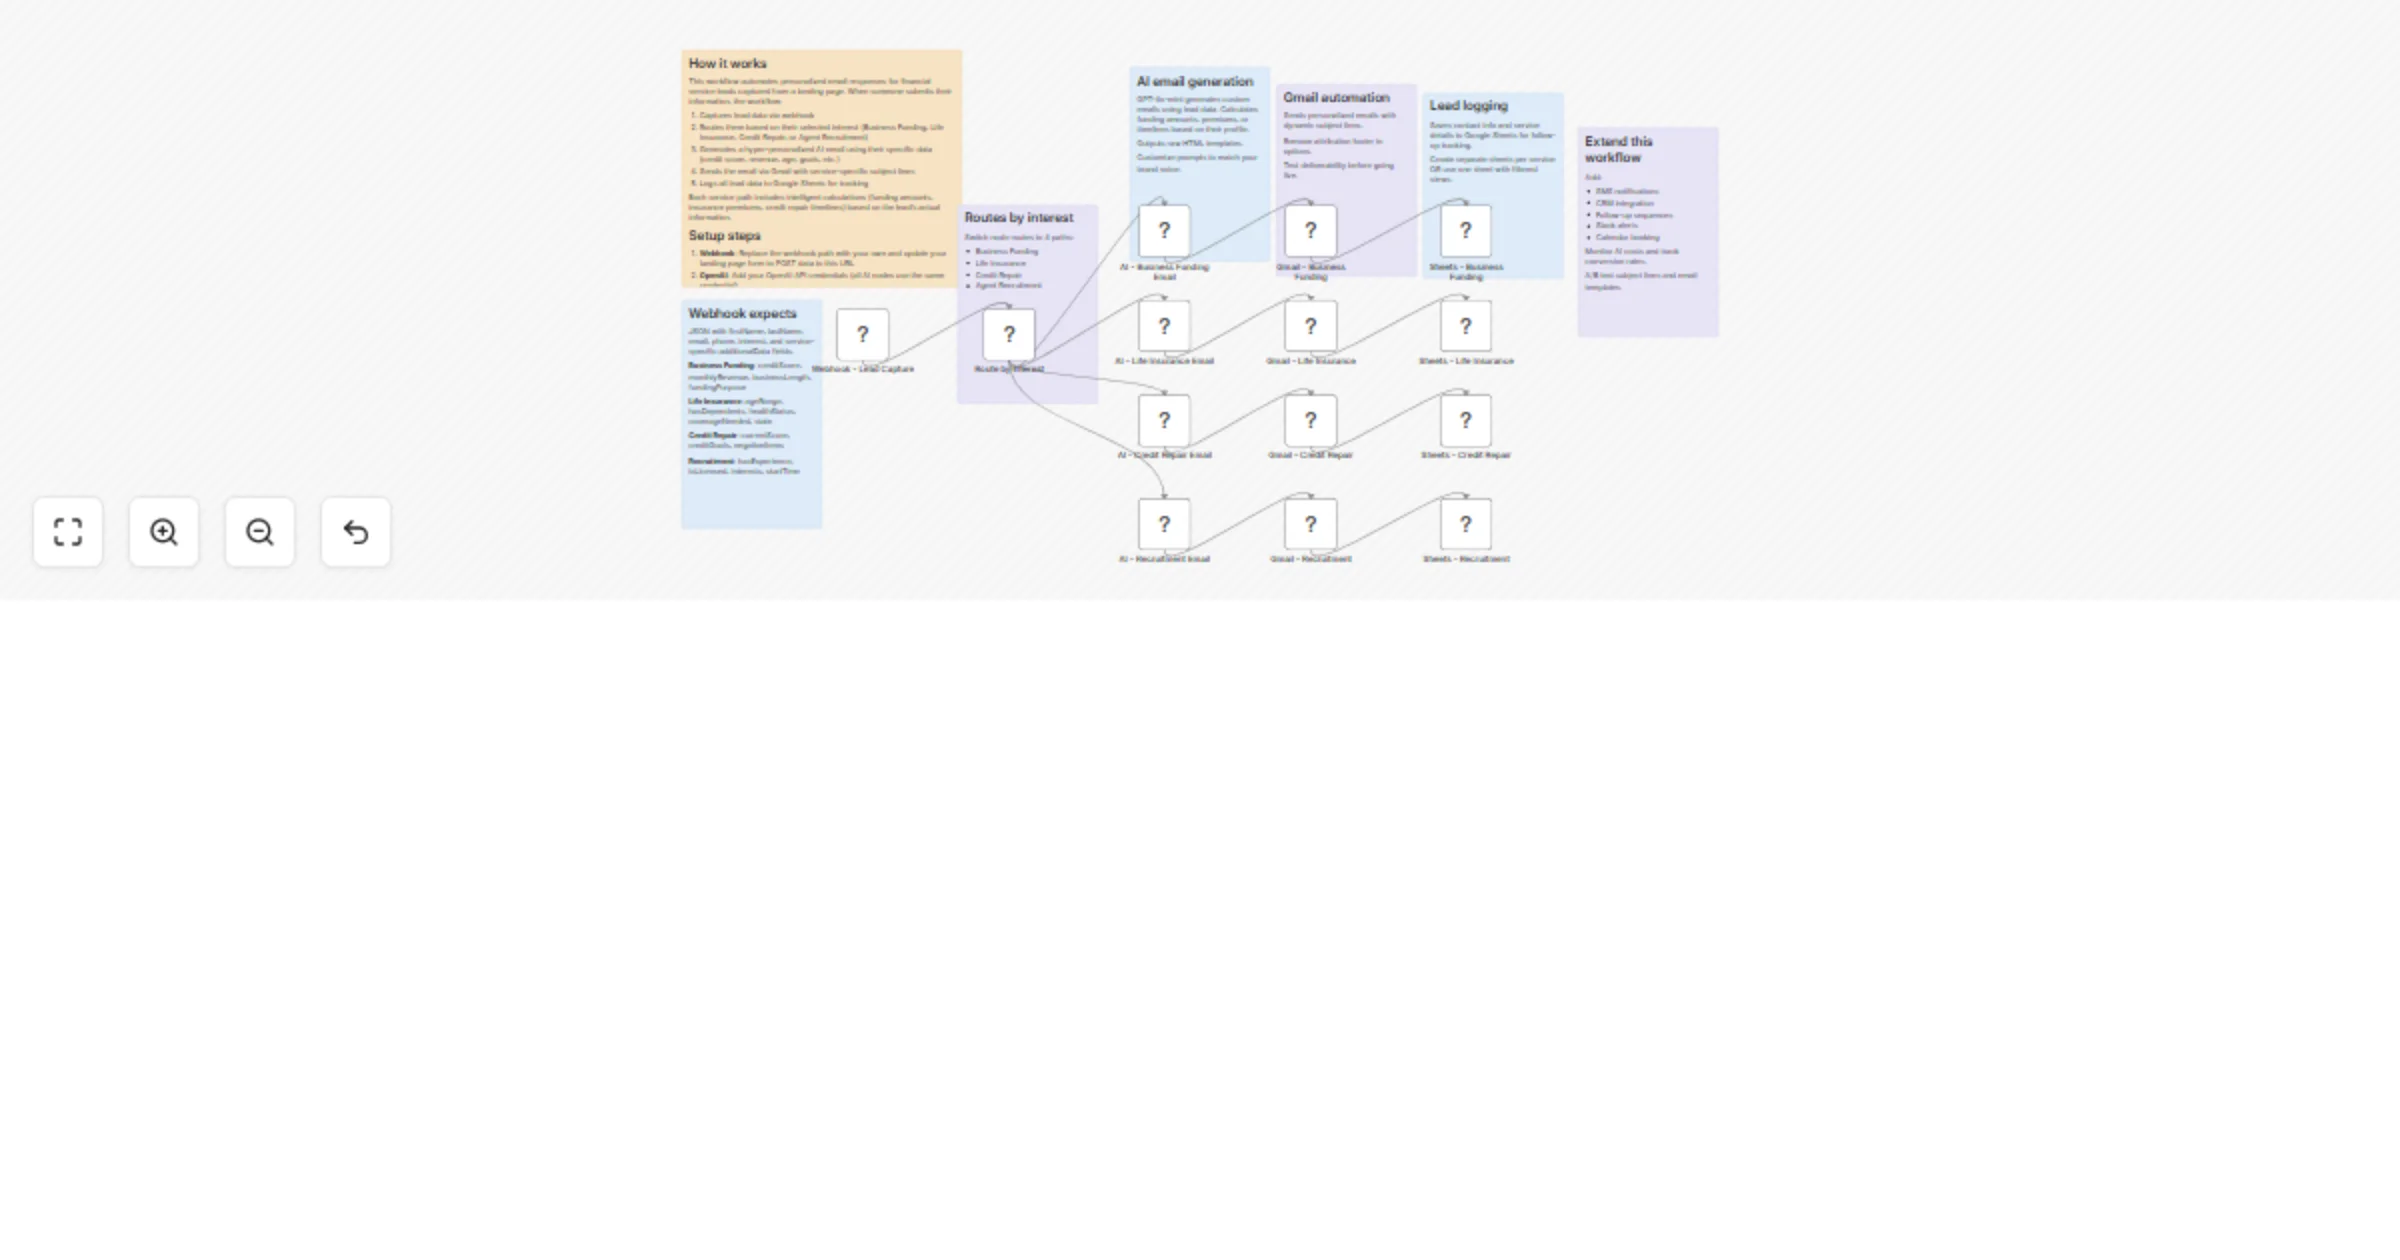
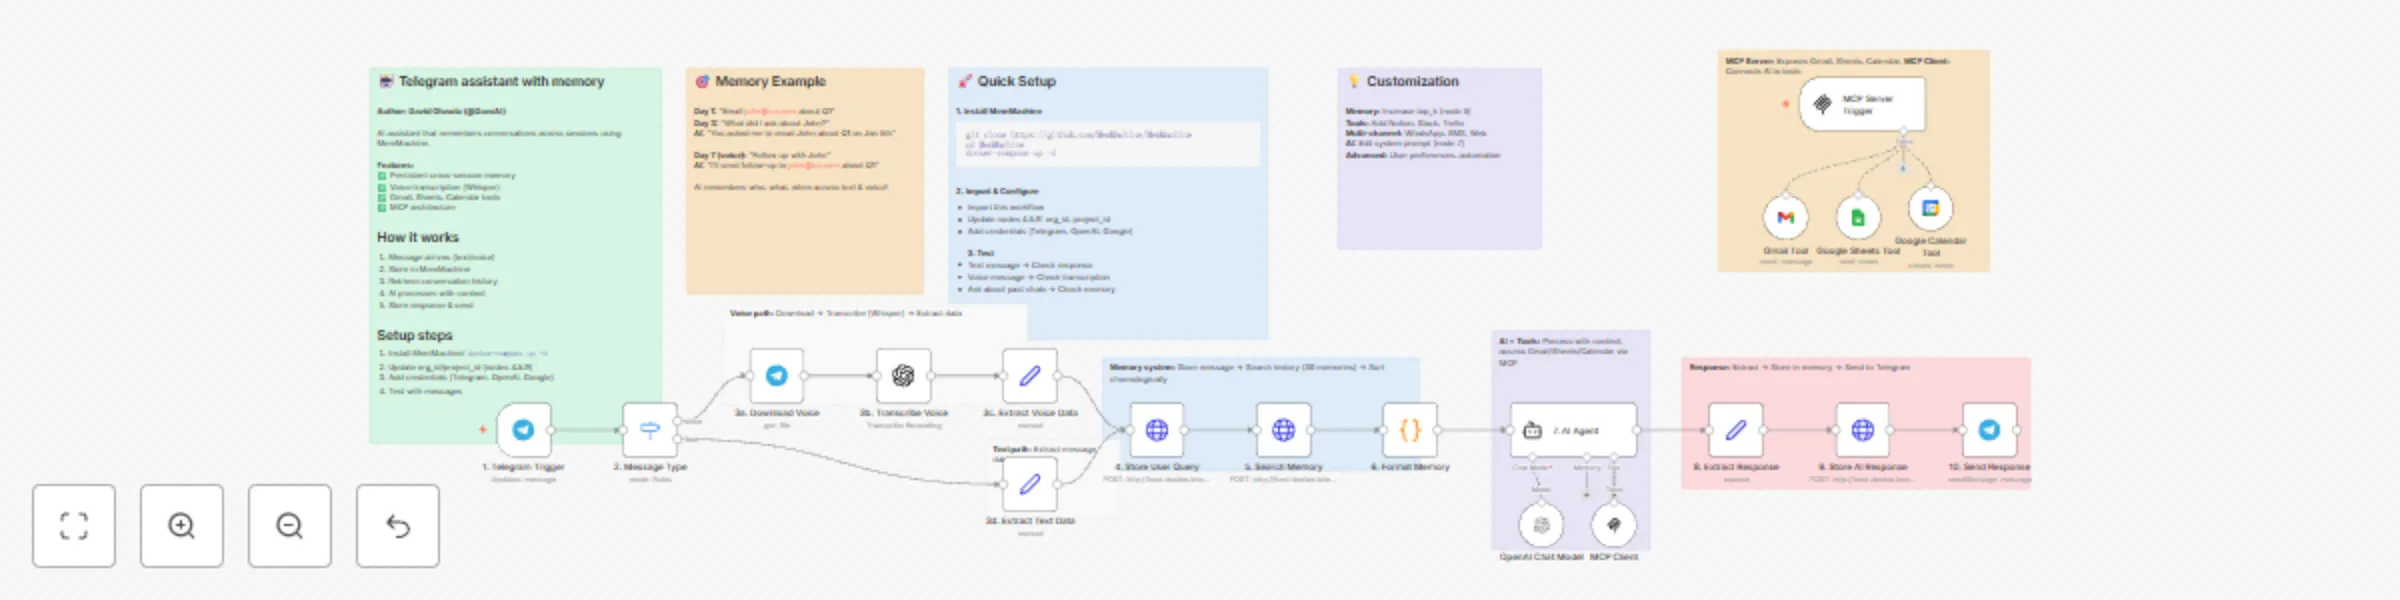
Build a Telegram AI assistant with MemMachine, OpenAI, and voice support
# Build a Telegram assistant with MemMachine and voice support An AI assistant that NEVER forgets using MemMachine for persistent cross-session memory, with voice transcription support and productivity tools. **⚠️ Important Deployment Note:** This workflow is designed for **self-hosted n8n** instances. If you're using n8n Cloud, you'll need to deploy MemMachine to a cloud server and update the HTTP Request URLs in nodes 4, 5, and 9. ## What This Template Does This workflow creates an intelligent personal assistant that maintains perfect memory across all conversations, whether you message today or weeks from now. It supports both text and voice messages, automatically transcribes voice using OpenAI Whisper, and provides tools for Gmail, Google Sheets, and Google Calendar. ## Key Features - 🧠 **Perfect Memory** - Remembers every conversation using MemMachine - 🎤 **Voice Transcription** - Supports voice messages via OpenAI Whisper - 📧 **Gmail Integration** - Send and read emails - 📊 **Google Sheets** - Read and write spreadsheet data - 📅 **Google Calendar** - Create and manage events - 🔧 **MCP Tools** - Extensible tool architecture - 💬 **Smart Context** - References past conversations naturally ## Real-World Example **Day 1 - Text Message:** - User: "Send an email to [email protected] about the Q1 report" - AI: *Uses Gmail tool* "Email sent to John about the Q1 report!" **Day 3 - Voice Message:** - 🎤 User: "What did I ask you to do for John?" - AI: "On January 5th, you asked me to email John about the Q1 report, which I sent." **Day 7 - Text Message:** - User: "Follow up with John" - AI: "I'll send a follow-up email to [email protected] about the Q1 report that we discussed on Jan 5th." The AI remembers who John is, what you discussed, and when it happened - all without you having to repeat yourself! ## How It Works ### Message Flow **For Text Messages:** 1. Telegram Trigger receives message 2. Extract user data and message text 3. Store message in MemMachine 4. Search conversation history (last 30 memories) 5. AI processes with full context + tools 6. Store AI response for future reference 7. Send reply to user **For Voice Messages:** 1. Telegram Trigger receives voice message 2. Download voice file 3. OpenAI Whisper transcribes to text 4. Extract transcribed text and user data 5. Store in MemMachine (same as text flow) 6. Process with AI + tools 7. Send reply to user ## Requirements ### Services & Credentials - **MemMachine** - Open-source memory system (self-hosted via Docker) - **Telegram Bot Token** - From @BotFather - **OpenAI API Key** - For AI responses and voice transcription - **Gmail OAuth** - For email integration (optional) - **Google Sheets OAuth** - For spreadsheet access (optional) - **Google Calendar OAuth** - For calendar management (optional) ### Installation ## MemMachine Setup ```bash # Clone and start MemMachine git clone https://github.com/MemMachine/MemMachine cd MemMachine docker-compose up -d # Verify it's running curl http://localhost:8080/health ``` ## Workflow Configuration ### Deployment Options This workflow supports two deployment scenarios: **Option 1: Self-Hosted n8n (Recommended)** - Both n8n and MemMachine run locally - Best for: Personal use, development, testing - Setup: 1. Run MemMachine: `docker-compose up -d` 2. Use `http://host.docker.internal:8080` in HTTP Request nodes (if n8n in Docker) 3. Or use `http://localhost:8080` (if n8n installed directly) **Option 2: n8n Cloud** - n8n hosted by n8n.io, MemMachine on your cloud server - Best for: Production, team collaboration - Setup: 1. Deploy MemMachine to cloud (DigitalOcean, AWS, GCP, etc.) 2. Expose MemMachine via HTTPS with SSL certificate 3. Update HTTP Request URLs in nodes 4, 5, 9 to: `https://your-memmachine-domain.com` 4. Ensure firewall allows n8n Cloud IP addresses ### Configuration Steps 1. **Import this template** into your n8n instance 2. **Update MemMachine URLs** (nodes 4, 5, 9): - **Self-hosted n8n in Docker**: `http://host.docker.internal:8080` - **Self-hosted n8n (direct install)**: `http://localhost:8080` - **n8n Cloud**: `https://your-memmachine-domain.com` 3. **Set Organization IDs** (nodes 4, 5, 9): - Change `your-org-id` to your organization name - Change `your-project-id` to your project name 4. **Add Credentials:** - Telegram Bot Token (node 1) - OpenAI API Key (nodes 4, 7) - Gmail OAuth (Gmail Tool node) - Google Sheets OAuth (Sheets Tool node) - Google Calendar OAuth (Calendar Tool node) ## Use Cases ### Personal Productivity - "Remind me what I worked on last week" - "Schedule a meeting with the team next Tuesday" - "Email Sarah about the proposal" ### Customer Support - AI remembers customer history - References past conversations - Provides contextual support ### Task Management - Track tasks across days/weeks - Remember project details - Follow up on action items ### Email Automation - "Send that email to John" (remembers John's email) - "What emails did I send yesterday?" - "Draft an email to the team" ### Calendar Management - "What's on my calendar tomorrow?" - "Schedule a meeting with Alex at 3pm" - "Cancel my 2pm meeting" ## Customization Guide ### Extend Memory Capacity In **Node 5 (Search Memory)**, adjust: ```json "top_k": 30 // Increase for more context (costs more tokens) ``` ### Modify AI Personality In **Node 7 (AI Agent)**, edit the system prompt to: - Change tone/style - Add domain-specific knowledge - Include company policies - Set behavioral guidelines ### Add More Tools Connect additional n8n tool nodes to the AI Agent: - Notion integration - Slack notifications - Trello/Asana tasks - Database queries - Custom API tools ### Multi-Channel Memory Create similar workflows for: - WhatsApp (same MemMachine instance) - SMS via Twilio (same memory database) - Web chat widget (shared context) All channels can share the same memory by using consistent `customer_email` identifiers! ## Memory Architecture ### Storage Structure Every message is stored with: ```json { "content": "message text", "producer": "[email protected]", "role": "user" or "assistant", "metadata": { "customer_email": "[email protected]", "channel": "telegram", "username": "john_doe", "timestamp": "2026-01-07T12:00:00Z" } } ``` ### Retrieval & Formatting 1. **Search** - Finds relevant memories by customer email 2. **Sort** - Orders chronologically (oldest to newest) 3. **Format** - Presents last 20 messages to AI 4. **Context** - AI uses history to inform responses ## Cost Estimate - **MemMachine**: Free (self-hosted via Docker) - **OpenAI API**: - Text responses: ~$0.001 per message (GPT-4o-mini) - Voice transcription: ~$0.006 per minute (Whisper) - **n8n**: Free (self-hosted) or $20/month (cloud) - **Google APIs**: Free tier available **Monthly estimate for 1,000 messages (mix of text/voice):** - OpenAI: $5-15 - Google APIs: $0 (within free tier) - Total: $5-15/month ## Troubleshooting ### Deployment Issues **n8n Cloud: Can't connect to MemMachine** - Ensure MemMachine is publicly accessible via HTTPS - Check firewall rules allow n8n Cloud IPs - Verify SSL certificate is valid - Test endpoint: `curl https://your-domain.com/health` **Self-Hosted: Can't connect to MemMachine** - Check Docker is running: `docker ps` - Verify URL matches your setup - Test endpoint: `curl http://localhost:8080/health` ### Voice not transcribing - Verify OpenAI API key is valid - Check API key has Whisper access - Test with short voice message first ### AI not remembering - Verify `org_id` and `project_id` match in nodes 4, 5, 9 - Check `customer_email` is consistent - Review node 5 output (are memories retrieved?) ### Tools not working - Verify OAuth credentials are valid - Check required API scopes/permissions - Test tools individually first ## Advanced Features ### Cloud Deployment Guide (For n8n Cloud Users) If you're using n8n Cloud, follow these steps to deploy MemMachine: **1. Choose a Cloud Provider** - DigitalOcean (Droplet: $6/month) - AWS (EC2 t3.micro) - Google Cloud (e2-micro) - Render.com (easiest, free tier available) **2. Deploy MemMachine** For DigitalOcean/AWS/GCP: ```bash # SSH into your server ssh root@your-server-ip # Install Docker curl -fsSL https://get.docker.com -o get-docker.sh sh get-docker.sh # Clone and start MemMachine git clone https://github.com/MemMachine/MemMachine cd MemMachine docker-compose up -d ``` **3. Configure HTTPS (Required for n8n Cloud)** ```bash # Install Caddy for automatic HTTPS apt install caddy # Create Caddyfile cat > /etc/caddy/Caddyfile << 'CADDYEND' your-domain.com { reverse_proxy localhost:8080 } CADDYEND # Start Caddy systemctl start caddy ``` **4. Update Workflow** - In nodes 4, 5, 9, change URL to: `https://your-domain.com` - Remove the `/api/v2/memories` part is already in the path **5. Security Best Practices** - Use environment variables for org_id and project_id - Enable firewall: `ufw allow 80,443/tcp` - Regular backups of MemMachine data - Monitor server resources ### Semantic Memory MemMachine automatically extracts semantic facts from conversations for better recall of important information. ### Chronological Context Memories are sorted by timestamp, not relevance, to maintain natural conversation flow. ### Cross-Session Persistence Unlike session-based chatbots, this assistant remembers across days, weeks, or months. ### Multi-Modal Input Seamlessly handles both text and voice, storing transcriptions alongside text messages. ## Template Information **Author:** David Olusola **Version:** 1.0.0 **Created:** January 2026 ## Support & Resources - **MemMachine Documentation**: https://github.com/MemMachine/MemMachine - **n8n Community**: https://community.n8n.io - **OpenAI Whisper**: https://platform.openai.com/docs/guides/speech-to-text ## Contributing Found a bug or have an improvement? Contribute to the template or share your modifications with the n8n community! --- **Start building your perfect-memory AI assistant today!** 🚀
Create a searchable YouTube educator directory with smart keyword matching
# 🎓 n8n Learning Hub — AI-Powered YouTube Educator Directory ## 📋 Overview This workflow demonstrates how to use **n8n Data Tables** to create a searchable database of educational YouTube content. Users can search for videos by topic (e.g., "voice", "scraping", "lead gen") and receive formatted recommendations from top n8n educators. ### What This Workflow Does: - **Receives search queries** via webhook (e.g., topic: "voice agents") - **Processes keywords** using JavaScript to normalize search terms - **Queries a Data Table** to find matching educational videos - **Returns formatted results** with video titles, educators, difficulty levels, and links - **Populates the database** with a one-time setup workflow --- ## 🎯 Key Features ✅ **Data Tables Introduction** - Learn how to store and query structured data ✅ **Webhook Integration** - Accept external requests and return JSON responses ✅ **Keyword Processing** - Simple text normalization and keyword matching ✅ **Batch Operations** - Use Split in Batches to populate tables efficiently ✅ **Frontend Ready** - Easy to connect with Lovable, Replit, or custom UIs --- ## 🛠️ Setup Guide ### Step 1: Import the Workflow 1. Copy the workflow JSON 2. In n8n, go to **Workflows** → **Import from File** or **Import from URL** 3. Paste the JSON and click **Import** ### Step 2: Create the Data Table The workflow uses a Data Table called `n8n_Educator_Videos` with these columns: - **Educator** (text) - Creator name - **video_title** (text) - Video title - **Difficulty** (text) - Beginner/Intermediate/Advanced - **YouTubeLink** (text) - Full YouTube URL - **Description** (text) - Video summary for search matching **To create it:** 1. Go to **Data Tables** in your n8n instance 2. Click **+ Create Data Table** 3. Name it `n8n_Educator_Videos` 4. Add the 5 columns listed above ### Step 3: Populate the Database 1. Click on the **"When clicking 'Execute workflow'"** node (bottom branch) 2. Click **Execute Node** to run the setup 3. This will insert all 9 educational videos into your Data Table ### Step 4: Activate the Webhook 1. Click on the **Webhook** node (top branch) 2. Copy the **Production URL** (looks like: `https://your-n8n.app.n8n.cloud/webhook/1799531d-...`) 3. Click **Activate** on the workflow 4. Test it with a POST request: ```bash curl -X POST https://your-n8n.app.n8n.cloud/webhook/YOUR-WEBHOOK-ID \ -H "Content-Type: application/json" \ -d '{"topic": "voice"}' ``` --- ## 🔍 How the Search Works ### Keyword Processing Logic The JavaScript node normalizes search queries: - **"voice", "audio", "talk"** → Matches voice agent tutorials - **"lead", "lead gen"** → Matches lead generation content - **"scrape", "data", "scraping"** → Matches web scraping tutorials The Data Table query uses **LIKE** matching on the Description field, so partial matches work great. ### Example Queries: ```json {"topic": "voice"} // Returns Eleven Labs Voice Agent {"topic": "scraping"} // Returns 2 scraping tutorials {"topic": "avatar"} // Returns social media AI avatar videos {"topic": "advanced"} // Returns all advanced-level content ``` --- ## 🎨 Building a Frontend with Lovable or Replit ### Option 1: Lovable (lovable.dev) Lovable is an AI-powered frontend builder perfect for quick prototypes. **Prompt for Lovable:** ``` Create a modern search interface for an n8n YouTube learning hub: - Title: "🎓 n8n Learning Hub" - Search bar with placeholder "Search for topics: voice, scraping, RAG..." - Submit button that POSTs to webhook: [YOUR_WEBHOOK_URL] - Display results as cards showing: * 🎥 Video Title (bold) * 👤 Educator name * 🧩 Difficulty badge (color-coded) * 🔗 YouTube link button * 📝 Description Design: Dark mode, modern glassmorphism style, responsive grid layout ``` **Implementation Steps:** 1. Go to lovable.dev and start a new project 2. Paste the prompt above 3. Replace `[YOUR_WEBHOOK_URL]` with your actual webhook 4. Export the code or deploy directly ### Option 2: Replit (replit.com) Use Replit's HTML/CSS/JS template for more control. **HTML Structure:** ```html <!DOCTYPE html> <html> <head> <title>n8n Learning Hub</title> <style> body { font-family: Arial; max-width: 900px; margin: 50px auto; } #search { padding: 10px; width: 70%; font-size: 16px; } button { padding: 10px 20px; font-size: 16px; } .video-card { border: 1px solid #ddd; padding: 20px; margin: 20px 0; } </style> </head> <body> <h1>🎓 n8n Learning Hub</h1> <input id="search" placeholder="Search: voice, scraping, RAG..." /> <button onclick="searchVideos()">Search</button> <div></div> <script> async function searchVideos() { const topic = document.getElementById('search').value; const response = await fetch('YOUR_WEBHOOK_URL', { method: 'POST', headers: {'Content-Type': 'application/json'}, body: JSON.stringify({topic}) }); const data = await response.json(); document.getElementById('results').innerHTML = data.Message || 'No results'; } </script> </body> </html> ``` ### Option 3: Base44 (No-Code Tool) If using Base44 or similar no-code tools: 1. Create a **Form** with a text input (name: `topic`) 2. Add a **Submit Action** → HTTP Request 3. Set Method: POST, URL: Your webhook 4. Map form data: `{"topic": "{{topic}}"}` 5. Display response in a **Text Block** using `{{response.Message}}` --- ## 📊 Understanding Data Tables ### Why Data Tables? - **Persistent Storage** - Data survives workflow restarts - **Queryable** - Use conditions (equals, like, greater than) to filter - **Scalable** - Handle thousands of records efficiently - **No External DB** - Everything stays within n8n ### Common Operations: 1. **Insert Row** - Add new records (used in the setup branch) 2. **Get Row(s)** - Query with filters (used in the search branch) 3. **Update Row** - Modify existing records by ID 4. **Delete Row** - Remove records ### Best Practices: - Use descriptive column names - Include a searchable text field (like Description) - Keep data normalized (avoid duplicate entries) - Use the "Split in Batches" node for bulk operations --- ## 🚀 Extending This Workflow ### Ideas to Try: 1. **Add More Educators** - Expand the video database 2. **Category Filtering** - Add a `Category` column (Automation, AI, Scraping) 3. **Difficulty Sorting** - Let users filter by skill level 4. **Vote System** - Add upvote/downvote columns 5. **Analytics** - Track which topics are searched most 6. **Admin Panel** - Build a form to add new videos via webhook ### Advanced Features: - **AI-Powered Search** - Use OpenAI embeddings for semantic search - **Thumbnail Scraping** - Fetch YouTube thumbnails via API - **Auto-Updates** - Periodically check for new videos from educators - **Personalization** - Track user preferences in a separate table --- ## 🐛 Troubleshooting **Problem:** Webhook returns empty results **Solution:** Check that the Description field contains searchable keywords **Problem:** Database is empty **Solution:** Run the "When clicking 'Execute workflow'" branch to populate data **Problem:** Frontend not connecting **Solution:** Verify webhook is activated and URL is correct (use Test mode first) **Problem:** Search too broad/narrow **Solution:** Adjust the keyword logic in "Load Video DB" node --- ## 📚 Learning Resources Want to learn more about the concepts in this workflow? - **Data Tables:** [n8n Data Tables Documentation](https://docs.n8n.io) - **Webhooks:** [Webhook Node Guide](https://docs.n8n.io/integrations/builtin/core-nodes/n8n-nodes-base.webhook/) - **JavaScript in n8n:** "Every N8N JavaScript Function Explained" (see database) --- ## 🎓 What You Learned By completing this workflow, you now understand: ✅ How to create and populate Data Tables ✅ How to query tables with conditional filters ✅ How to build webhook-based APIs in n8n ✅ How to process and normalize user input ✅ How to format data for frontend consumption ✅ How to connect n8n with external UIs --- **Happy Learning!** 🚀 Built with ❤️ using n8n Data Tables
Sync leads from Google Sheets to instantly email campaigns with data tables
# 🚀 Automated Lead Management: Google Sheets → Instantly + n8n Data Tables ## 📋 Overview This workflow automates lead management by syncing data from Google Sheets to Instantly email campaigns while maintaining tracking through n8n Data Tables. It processes leads in batches to avoid rate limits and ensures no duplicates are sent. --- ## ⚙️ Complete Setup Guide ### 1️⃣ **Create Your Google Sheet** **Option A: Use Our Template (Recommended)** 1. Copy this template with test data: [Google Sheets Template](https://docs.google.com/spreadsheets/d/1eFXld6aiZvnQXg1lgt1COFyUh-zcy9VGx2GmFXwmYzM/edit?usp=sharing) 2. Click **File → Make a copy** to create your own version 3. Populate with your lead data **Option B: Create Your Own** Create a Google Sheet with these **required columns**: - `Firstname` - Contact's first name - `Email` - Contact's email address - `Website` - Company website URL - `Company` - Company name - `Title` - Job title/position **💡 Pro Tip:** Add as many leads as you want - the workflow handles batching automatically! --- ### 2️⃣ **Set Up n8n Data Table** The workflow uses **one Data Table** to track leads and their sync status. #### **Create the "Leads" Data Table:** 1. In your n8n workflow editor, add a **Data Table node** 2. Click **"Create New Data Table"** 3. Name it: **`Leads`** 4. Add the following columns: | Column Name | Type | Purpose | |------------|------|---------| | `Firstname` | string | Contact's first name | | `Lastname` | string | Contact's last name | | `email` | string | Contact's email (unique identifier) | | `website` | string | Company website | | `company` | string | Company name | | `title` | string | Job title | | `campaign` | string | Sync status (e.g., "start", "added to instantly") | | `focusarea` | string | Enriched data from Title field | 5. Click **Save** **📌 Important:** The `campaign` field is crucial - it tracks which leads have been synced to prevent duplicates! --- ### 3️⃣ **Connect Your Google Sheets Account** 1. In the **"Get row(s) in sheet"** node, click **"Create New Credential"** 2. Select **Google Sheets OAuth2 API** 3. Follow the OAuth flow: - Sign in with your Google account - Grant n8n permission to access your sheets 4. Select your spreadsheet from the dropdown 5. Choose the correct sheet name (e.g., "instantly leads") 6. Test the connection to verify it works --- ### 4️⃣ **Connect Your Instantly Account** 1. Go to [Instantly.ai](https://app.instantly.ai) and log in 2. Navigate to **Settings → API** 3. Copy your **API Key** 4. Back in n8n, open the **"Create a lead"** node 5. Click **"Create New Credential"** 6. Select **Instantly API** 7. Paste your API key 8. **Important:** Update the campaign ID: - Current ID: `100fa5a2-3ed0-4f12-967c-b2cc4a07c3e8` (example) - Replace with your actual campaign ID from Instantly - Find this in Instantly under **Campaigns → Your Campaign → Settings** --- ### 5️⃣ **Configure the Data Table Nodes** You'll need to update **three Data Table nodes** to point to your newly created "Leads" table: #### **Node 1: "Get row(s)"** - Operation: `Get` - Data Table: Select **`Leads`** - Filter: `campaign = "start"` - This fetches only new, unsynced leads #### **Node 2: "Update row(s)1"** (Top Flow) - Operation: `Update` - Data Table: Select **`Leads`** - Filter: Match by `email` field - Update: Set `focusarea` to Title value - This enriches lead data #### **Node 3: "Update row(s)"** (Bottom Flow) - Operation: `Update` - Data Table: Select **`Leads`** - Filter: Match by `Email` field - Update: Set `campaign = "added to instantly"` - This prevents duplicate sends --- ### 6️⃣ **Configure the Schedule (Optional)** The workflow includes a **Schedule Trigger** for automation: **Default:** Runs every hour **To customize:** 1. Click the **"Schedule Trigger"** node 2. Choose your interval: - Every 30 minutes - Every 2 hours - Daily at specific time - Custom cron expression **💡 For testing:** Use the **"When clicking 'Execute workflow'"** manual trigger instead! --- ## 🔄 How It Works ### **Flow 1: Data Transfer (Top Path)** This flow moves leads from Google Sheets → n8n Data Table ``` Manual Trigger → Get Google Sheets → Batch Split (30) → Update Data Table → Loop ``` **Step-by-step:** 1. **Manual Trigger** - Click to start the workflow manually 2. **Get row(s) in sheet** - Fetches ALL leads from your Google Sheet 3. **Loop Over Items** - Splits into batches of 30 leads 4. **Update row(s)1** - For each lead: - Searches Data Table by `email` - Updates or creates the lead record - Stores `Title` → `focusarea` for enrichment 5. **Loop continues** - Processes next batch until all leads transferred **⚙️ Why 30 at a time?** - Prevents API timeouts - Respects rate limits - Allows monitoring of progress - Can be adjusted in the node settings --- ### **Flow 2: Instantly Sync (Bottom Path)** This flow syncs qualified leads from Data Table → Instantly ``` Schedule Trigger → Get Data Table (filtered) → Individual Loop → Create in Instantly → Update Status ``` **Step-by-step:** 1. **Schedule Trigger** - Runs automatically (every hour by default) 2. **Get row(s)** - Queries Data Table for leads where `campaign = "start"` - Only fetches NEW, unsynced leads - Ignores leads already processed 3. **Loop Over Items1** - Processes ONE lead at a time 4. **Create a lead** - Sends lead to Instantly: - Campaign: "Launchday 1" - Maps: Email, Firstname, Company, Website - Adds to email sequence 5. **Update row(s)** - Updates Data Table: - Sets `campaign = "added to instantly"` - Prevents duplicate sends on next run 6. **Loop continues** - Next lead until all processed **🔍 Why one at a time?** - Instantly API works best with individual requests - Ensures accurate status tracking - Prevents partial failures - Better error handling per lead --- ## ✅ Key Features Explained ### **Batch Processing** - Processes 30 Google Sheet leads at once - Configurable in **Loop Over Items** node - Prevents timeouts on large datasets ### **Duplicate Prevention** - Uses `campaign` field as status tracker - Only syncs leads where `campaign = "start"` - Updates to `"added to instantly"` after sync - Re-running workflow won't create duplicates ### **Data Enrichment** - Stores job title in `focusarea` field - Can be used for personalization later - Extensible for additional enrichment ### **Two-Trigger System** - **Manual Trigger**: For testing and one-time runs - **Schedule Trigger**: For automated hourly syncs - Both triggers use the same logic ### **Error Tolerance** - Individual lead processing prevents cascade failures - One failed lead won't stop the entire batch - Easy to identify and fix problematic records --- ## 🧪 Testing Your Workflow ### **Step 1: Test Data Transfer (Flow 1)** 1. Add 5 test leads to your Google Sheet 2. Click the **Manual Trigger** node 3. Click **"Execute Node"** 4. Check your **Leads Data Table** - should see 5 new rows 5. Verify `focusarea` field has data from `Title` column ### **Step 2: Test Instantly Sync (Flow 2)** 1. In Data Table, ensure at least one lead has `campaign = "start"` 2. Click the **Schedule Trigger** node 3. Click **"Execute Node"** (bypasses schedule for testing) 4. Check Instantly dashboard - should see new lead(s) 5. Check Data Table - `campaign` should update to `"added to instantly"` ### **Step 3: Test Duplicate Prevention** 1. Re-run the Schedule Trigger 2. No new leads should be created in Instantly 3. Data Table shows no changes (already marked as synced) --- ## 🚨 Troubleshooting ### **Issue: Google Sheets not fetching data** - ✅ Check OAuth credentials are valid - ✅ Verify spreadsheet ID in node settings - ✅ Ensure sheet name matches exactly - ✅ Check Google Sheet has data ### **Issue: Data Table not updating** - ✅ Verify Data Table exists and is named "Leads" - ✅ Check column names match exactly (case-sensitive) - ✅ Ensure email field is populated (used for matching) ### **Issue: Instantly not receiving leads** - ✅ Verify Instantly API key is correct - ✅ Update campaign ID to your actual campaign - ✅ Check `campaign = "start"` in Data Table - ✅ Verify email format is valid ### **Issue: Workflow runs but nothing happens** - ✅ Check if Data Table has leads with `campaign = "start"` - ✅ Verify loop nodes aren't stuck (check execution logs) - ✅ Ensure batch size isn't set to 0 --- ## 💡 Pro Tips & Best Practices ### **For Beginners:** 1. **Start small** - Test with 5-10 leads first 2. **Use manual trigger** - Don't enable schedule until tested 3. **Check each node** - Execute nodes individually to debug 4. **Monitor Data Table** - Use it as your source of truth 5. **Keep backups** - Export Data Table regularly ### **For Optimization:** 1. **Adjust batch size** - Increase to 50-100 for large datasets 2. **Add delays** - Insert "Wait" nodes if hitting rate limits 3. **Filter in Google Sheets** - Only fetch new rows (use formulas) 4. **Archive old leads** - Move synced leads to separate table 5. **Add error notifications** - Connect Slack/email for failures ### **For Scaling:** 1. **Use multiple campaigns** - Add campaign selection logic 2. **Implement retry logic** - Add "IF" nodes to retry failed syncs 3. **Add data validation** - Check email format before syncing 4. **Log everything** - Add "Set" nodes to track execution details 5. **Monitor API usage** - Track Instantly API quota --- ## 📊 Expected Results ### **After Setup:** - ✅ Google Sheets connected and fetching data - ✅ Data Table populated with lead information - ✅ Instantly receiving leads automatically - ✅ No duplicate sends occurring - ✅ Campaign status updating correctly ### **Performance Metrics:** - **100 leads** - Processes in ~5-10 seconds - **1000 leads** - Processes in ~15-20 seconds - **Instantly API** - 1 lead per second typical speed - **Schedule runs** - Every hour by default --- ## 📬 Need Help? ### **Customization Services:** - Advanced filtering and segmentation - Multi-campaign management - Custom field mapping and enrichment - Webhook integrations for real-time sync - Error handling and monitoring setup - Scale to 10K+ leads per day ### **Contact:** - 📧 **[email protected]** - 🎥 **[Watch Full Tutorial](https://www.youtube.com/watch?v=c8iv1u_jxDY)** --- ## 🎓 What You'll Learn By setting up this workflow, you'll master: ✅ **n8n Data Tables** - Creating, querying, and updating data ✅ **Batch Processing** - Handling large datasets efficiently ✅ **API Integrations** - Connecting Google Sheets and Instantly ✅ **Workflow Logic** - Building complex multi-path automations ✅ **Error Prevention** - Implementing duplicate checking ✅ **Scheduling** - Automating workflows with triggers --- *Happy Flogramming! 🎉*
AI resume screening with GPT-4o & error handling | Google Sheets & Drive flow
# GPT-4o Resume Screener with Error Handling - Google Sheets & Drive Pipeline ## How it works Enterprise-grade resume screening automation built for production environments. This workflow combines intelligent AI analysis with comprehensive error handling to ensure reliable processing of candidate applications. Every potential failure point is monitored with automatic recovery and notification systems. **Core workflow steps:** 1. **Intelligent Email Processing** - Monitors Gmail with attachment validation and file type detection 2. **Robust File Handling** - Multi-format support with upload verification and extraction validation 3. **Quality-Controlled AI Analysis** - GPT-4o evaluation with output validation and fallback mechanisms 4. **Verified Data Extraction** - Contact and qualification extraction with data integrity checks 5. **Dual Logging System** - Success tracking in main dashboard, error logging in separate audit trail **Error Recovery Features:** - Upload failure detection with retry mechanisms - Text extraction validation with quality thresholds - AI processing timeout protection and fallback responses - Data validation before final logging - Comprehensive error notification and tracking system ## Set up steps **Total setup time: 25-35 minutes** ### Core Credentials Setup (8 minutes) - Gmail OAuth2 with attachment permissions - Google Drive API with folder creation rights - Google Sheets API with read/write access - OpenAI API key with GPT-4o model access ### Primary Configuration (12 minutes) 1. **Configure monitoring systems** - Set up Gmail trigger with error detection 2. **Establish file processing pipeline** - Create Drive folders for resumes and configure upload validation 3. **Deploy dual spreadsheet system** - Set up main tracking sheet and error logging sheet 4. **Initialize AI processing** - Configure GPT-4o with structured output parsing and timeout settings 5. **Customize job requirements** - Update role specifications and scoring criteria ### Error Handling Setup (10 minutes) 1. **Configure error notifications** - Set administrator email for failure alerts 2. **Set up error logging spreadsheet** - Create audit trail for failed processing attempts 3. **Customize timeout settings** - Adjust processing limits based on expected file sizes 4. **Test error pathways** - Validate notification system with sample failures ### Advanced Customization (5 minutes) - Modify validation thresholds for resume quality - Adjust AI prompt for industry-specific requirements - Configure custom error messages and escalation rules - Set up automated retry logic for transient failures **Production-Ready Features:** - Comprehensive logging for compliance and auditing - Graceful degradation when services are temporarily unavailable - Detailed error context for troubleshooting - Scalable architecture for high-volume processing ## Template Features **Enterprise Error Management** - Multi-layer validation at every processing stage - Automatic error categorization and routing - Administrative alerts with detailed context - Separate error logging for audit compliance - Timeout protection preventing workflow hangs **Advanced File Processing** - Upload success verification before processing - Text extraction quality validation - Resume content quality thresholds - Corrupted file detection and handling - Format conversion error recovery **Robust AI Integration** - GPT-4o processing with output validation - Structured response parsing with error checking - AI timeout protection and fallback responses - Failed analysis logging with manual review triggers - Retry logic for transient API failures **Production Monitoring** - Real-time error notifications via email - Comprehensive error logging dashboard - Processing success/failure metrics - Failed resume tracking for manual review - Audit trail for compliance requirements **Data Integrity Controls** - Pre-logging validation of all extracted data - Missing information detection and flagging - Contact information verification checks - Score validation and boundary enforcement - Duplicate detection and handling Designed for HR departments and recruiting agencies that need reliable, scalable resume processing with enterprise-level monitoring and error recovery capabilities.
AI resume screening with Gmail, GPT-4o & Google Sheets - automated hiring pipeline
# AI Resume Screening with GPT-4o & Google Drive - Automated Hiring Pipeline ## How it works Transform your hiring process with this intelligent automation that screens resumes in minutes, not hours. The workflow monitors your Gmail inbox, processes resume attachments using AI analysis, and delivers structured candidate evaluations to a centralized Google Sheets dashboard. **Key workflow steps:** 1. **Email Detection** - Monitors Gmail for resume attachments (PDF, DOCX, TXT) 2. **File Processing** - Uploads to Google Drive and extracts text content 3. **AI Analysis** - GPT-4o evaluates candidates against job requirements 4. **Data Extraction** - Pulls contact info and key qualifications automatically 5. **Results Logging** - Saves structured analysis to Google Sheets for team review ## Set up steps **Total setup time: 15-20 minutes** ### Required Credentials (5 minutes) - Gmail account with OAuth2 access - Google Drive API credentials - Google Sheets API access - OpenAI API key for GPT-4o ### Configuration Steps (10 minutes) 1. **Connect Gmail trigger** - Authorize email monitoring 2. **Set up Google Drive folder** - Choose destination for resume files 3. **Create tracking spreadsheet** - Copy the provided Google Sheets template 4. **Add OpenAI credentials** - Insert your API key for AI analysis 5. **Customize job description** - Update the role requirements in the "Job Description" node ### Optional Customization (5 minutes) - Modify AI scoring criteria in the recruiter prompt - Adjust candidate information extraction fields - Customize Google Sheets column mapping **No coding required** - All configuration happens through the n8n interface using pre-built nodes and simple dropdown selections. ## Template Features **Smart File Handling** - Supports PDF, Word documents, and plain text resumes - Automatic format conversion and text extraction - Intelligent routing based on file type **AI-Powered Analysis** - GPT-4o evaluation against job requirements - Structured scoring with strengths/weaknesses breakdown - Risk and opportunity assessment for each candidate - Actionable next-steps recommendations **Seamless Integration** - Direct Gmail inbox monitoring - Automatic Google Drive file organization - Real-time Google Sheets dashboard updates - Clean data extraction for CRM integration **Professional Output** - Standardized candidate scoring (1-10 scale) - Detailed justification for each evaluation - Contact information extraction - Resume quality validation Perfect for HR teams, recruiting agencies, and growing companies looking to streamline their hiring pipeline with intelligent automation.
Create a BTC/ETH price & USD exchange rate API with CoinGecko & ExchangeRate-API
# 🌐 Crypto + FX Micro-API (Webhook JSON) ## 📌 Overview Spin up a tiny, serverless-style API from n8n that returns **BTC/ETH prices & 24h changes** plus **USD→EUR** and **USD→NGN** from public, no-key data sources. Ideal for dashboards, low-code apps, or internal tools that just need a simple JSON feed. ## ⚙️ How it works 1. **Webhook (GET /crypto-fx)** — entrypoint for your client/app. 2. **HTTP: ExchangeRate-API** — USD-base FX rates (no API key). 3. **HTTP: CoinGecko** — BTC/ETH prices + 24h % change (no API key). 4. **Merge** — combines payloads. 5. **Code (v2)** — shapes a clean JSON: - `btc.price`, `btc.change_24h` - `eth.price`, `eth.change_24h` - `usd_eur`, `usd_ngn`, `ts` (ISO timestamp) 6. **Respond to Webhook** — returns the JSON with HTTP **200**. ## 🛠 Setup Guide 1) Webhook path & URL In the Webhook node, confirm HTTP Method = GET and Path = crypto-fx. Use the Test URL while building; switch to Production URL for live usage. 2) Test the endpoint Curl: curl -s https://<your-n8n-host>/webhook/crypto-fx Browser / fetch(): fetch('https://<your-n8n-host>/webhook/crypto-fx') .then(r => r.json()) .then(data => console.log(data)) 3) Response mapping (already wired) Respond to Webhook → Response Body is set to {{$json}}. The Code node outputs the exact JSON structure shown above, so no extra mapping is required. 🔐 Security (recommended) Add a Webhook Secret (query header check in Code node) or IP allowlist via your reverse proxy. If embedding in public sites, proxy through your backend and apply rate-limit/cache headers there. 🚀 Usage ideas Frontend dashboards (Chart.js, ECharts). HomeAssistant / Node-RED info panels. Google Apps Script to store the JSON into Sheets on a timer. 🎛 Customization More coins: extend CoinGecko ids= (e.g., bitcoin,ethereum,solana). More FX: read additional codes from fx.rates and add to the payload. Timestamps: convert ts to your preferred timezone on client side. CORS: if calling from browsers, add CORS headers in Respond (options → headers). 🧩 Troubleshooting Empty/partial JSON: run the two HTTP nodes once to verify responses. 429s / rate limiting: add a short Wait node or cache outputs. Wrong URL: ensure you’re using Production URL outside the n8n editor. Security errors: if you add a secret, return 401 when it’s missing/invalid.
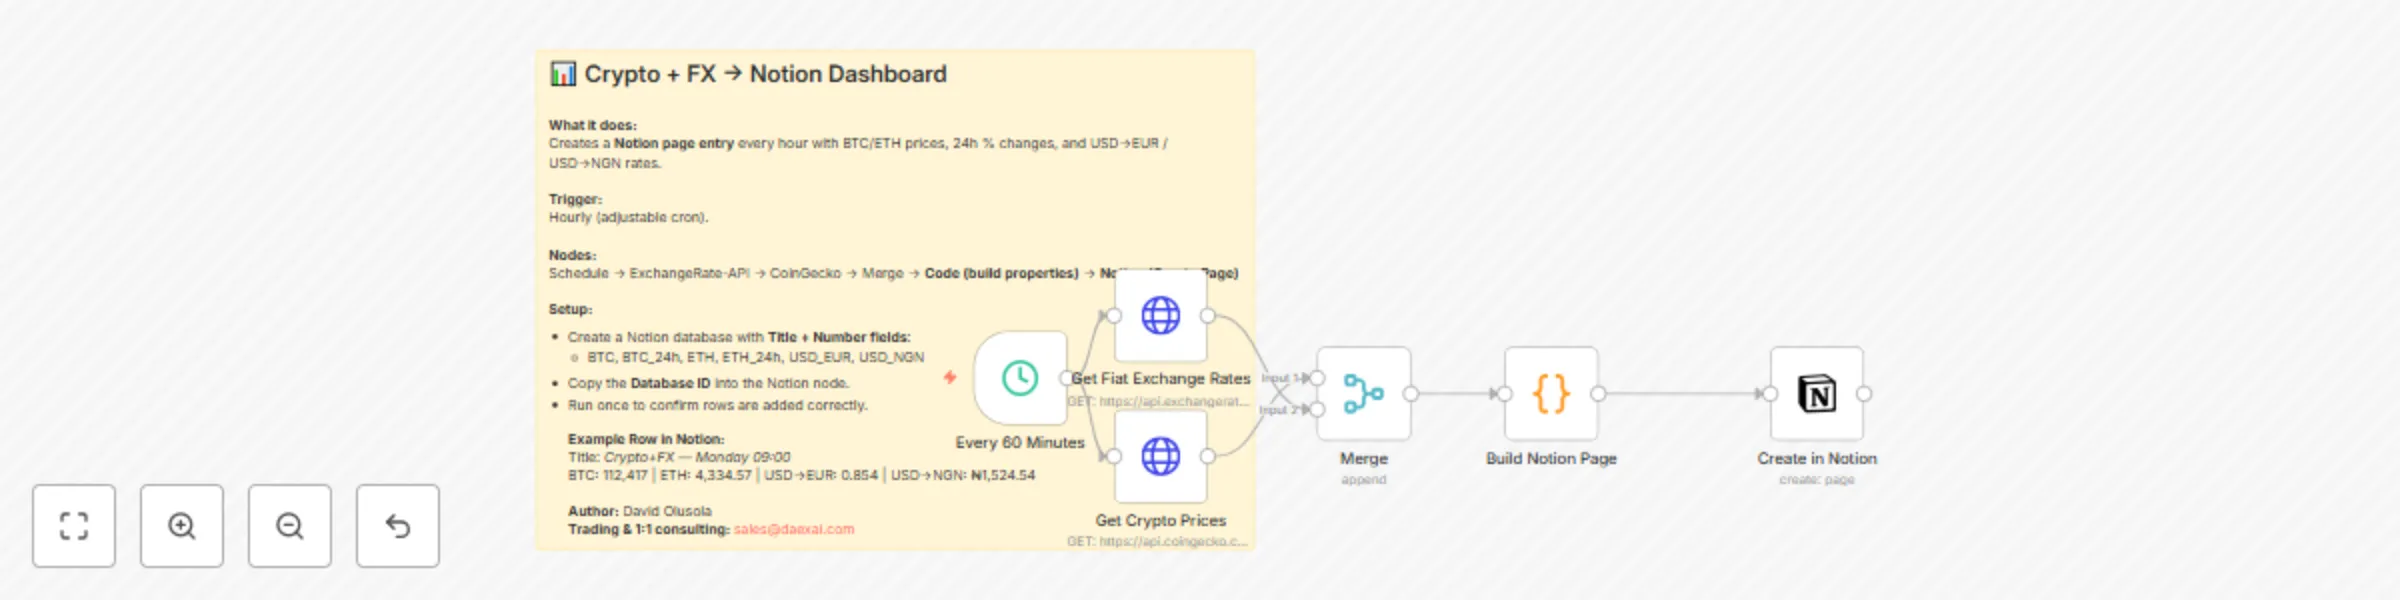
Track crypto prices & FX rates with CoinGecko & ExchangeRate-API to Notion
# 📊 Log BTC/ETH Prices and USD Exchange Rates to Notion (Hourly) ## 📌 Overview This workflow automatically logs live **crypto prices (Bitcoin & Ethereum)** and **fiat exchange rates (USD→EUR / USD→NGN)** into a Notion database every hour. Each entry becomes a new row in your Notion dashboard, letting you visualize currency and crypto trends side by side. It’s perfect for traders, analysts, and anyone who wants a **single source of truth in Notion** without needing multiple apps open. With hourly updates, you’ll have a clean data history for building rollups, trend graphs, or financial dashboards. --- ## ⚙️ How it works 1. **Schedule Trigger** — runs every hour (adjustable via cron). 2. **HTTP Request (ExchangeRate-API)** — fetches USD-base FX rates (no API key required). 3. **HTTP Request (CoinGecko)** — fetches BTC & ETH prices + 24h % change (no API key required). 4. **Merge** — combines both payloads. 5. **Code (v2)** — formats a Notion-ready JSON payload with the correct fields. 6. **Notion Node** — creates a new page in your database with mapped properties. **Example Row in Notion:** Title: *Crypto+FX — 2025-09-08 09:00* BTC: 112,417 | BTC_24h: +1.22% ETH: 4,334.57 | ETH_24h: +1.33% USD→EUR: 0.854 | USD→NGN: ₦1,524.54 --- ## 🛠 Setup Guide ### 1) Create the Notion database - In Notion, create a new **database (Table view)**. - Add these columns with matching property types: | Column | Property Type | |------------|---------------| | Title | Title | | BTC | Number | | BTC_24h | Number | | ETH | Number | | ETH_24h | Number | | USD_EUR | Number | | USD_NGN | Number | ### 2) Connect Notion in n8n - In the **Notion “Create Page” node**, connect with your **Notion OAuth2 credentials**. - On first use, you’ll be redirected to authorize n8n with your Notion workspace. - Copy your **Database ID** (from the Notion URL) and paste it into the node. ### 3) Map the Code output - The Code node outputs JSON fields: `BTC`, `BTC_24h`, `ETH`, `ETH_24h`, `USD_EUR`, `USD_NGN`. - In the Notion node, map each property: - `BTC` → `{{$json.BTC}}` - `BTC_24h` → `{{$json.BTC_24h}}` - `ETH` → `{{$json.ETH}}` - `ETH_24h` → `{{$json.ETH_24h}}` - `USD_EUR` → `{{$json.USD_EUR}}` - `USD_NGN` → `{{$json.USD_NGN}}` ### 4) Test - Run the workflow once. - Confirm that a new page is added to your Notion database with all values filled. --- ## 🎛 Customization - **Cadence:** change the schedule to 10 minutes, 4 hours, or daily depending on your needs. - **Extra coins:** add more IDs (e.g., `solana`, `bnb`) in the CoinGecko call and update the Code node. - **Extra FX pairs:** expand from ExchangeRate-API (e.g., USD→GBP, USD→ZAR). - **Notion dashboards:** use rollups, charts, and linked databases for trend visualization. - **Formatting:** add emojis, colors, or sections in your Notion view for clarity. --- ## 🧩 Troubleshooting - **Page not created:** verify Database ID and ensure the Notion API integration has access. - **Empty fields:** check that property names in Notion exactly match those used in the Code node. - **Wrong data type:** make sure properties are set as **Number**, not Text. - **Rate limits:** CoinGecko and ExchangeRate-API are free but may rate-limit if called too often; keep cadence reasonable (hourly recommended). ---
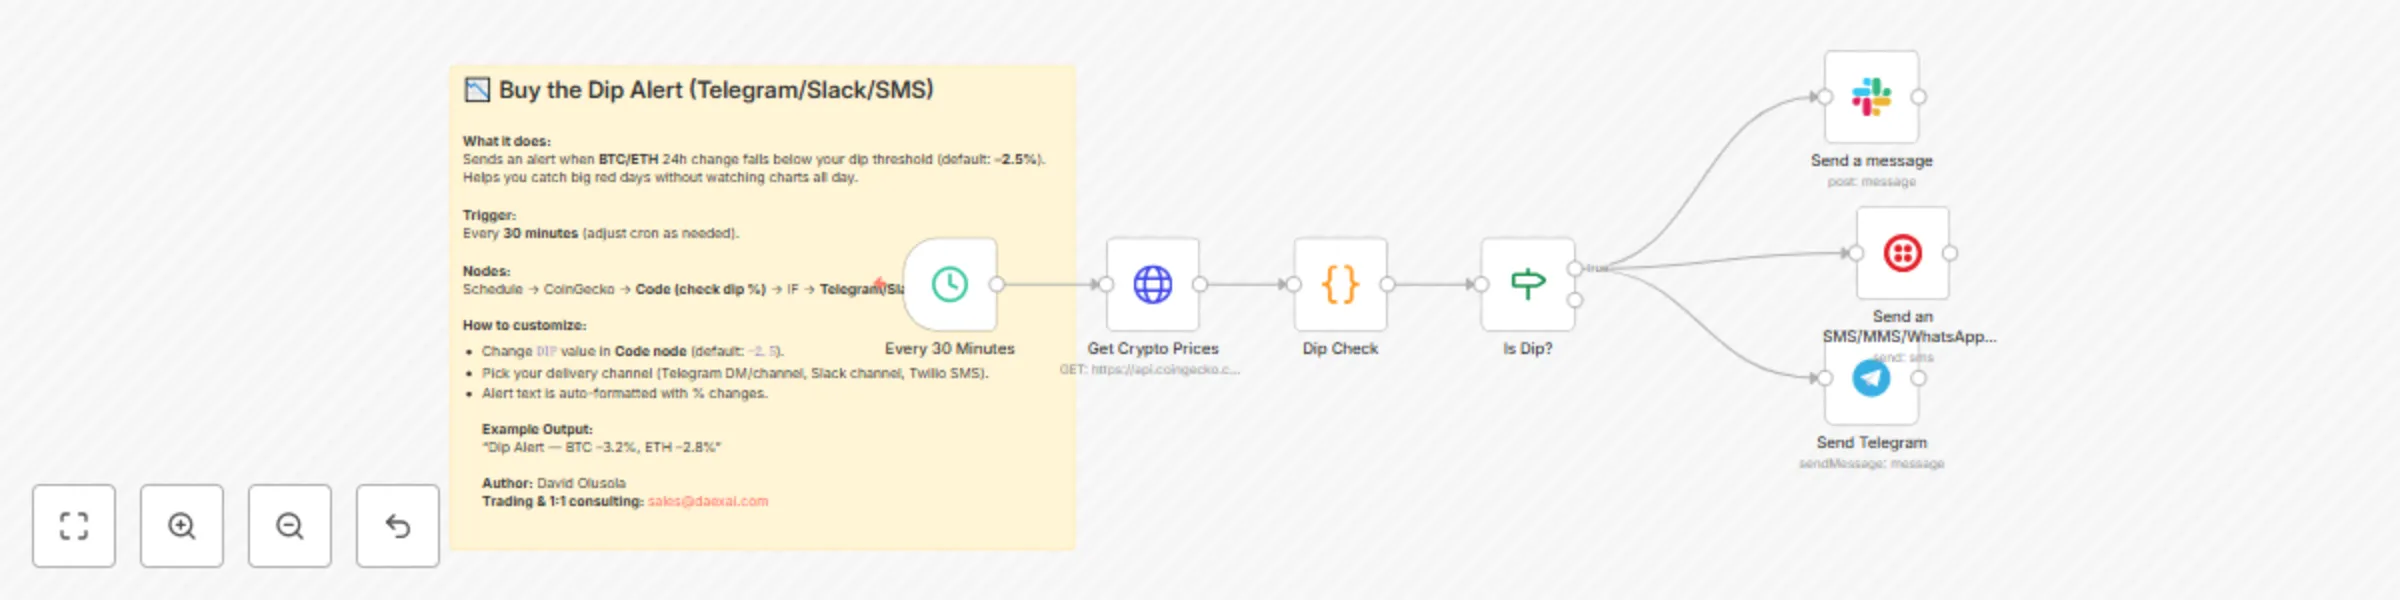
Cryptocurrency dip alerts for Bitcoin & Ethereum via Telegram, Slack & SMS
# 📉 Buy the Dip Alert (Telegram/Slack/SMS) ## 📌 Overview This workflow automatically notifies you when **Bitcoin or Ethereum** drops more than a set percentage in the last 24 hours. It’s ideal for traders who want to stay ready for **buy-the-dip opportunities** without constantly refreshing charts. --- ## ⚙️ How it works 1. **Schedule Trigger** — runs every 30 minutes (adjustable). 2. **HTTP Request (CoinGecko)** — fetches BTC & ETH prices and 24h % change. 3. **Code Node (“Dip Check”)** — compares changes against your dip threshold. 4. **IF Node** — continues only if dip condition is true. 5. **Notification Node** — sends alert via Telegram, Slack, or SMS (Twilio). **Example Output:** Dip Alert — BTC –3.2%, ETH –2.8% Not financial advice. --- ## 🛠 Setup Guide ### 1) Dip threshold - Open the **Code node**. - Change the line: ```js const DIP = -2.5; // trigger if 24h drop <= -2.5% Set your preferred dip value (e.g., –5 for a 5% drop). 2) Choose your alert channel Telegram: add your bot token & chat ID. Slack: connect Slack API & set channel name. Twilio: configure SID, token, from/to numbers. 3) Test Temporarily set DIP to 0 to force an alert. Run once from the Code node → confirm alert message text. Execute the Notification node → confirm delivery to your channel. 🎛 Customization Cadence: change Schedule Trigger (every 5m, 15m, hourly, etc.). Coins: extend the CoinGecko call (add solana, bnb) and update Code node logic. Multiple alerts: duplicate IF → Notification branch for different thresholds (minor vs major dip). Combine with “Threshold Alerts” workflow to cover both upside breakouts and downside dips. Storage: log alerts into Google Sheets for tracking dip history. 🧩 Troubleshooting No alerts firing: check CoinGecko API response in Execution Data. Wrong %: CoinGecko returns usd_24h_change directly — no math needed. Duplicate alerts: add a debounce using a Sheet/DB to store last fired time. Telegram not posting: confirm bot has access to your channel/group.
Monitor Bitcoin & Ethereum prices with CoinGecko alerts via Email/SMS
# ⚠️ Crypto Price Threshold Alerts (Email/SMS/Telegram) ## 📌 Overview This workflow monitors **Bitcoin (BTC)** and **Ethereum (ETH)** prices in real-time using **CoinGecko’s public API**. It sends you an **instant alert** when a price crosses a custom threshold or when the 24-hour change moves beyond your defined % range. Perfect for traders who want **automated price pings** without constantly checking charts. --- ## ⚙️ How it works 1. **Schedule Trigger** — runs every 10–15 minutes (configurable cron). 2. **HTTP Request (CoinGecko)** — fetches live BTC/ETH prices + 24h % changes. 3. **Code Node** — compares values against your target thresholds. 4. **IF Node** — checks if any condition is true (cross up/down or big move). 5. **Notification Node** — sends alert via Email, SMS (Twilio), or Telegram. **Example Output:** > “BTC broke $110,000 (+2.1% 24h)” --- ## 🛠 Setup Guide 1. **Set your thresholds** in the **Code node**: - `BTC_UP` / `BTC_DOWN` - `ETH_UP` / `ETH_DOWN` - `MOVE_ABS` (absolute % change to trigger) 2. **Choose delivery channel**: - **Email Node** → SMTP (Gmail, Outlook, etc.) - **Twilio Node** → SMS alerts - **Telegram Node** → DM or channel alerts 3. **Test Run**: - Execute once from the Code node. - If thresholds are crossed, you’ll see a formatted alert payload. --- ## 🎛 Customization - Adjust **interval** in the **Schedule Trigger** (default: every 15m). - Add more cryptos by editing the CoinGecko API call. - Use **Slack** or **Discord** instead of Email/Telegram for team alerts. - Store last triggered state in **Google Sheets/DB** to avoid repeated pings. --- ## 👤 Author **David Olusola** For traning automation & 1:1 consulting: [[email protected]](mailto:[email protected])
Daily currency rates email report with USD→EUR/NGN & BTC/ETH price tracking
# 💰 Track Daily Fiat & Crypto Exchange Rates Report with ExchangeRate-API & CoinGecko A simple, reliable workflow that emails you a **beautiful HTML currency report** every morning at **8:00 AM** (your n8n server’s timezone). It pulls **USD→EUR** and **USD→NGN** fiat rates and **BTC/ETH** prices (+ 24h % change), then formats a clean HTML email. --- ## 📌 What It Does - ⏰ **Schedule:** Runs daily at 8:00 AM - 🌍 **Fiat Rates:** USD→EUR and USD→NGN (via ExchangeRate-API, no key needed) - ₿ **Crypto:** BTC & ETH prices + 24h change (via CoinGecko, no key needed) - ✉️ **Email:** Sends a **mobile-friendly HTML** + plain text fallback --- ## 🗺️ Node Map (At a Glance) | # | Node Name | Type | Purpose | |---|-----------|------|---------| | 1 | **Daily 8AM Trigger** | `Schedule Trigger` | Fires every day at 08:00 | | 2 | **Get Fiat Exchange Rates** | `HTTP Request` | `https://api.exchangerate-api.com/v4/latest/USD` | | 3 | **Get Crypto Prices** | `HTTP Request` | CoinGecko simple price endpoint | | 4 | **Merge** | `Merge` | Combines fiat + crypto responses | | 5 | **Format Email Content** | `Code (v2)` | Builds HTML + text, sets subject & summary | | 6 | **Send Daily Currency Email** | `Email Send` | Sends the HTML email via SMTP | > 📝 Sticky Notes in the canvas explain each section. They’re optional and safe to delete. --- ## ⚙️ Required Setup ### 1) Schedule Time - Open **Daily 8AM Trigger** → set cron to **08:00 daily**. Suggested cron: `0 8 * * *` (server local time; if you’re in Lagos, ensure server timezone matches **Africa/Lagos** or adjust accordingly). ### 2) SMTP Credentials - Open **Send Daily Currency Email** → set: - **From Email**: your sender (e.g. `[email protected]`) - **To Email**: recipient address - **Credentials**: select your SMTP account - **Gmail tip:** use **App Passwords** (with 2FA enabled). - Server: `smtp.gmail.com` - Port: `587` (STARTTLS) or `465` (SSL) - Auth: your full Gmail address + app password ### 3) API Access - Both endpoints are **free** & **no API key**: - Fiat (USD base): `https://api.exchangerate-api.com/v4/latest/USD` - Crypto (BTC/ETH): `https://api.coingecko.com/api/v3/simple/price?ids=bitcoin,ethereum&vs_currencies=usd&include_24hr_change=true` --- ## 🧩 Input Order The **Format Email Content** node is written to **auto-detect** which input is fiat vs crypto, so the Merge order doesn’t matter. A clean pattern is: - **Get Crypto Prices** → **Merge** (Input 1) - **Get Fiat Exchange Rates** → **Merge** (Input 2) - **Merge** → **Format Email Content** → **Send Daily Currency Email** --- ## 🚀 Test It Quickly 1. Run **Get Fiat Exchange Rates** → verify `rates.EUR` and `rates.NGN` exist. 2. Run **Get Crypto Prices** → verify BTC/ETH `usd` and `usd_24h_change`. 3. Run **Format Email Content** → check it outputs `subject`, `html`, `text`. 4. Run **Send Daily Currency Email** → confirm the styled report arrives. --- ## 🎛 Customize - **Currencies:** Add more fiat codes from `rates` (e.g., GBP, ZAR) and extend the HTML template. - **Coins:** Add `ids=` in CoinGecko (e.g., `bitcoin,ethereum,solana`) and render extra cards. - **Send time:** Adjust the cron (e.g., `30 7 * * *` for 7:30 AM). - **Branding:** Edit colors, fonts, and header gradient in the HTML string. - **Timezone stamp:** Change the display timezone inside the Code node if needed. --- ## 🧩 Common Pitfalls & Fixes - **Email not styled:** Ensure the Email node is set to **HTML** format. - **Gmail auth fails:** Use an **App Password** and port **587** with STARTTLS. - **Empty values:** Run the two HTTP nodes once and confirm the responses contain data. - **Rate limits:** If you increase frequency, consider adding a short Wait node or caching.
Auto-summarize Zoom recordings with GPT-4 → Slack & email
# 🎥 Auto-Summarize Zoom Recordings → Slack & Email Never lose meeting insights again! This workflow automatically summarizes Zoom meeting recordings using **OpenAI GPT-4** and delivers structured notes directly to **Slack** and **Email**. --- ## ⚙️ How It Works 1. **Zoom Webhook** – triggers when a recording is completed. 2. **Normalize Data** – extracts meeting details + transcript. 3. **OpenAI GPT-4** – creates structured meeting summary. 4. **Slack** – posts summary to your chosen channel. 5. **Email** – delivers summary to your inbox. --- ## 🛠️ Setup Steps ### 1. Zoom - Create a Zoom App with the **`recording.completed`** event. - Add workflow webhook URL. ### 2. OpenAI - Add your **API key** to n8n. - Use **GPT-4** for best results. ### 3. Slack - Connect Slack credentials. - Replace `YOUR_SLACK_CHANNEL` with your channel ID. ### 4. Email - Connect Gmail or SMTP. - Replace recipient email(s). --- ## 📊 Example Slack Message 📌 Zoom Summary Topic: Sales Demo Pitch Host: [email protected] Date: 2025-08-30 Summary: Reviewed Q3 sales pipeline Discussed objections handling Assigned action items for next week --- ⚡ Get instant summaries from every Zoom meeting — no more manual note-taking!
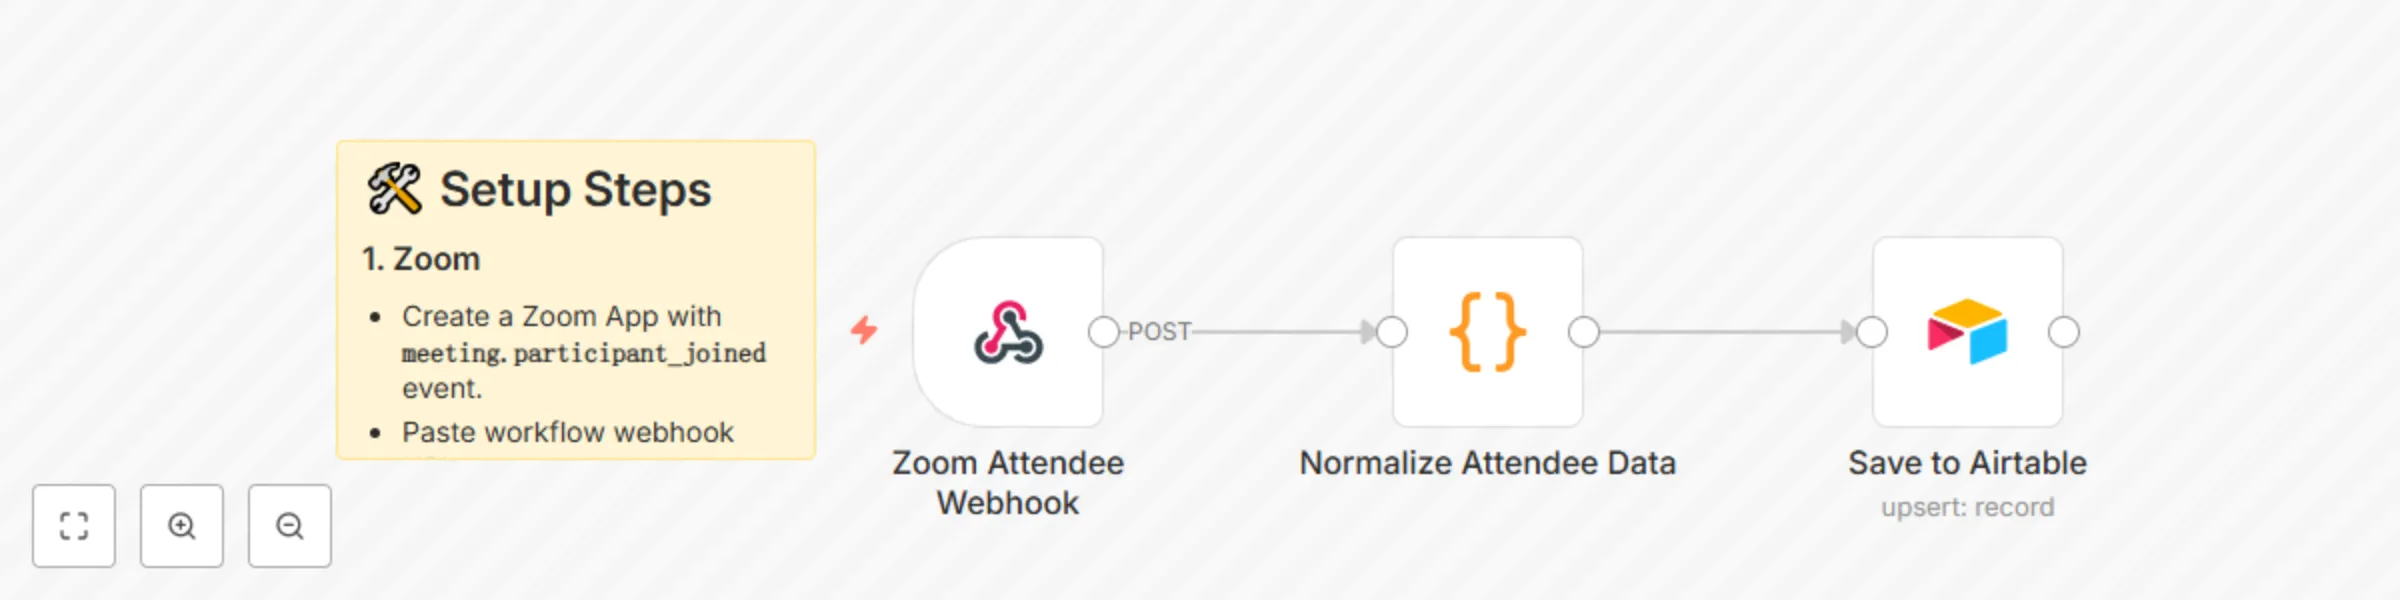
Auto-create Airtable CRM records for Zoom attendees
# 🗂️ Auto-Create Airtable CRM Records for Zoom Attendees This workflow automatically logs every Zoom meeting attendee into an Airtable CRM — capturing their details for sales follow-up, reporting, or onboarding. --- ## ⚙️ How It Works 1. **Zoom Webhook** → Captures participant join event. 2. **Normalize Data** → Extracts attendee name, email, join/leave times. 3. **Airtable** → Saves/updates record with meeting + contact info. --- ## 🛠️ Setup Steps ### 1. Zoom - Create a Zoom App with **`meeting.participant_joined`** event. - Paste workflow webhook URL. ### 2. Airtable - Create a base called **CRM**. - Table: **Attendees**. - Columns: - Meeting ID - Topic - Name - Email - Join Time - Leave Time - Duration - Tag ### 3. n8n - Replace `YOUR_AIRTABLE_BASE_ID` + `YOUR_AIRTABLE_TABLE_ID` in the workflow. - Connect Airtable API key. --- ## 📊 Example Airtable Row | Meeting ID | Topic | Name | Email | Join Time | Duration | Tag | |------------|--------------|----------|--------------------|----------------------|----------|----------| | 999-123-456 | Sales Demo | Sarah L. | [email protected] | 2025-08-30T10:02:00Z | 45 min | New Lead | --- ⚡ With this workflow, every Zoom attendee becomes a structured CRM record automatically.
Personalized follow-up emails for Zoom attendees with GPT-4 and Gmail
# 📧 Auto-Send AI Follow-Up Emails to Zoom Attendees This workflow automatically emails personalized follow-ups to every Zoom meeting participant once the meeting ends. --- ## ⚙️ How It Works 1. **Zoom Webhook** → Captures meeting.ended event + participant list. 2. **Normalize Data** → Extracts names, emails, and transcript (if available). 3. **AI (GPT-4)** → Drafts short, professional follow-up emails. 4. **Gmail** → Sends thank-you + recap email to each participant. --- ## 🛠️ Setup Steps ### 1. Zoom App - Enable **`meeting.ended`** event. - Include participant email/name in webhook payload. - Paste workflow webhook URL. ### 2. Gmail - Connect Gmail OAuth in n8n. - Emails are sent automatically per participant. ### 3. OpenAI - Add your OpenAI API key. - Uses **GPT-4** for personalized drafting. --- ## 📊 Example Output **Email Subject:** Follow-Up: Marketing Strategy Session **Email Body:** Hi Sarah, Thank you for joining our Marketing Strategy Session today. Key points we discussed: Campaign launch next Monday Budget allocation approved Need design assets by Thursday Next steps: I'll follow up with the creative team and share the updated timeline. Best, David --- ⚡ With this workflow, every attendee feels valued and aligned after each meeting.
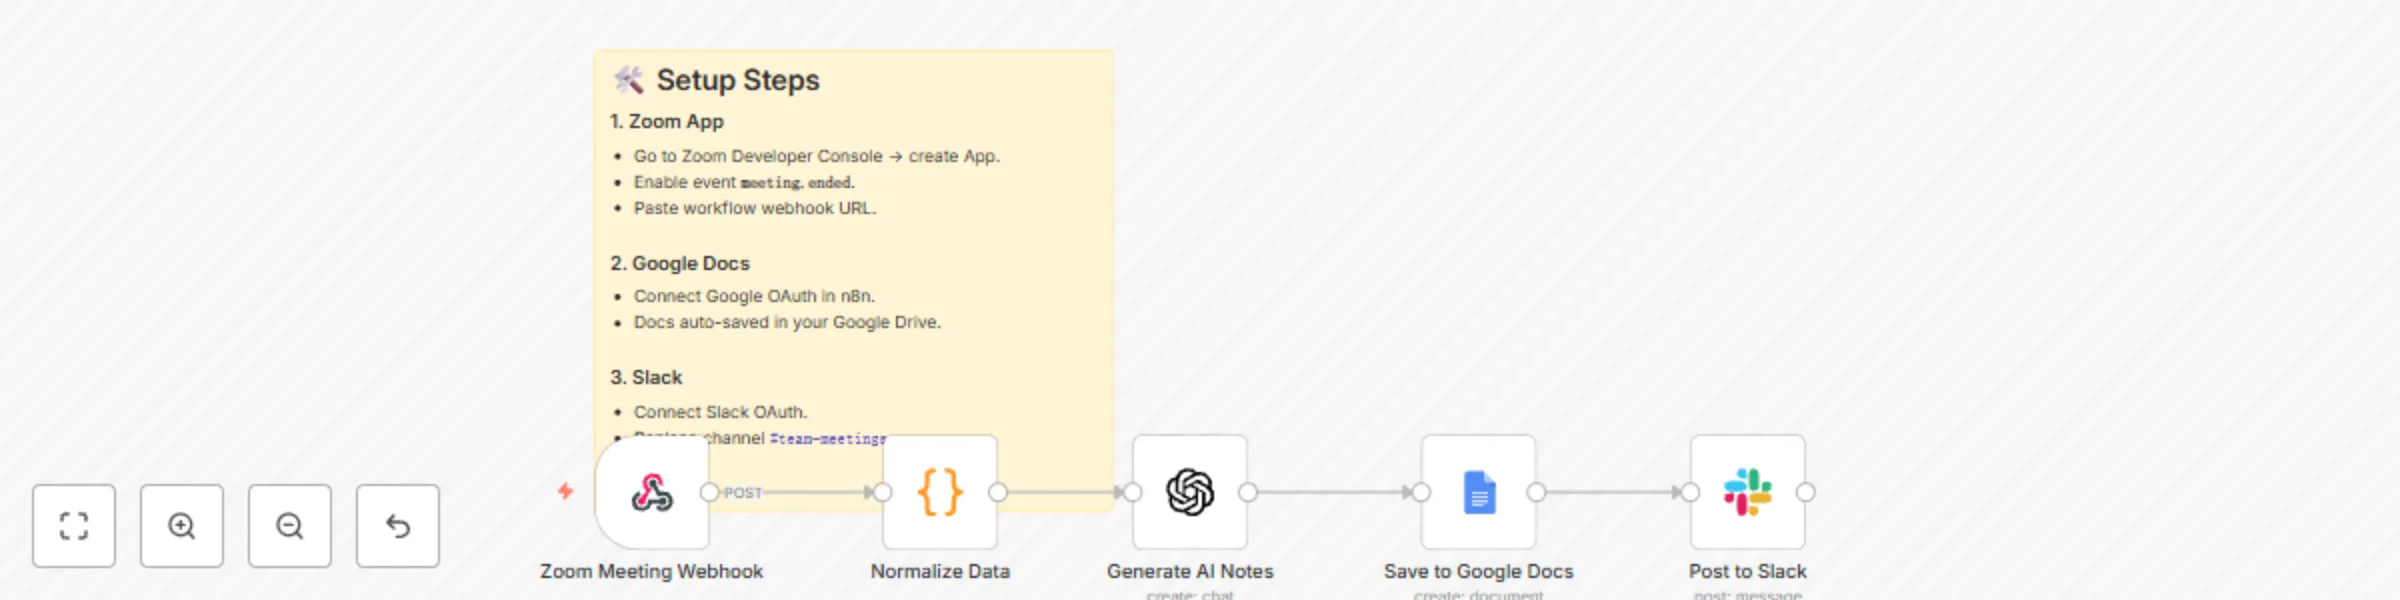
Generate AI meeting notes from Zoom with GPT-4, Google Docs & Slack
# 📝 Auto-Generate Meeting Notes & Summaries (Zoom → Google Docs + Slack) This workflow automatically captures Zoom meeting data when a meeting ends, generates AI-powered notes, saves them to Google Docs, and instantly posts a summary with a link in Slack. --- ## ⚙️ How It Works 1. **Zoom Webhook** → Triggers on `meeting.ended` or `recording.completed`. 2. **Normalize Data** → Extracts meeting details (topic, host, duration, transcript). 3. **AI Notes (GPT-4)** → Summarizes transcript into key decisions, action items, and next steps. 4. **Google Docs** → Saves formatted meeting notes + transcript archive. 5. **Slack Post** → Shares summary + link to notes in `#team-meetings`. --- ## 🛠️ Setup Steps ### 1. Zoom App - Go to Zoom Developer Console → create App. - Enable event **`meeting.ended`**. - Paste workflow webhook URL. ### 2. Google Docs - Connect Google OAuth in n8n. - Docs auto-saved in your Google Drive. ### 3. Slack - Connect Slack OAuth. - Replace channel `#team-meetings`. ### 4. OpenAI - Add your OpenAI API key. - Uses **GPT-4** for accurate summaries. --- ## 📊 Example Output **Slack Message:** # 📝 Auto-Generate Meeting Notes & Summaries (Zoom → Google Docs + Slack) This workflow automatically captures Zoom meeting data when a meeting ends, generates AI-powered notes, saves them to Google Docs, and instantly posts a summary with a link in Slack. --- ## ⚙️ How It Works 1. **Zoom Webhook** → Triggers on `meeting.ended` or `recording.completed`. 2. **Normalize Data** → Extracts meeting details (topic, host, duration, transcript). 3. **AI Notes (GPT-4)** → Summarizes transcript into key decisions, action items, and next steps. 4. **Google Docs** → Saves formatted meeting notes + transcript archive. 5. **Slack Post** → Shares summary + link to notes in `#team-meetings`. --- ## 🛠️ Setup Steps ### 1. Zoom App - Go to Zoom Developer Console → create App. - Enable event **`meeting.ended`**. - Paste workflow webhook URL. ### 2. Google Docs - Connect Google OAuth in n8n. - Docs auto-saved in your Google Drive. ### 3. Slack - Connect Slack OAuth. - Replace channel `#team-meetings`. ### 4. OpenAI - Add your OpenAI API key. - Uses **GPT-4** for accurate summaries. --- ## 📊 Example Output **Slack Message:** 📝 New Meeting Notes Available Topic: Marketing Sync Host: [email protected] Duration: 45 mins 👉 Read full notes here: https://docs.google.com/document/d/xxxx **Google Doc:** - Executive Summary - Key Decisions - Action Items w/ Owners - Next Steps - Full Transcript --- ⚡ With this workflow, your team never scrambles for meeting notes again.
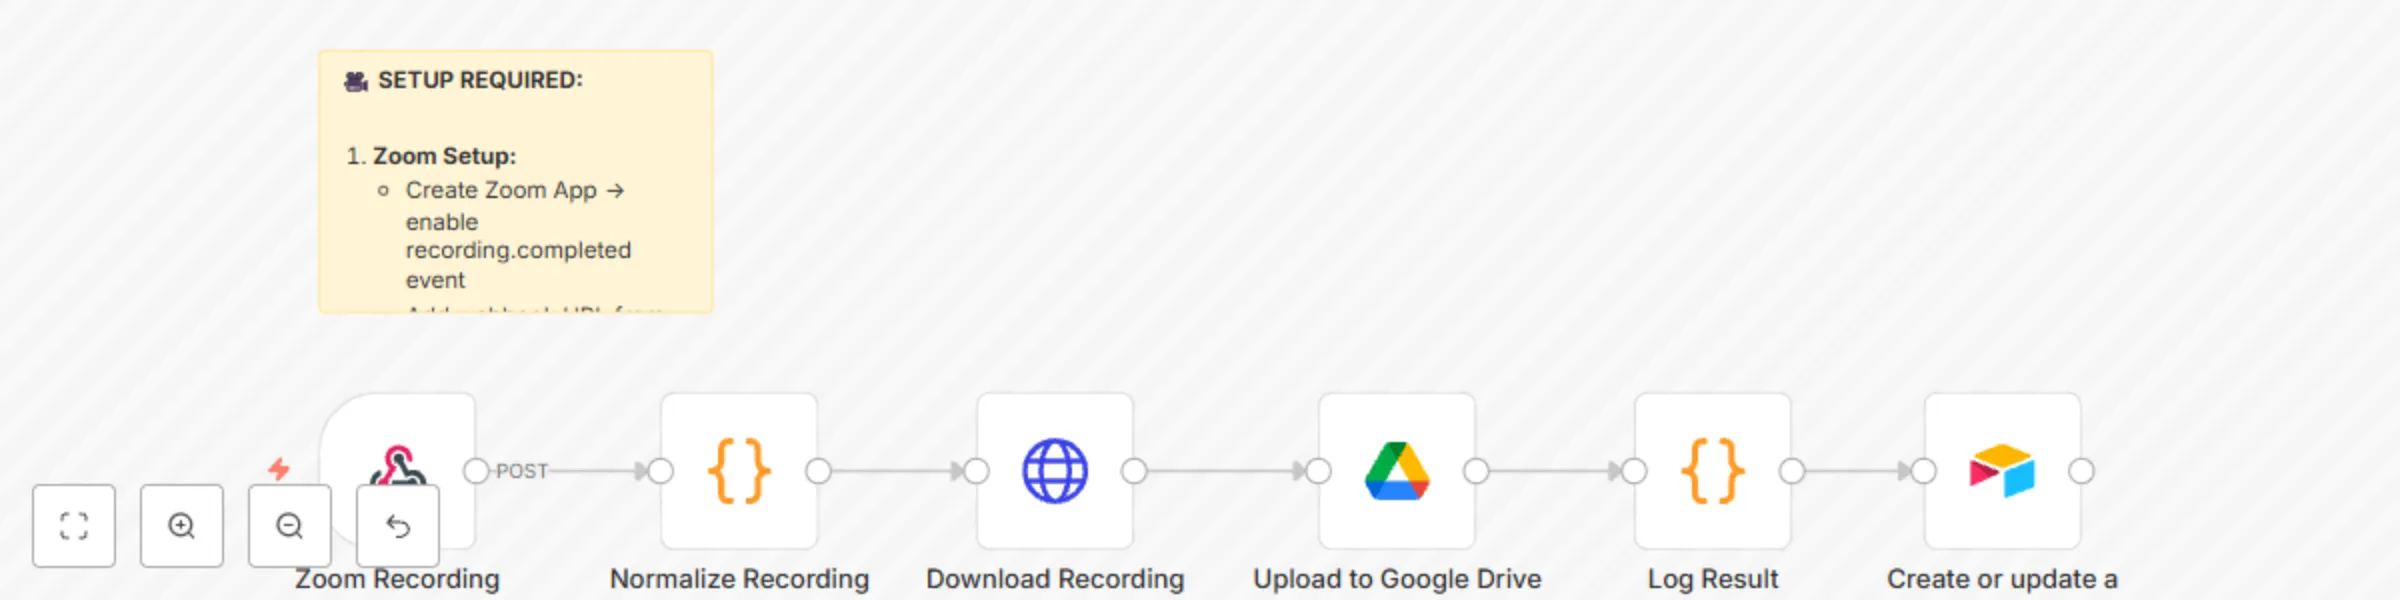
Auto-save Zoom recordings to Google Drive + log meetings in Airtable
# 🎥 Auto-Save Zoom Recordings to Google Drive + Log Meetings in Airtable This workflow automatically saves **Zoom meeting recordings** to **Google Drive** and logs all important details into **Airtable** for easy tracking. Perfect for teams that want a searchable meeting archive. --- ## ⚙️ How It Works 1. **Zoom Recording Webhook** - Listens for `recording.completed` events from Zoom. - Captures metadata (Meeting ID, Topic, Host, File Type, File Size, etc.). 2. **Normalize Recording Data** - A Code node extracts and formats Zoom payload into clean JSON. 3. **Download Recording** - Uses HTTP Request to download the recording file. 4. **Upload to Google Drive** - Saves the recording into your chosen Google Drive folder. - Returns the file ID and share link. 5. **Log Result** - Combines Zoom metadata with Google Drive file info. 6. **Save to Airtable** - Logs all details into your `Meeting Logs` table: - Meeting ID - Topic - Host - File Type - File Size - Google Drive Saved (Yes/No) - Drive Link - Timestamp --- ## 🛠️ Setup Steps ### 1. Zoom - Create a Zoom App → enable **`recording.completed`** event. - Add the workflow’s Webhook URL as your Zoom Event Subscription endpoint. ### 2. Google Drive - Connect OAuth in n8n. - Replace `YOUR_FOLDER_ID` with your destination Drive folder. ### 3. Airtable - Create a base with table **`Meeting Logs`**. - Add columns: - Meeting ID - Topic - Host - File Type - File Size - Google Drive Saved - Drive Link - Timestamp - Replace `YOUR_AIRTABLE_BASE_ID` in the node. --- ## 📊 Example Airtable Output | Meeting ID | Topic | Host | File Type | File Size | Google Drive Saved | Drive Link | Timestamp | |------------|-------------|-------------------|-----------|-----------|--------------------|------------|---------------------| | 987654321 | Team Sync | [email protected] | MP4 | 104 MB | Yes | 🔗 Link | 2025-08-30 15:02:10 | --- ⚡ With this workflow, every Zoom recording is safely archived in Google Drive and logged in Airtable for quick search, reporting, and compliance tracking.
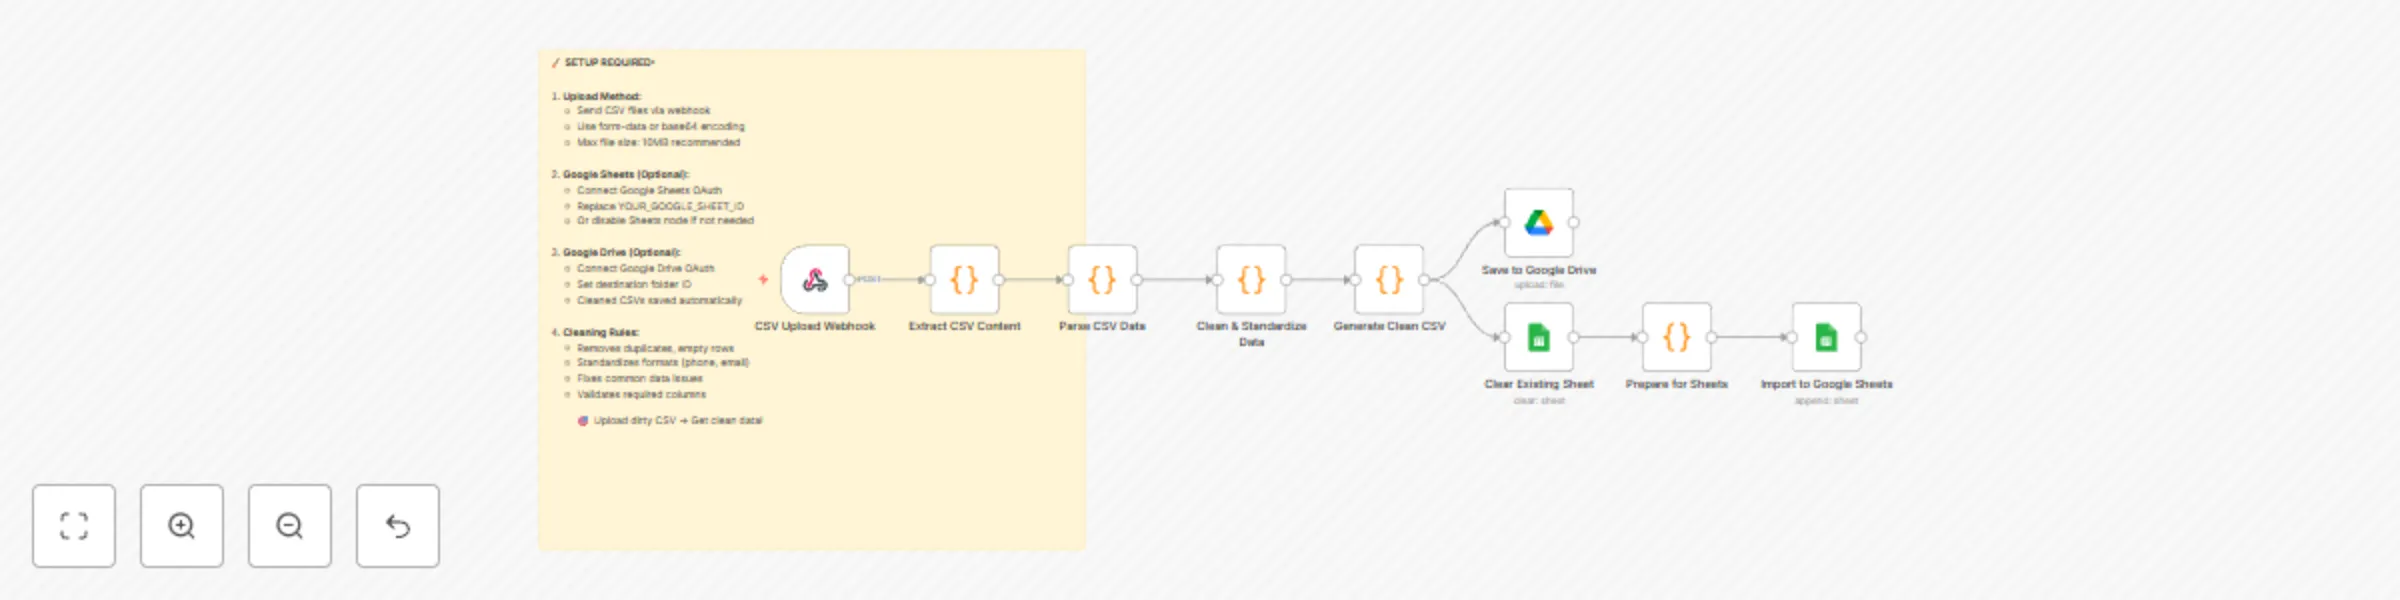
Clean & standardize CSV uploads for Google Sheets and Drive import
# 🧹 Auto-Clean CSV Uploads Before Import This workflow automatically **cleans, validates, and standardizes any CSV file** you upload. Perfect for preparing customer lists, sales leads, product catalogs, or any messy datasets before pushing them into Google Sheets, Google Drive, or other systems. --- ## ⚙️ How It Works 1. **CSV Upload (Webhook)** - Upload your CSV via webhook (supports **form-data**, **base64**, or binary file upload). - Handles files up to ~10MB comfortably. 2. **Extract & Parse** - Reads raw CSV content. - Validates file structure and headers. - Detects and normalizes column names (e.g. `First Name` → `first_name`). 3. **Clean & Standardize Data** - **Removes duplicate rows** (based on email or all fields). - **Deletes empty rows**. - **Standardizes fields**: - Emails → lowercased, validated format. - Phone numbers → normalized `(xxx) xxx-xxxx` or `+1 format`. - Names → capitalized (John Smith). - Text → trims spaces & fixes inconsistent spacing. - Assigns each row a **data quality score** so you know how “clean” it is. 4. **Generate Cleaned CSV** - Produces a cleaned CSV file with the same headers. - Saves to Google Drive (optional). - Ready for immediate import into Sheets or any app. 5. **Google Sheets Integration (Optional)** - Clears out an existing sheet. - Re-imports the cleaned rows. - Perfect for always keeping your “master sheet” clean. 6. **Final Report** - Logs processing summary: - Rows before & after cleaning. - Duplicates removed. - Low-quality rows removed. - Average data quality score. - Outputs a neat summary for auditing. --- ## 🛠️ Setup Steps 1. **Upload Method** - Use the webhook endpoint generated by the `CSV Upload Webhook` node. - Send CSV via binary upload, base64 encoding, or JSON payload with `csv_content`. 2. **Google Drive (Optional)** - Connect your Drive OAuth credentials. - Replace `YOUR_DRIVE_FOLDER_ID` with your target folder. 3. **Google Sheets (Optional)** - Connect Google Sheets OAuth. - Replace `YOUR_GOOGLE_SHEET_ID` with your target sheet ID. 4. **Customize Cleaning Rules** - Adjust the `Clean & Standardize Data` code node if you want different cleaning thresholds (default = 30% minimum data quality). --- ## 📊 Example Cleaning Report **Input file:** `raw_leads.csv` - Rows before: **2,450** - Rows after cleaning: **1,982** - Duplicates removed: **210** - Low-quality rows removed: **258** - Avg. data quality: **87%** ✅ Clean CSV saved to Drive ✅ Clean data imported into Google Sheets ✅ Full processing report generated --- ## 🎯 Why Use This? - Stop wasting time manually cleaning CSVs. - Ensure **high-quality, import-ready data** every time. - Works with **any dataset**: leads, contacts, e-commerce exports, logs, surveys. - Completely free — a must-have utility in your automation toolbox. --- ⚡ Upload dirty CSV → Get **clean, validated, standardized data** instantly!
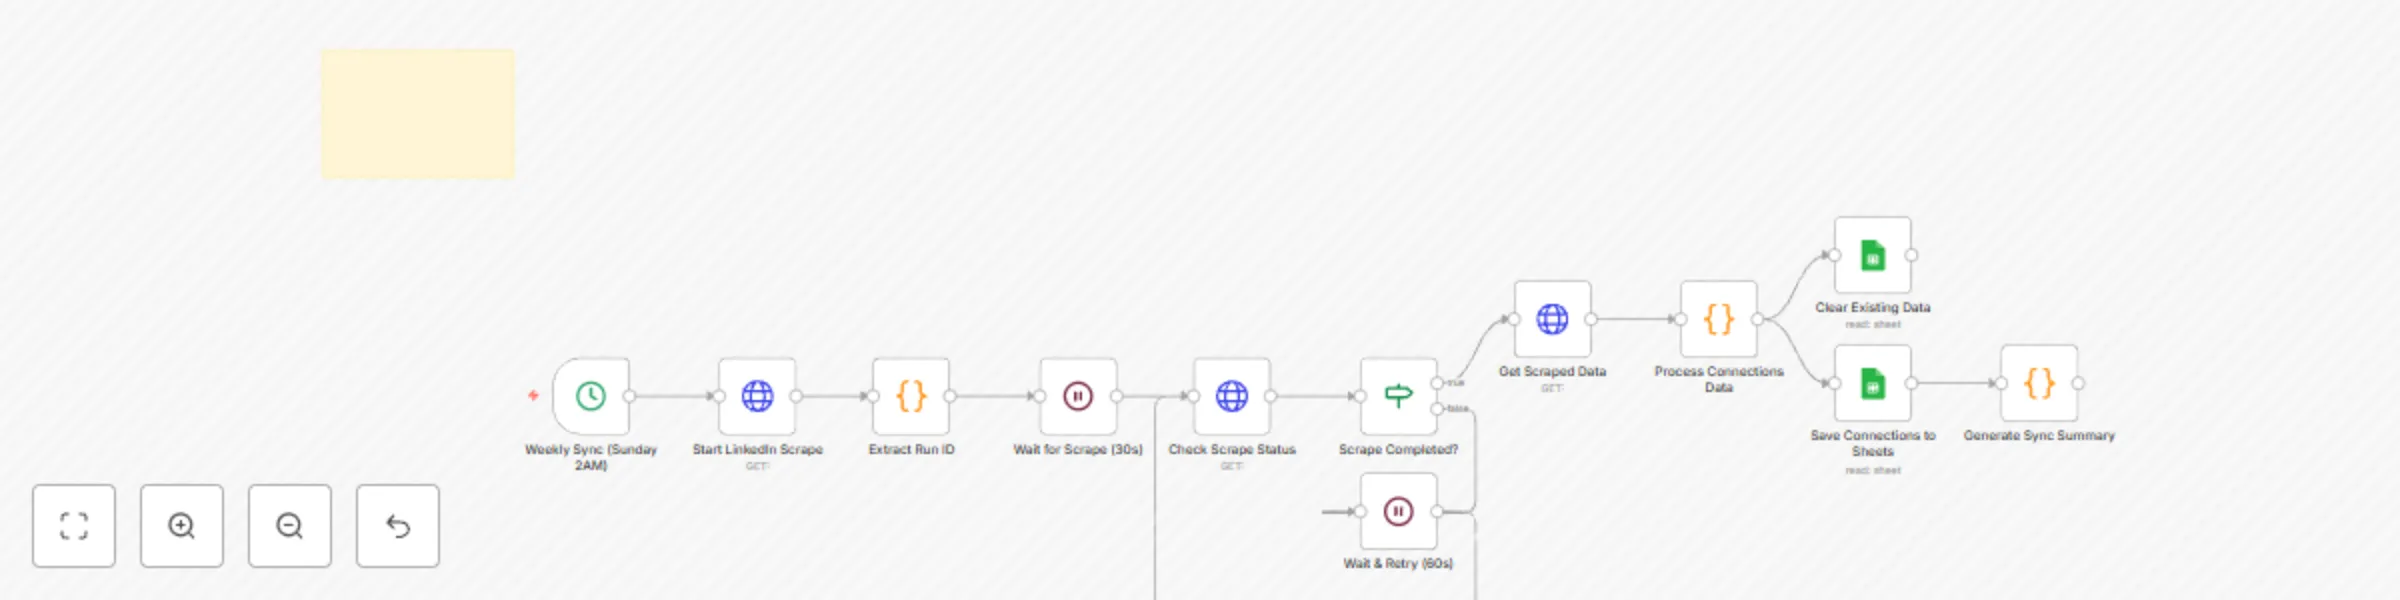
Weekly LinkedIn connections sync & analysis with Apify and Google Sheets
# 💼 Auto-Sync LinkedIn Connections to Google Sheets (Apify + n8n) This workflow automatically **scrapes your LinkedIn connections using Apify**, processes the data, and logs it into a structured **Google Sheet** every week. It also generates a summary of top companies, locations, and industries across your network. --- ## ⚙️ How It Works 1. **Weekly Sync (Sunday 2 AM)** - A **Cron node** triggers the workflow weekly (default: Sunday at 2 AM). - Frequency can be adjusted. 2. **Start LinkedIn Scrape** - Calls the **Apify LinkedIn Scraper Actor** with your credentials. - Initiates a scraping run for all your LinkedIn connections. 3. **Extract Run ID & Wait** - Extracts the scrape run ID from Apify’s response. - Waits 30 seconds before checking status (retries every 60s until completed). 4. **Check Scrape Status** - Confirms if the scrape has finished successfully. - If not completed, waits and retries until done. 5. **Get Scraped Data** - Fetches scraped connection data from the Apify dataset. - Includes fields like name, title, company, location, industry, mutual connections, and profile URL. 6. **Process Connections Data** - A **Code node** cleans and normalizes the scraped data. - Removes incomplete profiles, trims whitespace, merges duplicate fields. 7. **Save to Google Sheets** - Clears existing data and appends the latest connections to your Google Sheet. - Headers include: ``` Name | Title | Company | Location | Profile URL Connection Date | Industry | Mutual Connections ``` 8. **Generate Sync Summary** - Analyzes all saved connections. - Produces quick stats: - Total connections synced - Top 5 companies - Top 5 locations - Industry breakdown --- ## 🛠️ Setup Steps ### 1. Apify Setup - Sign up at [apify.com](https://apify.com). - Get your **API token** from account settings. - Use the **LinkedIn Scraper Actor**. - Add your **LinkedIn session cookies** for stable results. ⚠️ Respect LinkedIn’s Terms of Service. ### 2. Google Sheets - Create a Google Sheet with headers: Name | Title | Company | Location | Profile URL | Connection Date | Industry | Mutual Connections - Copy the **Sheet ID** from the URL. - Replace `YOUR_GOOGLE_SHEET_ID` in the workflow. ### 3. Credentials - Add **Apify API Token** as an HTTP header credential in n8n. - Connect your Google Sheets OAuth account. ### 4. Scheduling - Default: runs every **Sunday at 2 AM**. - Modify the Cron node to adjust frequency. --- ## 📊 Example Output (Google Sheets Row) | Name | Title | Company | Location | Profile URL | Connection Date | Industry | Mutual Connections | |-------------|------------------------|---------------|--------------|--------------------------|----------------|------------|--------------------| | Jane Smith | Marketing Director | Acme Corp | New York, US | linkedin.com/in/janesmith | 2025-08-25 | Marketing | 12 | --- ## 📈 Example Sync Summary ✅ LinkedIn sync completed: 248 connections saved 🏢 Top companies: Acme Corp, Deloitte, Google, Meta, Amazon 🌍 Top locations: New York, San Francisco, London, Berlin, Toronto 📌 Industries: Marketing (32), Tech (45), Finance (28), Consulting (20) --- ⚡ With this workflow, your LinkedIn connections stay automatically logged and analyzed — ready for outreach, reporting, or CRM import.
Weather alerts via SMS (OpenWeather + Twilio)
# 🌤️ Weather Alerts via SMS (OpenWeather + Twilio) This workflow checks the **current weather and forecast** every 6 hours using the **OpenWeather API**, and automatically sends an **SMS alert via Twilio** if severe conditions are detected. It’s great for keeping teams, family, or field workers updated about extreme heat, storms, or snow. --- ## ⚙️ How It Works 1. **Check Every 6 Hours** - A **Cron node** triggers the workflow every 6 hours. - Frequency can be adjusted based on your needs. 2. **Fetch Current Weather & Forecast** - Calls **OpenWeather API** for both current conditions and the 24-hour forecast. - Retrieves temperature, precipitation, wind speed, and weather descriptions. 3. **Analyze Weather Data** - A **Code node** normalizes the weather data. - Detects alert conditions such as: - Extreme heat (≥95°F) - Extreme cold (≤20°F) - Severe storms (thunderstorm, tornado) - Rain or snow - High winds (≥25 mph) - Also checks upcoming forecast for severe weather in the next 24 hours. 4. **Alert Needed?** - If no severe conditions → workflow stops. - If alerts exist → proceed to SMS formatting. 5. **Format SMS Alert** - Prepares a compact, clear SMS message with: - Current conditions - Detected alerts - Next 3 hours forecast preview - Example: ``` 🌤️ WEATHER ALERT - New York, US NOW: 98°F, clear sky 🚨 ALERTS (1): 🔥 EXTREME HEAT: 98°F (feels like 103°F) 📅 NEXT 3 HOURS: 1 PM: 99°F, sunny 2 PM: 100°F, sunny 3 PM: 100°F, partly cloudy ``` 6. **Send Weather SMS** - Twilio sends the SMS to configured phone numbers. - Supports multiple recipients. 7. **Log Alert Sent** - Logs the alert type, urgency, and timestamp. - Useful for auditing and troubleshooting. --- ## 🛠️ Setup Steps ### 1. OpenWeather API - Sign up at [openweathermap.org](https://openweathermap.org). - Get a **free API key** (1000 calls/day). - Update the API key and location (`city` or `lat/long`) in the HTTP Request nodes. ### 2. Twilio Setup - Sign up at [twilio.com](https://twilio.com). - Get your **Account SID & Auth Token**. - Buy a Twilio phone number (≈ $1/month). - Add Twilio credentials in n8n. ### 3. Recipients - In the **Send Weather SMS** node, update phone numbers (format: `+1234567890`). - You can add multiple recipients. ### 4. Customize Alert Conditions - Default alerts: rain, snow, storms, extreme temps, high winds. - Modify the **Analyze Weather Data** node to fine-tune conditions. --- ## 📲 Example SMS Output 🌤️ WEATHER ALERT - New York, US NOW: 35°F, light snow 🚨 ALERTS (2): ❄️ SNOW ALERT: light snow 💨 HIGH WINDS: 28 mph 📅 NEXT 3 HOURS: 10 AM: 34°F, snow 11 AM: 33°F, snow 12 PM: 32°F, overcast ⏰ Alert sent: 08/29/2025, 09:00 AM --- ⚡ With this workflow, you’ll always know when bad weather is on the way — keeping you, your team, or your customers safe and informed.
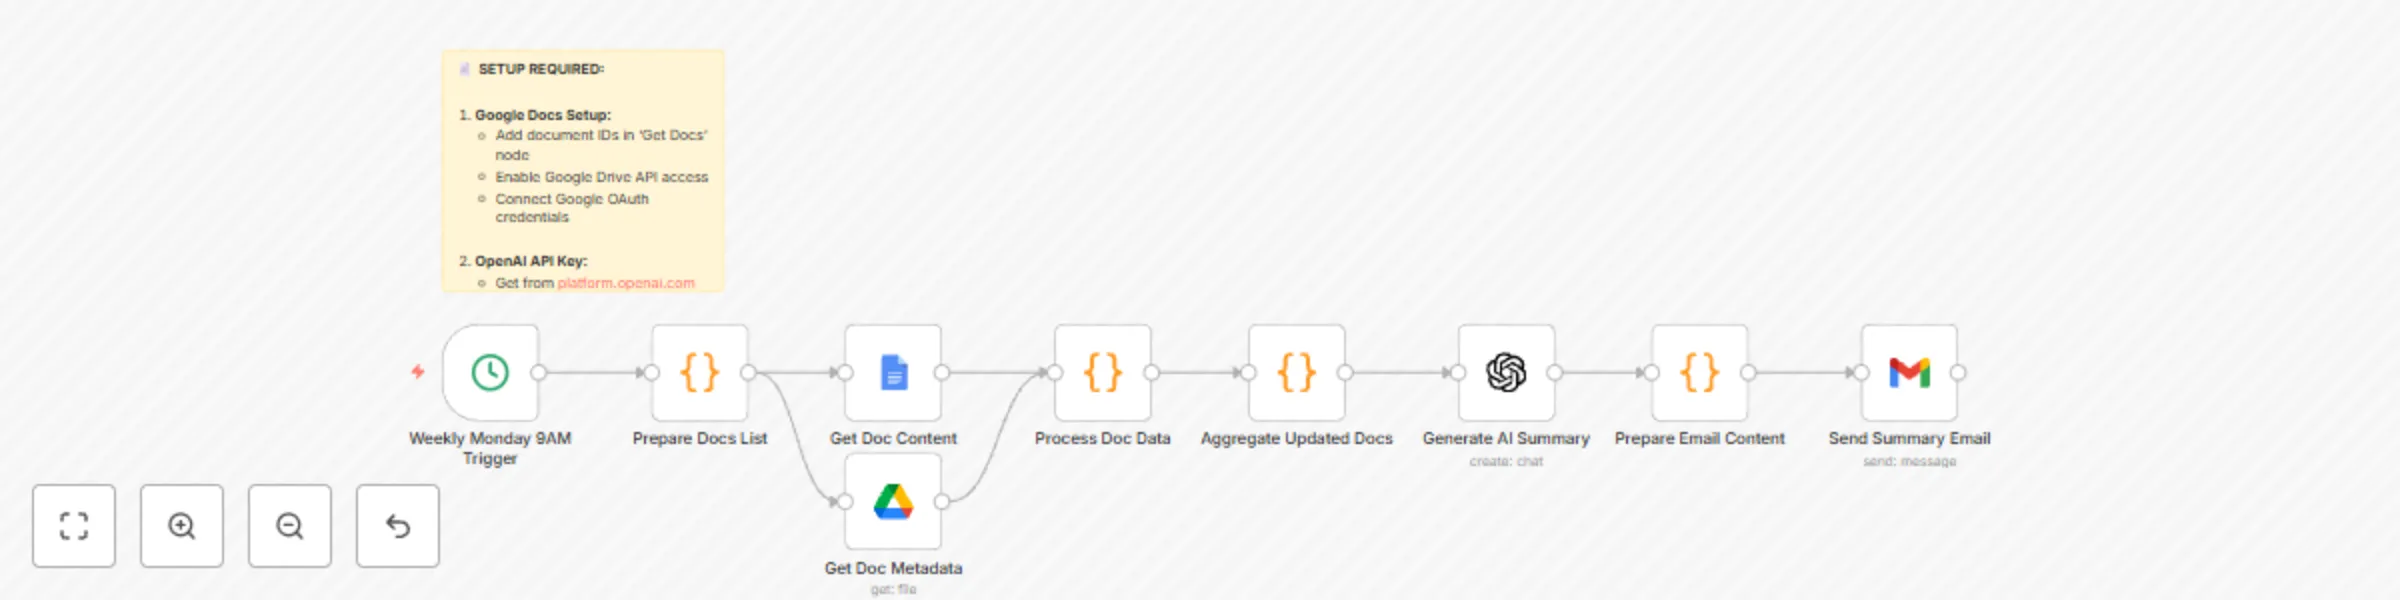
Generate weekly document digests from Google Docs with GPT-4 and email delivery
# 📄 AI Summarize Weekly Google Docs Updates → Send Email This workflow automatically reviews selected **Google Docs** every week, checks for updates, and generates a **professional weekly summary email** using AI. It’s perfect for keeping your team or leadership informed without manually digging through multiple documents. --- ## ⚙️ How It Works 1. **Weekly Monday 9AM Trigger** - A **Cron node** runs every Monday at 9 AM (adjustable). - Ensures summaries arrive at the start of the workweek. 2. **Prepare Docs List** - A **Code node** defines which Google Docs to monitor. - Includes doc IDs, names, and categories (e.g., Projects, Meetings, Updates). - Sets a 7-day date range for updates. 3. **Fetch Google Docs & Metadata** - Retrieves document content and metadata (last modified, user, version). - Filters only docs that have been updated in the past week. 4. **Process Doc Data** - Extracts plain text content from Google Docs. - Cleans and normalizes text for summarization. - Collects key details: word count, modified by, last updated date. 5. **Aggregate Updated Docs** - Gathers all updated docs into one combined content block. - Prepares context for the AI model to create a weekly digest. 6. **Generate AI Summary** - Uses **GPT-4** to generate a **business-style weekly summary**. - Includes: - Executive summary - Key updates by document - Important changes - Action items - Next week’s focus 7. **Prepare Email Content** - Formats the AI response into both plain text and HTML email. - Adds a list of updated documents with last modified info. 8. **Send Summary Email** - Sends the final summary to the configured team emails via Gmail. - Subject line includes the date range for easy reference. --- ## 🛠️ Setup Steps ### 1. Google Docs Setup - Add document IDs in the **Prepare Docs List** node. - Enable the **Google Drive API** in your Google account. - Connect Google OAuth credentials in n8n. ### 2. OpenAI API Key - Get your key from [platform.openai.com](https://platform.openai.com). - Add it to your n8n credentials. - Uses **GPT-4** for high-quality summaries. ### 3. Email Recipients - Update the **Gmail node** with your team’s email addresses. - Customize the subject line and template if needed. ### 4. Schedule - Default: Every **Monday at 9 AM**. - Adjust the **Cron node** if you prefer a different time. --- ## 📧 Example Output **Subject:** 📄 Weekly Document Updates Summary – 08/22/2025 – 08/29/2025 **Body (excerpt):** Dear Team, Here's your weekly document updates summary: Executive Summary: Project Status Doc updated with new timelines. Meeting Notes highlight three key decisions from leadership. Team Updates document includes two new hires and onboarding tasks. Key Updates by Document: • Project Status Doc (Projects) - Updated by Alice on 08/27 • Meeting Notes (Meetings) - Updated by Bob on 08/28 • Team Updates (Updates) - Updated by Sarah on 08/29 Action Items: Confirm revised project deadlines. Follow up on onboarding checklist. This summary was automatically generated by your n8n workflow. --- ⚡ With this workflow, you’ll never miss important document changes — your team gets a clear, AI-generated weekly digest straight in their inbox.
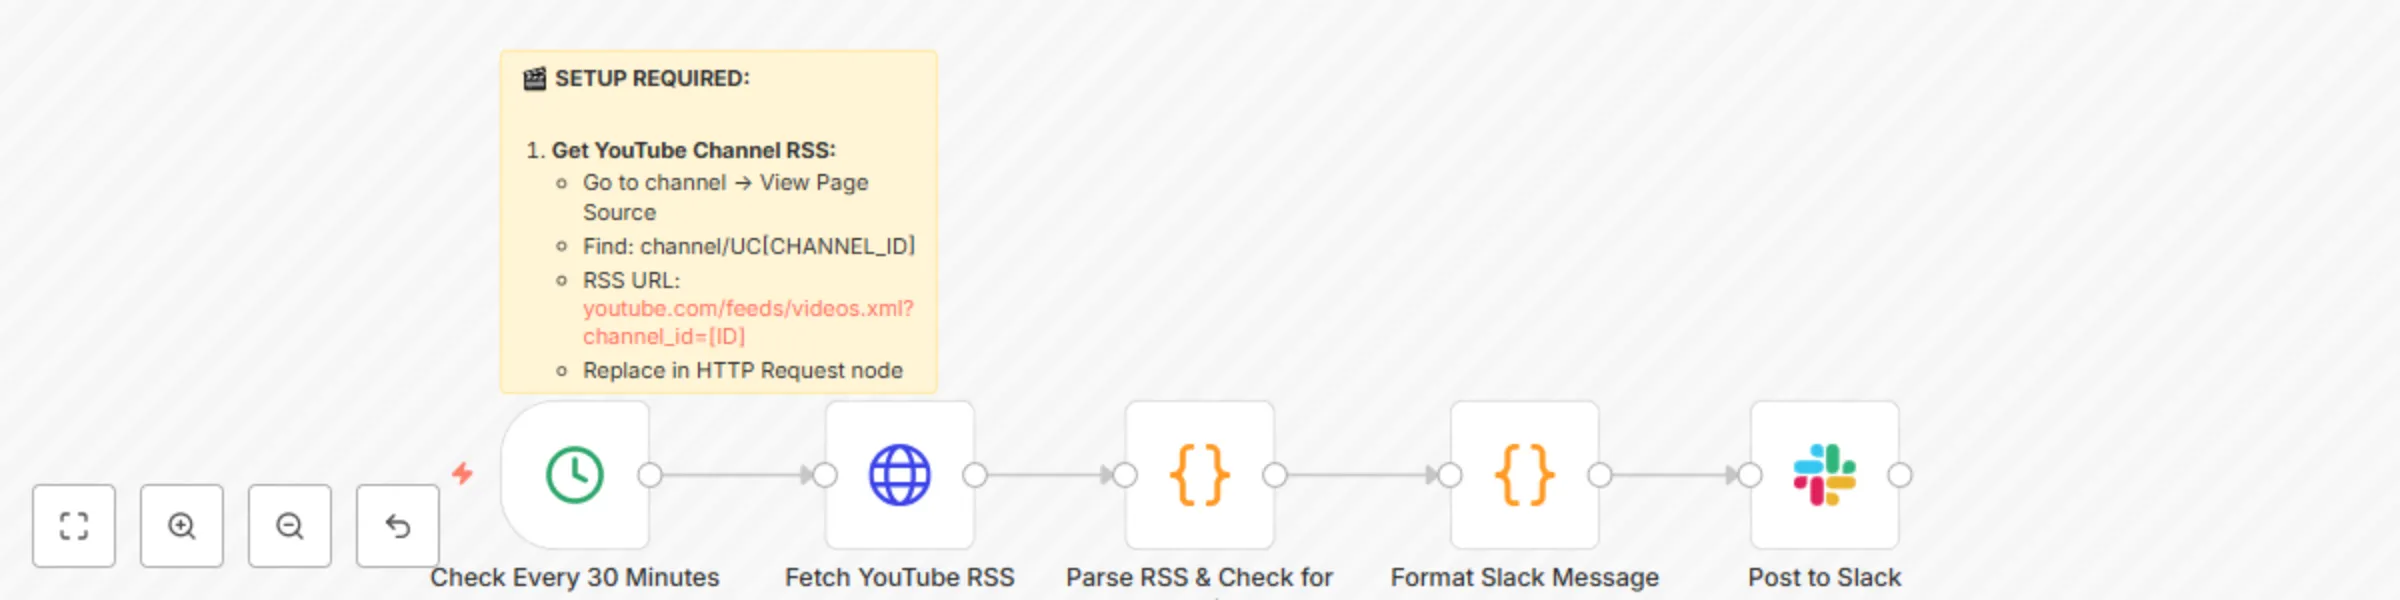
Automate YouTube video notifications to Slack
# 🎬 YouTube New Video → Auto-Post Link to Slack This workflow automatically checks your **YouTube channel’s RSS feed** every 30 minutes and posts a message to Slack when a new video is published. It includes the title, description snippet, publish date, and a direct “Watch Now” button. --- ## ⚙️ How It Works 1. **Check Every 30 Minutes** - A **Cron node** runs on a 30-minute interval. - Keeps monitoring the channel RSS feed for updates. 2. **Fetch YouTube RSS** - The **HTTP Request node** retrieves the channel’s RSS feed. - Uses the format: ``` https://www.youtube.com/feeds/videos.xml?channel_id=YOUR_CHANNEL_ID ``` 3. **Parse RSS & Check for New Video** - A **Code node** extracts video info: - Title - Link - Description - Published date - Sorts by most recent publish date. - Ensures only **new videos within last 2 hours** are processed (avoids duplicate posts). 4. **Format Slack Message** - Builds a **rich Slack message** with: - Video title - Description preview - Published date - Button: “🎥 Watch Now” 5. **Post to Slack** - Sends the formatted message to your chosen Slack channel (default: `#general`). - Includes custom username/icon for branding. --- ## 🛠️ Setup Steps ### 1. Get YouTube Channel RSS - Go to your channel page → **View Page Source**. - Find: `channel/UCxxxxxxxxxx` (your channel ID). - Construct RSS feed: https://www.youtube.com/feeds/videos.xml?channel_id=YOUR_CHANNEL_ID - Replace `YOUR_CHANNEL_ID_HERE` in the HTTP Request node. ### 2. Connect Slack - Create a Slack app at [api.slack.com](https://api.slack.com). - Add OAuth scopes: `chat:write`, `channels:read`. - Install to your workspace. - In n8n, connect your Slack OAuth credentials. ### 3. Adjust Timing (Optional) - Default = runs every 30 minutes. - Modify the **Cron node** if you want faster or slower checks. --- ## 📺 Example Slack Output 🎬 New Video Published! How to Automate Your Business with n8n 📅 Published: Aug 29, 2025 Learn how to connect your apps and automate repetitive tasks using n8n… With a clickable **🎥 Watch Now** button linking directly to the video. --- ⚡ With this workflow, your Slack team is always up to date on new YouTube uploads — no manual link sharing needed.
Auto-add new Calendly bookings to Google Sheets
# 📅 Auto-Log Calendly Bookings to Google Sheets This workflow automatically captures new **Calendly bookings** and saves them into a structured **Google Sheet**. It records all important details like invitee name, email, phone, event type, date, time, status, meeting link, and notes. No more manual copy-pasting from Calendly into your CRM or sheets. --- ## ⚙️ How It Works 1. **Calendly Booking Webhook** - Listens for new bookings (`invitee.created` event). - Triggers every time someone schedules a meeting. 2. **Normalize Booking Data** - A **Code node** parses Calendly’s payload. - Extracts invitee name, email, phone number, event type, time, notes, and meeting link. - Ensures consistent data format for Sheets. 3. **Save Booking to Google Sheets** - The **Google Sheets node** appends a new row with the booking details. - Prevents duplicate entries using append/update mode. 4. **Log Booking Success** - A **Code node** logs the successful save. - Can be extended to send confirmation emails, Slack alerts, or calendar invites. --- ## 🛠️ Setup Steps ### 1. Create Google Sheet - In Google Sheets, create a new sheet with headers: - Copy the **Sheet ID** from the URL. - Replace `YOUR_GOOGLE_SHEET_ID` in the workflow with your actual ID. ### 2. Calendly Webhook - In your Calendly account: - Go to **Integrations → Webhooks** - Add a new webhook with the URL from the **Webhook node** in n8n. - Select event type: `invitee.created`. ### 3. Google Sheets OAuth - In n8n, connect your Google account credentials. - Grant permission for reading/writing Sheets. --- ## 📊 Example Output (Google Sheets Row) | Name | Email | Phone | Event Type | Date | Time | Status | Meeting Link | Notes | |------------|--------------------|------------|------------|------------|-------------------|------------|-----------------------------|---------------------| | David mark | [email protected] | +123456789 | Demo Call | 2025-08-29 | 3:00 PM - 3:30 PM | Scheduled | https://zoom.us/j/123456789 | Wants to discuss AI | --- ⚡ With this workflow, every new Calendly booking is instantly logged into your Google Sheet, keeping your scheduling records accurate and centralized.
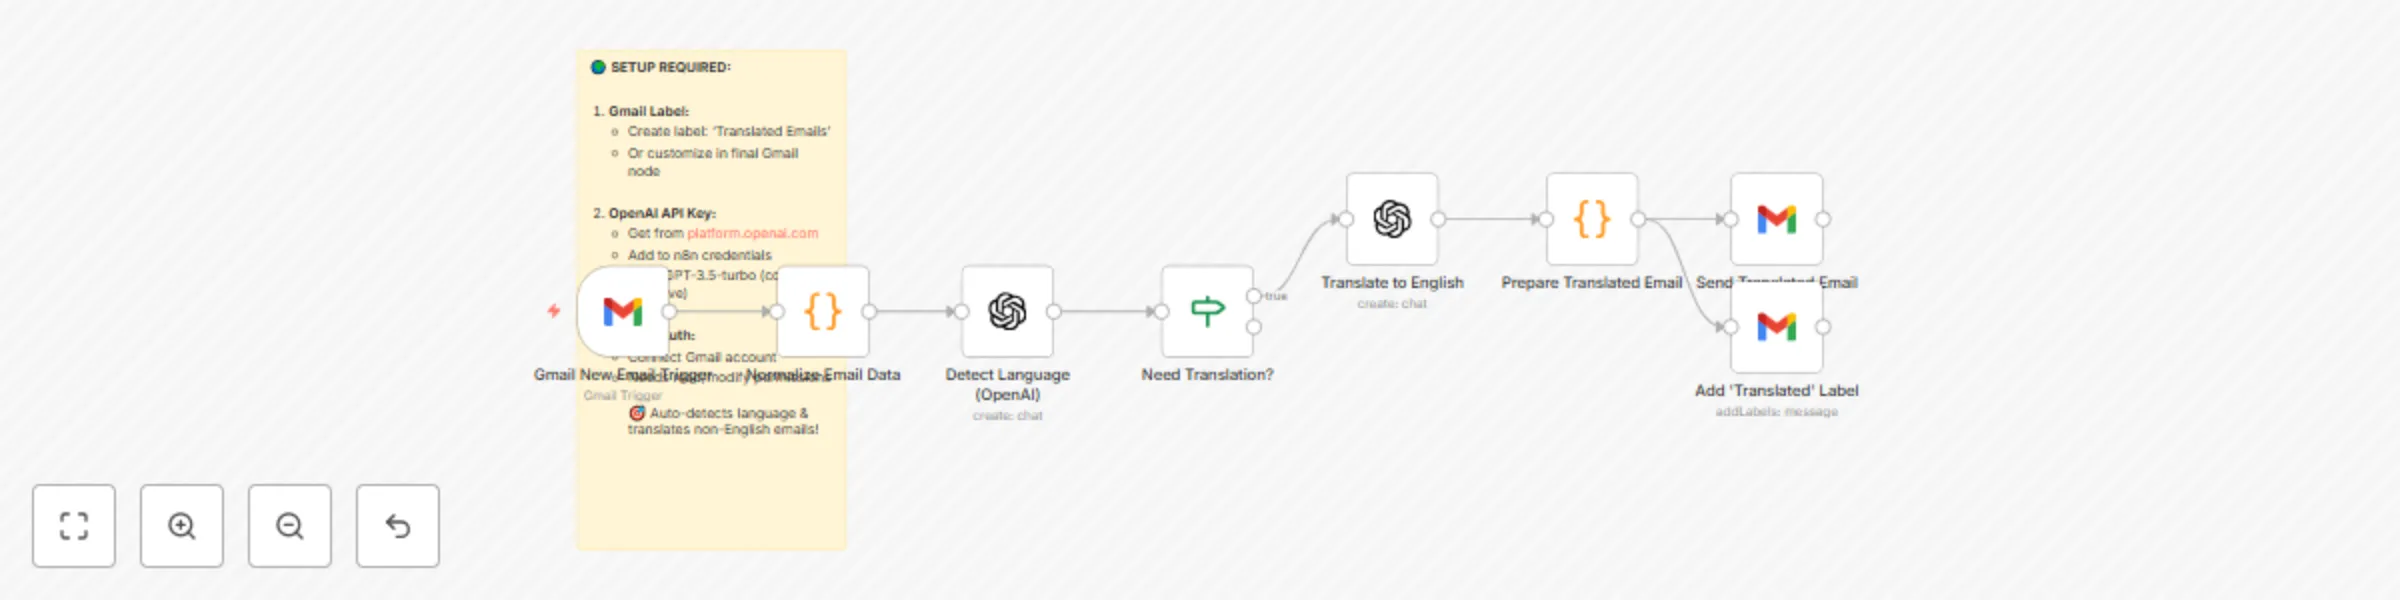
Auto-translate incoming Gmail emails to English with OpenAI GPT-3.5
# 🌍 Auto-Translate Incoming Emails to English This workflow automatically detects the language of every **new Gmail email** and translates non-English messages into English. The translated email is forwarded to your inbox with a clear "[TRANSLATED]" subject tag, and a label is added for easy filtering. --- ## ⚙️ How It Works 1. **Gmail New Email Trigger** - Listens for **new unread emails** in your Gmail inbox. - Captures subject, sender, body text, and metadata. 2. **Normalize Email Data** - A **Code node** extracts the raw content from the email. - Strips HTML, normalizes plain text, and prepares data for language detection. 3. **Detect Language (OpenAI)** - Uses **OpenAI GPT-3.5-turbo** to detect the email’s language. - If the language is English, workflow ends. - If not, continues to translation. 4. **Translate to English** - OpenAI translates the email body into clear English. 5. **Prepare Translated Email** - Builds a forwarded email containing: - Original sender & subject - Received date - Message ID - Translated content (with formatting) 6. **Send Translated Email** - A **Gmail node** sends the translated message to your inbox. - Subject is prefixed with `[TRANSLATED]` for easy recognition. 7. **Add "Translated Emails" Label** - Automatically tags the original message in Gmail with **"Translated Emails"**. - Helps you filter all auto-translated emails later. --- ## 🛠️ Setup Steps ### 1. Gmail Label - In Gmail, create a new label: Translated Emails - Or update the label in the final Gmail node. ### 2. OpenAI API Key - Get your key from [platform.openai.com](https://platform.openai.com). - Add credentials in n8n. - Uses **GPT-3.5-turbo** (low cost, reliable). ### 3. Gmail OAuth - In n8n, connect your Gmail account. - Requires **read/modify** permissions. --- ## 📧 Example Output **Subject:** `[TRANSLATED] Meeting Proposal` **Body:** 🌍 AUTO-TRANSLATED EMAIL (Original Language: ES) 📧 Original From: [email protected] 📅 Received: 2025-08-29 🔗 Message ID: 123456abcdef ═══════════════════════════════════════ TRANSLATED CONTENT: Hello, I wanted to ask if we can schedule the meeting for next week. ═══════════════════════════════════════ ✨ This email was automatically translated by n8n workflow. --- ⚡ With this workflow, every foreign-language email is instantly translated and delivered to you in English — no manual copy-pasting into Google Translate again.
Auto-send PDF invoices with Stripe payment triggers and Gmail
# 💰 Auto-Send PDF Invoice When Stripe Payment is Received This workflow automatically generates a **PDF invoice** every time a successful payment is received in **Stripe**, then emails the invoice to the customer via **Gmail**. Perfect for freelancers, SaaS businesses, and service providers who want to automate billing without manual effort. --- ## ⚙️ How It Works 1. **Stripe Payment Webhook** - Listens for successful payment events (`payment_intent.succeeded`). - Triggers the workflow whenever a new payment is made. 2. **Normalize Payment Data** - A **Code node** extracts and formats details like: - Payment ID - Amount & currency - Customer name & email - Payment date - Description - Generates a unique invoice number. 3. **Generate Invoice HTML** - A **Code node** builds a professional **invoice template** in HTML. - Data is dynamically inserted (amount, customer info, invoice number). - Output prepared for PDF generation. 4. **Send Invoice Email** - The **Gmail node** sends an email to the customer. - Invoice is attached as a PDF file. - Includes a confirmation message with payment details. --- ## 🛠️ Setup Steps ### 1. Stripe Webhook - In your [Stripe Dashboard](https://dashboard.stripe.com): - Navigate to **Developers → Webhooks** - Add a new endpoint with your **Webhook URL** from the n8n Webhook node. - Select event: - `payment_intent.succeeded` ### 2. Gmail Setup - In n8n, connect your **Gmail OAuth2 credentials**. - Emails will be sent directly from your Gmail account. ### 3. Customize Invoice - Open the **Generate Invoice HTML** node. - Replace `"Your Company Name"` with your actual business name. - Adjust invoice branding, colors, and layout as needed. --- ## 📧 Example Email Sent **Subject:** Invoice INV-123456789 - Payment Confirmation **Body:** Dear John Doe, Thank you for your payment! Please find your invoice attached. Payment Details: Amount: USD 99.00 Payment ID: pi_3JXXXXXXXX Date: 2025-08-29 Best regards, Your Company Name (Attached: `invoice_INV-123456789.pdf`) --- ⚡ With this workflow, every Stripe payment automatically creates and delivers a polished PDF invoice — no manual work required.
Daily motivational quotes from ZenQuotes to Slack channels
# 🌟 Send Daily Motivational Quote to Slack This workflow automatically posts an inspiring motivational quote to your Slack channel every morning at **8 AM**. It uses the free [ZenQuotes.io](https://zenquotes.io) API (no API key required) to fetch quotes and delivers them to your team in Slack. --- ## ⚙️ How It Works 1. **Trigger at 8 AM** A **Cron node** runs daily at **8 AM EST** (America/New_York timezone by default). 2. **Fetch a Random Quote** The workflow sends an **HTTP Request** to [ZenQuotes.io API](https://zenquotes.io/api/random) to retrieve a motivational quote. 3. **Format the Message** A **Code node** structures the quote into a Slack-friendly message, adding styling, emojis, and the author’s name. 4. **Post to Slack** Finally, the **Slack node** sends the motivational message to your chosen Slack channel (default: `#general`). --- ## 🛠️ Setup Steps ### 1. Connect Slack App - Go to [api.slack.com](https://api.slack.com) → Create a new app. - Add OAuth scopes: - `chat:write` - `channels:read` - Install the app to your Slack workspace. - Copy credentials into n8n. ### 2. Configure Slack Channel - Default is `#general`. - Update the **Slack node** if you want to post to another channel. ### 3. Adjust Timezone (Optional) - Workflow is set to **America/New_York** timezone. - Change under workflow → settings → timezone if needed. --- ## ✅ Example Slack Output 🌟 Daily Motivation 🌟 "Success is not final, failure is not fatal: it is the courage to continue that counts." — Winston Churchill --- ⚡ Once enabled, your team will receive a motivational quote in Slack every morning at 8 AM — simple, automatic, and uplifting!