Yusuke Yamamoto
Workflows by Yusuke Yamamoto
Automated asteroid alerts with NASA API, Slack & Google Calendar
This n8n template creates an automated alert system that checks NASA's data for near-Earth asteroids twice a day. When it finds asteroids meeting specific criteria, it sends a summary alert to Slack and creates individual events in Google Calendar for each object. ## Use cases - **Automated Monitoring**: Keep track of potentially hazardous asteroids without manually checking websites. - **Team or Community Alerts**: Automatically inform a team, a group of friends, or a community about significant celestial events via Slack. - **Personalized Space Calendar**: Populate your Google Calendar with upcoming asteroid close approaches, creating a personal "what's up in space" agenda. - **Educational Tool**: Use this as a foundation to learn about API data fetching, data processing, and multi-channel notifications in n8n. ## Good to know - This workflow runs on a **schedule** (every 12 hours by default) and does not require a manual trigger. - **NASA API Key is highly recommended**. The default `DEMO_KEY` has strict rate limits. Get a free key from [api.nasa.gov](https://api.nasa.gov/). - The filtering logic for what constitutes an "alert-worthy" asteroid (distance and size) is fully customizable within the "Filter and Process Asteroids" Code node. ## How it works 1. A **Schedule Trigger** starts the workflow every 12 hours. 2. The "Calculate Date Range" **Code node** generates the start and end dates for the API query (today to 14 days from now). 3. The **NASA node** uses these dates to query the Near Earth Object Web Service (NeoWs) API, retrieving a list of all asteroids that will pass by Earth in that period. 4. The "Filter and Process Asteroids" **Code node** iterates through the list. It filters out objects that are too small or too far away, based on thresholds defined in the code. It then formats and sorts the remaining "interesting" asteroids by their closest approach distance. 5. An **If node** checks if any asteroids were found after filtering. - If **true** (asteroids were found), the flow continues to the alert steps. - If **false**, the workflow ends quietly via a **NoOp node**. 6. The "Format Alert Messages" **Code node** compiles a single, well-formatted summary message for Slack and prepares the data for other notifications. 7. The workflow then splits into two parallel branches: - **Slack Alert**: The **Slack node** sends the summary message to a specified channel. - **Calendar Events**: The **Split Out node** separates the data so that each asteroid is processed individually. For each asteroid, the **Google Calendar node** creates an all-day event on its close-approach date. ## How to use 1. **Configure the NASA Node**: - Open the "Get an asteroid neo feed" (NASA) node. - Create new credentials and replace the default `DEMO_KEY` with your own NASA API key. 2. **Customize Filtering (Optional)**: - Open the "Filter and Process Asteroids" Code node. - Adjust the `MAX_DISTANCE_KM` and `MIN_DIAMETER_METERS` variables to make the alerts more or less sensitive. ```javascript // Example: For closer, larger objects const MAX_DISTANCE_KM = 7500000; // 7.5 million km (approx. 19.5 lunar distances) const MIN_DIAMETER_METERS = 100; // 100 meters ``` 3. **Configure Slack Alerts**: - Open the "Send Slack Alert" node. - Add your Slack OAuth2 credentials. - Select the channel where you want to receive alerts (e.g., `#asteroid-watch`). 4. **Configure Google Calendar Events**: - Open the "Create an event" (Google Calendar) node. - Add your Google Calendar OAuth2 credentials. - Select the calendar where events should be created. 5. **Activate the workflow**. ## Requirements - A free **NASA API Key**. - **Slack credentials** (OAuth2) and a workspace to post alerts. - **Google Calendar credentials** (OAuth2) to create events. ## Customising this workflow - **Add More Notification Channels**: Add nodes for Discord, Telegram, or email to send alerts to other platforms. - **Create a Dashboard**: Instead of just sending alerts, use the processed data to populate a database (like Baserow or Postgres) to power a simple dashboard. - **Different Data Source**: Modify the HTTP Request node to pull data from other space-related APIs, like a feed of upcoming rocket launches.
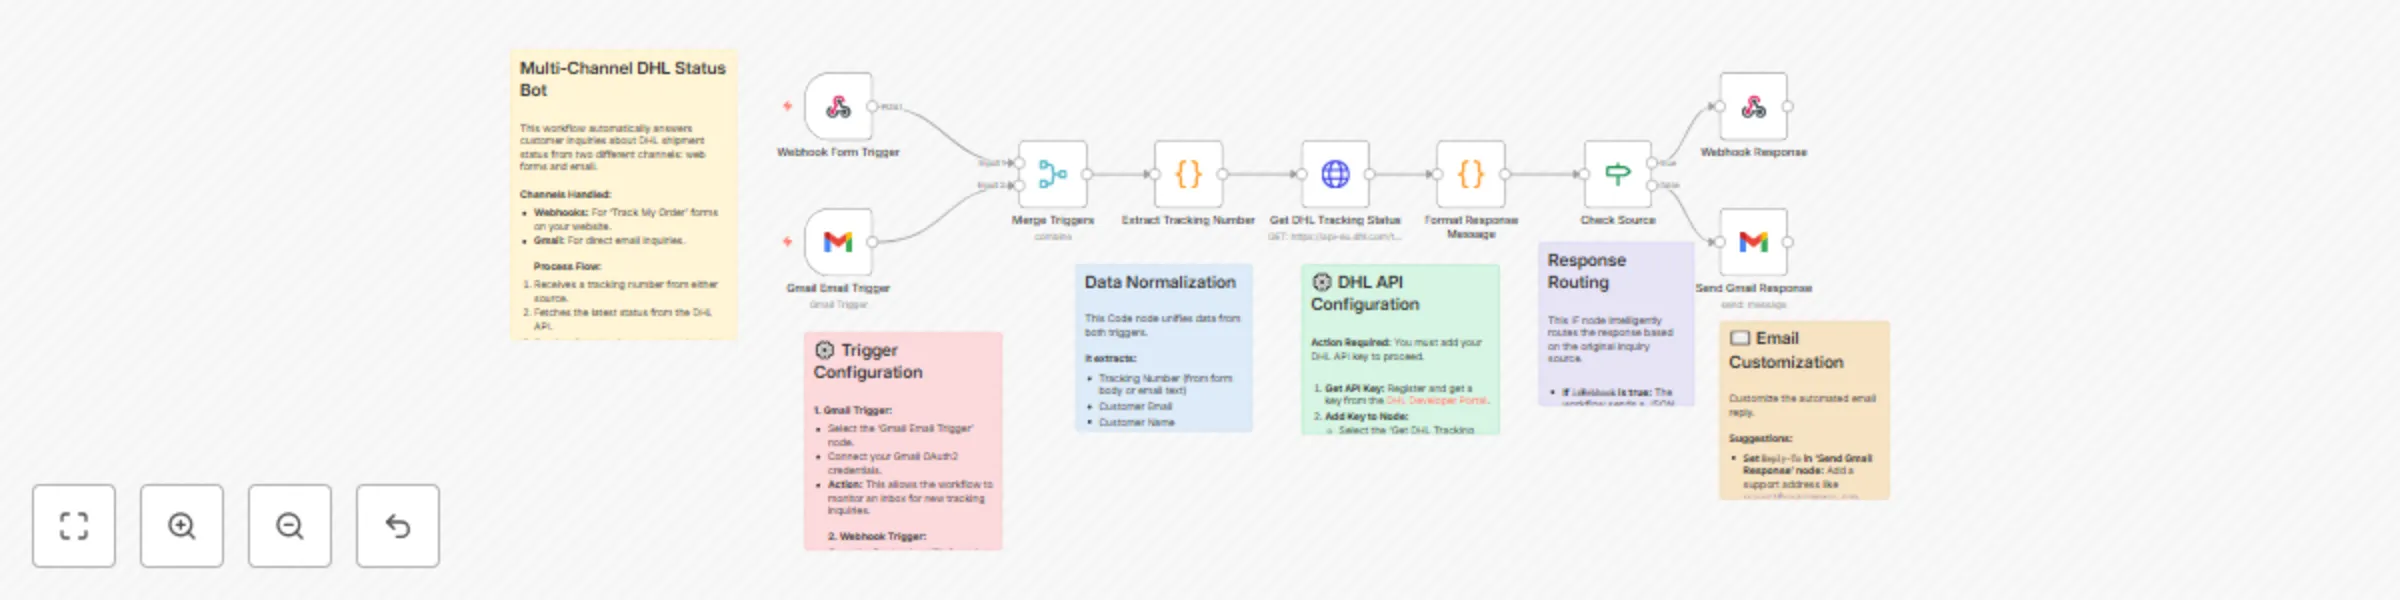
Automated DHL shipment tracking bot for web forms and email inquiries
This n8n template automates responses to customer inquiries about DHL shipment status, handling requests from both web forms and emails. ## Use cases - **Automate Customer Support**: Provide 24/7 instant answers to the common "Where is my order?" question without human intervention. - **Reduce Support Tickets**: Decrease the volume of repetitive tracking inquiries by providing customers with immediate, self-service information. - **Enhance Customer Experience**: Offer a consistent and rapid response across multiple channels (your website and email), allowing customers to use their preferred method of contact. ## Good to know - **DHL API Key is required**: You'll need to register on the [DHL Developer Portal](https://developer.dhl.com/) to get your API key. - This workflow requires **Gmail credentials** (OAuth2) to monitor incoming emails and send replies. - The webhook URL must be configured in your website's contact or tracking form to receive submissions. ## How it works 1. The workflow is initiated by one of two triggers: a **Webhook** (from a website form) or a **Gmail Trigger** (when a new email arrives). 2. A **Merge node** combines the data from both triggers into a single, unified flow. 3. The "Extract Tracking Number" **Code node** intelligently parses the tracking number from either the form data or the email body. It also extracts the customer's name and email address. 4. The **HTTP Request node** sends the extracted tracking number to the DHL API to fetch the latest shipment status. 5. The "Format Response Message" **Code node** takes the API response and composes a user-friendly message for the customer. It also handles cases where tracking information is not found. 6. An **If node** checks the original source of the inquiry to determine whether it came from the webhook or email. 7. If the request came from the webhook, a **Respond to Webhook node** sends the tracking data back as a JSON response. 8. If the request came from an email, the **Gmail node** sends the formatted message as an email reply to the customer. ## How to use 1. **Configure the Triggers**: - **Webhook Trigger**: Copy the Test URL and set it as the action endpoint for your web form. Once you activate the workflow, use the Production URL. ``` Webhook URL: https://your-n8n-instance.com/webhook/dhl-tracking-inquiry ``` - **Gmail Trigger**: Connect your Gmail account using OAuth2 credentials and set the desired filter conditions (e.g., unread emails with a specific subject). 2. **Set up the DHL API**: - Open the "Get DHL Tracking Status" (HTTP Request) node and navigate to the "Headers" tab. - Replace `YOUR_DHL_API_KEY` with your actual DHL API key. ```json { "DHL-API-Key": "YOUR_DHL_API_KEY" } ``` 3. **Configure the Gmail Send Node**: - Connect the same Gmail credentials to the "Send Gmail Response" node. - Customize options like the `replyTo` address as needed. 4. **Activate the workflow**. ## Requirements - A **DHL Developer Portal account** to obtain an API key. - A **Gmail account** configured with OAuth2 in n8n. ## Customising this workflow - **Add More Carriers**: Duplicate the HTTP Request node and response formatting logic to support other shipping carriers like FedEx or UPS. - **Log Inquiries**: Add a node to save inquiry details (tracking number, customer email, status) to a Google Sheet or database for analytics. - **Advanced Error Handling**: Implement more robust error handling, such as sending a Slack notification to your support team if the DHL API is down or returns an unexpected error.
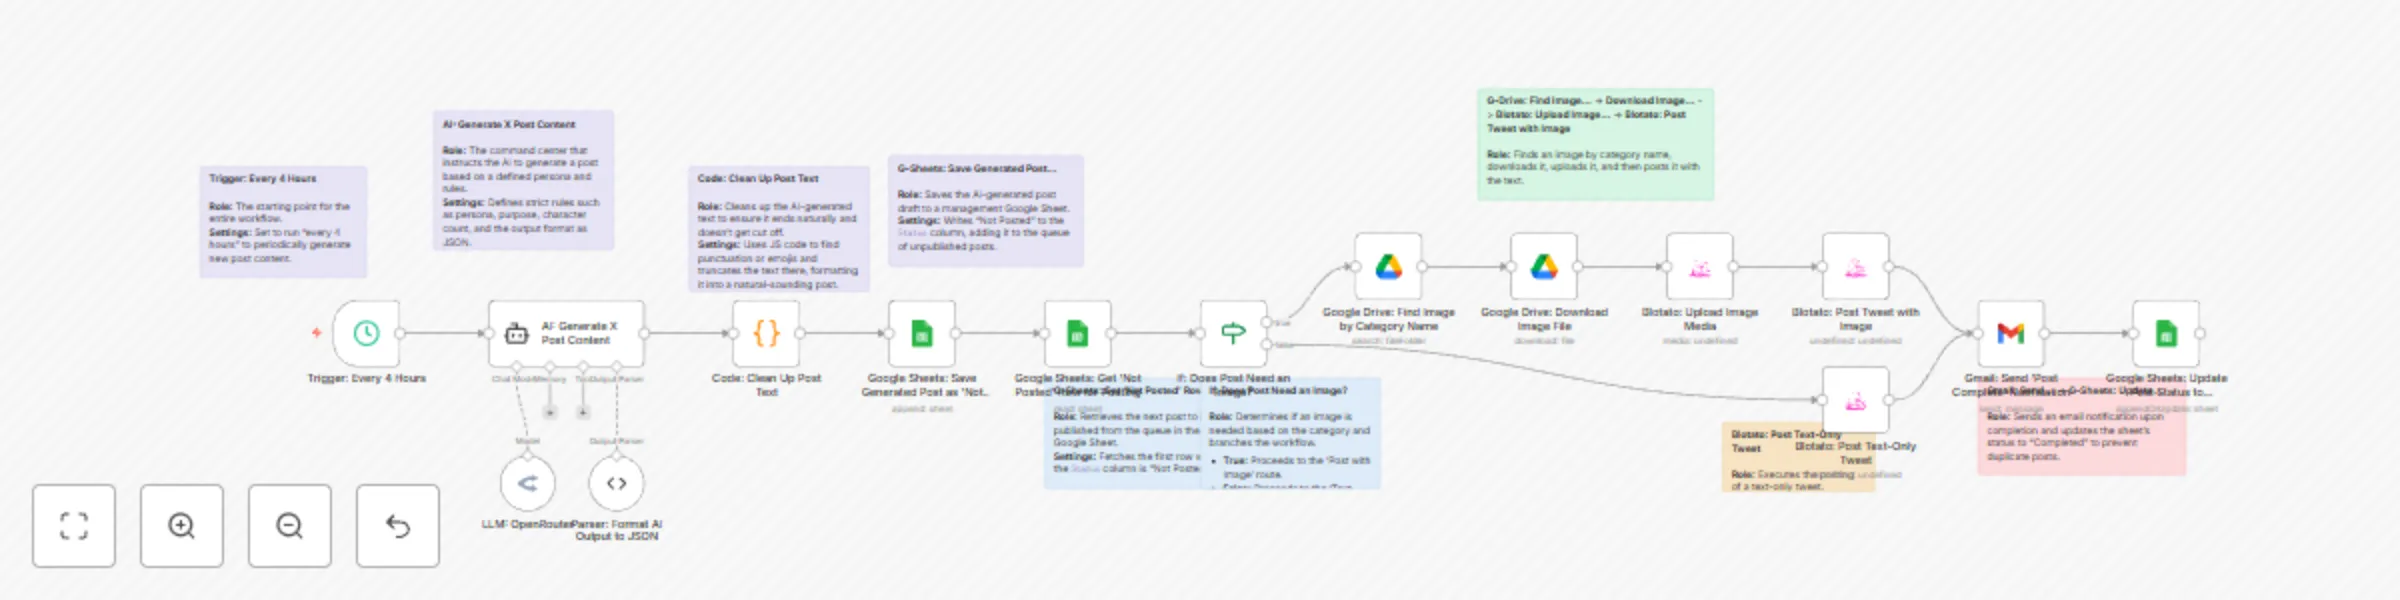
AI-powered X (Twitter) content generator and scheduler with LangChain and Blotato
This n8n template demonstrates how to use AI to fully automate the generation and scheduling of X (formerly Twitter) content based on a specific, predefined persona. Use cases are many: It's perfect for social media marketers looking to streamline content creation, individual experts building a consistent brand voice, or businesses aiming to drive traffic to specific services with a steady stream of relevant content. #### Good to know * The AI model used in this workflow (via OpenRouter) requires an API key and will incur costs based on usage (typically a few cents per generation). * The Blotato node used for posting is a third-party community node and requires a separate Blotato account. #### How it works This workflow is divided into two main processes: **Content Generation** and **Content Posting**. 1. **Content Generation Process:** * A Schedule Trigger kicks off the workflow every 4 hours. * An AI Agent (LangChain) generates a post based on a detailed prompt defining a persona, purpose, and rules. * A Code node refines the AI's output, ensuring the text ends naturally. * The generated post is then saved to a Google Sheet with a "Not Posted" status, creating a content queue. 2. **Content Posting Process:** * The workflow retrieves one "Not Posted" item from the Google Sheet. * An IF node checks the post's category to determine if an image is required. * If an image is needed, it searches for and retrieves a matching image file from a specified Google Drive folder. * The Blotato node posts the text (and image, if applicable) to the designated X (Twitter) account. * A confirmation email is sent via Gmail to notify stakeholders of the successful post. * Finally, the Google Sheet status is updated to "Completed" to prevent duplicate posts. #### How to use * You can test the workflow anytime using the manual trigger. For production, adjust the posting frequency in the "Trigger: Every 4 Hours" node. * The quality of the generated content is determined by the prompt. Edit the system message within the "AI: Generate X Post Content" node to customize the persona, purpose, tone of voice, etc. * To generate posts with images, you must upload image files to the specified Google Drive folder. The filename must exactly match the post's category name (e.g., `Evidence-based_Graph.png`). #### Requirements * An OpenRouter account (or another AI service account) for the LLM. * A Blotato account for social media posting. * A Google account for content management, image storage, and notifications (Sheets, Drive, Gmail). #### Customising this workflow * Expand the workflow to post to other social media platforms supported by Blotato, such as Facebook or LinkedIn. * Instead of posting immediately, add a human-in-the-loop approval step by sending the AI-generated draft to Slack or email for review before publishing. * Replace the Schedule Trigger with a Webhook Trigger to generate and post relevant content based on external events, such as "when a new blog post is published."
Generate recipes from fridge photos using GPT-4 Vision & Telegram
This n8n template demonstrates a multi-modal AI recipe assistant that suggests delicious recipes based on user input, delivered via Telegram. The workflow can uniquely handle two types of input: a photo of your ingredients or a simple text list. Use cases are many: Get instant dinner ideas by taking a photo of your fridge contents, reduce food waste by finding recipes for leftover ingredients, or create a fun and interactive service for a cooking community or food delivery app! ### Good to know - This workflow uses two different AI models (one for vision, one for text generation), so costs will be incurred for each execution. See [OpenRouter Pricing](https://openrouter.ai/pricing) or your chosen model provider's pricing page for updated info. - The AI prompts are in English, but the final recipe output is configured to be in Japanese. You can easily change the language by editing the prompt in the `Recipe Generator` node. ### How it works 1. The workflow starts when a user sends a message or an image to your bot on Telegram via the **Telegram Trigger**. 2. An **IF node** intelligently checks if the input is text or an image. 3. If an **image** is sent, the **AI Vision Agent** analyzes it to identify ingredients. A **Structured Output Parser** then forces this data into a clean JSON list. 4. If **text** is sent, a **Set node** directly prepares the user's text as the ingredient list. 5. Both paths converge, providing a standardized ingredient list to the **Recipe Generator** agent. This AI acts as a professional chef to create three detailed recipes. 6. Crucially, a second **Structured Output Parser** takes the AI's creative text and formats it into a reliable JSON structure (with name, difficulty, instructions, etc.). This ensures the output is always predictable and easy to work with. 7. A final **Set node** uses a JavaScript expression to transform the structured recipe data into a beautiful, emoji-rich, and easy-to-read message. 8. The formatted recipe suggestions are sent back to the user on Telegram. ### How to use - Configure the **Telegram Trigger** with your own bot's API credentials. - Add your AI provider credentials in the **OpenAI Vision Model** and **OpenAI Recipe Model** nodes (this template uses OpenRouter, but it can be swapped for a direct OpenAI connection). ### Requirements - A Telegram account and a bot token. - An AI provider account that supports vision and text models, such as OpenRouter or OpenAI. ### Customising this workflow - Modify the prompt in the `Recipe Generator` to include dietary restrictions (e.g., "vegan," "gluten-free") or to change the number of recipes suggested. - Swap the Telegram nodes for **Discord**, **Slack**, or a **Webhook** to integrate this recipe bot into a different platform or your own application. - Connect to a recipe database API to supplement the AI's suggestions with existing recipes.
Automate email responses with GPT-4o-mini and human review in Gmail
This n8n template demonstrates a “Human-in-the-Loop” workflow where AI automatically drafts replies to inbound emails, which are then reviewed and approved by a human before being sent. This powerful pattern ensures both the efficiency of AI and the quality assurance of human oversight. Use cases are many: Streamline sales inquiry responses, manage first-level customer support, handle initial recruitment communications, or any business process that requires personalized yet consistent email replies. # Good to know - At the time of writing, the cost per execution depends on your OpenAI API usage. This workflow uses a cost-effective model like gpt-4o-mini. See [OpenAI Pricing](https://openai.com/pricing) for updated info. - The AI’s knowledge base and persona are fully customizable within the **Basic LLM Chain** node’s prompt. # How it works 1. The **Gmail Trigger** node starts the workflow whenever a new email arrives in the specified inbox. 2. The **Classify Potential Leads** node uses AI to determine if the incoming email is a potential lead. If not, the workflow stops. 3. The **Basic LLM Chain**, powered by an OpenAI Chat Model, generates a draft reply based on a detailed system prompt and your internal knowledge base. 4. A **Structured Output Parser** is crucially used to force the AI’s output into a reliable JSON format (`{"subject": "...", "body": "..."}`), preventing errors in subsequent steps. 5. The **Send for Review** Gmail node sends the AI-generated draft to a human reviewer and pauses the workflow, waiting for a reply. 6. The **IF** node checks the reviewer’s reply for approval keywords (e.g., “approve”, “承認”). 7. If approved, the **✅ Send to Customer** Gmail node sends the final email to the original customer. 8. If not approved, the reviewer’s feedback is treated as a revision request, and the workflow loops back to the **Basic LLM Chain** to generate a new draft incorporating the feedback. # How to use - **Gmail Trigger** node: Configure with your own Gmail account credentials. - **Send for Review** node: Replace the placeholder email `[email protected]` with the actual reviewer's email address. - **IF** node: You can customize the approval keywords to match your team’s vocabulary. - **OpenAI Nodes**: Ensure your OpenAI credentials are set up. You can select a different model if needed, but the prompt is optimized for models like GPT-4o mini. # Requirements - An OpenAI account for the LLM. - A Gmail account for receiving customer emails and for the review process. # Customising this workflow - By modifying the prompt and knowledge base in the **Basic LLM Chain**, you can adapt this agent for various departments, such as technical support, HR, or public relations. - The approval channel is not limited to Gmail. You can easily replace the review nodes with Slack or Microsoft Teams nodes to fit your internal communication tools.
Automated daily news summaries with OpenRouter AI & Gmail delivery
### Daily AI News Summary & Gmail Delivery This n8n template demonstrates how to build an autonomous AI agent that automatically scours the web for the latest news, intelligently summarizes the top stories, and delivers a professional, formatted news digest directly to your email inbox. Use cases are many: Create a personalized daily briefing to start your day informed, keep your team updated on industry trends and competitor news, or automate content curation for your newsletter. **Good to know** * At the time of writing, costs will depend on the LLM you select via **OpenRouter** and your usage of the **Tavily Search API**. Both services offer free tiers to get started. * This workflow requires API keys and credentials for OpenRouter, Tavily, and Gmail. * The AI Agent's system prompt is configured to produce summaries in **Japanese**. You can easily change the language and topics by editing the prompt in the "AI News Agent" node. **How it works** 1. The workflow begins on a daily schedule, which you can configure to your preferred time. 2. A **Code node** dynamically generates a search query for the current day's most important news across several categories. 3. The **AI Agent** receives this query. It uses its attached tools to perform the task: * It uses the **Tavily News Search** tool to find relevant, up-to-date articles from the web. * It then uses the **OpenRouter Chat Model** to analyze the search results, identify the most significant stories, and write a summary for each. * The agent's output is strictly structured into a JSON format, containing a main title and an array of individual news stories. 4. Another **Code node** takes this structured JSON data and transforms it into a clean, professional HTML-formatted email. 5. Finally, the **Gmail node** sends the beautifully formatted email to your specified recipient. **How to use** * Before you start, you must add your credentials for **OpenRouter**, **Tavily**, and **Gmail** in their respective nodes. * Customize the schedule in the "Schedule Trigger" node to set the daily delivery time. * Change the recipient's email address in the final "Send a message" (Gmail) node. **Requirements** * OpenRouter account (for access to various LLMs) * Tavily AI account (for the real-time search API) * Google account with Gmail enabled for sending emails via OAuth2 **Customising this workflow** * **Change the delivery channel:** Easily swap the final Gmail node for a Slack, Discord, or Telegram node to send the news summary to a team channel. * **Focus the news topics:** Modify the "Prepare News Query" node to search for highly specific topics, such as "latest advancements in artificial intelligence" or "financial news from the European market." * **Archive the news:** Add a node after the AI Agent to save the structured JSON data to a database or Google Sheet, allowing you to build a searchable news archive over time.