對馬 瑠斗
Workflows by 對馬 瑠斗
Marketing analytics reports with Google Analytics, Sheets, Slides & email alerts
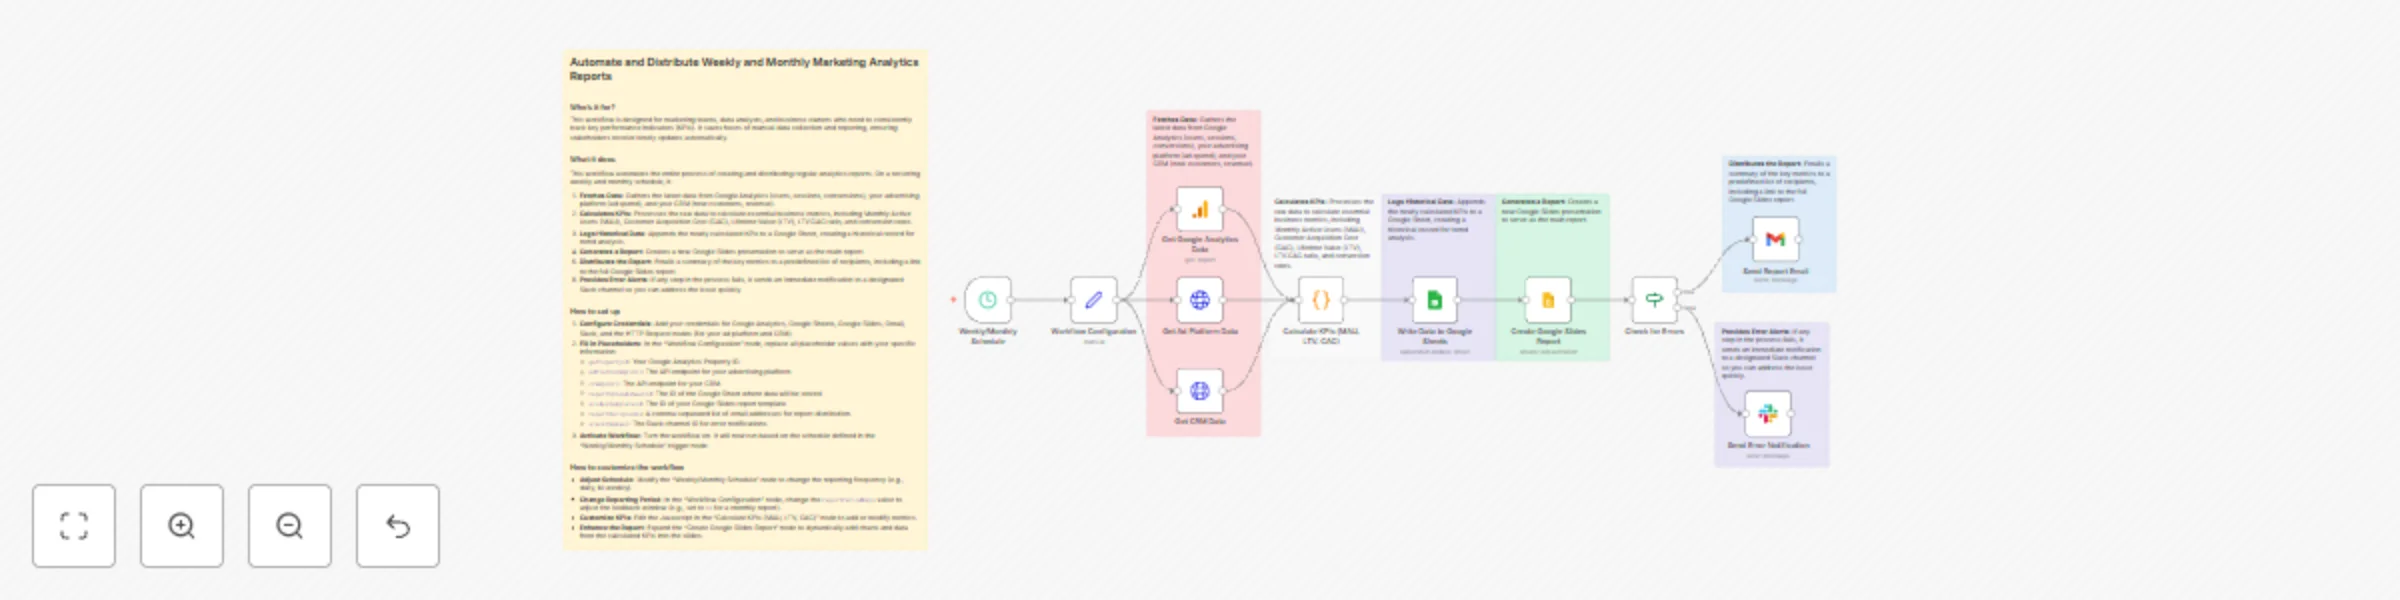
## Automate and Distribute Weekly and Monthly Marketing Analytics Reports ### Who's it for? This workflow is designed for marketing teams, data analysts, and business owners who need to consistently track key performance indicators (KPIs). It saves hours of manual data collection and reporting, ensuring stakeholders receive timely updates automatically. ### What it does This workflow automates the entire process of creating and distributing regular analytics reports. On a recurring weekly and monthly schedule, it: 1. **Fetches Data:** Gathers the latest data from Google Analytics (users, sessions, conversions), your advertising platform (ad spend), and your CRM (new customers, revenue). 2. **Calculates KPIs:** Processes the raw data to calculate essential business metrics, including Monthly Active Users (MAU), Customer Acquisition Cost (CAC), Lifetime Value (LTV), LTV:CAC ratio, and conversion rates. 3. **Logs Historical Data:** Appends the newly calculated KPIs to a Google Sheet, creating a historical record for trend analysis. 4. **Generates a Report:** Creates a new Google Slides presentation to serve as the main report. 5. **Distributes the Report:** Emails a summary of the key metrics to a predefined list of recipients, including a link to the full Google Slides report. 6. **Provides Error Alerts:** If any step in the process fails, it sends an immediate notification to a designated Slack channel so you can address the issue quickly. ### How to set up 1. **Configure Credentials:** Add your credentials for Google Analytics, Google Sheets, Google Slides, Gmail, Slack, and the HTTP Request nodes (for your ad platform and CRM). 2. **Fill in Placeholders:** In the "Workflow Configuration" node, replace all placeholder values with your specific information: * `gaPropertyId`: Your Google Analytics Property ID. * `adPlatformApiUrl`: The API endpoint for your advertising platform. * `crmApiUrl`: The API endpoint for your CRM. * `reportSpreadsheetId`: The ID of the Google Sheet where data will be stored. * `slidesTemplateId`: The ID of your Google Slides report template. * `reportRecipients`: A comma-separated list of email addresses for report distribution. * `slackChannel`: The Slack channel ID for error notifications. 3. **Activate Workflow:** Turn the workflow on. It will now run based on the schedule defined in the "Weekly/Monthly Schedule" trigger node. ### How to customize the workflow * **Adjust Schedule:** Modify the "Weekly/Monthly Schedule" node to change the reporting frequency (e.g., daily, bi-weekly). * **Change Reporting Period:** In the "Workflow Configuration" node, change the `reportPeriodDays` value to adjust the lookback window (e.g., set to `30` for a monthly report). * **Customize KPIs:** Edit the Javascript in the "Calculate KPIs (MAU, LTV, CAC)" node to add or modify metrics. * **Enhance the Report:** Expand the "Create Google Slides Report" node to dynamically add charts and data from the calculated KPIs into the slides.
Automated event management with Typeform, Stripe, Google tools & Slack notifications
## Event Participant Management and Automated Follow-up System This workflow automates the entire process of managing event participants, from registration and payment to sending reminders and follow-up communications. It's designed for event organizers who want to streamline their operations and ensure a smooth experience for attendees. ### Who is this for? This template is ideal for event organizers, community managers, and businesses that host workshops, webinars, conferences, or any event requiring participant registration and communication. ### How it works The workflow is divided into three main parts: 1. **Registration and Onboarding:** * When a new participant registers via a Typeform, their details are immediately added to a Google Sheet. * Payment is processed via Stripe. * Upon successful payment, a confirmation email is sent to the participant, and the event is added to their Google Calendar. * The organizer receives a Slack notification about the new registration. 2. **Event Reminders:** * A daily scheduled trigger checks the Google Sheet for upcoming events. * It calculates if an event is within the specified reminder period (e.g., 3 days before). * If a reminder is needed, an email is automatically sent to the participant. 3. **Post-Event Follow-up:** * Another daily scheduled trigger checks for past events. * It calculates if an event is due for a follow-up (e.g., 2 days after). * A thank-you email, including a survey link, is sent to participants. * The participant's status in the Google Sheet is updated to mark the follow-up as sent. ### How to set it up 1. **Typeform Registration Form:** Replace `<__PLACEHOLDER_VALUE__Typeform Form ID__>` with your actual Typeform ID. 2. **Workflow Configuration:** Fill in the placeholder values for `Event Name`, `Event Date`, `Event Time`, `Event Location`, `Participation Fee Amount`, and `Slack Channel ID`. 3. **Google Sheets:** * Replace `<__PLACEHOLDER_VALUE__Google Sheets Document ID__>` and `<__PLACEHOLDER_VALUE__Sheet Name (e.g., Participants)__>` with your Google Sheet details. Ensure your sheet has columns for "Name", "Email", "Phone", "Registration Date", "Event Name", "Event Date", "Payment Status", "Follow-up Sent", and "Follow-up Date". * You will need to set up Google Sheets OAuth2 API credentials. 4. **Stripe (Process Payment):** Replace `<__PLACEHOLDER_VALUE__Customer ID__>` and `<__PLACEHOLDER_VALUE__Source ID__>` with your Stripe customer and source IDs. You will need Stripe API credentials. 5. **Gmail (Send Confirmation Email, Send Reminder Email, Send Thank You & Survey):** You will need to set up Gmail OAuth2 credentials. 6. **Google Calendar (Add to Calendar):** You will need to set up Google Calendar OAuth2 API credentials. 7. **Slack (Notify Organizer):** Replace `<__PLACEHOLDER_VALUE__Slack Channel ID__>` (if not already set in Workflow Configuration) and set up Slack OAuth2 API credentials. 8. **Survey URL (Send Thank You & Survey):** Replace `<__PLACEHOLDER_VALUE__Survey URL__>` with the link to your post-event survey. ### Requirements * Typeform account and a registration form. * Google Sheet for participant management. * Stripe account for payment processing. * Gmail account for sending emails. * Google Calendar for event scheduling. * Slack account for organizer notifications. * n8n credentials for Google Sheets, Stripe, Gmail, Google Calendar, and Slack. ### How to customize the workflow * **Reminder/Follow-up Timing:** Adjust the `reminderDaysBefore` and `followupDaysAfter` values in the "Workflow Configuration" node to change when reminder and follow-up emails are sent. * **Email Content:** Modify the HTML content in the "Send Confirmation Email", "Send Reminder Email", and "Send Thank You & Survey" nodes to match your branding and messaging. * **Payment Currency:** Change the `currency` in the "Process Payment" node if your event uses a different currency. * **Additional Data:** Extend the Google Sheets nodes to capture more participant information from Typeform if needed. * **Integration:** Easily integrate with other services by adding more nodes, for example, a CRM to add new participants as leads.
Manage customer inquiries from email & web forms with Slack & Google Sheets
This n8n workflow is designed to centralize the management and tracking of customer inquiries received through multiple channels (email and web forms). **Who's it for?** * Customer support teams * Marketing teams * Sales teams * Small to medium-sized businesses * Individuals looking to streamline customer inquiry processes **How it works / What it does** This workflow is designed to automatically collect, process, route, and track customer inquiries from different sources. 1. **Multi-Channel Input**: The workflow listens for inquiries from both incoming emails and web form submissions. * **Email Trigger**: Monitors a specific inbox for sent emails. * **Webhook - Web Form**: Listens for web form data submitted to a designated endpoint. 2. **Data Extraction and Parsing**: * **Extract Email Content**: Extracts HTML content from incoming emails to get a clean text message. * **Parse Email Data**: Extracts relevant information from the email, such as customer name, email address, subject, message, received timestamp, source ("email"), and inquiry type (e.g., "urgent", "billing", "general") based on the subject line. * **Parse Webhook Data**: Extracts customer name, email, subject, message, received timestamp, source ("webform"), and inquiry type from the web form data based on the provided type or a default of "general". 3. **Merge Inquiries**: The parsed email and web form inquiry data are combined into a single stream for continued processing. 4. **Route by Inquiry Type**: The workflow then routes the inquiries based on the extracted `inquiryType`. * **Urgent Inquiries**: Inquiries marked as "urgent" are routed to a specific Slack channel for immediate alerts. * **General Inquiries**: Inquiries marked as "general" are notified in another Slack channel. * **Billing Inquiries**: Inquiries marked as "billing" are routed to the general inquiries channel, or can be customized for a separate channel if needed. 5. **Save to Google Sheets**: All inquiry data is logged into a Google Sheet, which serves as a central repository, including details like customer name, email, subject, message, source, received timestamp, and inquiry type. 6. **Send Auto-Reply Email**: Customers receive an automated email reply confirming that their inquiry has been successfully received. **How to set up** 1. **Google Sheets**: * Create a new spreadsheet in your Google Drive. * Name the first sheet "Inquiries" and create the following header row: `customerName`, `customerEmail`, `subject`, `message`, `source`, `receivedAt`, `inquiryType`. * In the **'Save to Google Sheets'** node, configure the Spreadsheet ID and Sheet Name. Link your Google Sheets credentials. 2. **Email Trigger (IMAP)**: * Set up the **'Email Trigger'** node to connect to your IMAP email account. Test it to ensure it correctly listens for incoming emails before activating the workflow. 3. **Webhook - Web Form**: * Copy the Webhook URL from the **'Webhook - Web Form'** node and configure your web form to submit data to it. Ensure your web form sends fields like `name`, `email`, `subject`, `message`, and `type` in JSON format. 4. **Slack**: * Configure your Slack credentials to connect to your Slack workspace. * Update the relevant Slack Channel IDs in both the **'Notify Urgent - Slack'** and **'Notify General - Slack'** nodes for sending notifications for urgent and general inquiries. 5. **Gmail**: * Set up your Gmail credentials to connect to your Gmail account. * Ensure the **'Send Auto-Reply Email'** node is correctly linked to your sending Gmail account. **Requirements** * An n8n instance * A Google Sheets account * An IMAP-enabled email account * A Slack workspace * A Gmail account * A basic web form (to integrate with the Webhook node) **How to customize the workflow** * **Add more Inquiry Types**: You can add more specific inquiry types (e.g., "technical support", "returns") by adding more rules in the **'Route by Inquiry Type'** node. * **Additional Notification Channels**: To integrate other notification systems (e.g., Microsoft Teams, Discord, SMS) beyond Slack, create new routing outputs and add new notification nodes for the desired service. * **CRM Integration**: Instead of or in addition to saving data to Google Sheets, you can add new nodes to connect to CRM systems like Salesforce, HubSpot, or others. * **Prioritization and Escalation**: Implement more complex logic to trigger escalation processes or prioritization rules based on inquiry type or keywords. * **AI Sentiment Analysis**: Integrate an AI node to analyze the sentiment of inquiry messages and route or prioritize them accordingly. `
Automate invoice processing & weekly spending reports with GPT-4 and Airtable
## Invoice Automation Kit: AI-Powered Invoice Processing and Weekly Reports This n8n workflow is designed to automate invoice processing and streamline financial management. It leverages AI to extract key invoice data, validate it, and store it in Airtable. Additionally, it generates and emails weekly spending reports. ### Who is it for? This template is for small businesses, freelancers, or individuals looking to save time on manual invoice processing. It's ideal for anyone who wants to improve the accuracy of their financial data and maintain a clear overview of their spending. ### How it Works / What it Does This workflow consists of two main parts: 1. **Invoice Data Extraction and Storage**: * **Invoice Upload Form**: Upload your invoices (PDF, PNG, JPG) via an n8n form. * **AI-Powered Data Extraction**: AI extracts key information such as vendor name, invoice date, total amount, currency, and line items (description, quantity, unit price, total) from the uploaded invoice. * **Data Validation**: The extracted data is validated to ensure it is complete and accurate. * **Store in Airtable**: Validated invoice data is saved in a structured format to your specified Airtable base and table. 2. **Weekly Spending Report Generation and Email**: * **Weekly Report Schedule**: Automatically triggers every Sunday at 6 PM. * **Fetch Weekly Invoices**: Retrieves all invoices stored in Airtable within the last 7 days. * **AI-Powered Spending Report Generation**: Based on the retrieved invoice data, AI generates a comprehensive spending report, including total spending for the week, breakdown by vendor, top 5 expenses, spending trends, and any notable observations. * **Send Weekly Report Email**: The generated report is sent in a professional format to the configured recipient email address. ### How to Set Up 1. **Update Workflow Configuration Node**: * Replace `airtableBaseId` with your Airtable Base ID. * Replace `airtableTableId` with your Airtable Table ID. * Replace `reportRecipientEmail` with the email address that should receive the weekly reports. 2. **Airtable Credentials**: * Set up your Airtable Personal Access Token credentials in the Airtable nodes. 3. **OpenAI Credentials**: * Set up your OpenAI API key credentials in the OpenAI Chat Model nodes. 4. **Email Credentials**: * Configure your email sending service (e.g., SMTP) credentials in the "Send Weekly Report Email" node and update the `fromEmail`. 5. **Airtable Table Setup**: * Ensure your Airtable has a table set up with appropriate columns to store invoice data, such as "Vendor", "Invoice Date", "Total Amount", "Currency", and "Line Items". ### Requirements * An n8n instance * An OpenAI account and API key * An Airtable account and Personal Access Token * An email sending service (e.g., SMTP server) ### How to Customize the Workflow * **Adjust Information Extraction**: Edit the prompt in the "Extract Invoice Data" node to include additional information you wish to extract. * **Customize Report**: Adjust the prompt in the "Generate Spending Report" node to change specific analyses or formatting included in the report. * **Add Notifications**: Incorporate notification nodes to other services like Slack or Microsoft Teams to be alerted when an invoice is uploaded or a report is ready. * **Modify Validation Rules**: Edit the conditions in the "Validate Invoice Data" node to implement additional validation rules. Here's a visual representation of the workflow.