Ruthwik
Workflows by Ruthwik
Create a two-way WhatsApp + Telegram integration for 10k+ customer support chats
# ⚡ Next-Gen Customer Support: Two-Way WhatsApp + Telegram Integration for 10k+ Clients ------------------------------------------------------------------------ ## Who is this workflow for This workflow is designed for **customer support teams, e-commerce founders, and operations managers** who want to handle thousands of customer queries seamlessly. Instead of building a brand-new chat application, it leverages **WhatsApp (where customers already are)** and **Telegram (where your support team operates)** to create a scalable, topic-based support system. If you are a brand handling 1000s of daily WhatsApp customer messages and need a structured way to map each customer into a dedicated support thread without chaos, this workflow is for you. ------------------------------------------------------------------------ ## What it does / How it works This **two-way n8n automation** bridges WhatsApp and Telegram by creating **one Telegram forum topic per customer** and syncing messages both ways: 1. **Incoming WhatsApp → Telegram** - When a new WhatsApp message arrives, the workflow checks if the customer already has a topic in Telegram. - If yes → The message is forwarded into that existing topic. - If no → A new topic is created automatically, the mapping is saved in the database, and the message is posted there. - Result: every customer has a dedicated thread in your Telegram supergroup. 2. **Outgoing Telegram → WhatsApp** - When a support agent replies in a Telegram topic, the workflow looks up the linked WhatsApp number. - The reply is sent back to the customer on WhatsApp, preserving context. - Result: two-way synced conversations without building a custom app. ------------------------------------------------------------------------ ## How to set it up 1. **Configure WhatsApp Cloud API** - Create a Meta Developer account and register a WhatsApp Business number. - Generate an access token and phone number ID. 2. **Configure Telegram Bot** - Use BotFather to create a bot and enable it in a **Telegram Supergroup with Topics**. - Get the `chat_id` and allow the bot to create/send messages in topics. 3. **Database (Supabase/Postgres)** - Create a table `wa_tg_threads` to map `phone_e164` ↔ `telegram_topic_id` ↔ `supergroup_id`. 4. **n8n Workflows** - Workflow A: WhatsApp → Telegram - Trigger: WhatsApp Webhook - Steps: Lookup customer → If exists send to topic, else create topic → Save mapping → Forward message. - Workflow B: Telegram → WhatsApp - Trigger: Telegram Webhook - Steps: Filter only topic replies → Lookup mapping → Send WhatsApp message. 5. **Testing** - Send a WhatsApp message → Check Telegram topic created. - Reply in Telegram topic → Ensure customer receives WhatsApp reply. ------------------------------------------------------------------------ ## Requirements - A free or paid **n8n instance** (self-hosted or cloud). - **WhatsApp Cloud API credentials** (phone number ID + access token). - **Telegram Bot token** with access to a **Supergroup with Topics** enabled. - A **Postgres/Supabase database** to store thread mappings. - Basic familiarity with editing HTTP Request nodes in n8n. ------------------------------------------------------------------------ ## How to customize the workflow - **Brand personalization:** Pre-populate first message templates (thank you, order status, delivery updates). - **Routing rules:** Assign specific agents to certain topics by ID ranges. - **Integrations:** Extend to CRMs (HubSpot, Zoho) or support platforms (Freshdesk, Zendesk). - **Notifications:** Push high-priority WhatsApp queries into Slack/Teams for instant alerts. - **Archival:** Auto-close inactive topics after N days and mark customers as dormant. ------------------------------------------------------------------------ ## Why Telegram instead of building a new App The client's requirement was clear: **use an existing, reliable, and scalable chat platform** instead of building a new app from scratch. - **Telegram Supergroups with Topics** scale to 100,000+ members and millions of messages, making them ideal for managing 10k+ customer threads. - Agents don't need to install or learn a new tool---they continue inside Telegram, which is fast, free, and mobile-friendly. - Building a custom chat app would require authentication, push notifications, scaling infra, and UX---all solved instantly by Telegram. This decision **saves development cost, accelerates deployment, and provides proven scalability**. ------------------------------------------------------------------------ ## Why this improves support productivity - **Organized by customer:** Each WhatsApp number has its own Telegram topic. - **No missed messages:** Agents can quickly scroll topics without drowning in one endless chat. - **Two-way sync:** Replies flow back to WhatsApp seamlessly. - **Scales automatically:** Handle 10k+ conversations without losing track. - **Leverages existing tools:** WhatsApp (customers) + Telegram (agents). Result: **faster responses, better tracking, and zero need to reinvent chat software.** ------------------------------------------------------------------------
AI-powered WhatsApp customer support for Shopify brands with LLM agents
# 🚀 AI-Powered WhatsApp Customer Support for Shopify Brands This n8n template builds a WhatsApp support copilot that answers **order status** and **product availability** from Shopify using LLM "agents," then replies to the customer in WhatsApp or routes to human support. ------------------------------------------------------------------------ ## Use cases - "Where is my order?" → live status + tracking link - "What are your best-selling T-shirts?" → in-stock sizes & variants - Greetings / small talk → welcome message - Anything unclear → handoff to support channel ------------------------------------------------------------------------ ## Good to know - WhatsApp Business conversations are billed by Meta/Twilio/Exotel; plan accordingly. - Shopify Admin API has rate limits (leaky bucket) --- stagger requests. - LLM usage incurs token costs; cap max tokens and enable caching where possible. - Avoid sending PII to the model; only pass minimal order/product fields. ------------------------------------------------------------------------ ## How it works 1. **WhatsApp Trigger**\ Receives an incoming message (e.g., "Where is my order?"). 2. **Get Customer from Shopify → Customer Details → Normalize Input**\ Looks up the customer by phone, formats the query (lower-case, emoji & punctuation normalization). 3. **Switch (intent router)**\ Classifies into `welcome`, `orderStatusQuery`, `productQuery`, or `supportQuery`. 4. **Welcome path**\ **Welcome message** → polite greeting → (noop placeholder). 5. **Order status path (Orders Agent)** - **Orders Agent (LLM + Memory)** interprets the user request and extracts needed fields. - **Get Customer Orders (HTTP to Shopify)** fetches the user's latest order(s). - **Structured Output Parser** cleans the agent's output into a strict schema. - **Send Order Status (WhatsApp message)** returns status, ETA, and tracking link. 6. **Products path (Products Agent)** - **Products Agent (LLM + Memory)** turns the ask into a product query. - **Get Products from Shopify (HTTP)** pulls best sellers / inventory & sizes. - **Structured Output Parser** formats name, price, sizes, stock. - **Send Products message (WhatsApp)** sends a tidy, human-readable reply 7. **Support path** **Send a message to support** posts the transcript/context to your agent/helpdesk channel and informs the user a human will respond ------------------------------------------------------------------------ ## How to use - Replace the **manual/WhatsApp trigger** with your live WhatsApp number/webhook. - Set env vars/credentials: Shopify domain + Admin API token, WhatsApp provider keys, LLM key (OpenAI/OpenRouter), and (optionally) your support channel webhook. - Edit message templates for tone, add your brand name, and localize if needed. - Test with samples: "Where is my order?", "Show best sellers", "Hi". ------------------------------------------------------------------------ ## Requirements - WhatsApp Business API (Meta/Twilio/Exotel) - Shopify store + Admin API access - LLM provider (OpenAI/OpenRouter etc.) - Slack webhook for human handoff ------------------------------------------------------------------------ ## Prerequisites - Active **WhatsApp Business Account** connected via API provider (Meta, Twilio, or Exotel). - **Shopify Admin API credentials** (API key, secret, store domain). - **Slack OAuth app** or webhook for human support escalation. - API key for your LLM provider (OpenAI, OpenRouter, etc.). ------------------------------------------------------------------------ ## Customising this workflow - Add intents: returns/exchanges, COD confirmation, address changes. - Enrich product replies with images, price ranges, and "Buy" deep links. - Add multilingual support by detecting locale and templating responses. - Log all interactions to a DB/Sheet for analytics and quality review. - Guardrails: confidence thresholds → fallback to support; redact PII; retry on API errors.
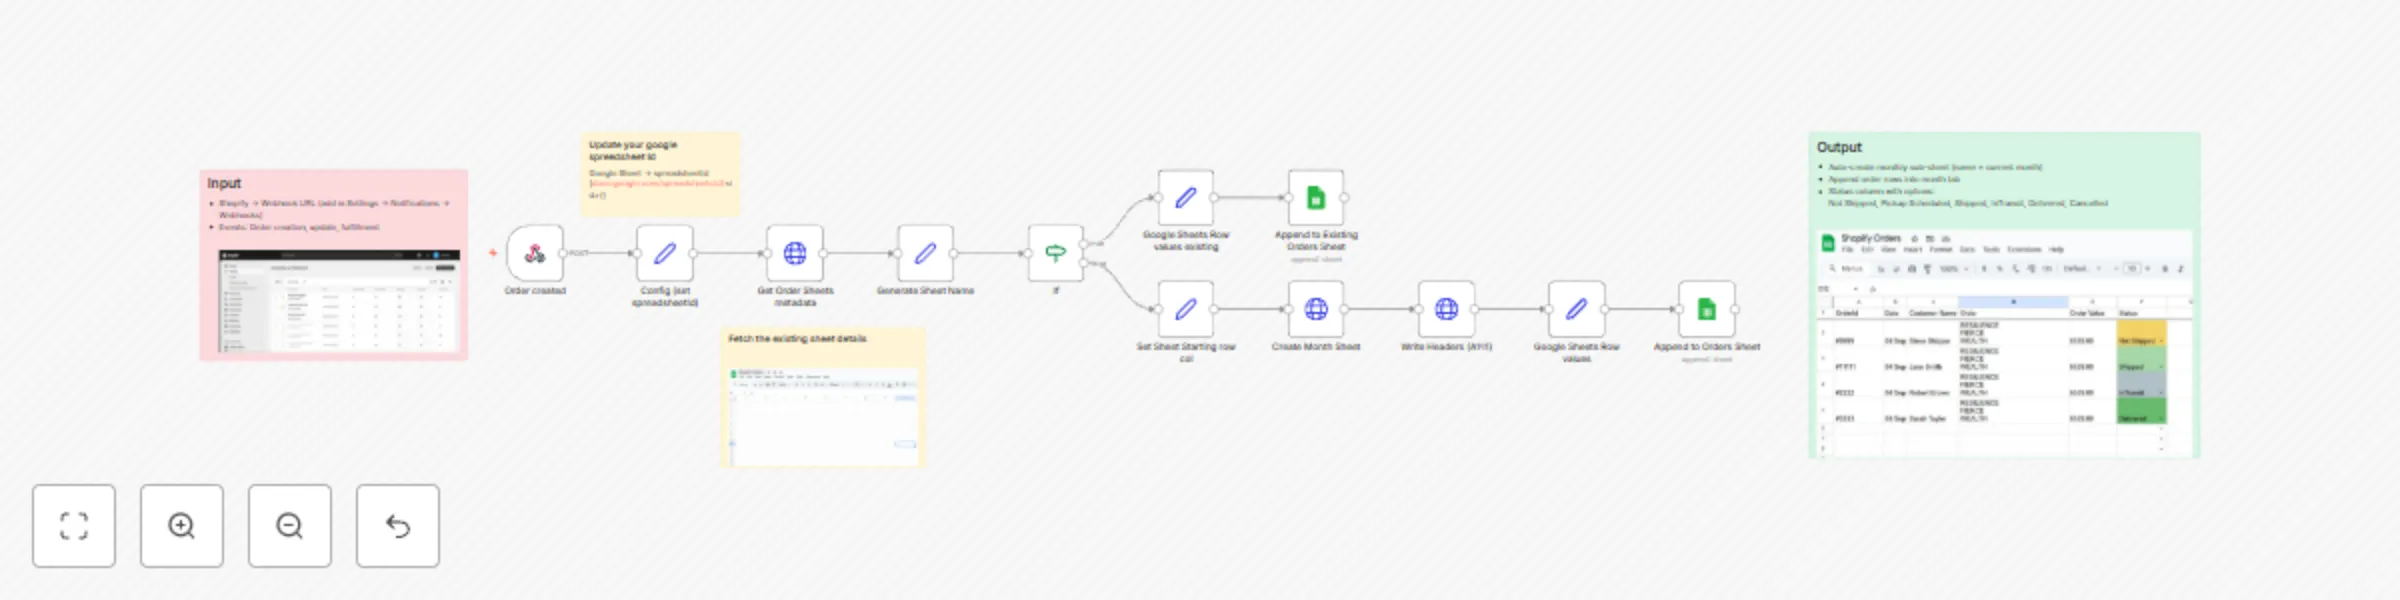
Log e-commerce orders in Google Sheets with monthly tabs & status tracking
# n8n Google Sheets Monthly Order Logger This n8n template records incoming e-commerce orders into Google Sheets, auto-creates a monthly sub-sheet, and adds a “Status” dropdown so your team can track fulfillment at a glance. --- ## Use cases Centralize order logs, coordinate shipping across months, trigger customer updates (e.g., WhatsApp/Email) from status changes, and build lightweight ops dashboards. --- ## Good to know - The Google Sheet **ID** is the part in the URL between `/d/` and the next slash: `https://docs.google.com/spreadsheets/d/<sheetId>/`. - A **new sub-sheet is created every month** (sheet name = current month, e.g., “September 2025”). If it already exists, the workflow appends to it. - The **Status** column uses data validation with these options: **Not Shipped, Pickup Scheduled, Shipped, InTransit, Delivered, Cancelled**. - Make sure the Google credential in n8n has edit access to the spreadsheet. - The **Webhook URL must be updated** in your Shopify **Settings → Notifications → Webhooks** page with the required **Order events** (e.g., Order creation, Order update, Order fulfillment). Reference: [Shopify Webhooks Guide](https://help.shopify.com/en/manual/fulfillment/setup/notifications/webhooks) --- ## How it works 1. **Order created (Webhook/Trigger):** Receives a new order payload from your store/stack. 2. **Config (set spreadsheetId):** Stores the target Google Sheets **spreadsheetId** (copied from the URL). 3. **Get Order Sheets metadata:** Lists existing tabs to see if the tab for the **current month** already exists. 4. **Generate Sheet Name:** Computes the sheet name like `{{ $now.format('MMMM YYYY') }}`. 5. **If (sheet exists?):** - **True → Google Sheets Row values (existing):** Prepares the row for append using the month tab. - **Append to Existing Orders Sheet:** Appends the order as a new row. - **False → Set Sheet Starting row/col:** Sets starting cell (e.g., A1) for a brand-new month tab. - **Create Month Sheet:** Creates a new tab named for the current month. - **Write Headers (A1:…):** Writes the column headers. - **Google Sheets Row values:** Maps payload fields into the header order and applies validation to **Status**. - **Append to Orders Sheet:** Appends the first row into the newly created month tab. --- ## How to use - In **Config**, paste your `spreadsheetId` from the sheet URL and confirm your Google credential has edit access. - (Optional) Adjust the month-tab naming format to match your preference. - In **Shopify → Settings → Notifications → Webhooks**, add your n8n webhook URL and select the **Order events** (Order creation, Order update, Order fulfillment, etc.) you want to capture. - Deploy the workflow and send a sample order to the trigger; a new month tab will be created automatically on the first order of each month. --- ## Requirements - n8n instance with the **Google Sheets** node credential configured. - A Google Spreadsheet you own or can edit. - A Shopify store with webhook events enabled (see [Shopify Webhooks Guide](https://help.shopify.com/en/manual/fulfillment/setup/notifications/webhooks)). --- ## Customising this workflow - Add/remove columns (e.g., taxes, discounts, warehouse notes). - Change the **Status** list or add conditional formatting (e.g., green = Delivered). - Chain automations: on **Status** update → send tracking links, COD confirmation, or delivery feedback forms.
Automatic email categorization & labeling in Zoho Mail with GPT-4o-mini
# 📧 AI-Powered Email Categorization & Labeling in Zoho Mail This n8n template demonstrates how to use **AI text classification** to automatically categorize incoming emails in Zoho Mail and apply the correct label (e.g., Support, Billing, HR). It saves time by keeping your inbox structured and ensures emails are routed to the right category. ### Use cases include: - Routing customer support requests to the correct team. - Organizing billing and finance communications separately. - Streamlining HR and recruitment email handling. - Reducing inbox clutter and ensuring no important message is missed. --- ## ℹ️ Good to know - You’ll need to configure **Zoho OAuth credentials** — see [Self Client Overview](#), [Authorization Code Flow](#), and [Zoho Mail OAuth Guide](#). - The **labels must already exist in Zoho Mail** (e.g., Support, Billing, HR). The workflow fetches these labels and applies them automatically. - The Zoho Mail API domain changes depending on your account region: - `.com` → Global accounts (`https://mail.zoho.com/api/...`) - `.eu` → EU accounts (`https://mail.zoho.eu/api/...`) - `.in` → India accounts (`https://mail.zoho.in/api/...`) Example: For an EU account, the endpoint would be: ```bash https://mail.zoho.eu/api/accounts/<accountID>/updatemessage ``` - The AI model used for text classification may incur costs depending on your provider (e.g., OpenRouter). - Start by testing with a small set of emails before enabling for your full inbox. --- ## 🔄 How it works 1. A new email in Zoho Mail triggers the workflow. 2. OAuth authentication retrieves access to Zoho Mail’s API. 3. All available labels are fetched, and a **label map (display name → ID)** is created. 4. The AI model analyzes the subject and body to predict the correct category. 5. The workflow routes the email to the right category branch. 6. The matching Zoho Mail label is applied (final node is deactivated by default). --- ## 🛠️ How to use - Create the required labels (e.g., Support, Billing, HR, etc.) in your Zoho Mail account before running the workflow. - Replace the **Zoho Mail Account ID** in the *Set Account ID* node. - Configure your **Zoho OAuth credentials** in the *Get Access Token* node. - Update the API base URL to match your Zoho account’s region (`.com`, `.eu`, `.in`, etc.). - Activate the **Apply Label to Email** node once ready for production. - Optionally, adjust categories in the AI classifier prompt to fit your organization’s needs. --- ## 📋 Requirements - Zoho Mail account with API access enabled. - Labels created in Zoho Mail for each category you want to classify. - OAuth credentials set up in n8n. - Correct Zoho Mail API domain (`.com`, `.eu`, `.in`) based on your account region. - An AI model (via OpenRouter or other provider) for text classification. --- ## 🎨 Customising this workflow This workflow can be adapted to many inbox management scenarios. Examples include: - Auto-routing customer inquiries to specific departments. - Prioritizing VIP client emails with special labels. - Filtering job applications directly into an HR-managed folder. ---