Rohit Dabra
Workflows by Rohit Dabra
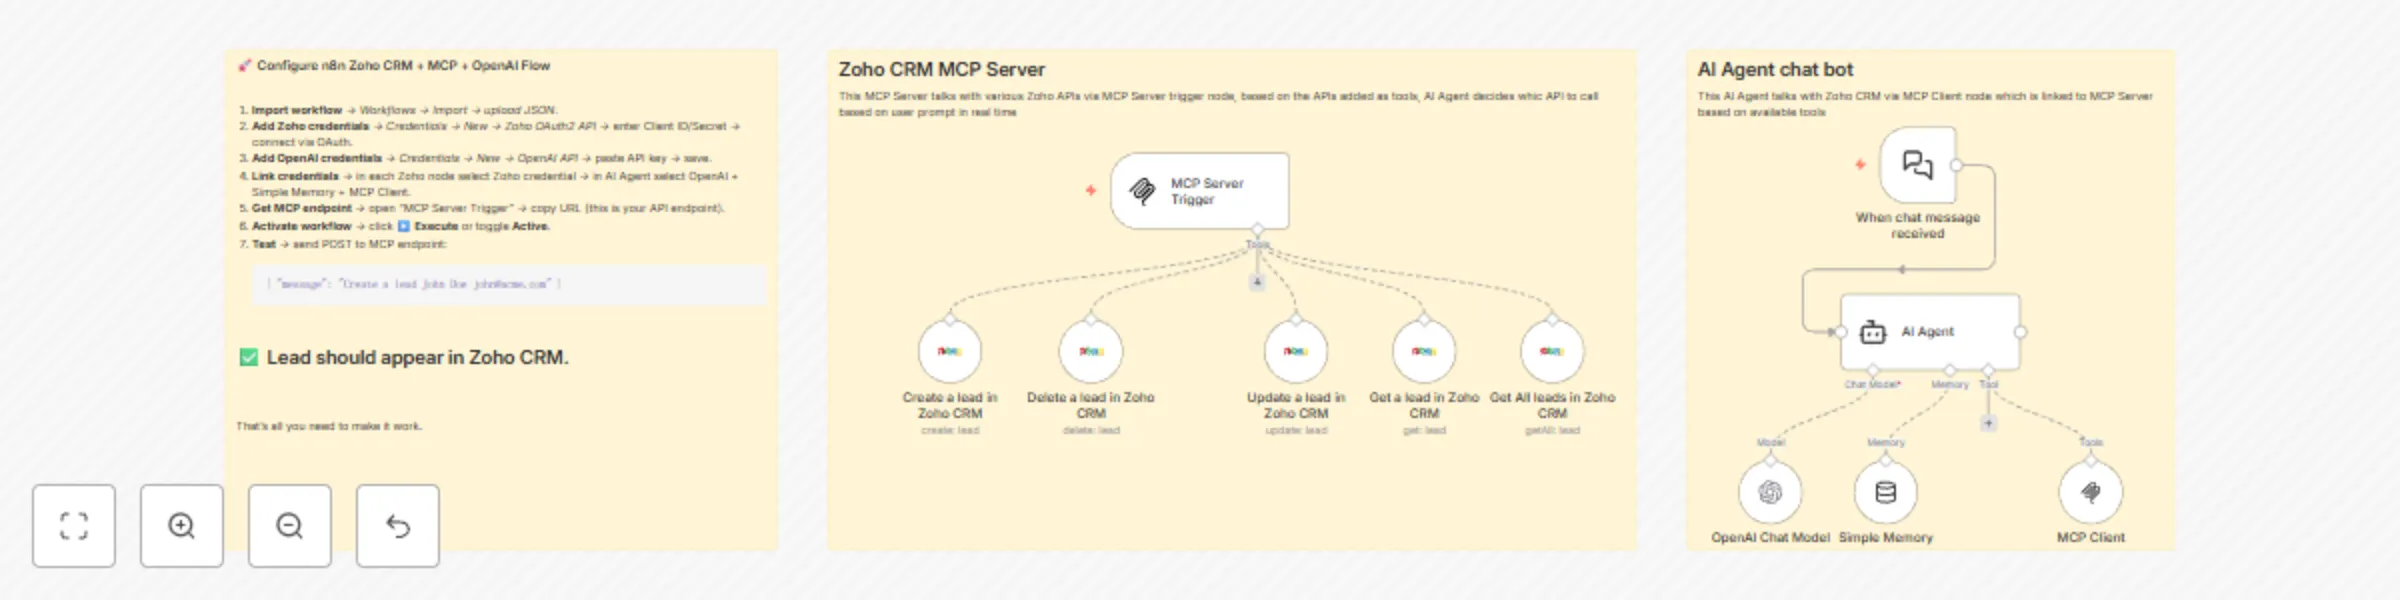
AI-Powered Zoho CRM Lead Management with OpenAI GPT
# 🧩 Zoho CRM MCP Server Integration (n8n Workflow) ## 🧠 Overview This n8n flow integrates **Zoho CRM** with an **MCP (Model Context Protocol) Server** and **OpenAI Chat Model**, enabling AI-driven automation for CRM lead management. It allows an **AI Agent** to **create**, **update**, **delete**, and **fetch leads** in Zoho CRM through natural language instructions. --- ## ▶️ Demo Video Watch the full demo here: 👉 [YouTube Demo Video](https://youtu.be/BnZCTfnXxS0) --- ### ⚙️ Core Components | Component | Purpose | | ---------------------- | -------------------------------------------------------------------------------------------------- | | **MCP Server Trigger** | Acts as the entry point for requests sent to the MCP Server (external systems or chat interfaces). | | **Zoho CRM Nodes** | Handle CRUD operations for leads (`create`, `update`, `delete`, `get`, `getAll`). | | **AI Agent** | Uses the OpenAI Chat Model and Memory to interpret and respond to incoming chat messages. | | **OpenAI Chat Model** | Provides the LLM (Large Language Model) intelligence for the AI Agent. | | **Simple Memory** | Stores short-term memory context for chat continuity. | | **MCP Client** | Bridges communication between the AI Agent and the MCP Server for bi-directional message handling. | --- ## 🧭 Flow Description ### 1. **Left Section (MCP Server + Zoho CRM Integration)** * **Trigger:** `MCP Server Trigger` — receives API requests or chat events. * **Zoho CRM Actions:** * 🟢 `Create a lead in Zoho CRM` * 🔵 `Update a lead in Zoho CRM` * 🟣 `Get a lead in Zoho CRM` * 🟠 `Get all leads in Zoho CRM` * 🔴 `Delete a lead in Zoho CRM` Each of these nodes connects to the **Zoho CRM credentials** and performs the respective operation on Zoho CRM’s “Leads” module. --- ### 2. **Right Section (AI Agent + Chat Flow)** * **Trigger:** `When chat message received` — initiates flow when a message is received. * **AI Agent Node:** Uses: * `OpenAI Chat Model` → for natural language understanding and generation. * `Simple Memory` → to maintain context between interactions. * `MCP Client` → to call MCP actions (which include Zoho CRM operations). This creates a conversational interface allowing users to type things like: > “Add a new lead named John Doe with email [[email protected]](mailto:[email protected])” The AI agent interprets this and routes the request to the proper Zoho CRM action node automatically. --- ## ⚙️ Step-by-Step Configuration Guide ### 🧩 1. Import the Flow 1. In n8n, go to **Workflows → Import**. 2. Upload the JSON file of this workflow (or paste the JSON code). 3. Once imported, you’ll see the structure as in the image. --- ### 🔐 2. Configure Zoho CRM Credentials You must connect Zoho CRM API to n8n. 1. Go to **Credentials → New → Zoho OAuth2 API**. 2. Follow Zoho’s [official n8n documentation](https://docs.n8n.io/integrations/builtin/credentials/zoho/). 3. Provide the following: * **Environment:** `Production` * **Data Center:** e.g., `zoho.in` or `zoho.com` depending on your region * **Client ID** and **Client Secret** — from Zoho API Console ([https://api-console.zoho.com/](https://api-console.zoho.com/)) * **Scope:** ``` ZohoCRM.modules.leads.ALL ``` * **Redirect URL:** Use the callback URL shown in n8n (copy it before saving credentials) 4. Click **Connect** and complete the OAuth consent. ✅ Once authenticated, all Zoho CRM nodes (Create, Update, Delete, etc.) will be ready. --- ### 🔑 3. Configure OpenAI API Key 1. In n8n, go to **Credentials → New → OpenAI API**. 2. Enter: * **API Key:** from [https://platform.openai.com/account/api-keys](https://platform.openai.com/account/api-keys) 3. Save credentials. 4. In the **AI Agent node**, select this OpenAI credential under **Model**. --- ### 🧠 4. Configure the AI Agent 1. Open the **AI Agent node**. 2. Choose: * **Chat Model:** Select your configured **OpenAI Chat Model**. * **Memory:** Select **Simple Memory**. * **Tools:** Add **MCP Client** as the tool. 3. Configure AI instructions (System Prompt) — for example: ``` You are an AI assistant that helps manage leads in Zoho CRM. When the user asks to create, update, or delete a lead, use the appropriate tool. Provide confirmations in natural language. ``` --- ### 🧩 5. Configure MCP Server #### A. **MCP Server Trigger** 1. Open the **MCP Server Trigger node**. 2. Note down the endpoint URL — this acts as the API entry point for external requests. 3. It listens for incoming POST requests from your MCP client or chat interface. #### B. **MCP Client Node** 1. In the **AI Agent**, link the MCP Client node. 2. Configure it to send requests back to your MCP Server endpoint (for 2-way communication). > 🔄 This enables a continuous conversation loop between external clients and the AI-powered CRM automation system. --- ### 🧪 6. Test the Flow Once everything is connected: 1. Activate the workflow. 2. From your chat interface or Postman, send a message to the MCP Server endpoint: ```json { "message": "Create a new lead named Alice Johnson with email [email protected]" } ``` 3. Observe: * The **AI Agent** interprets the intent. * Calls **Zoho CRM Create Lead** node. * Returns a success message with lead ID. --- ## 🧰 Example Use Cases | User Query | Action Triggered | | ------------------------------------------------- | ----------------------- | | “Add John as a lead with phone number 9876543210” | Create lead in Zoho CRM | | “Update John’s company to Acme Inc.” | Update lead in Zoho CRM | | “Show me all leads from last week” | Get All Leads | | “Delete lead John Doe” | Delete lead | --- ## 🧱 Tech Stack Summary | Layer | Technology | | ---------------------- | ---------------------------- | | Automation Engine | n8n | | AI Layer | OpenAI GPT Chat Model | | CRM | Zoho CRM | | Communication Protocol | MCP (Model Context Protocol) | | Memory | Simple Memory | | Trigger | HTTP-based MCP Server | --- ## ✅ Best Practices * 🔄 **Refresh Tokens Regularly** — Zoho tokens expire; ensure auto-refresh setup. * 🧹 **Use Environment Variables** for API keys instead of hardcoding. * 🧠 **Fine-tune System Prompts** for better AI understanding. * 📊 **Enable Logging** for request/response tracking. * 🔐 **Restrict MCP Server Access** with an API key or JWT token. ---
Manage Odoo CRM with natural language using OpenAI and MCP Server
# Odoo CRM MCP Server Workflow ## 📖 Overview This workflow connects an **AI Agent** with **Odoo CRM** using the **Model Context Protocol (MCP)**. It allows users to manage CRM data in Odoo through natural language chat commands. The assistant interprets the user’s request, selects the appropriate Odoo action, and executes it seamlessly. ### 🔹 Key Features - **Contacts Management**: Create, update, delete, and retrieve contacts. - **Opportunities Management**: Create, update, delete, and retrieve opportunities. - **Notes Management**: Create, update, delete, and retrieve notes. - **Conversational AI Agent**: Understands natural language and maps requests to Odoo actions. - **Model Used**: OpenAI Chat Model. This makes it easy for end-users to interact with Odoo CRM without needing technical commands—just plain language instructions. --- ## ▶️ Demo Video Watch the full demo here: 👉 [YouTube Demo Video](https://youtu.be/jQAexlhzH8c) --- ## ⚙️ Setup Guide Follow these steps to set up and run the workflow: ### 1. Prerequisites - An **Odoo instance** configured with CRM enabled. - An **n8n** or **automation platform** account where MCP workflows are supported. - An **OpenAI API key** with access to GPT models. - MCP Server installed and running. ### 2. Import the Workflow 1. Download the provided workflow JSON file. 2. In your automation platform (n8n, Langflow, or other MCP-enabled tool), choose **Import Workflow**. 3. Select the JSON file and confirm. ### 3. Configure MCP Server 1. Go to your **MCP Server Trigger node** in the workflow. 2. Configure it to connect with your Odoo instance. - Set API endpoint. - Provide **authentication credentials** (API key). 3. Test the connection to ensure the MCP server can reach Odoo. ### 4. Configure the OpenAI Model 1. Select the **OpenAI Chat Model node** in the workflow. 2. Enter your **OpenAI API Key**. 3. Choose the model (e.g., `gpt-5` or `gpt-5-mini`). ### 5. AI Agent Setup - The **AI Agent node** links the Chat Model, Memory, and MCP Client. - Ensure the **MCP Client** is mapped to the correct Odoo tools (Contacts, Opportunities, Notes). - The **System Prompt** defines assistant behavior—use the tailored system prompt provided earlier. ### 6. Activate and Test 1. Turn the workflow **ON** (toggle Active). 2. Open chat and type: - "Create a contact named *John Doe* with email [email protected]." - "Show me all opportunities." - "Add a note to *John Doe* saying 'Follow-up scheduled for Friday'." 3. Verify the results in your Odoo CRM. --- ## ✅ Next Steps - Extend functionality with **Tasks, Stages, Companies, and Communication Logs** for a complete CRM experience. - Add **confirmation prompts** for destructive actions (delete contact/opportunity/note). - Customize the AI Agent’s system prompt for your organization’s workflows. ---
Manage Shopify store via conversational OpenAI assistant with SmartCommerce
# Shopify MCP AI Agent Workflow for n8n ## Overview This n8n workflow showcases a full-featured AI-powered assistant connected to a Shopify store through a custom MCP (Multi-Channel Commerce Platform) Server toolkit. It empowers users to automate comprehensive Shopify store management by leveraging AI to interact conversationally with their data and operations. The workflow can create, fetch, search, update, and delete Shopify products and orders, all triggered via simple chat messages, making day-to-day store operations frictionless and highly efficient. Core capabilities include: - Product and order management (CRUD) via chat commands. - Smart retrieval: AI proactively fetches details instead of asking repeated questions. - Contextual memory: AI uses n8n memory to provide context-aware, fluent responses. - End-to-end automation: Connects Shopify, OpenAI, and n8n’s automation logic for seamless workflows. This solution is ideal for Shopify merchants, agencies, and developers aiming to reduce manual overhead and enable conversational, AI-powered commerce automation in their operations. ## 🎬 [Watch Demo Video on YouTube](https://youtu.be/5ZXKNVWXojA) *** ## Step-by-Step Setup Guide Follow these steps to import and configure the Shopify MCP AI Agent workflow in n8n: ### 1. Import the Workflow File - Download the workflow file from this Creator Hub listing. - In your n8n instance, go to Workflows > Import from File and upload the JSON. ### 2. Prepare Shopify Access - Log in to your [Shopify admin](https://shopify.com/admin). - Create a Custom App or use an existing app and retrieve the Admin API Access Token. - Storefront access: Ensure your app has relevant permissions for Products, Orders, Discounts, and Store Settings. ### 3. Set Up Credentials in n8n - In n8n, navigate to Credentials and add a new Shopify API credential using your Access Token. - Name it something memorable (e.g., Shopify Access Token account) to match the credential used in the workflow nodes. ### 4. Configure the MCP Server Connection - Make sure your MCP Server is running and accessible with API endpoints for product/order management. - Update any relevant connection endpoints in the workflow if you run your MCP Server locally or in a different location. ### 5. Connect OpenAI or Other LLM Provider - Provide your API key for OpenAI GPT or a compatible model. - Link the credential to the OpenAI Chat Model node (replace with other providers if required). ### 6. (Optional) Customize for Your Needs - Tweak node logic, add new triggers, or extend memory features as required. - Add, remove, or restrain the AI’s capabilities to fit your operational needs. - Configure chat triggers for more personalized workflows. ### 7. Testing - Use the “When chat message received” trigger or send http requests to the workflow’s endpoint. - Example: “Create an order for Jane Doe, 3 Black T-shirts” or “Show today’s fulfilled orders”. - The workflow and AI Agent will handle context, fetch/store data, and reply accordingly. ### 8. Ready to Automate! - Begin leveraging conversational automation to manage your Shopify store. - For additional tips, consult the workflow’s internal documentation and n8n’s official guides. *** ## Additional Notes - This template includes all core Shopify product and order operations. - The AI agent auto-resolves context, making routine admin tasks simple and quick. - Extend or fork the workflow to suit niche scenarios—discounts, analytics, and more. - Visual thumbnail and schematic are included for easy reference. ***
Jira project management automation with Google Gemini & MCP server
# Jira MCP Server Integration with n8n ## Overview Transform your Jira project management with the power of AI and automation! This n8n workflow template demonstrates how to create a seamless integration between chat interfaces, AI processing, and Jira Software using MCP (Model Context Protocol) server architecture. ### What This Workflow Does - **Chat-Driven Automation**: Trigger Jira operations through simple chat messages - **AI-Powered Issue Creation**: Automatically generate detailed Jira issues with descriptions and acceptance criteria - **Complete Jira Management**: Get issue status, changelogs, comments, and perform full CRUD operations - **Memory Integration**: Maintain context across conversations for smarter automations - **Zero Manual Entry**: Eliminate repetitive data entry and human errors ### Key Features ✅ **Natural Language Processing**: Use Google Gemini to understand and process chat requests ✅ **MCP Server Integration**: Secure, efficient communication with Jira APIs ✅ **Comprehensive Jira Operations**: Create, read, update, delete issues and comments ✅ **Smart Memory**: Context-aware conversations for better automation ✅ **Multi-Action Workflow**: Handle multiple Jira operations from a single trigger ## Demo Video 🎥 **Watch the Complete Demo**: [Automate Jira Issue Creation with n8n & AI | MCP Server Integration](https://youtu.be/mMHDlwTS9Cs?si=GCqC5A-Xbzy45-uZ) ## Prerequisites Before setting up this workflow, ensure you have: - **n8n instance** (cloud or self-hosted) - **Jira Software** account with appropriate permissions - **Google Gemini API** credentials - **MCP Server** configured and accessible - Basic understanding of n8n workflows ## Setup Guide ### Step 1: Import the Workflow 1. Copy the workflow JSON from this template 2. In your n8n instance, click **Import** > **From Text** 3. Paste the JSON and click **Import** ### Step 2: Configure Google Gemini 1. Open the **Google Gemini Chat Model** node 2. Add your Google Gemini API credentials 3. Configure the model parameters: - Model: `gemini-pro` (recommended) - Temperature: `0.7` for balanced creativity - Max tokens: As per your requirements ### Step 3: Set Up MCP Server Connection 1. Configure the **MCP Client** node: - Server URL: Your MCP server endpoint - Authentication: Add required credentials - Timeout: Set appropriate timeout values 2. Ensure your MCP server supports Jira operations: - Issue creation and retrieval - Comment management - Status updates - Changelog access ### Step 4: Configure Jira Integration 1. Set up Jira credentials in n8n: - Go to **Credentials** > **Add Credential** - Select **Jira Software API** - Add your Jira instance URL, email, and API token 2. Configure each Jira node: - **Get Issue Status**: Set project key and filters - **Create Issue**: Define issue type and required fields - **Manage Comments**: Set permissions and content rules ### Step 5: Memory Configuration 1. Configure the **Simple Memory** node: - Set memory key for conversation context - Define memory retention duration - Configure memory scope (user/session level) ### Step 6: Chat Trigger Setup 1. Configure the **When Chat Message Received** trigger: - Set up webhook URL or chat platform integration - Define message filters if needed - Test the trigger with sample messages ## Usage Examples ### Creating a Jira Issue **Chat Input:** ``` Can you create an issue in Jira for Login Page with detailed description and acceptance criteria? ``` **Expected Output:** - New Jira issue created with structured description - Automatically generated acceptance criteria - Proper labeling and categorization ### Getting Issue Status **Chat Input:** ``` What's the status of issue PROJ-123? ``` **Expected Output:** - Current issue status - Last updated information - Assigned user details ### Managing Comments **Chat Input:** ``` Add a comment to issue PROJ-123: "Ready for testing in staging environment" ``` **Expected Output:** - Comment added to specified issue - Notification sent to relevant team members ## Customization Options ### Extending Jira Operations - Add more Jira operations (transitions, watchers, attachments) - Implement custom field handling - Create multi-project workflows ### AI Enhancement - Fine-tune Gemini prompts for better issue descriptions - Add custom validation rules - Implement approval workflows ### Integration Expansion - Connect to Slack, Discord, or Teams - Add email notifications - Integrate with time tracking tools ## Troubleshooting ### Common Issues **MCP Server Connection Failed** - Verify server URL and credentials - Check network connectivity - Ensure MCP server is running and accessible **Jira API Errors** - Validate Jira credentials and permissions - Check project access rights - Verify issue type and field configurations **AI Response Issues** - Review Gemini API quotas and limits - Adjust prompt engineering for better results - Check model parameters and settings ### Performance Tips - Optimize memory usage for long conversations - Implement rate limiting for API calls - Use error handling and retry mechanisms - Monitor workflow execution times ## Best Practices 1. **Security**: Store all credentials securely using n8n's credential system 2. **Testing**: Test each node individually before running the complete workflow 3. **Monitoring**: Set up alerts for workflow failures and API limits 4. **Documentation**: Keep track of custom configurations and modifications 5. **Backup**: Regular backup of workflow configurations and credentials **Happy Automating!** 🚀 *This workflow template is designed to boost productivity and eliminate manual Jira management tasks. Customize it according to your team's specific needs and processes.*
Automate client invoicing & payments with Stripe, Google Sheets, Drive and Gmail
# Google Sheets → Stripe Payment Automation Workflow ## 📌 Overview This workflow automates the end-to-end process of generating and sending client payment links using **Google Sheets** and **Stripe**. Whenever a new or updated entry is added to the Google Sheet, the workflow will: 1. Fetch client and invoice details. 2. Create a **Stripe Product** and **Price**. 3. Generate a **Stripe Payment Link**. 4. Store the link back in the Google Sheet. 5. Upload a copy of the invoice to **Google Drive**. 6. Send a professional, formatted email with the payment link to the client using **Gmail**. 🔗 **Demo Video:** [Watch on YouTube](https://youtu.be/0tuQSe-b8G0) --- ## ⚡️ Workflow Steps 1. **Trigger** – The workflow is triggered on any update in the **Google Sheet**. 2. **Filter** – Ensures only relevant rows (e.g., `PENDING` invoices) proceed. 3. **Stripe Automation** - Create **Stripe Product** - Create **Stripe Price** - Generate **Stripe Payment Link** 4. **Google Drive** – Store invoice files (if required). 5. **Google Sheets** – Update the sheet with the generated **Stripe Payment Link** and timestamp. 6. **Gmail** – Send a client-facing email with the invoice details and payment link. --- ## 🛠 Setup Guide ### Prerequisites - **n8n account** - **Google Sheets & Google Drive credentials** - **Gmail API credentials** - **Stripe API Key** ### Steps 1. **Clone/Import Workflow** - Import the workflow JSON file into your **n8n** instance. 2. **Configure Google Sheets** - Create a Google Sheet with columns: - `Order ID, Client Name, Client Email, Items Description, Due Date, Amount, Currency, Invoice Status, Invoice Link, Stripe Payment Link, Last Updated` - Connect your **Google Sheets node** to this sheet. 3. **Set Up Stripe** - Obtain your **Stripe Secret Key** from [Stripe Dashboard](https://dashboard.stripe.com/). - Add it in the Stripe nodes for **Product**, **Price**, and **Payment Link** creation. 4. **Google Drive** - Configure to store invoice backups (optional). 5. **Gmail** - Authorize Gmail and set up the **Send Email** node. - Customize the email template with client details and the Stripe link. 6. **Test the Workflow** - Add a sample row in Google Sheets. - Run the workflow manually or update the sheet to trigger automatically. - Verify that the Stripe link is created, updated in the sheet, and emailed to the client. --- ✅ Now your workflow is ready to automatically manage client invoices and payments with **Stripe + Google Sheets + Gmail + Google Drive**.
Manage WooCommerce store with natural language using GPT-4.1 and MCP server
# WooCommerce AI Agent — n8n Workflow (Overview) **Description:** Turn your WooCommerce store into a conversational AI assistant — create products, place orders, run reports and manage coupons using natural language via n8n + an MCP Server. **Key features** - Natural-language commands mapped to WooCommerce actions (products, orders, reports, coupons). - Structured JSON outputs + lightweight mapping to avoid schema errors. - Calls routed through your MCP Server for secure, auditable tool execution. - Minimal user prompts — agent auto-fetches context and asks only when necessary. - Extensible: add new tools or customize prompts/mappings easily. # Demo of the workflow: [Youtube Video](https://youtu.be/HuFGGH29uyQ) # 🚀 Setup Guide: WooCommerce + AI Agent Workflow in n8n ## 1. Prerequisites - Running n8n instance - WooCommerce store with REST API keys - OpenAI API key - MCP server (production URL) --- ## 2. Import Workflow 1. Open n8n dashboard 2. Go to **Workflows → Import** 3. Upload/paste the workflow JSON 4. Save as `WooCommerce AI Agent` --- ## 3. Configure Credentials ### OpenAI - Create new credential → **OpenAI API** - Add your API key → Save & test ### WooCommerce - Create new credential → **WooCommerce API** - Enter Base URL, Consumer Key & Secret → Save & test ### MCP Client - In **MCP Client node**, set **Server URL** to your MCP server production URL - Add authentication if required --- ## 4. Test Workflow 1. Open workflow in editor 2. Run a sample request (e.g., create a test product) 3. Verify product appears in WooCommerce --- ## 5. Activate Workflow - Once tested, click **Activate** in n8n - Workflow is now live 🎉 --- ## 6. Troubleshooting - **Schema errors** → Ensure fields match WooCommerce node requirements - **Connection issues** → Re-check credentials and MCP URL