Rahi Uppal
Workflows by Rahi Uppal
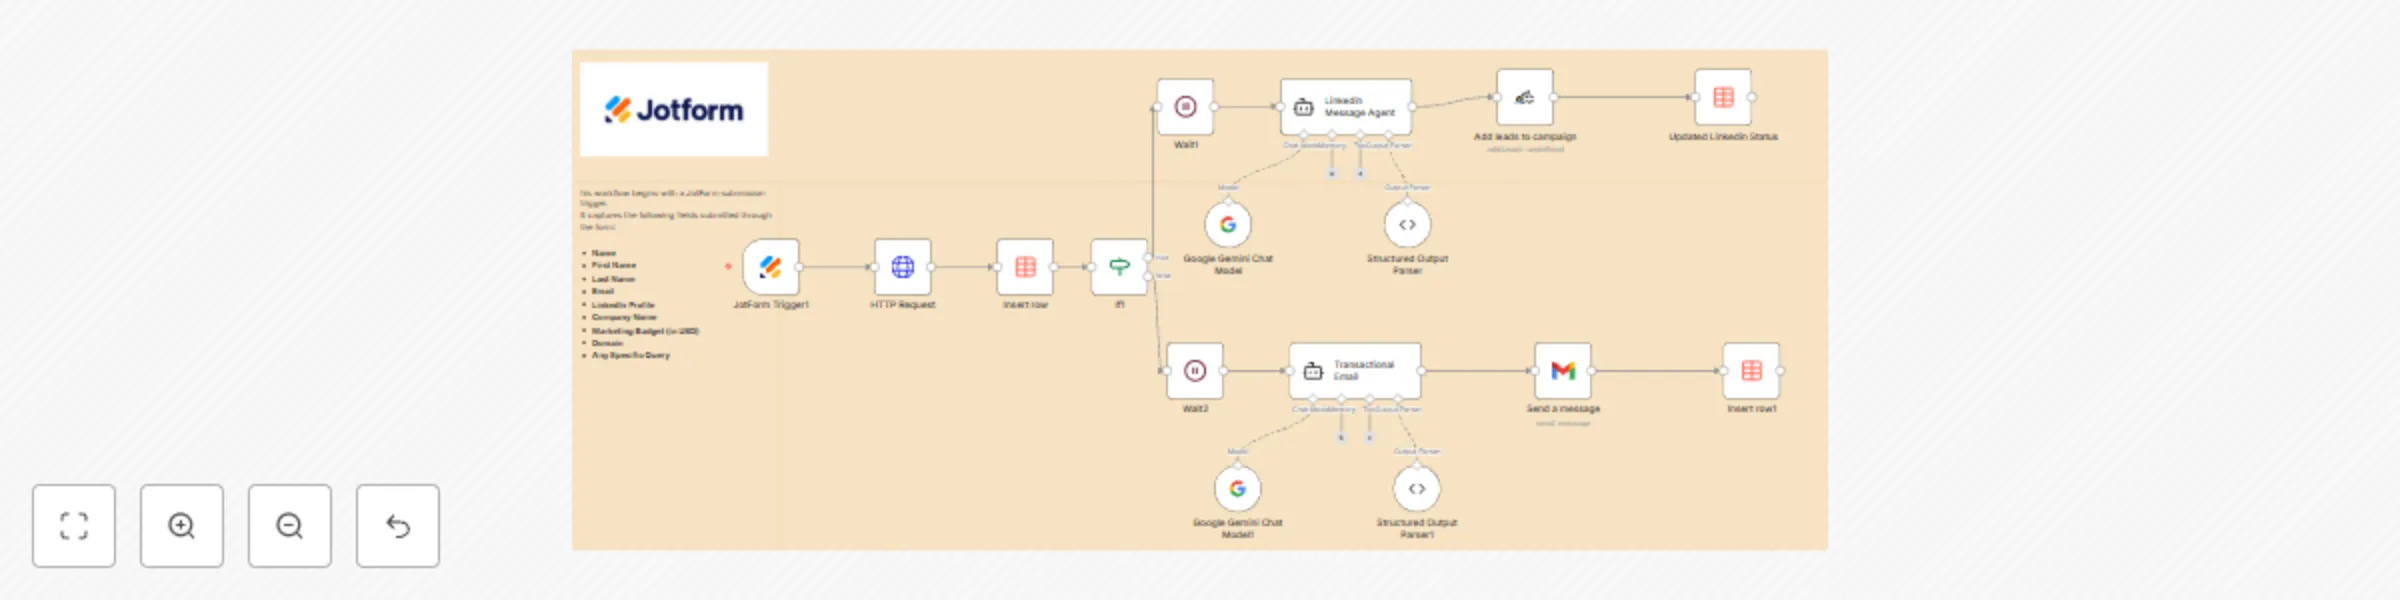
AI-powered multi-channel lead outreach with JotForm, Gemini AI & HeyReach
# 🧠 AI-Powered Outreach Engine (Jotform + Gemini AI + HeyReach + Data Tables) ## 🚀 Overview This workflow turns every **Jotform submission** — whether from your website or a live marketing campaign — into a **fully automated, AI-personalized outreach sequence**. Using **Google Gemini AI**, it instantly generates LinkedIn messages and email content tailored to each lead’s company and context. Depending on the data provided (like LinkedIn profile or email), it automatically routes the message to the right platform — **HeyReach for LinkedIn outreach** or **Gmail for email follow-up** — and logs all activity into **n8n Data Tables** for tracking and visibility. The result? Zero manual copywriting, zero campaign setup, and instant activation of every inbound lead through personalized, human-sounding communication. --- ## ⚙️ What It Does - **Trigger:** Starts when a new submission is received from a Jotform attached to your website or ongoing campaign. - **Lead Enrichment (Optional):** You can add an enrichment node (like Clearbit) to pull company, role, and domain details. - **AI Message Generation:** - Uses **Google Gemini AI (LangChain)** to write both a **LinkedIn outreach message** and a **short, conversational email**. - Each message is context-aware — referencing the company, role, or query captured from the Jotform submission. - **Conditional Routing Logic:** - If the form includes a **LinkedIn URL**, the workflow sends the lead and message to **HeyReach**, adding them to the correct campaign automatically. - If not, it sends the **email variant** via **Gmail**, ensuring no lead is missed. - **Data Tracking:** - All lead details, messages, and campaign statuses are automatically saved into **n8n Data Tables**, creating a single source of truth for your outreach history. - **Result:** Personalized, multi-channel follow-up happens in seconds — turning inbound form leads into active, engaged prospects instantly. --- ## 🧠 Example Use Case Imagine a SaaS or marketing agency running a “Request a Demo” or “Get Pricing” campaign via a Jotform on their website. With this workflow, every time someone fills the form: 1. Their details are captured and stored in **n8n Data Tables**. 2. **Gemini AI** instantly writes a relevant, human-sounding LinkedIn and email message. 3. The lead is automatically added to a **HeyReach campaign** or receives a **Gmail follow-up** if LinkedIn isn’t available. 4. All statuses (message type, delivery, and timing) are tracked in real time. This workflow replaces hours of manual effort with automated, AI-personalized communication that feels natural — not robotic. --- ## 🧩 Ideal For - **B2B SaaS teams** generating inbound leads through website forms - **Agencies** managing multi-channel LinkedIn + email campaigns - **Sales and growth teams** using form submissions for lead capture - **Marketers** running Jotform-based campaigns looking to instantly activate leads --- ## 💡 Key Integrations - **JotForm** → Capture and trigger workflow from form submissions - **Google Gemini AI (LangChain)** → Generate personalized LinkedIn & Email messages - **HeyReach** → Add AI-written messages directly into your LinkedIn campaign - **Gmail** → Send AI-personalized cold emails automatically - **n8n Data Tables** → Store, monitor, and analyze every lead and message generated --- ## 🧠 Workflow Logic | Step | Node | Description | |------|------|-------------| | 1 | **JotForm Trigger** | Captures lead data submitted through your form | | 2 | **HTTP Request (Optional Enrichment)** | Pulls company details from Clearbit or any enrichment API | | 3 | **Insert Row (n8n Data Table)** | Stores raw lead submission for tracking | | 4 | **If Node** | Determines if LinkedIn profile URL is available | | 5 | **Google Gemini AI (LinkedIn Agent)** | Creates personalized LinkedIn message | | 6 | **HeyReach Node** | Adds lead + message to selected campaign | | 7 | **Google Gemini AI (Email Agent)** | Generates personalized HTML email | | 8 | **Gmail Node** | Sends the AI-generated email if no LinkedIn is found | | 9 | **Insert Row (n8n Data Table)** | Logs campaign status, sent message, and timestamps | --- ## 🧾 Example Output (AI Node) ```json { "To": "[email protected]", "Subject": "AI automation ideas for CompanyX 🚀", "Email Type": "LinkedIn or Cold Email", "HTML": "<p>Hey Alex, noticed CompanyX is scaling fast — congrats! 👏</p><p>At Amply, we help growing businesses use <strong>AI-driven automations</strong> to eliminate repetitive ops work and boost team productivity by 30–50%.</p><p>Would it make sense to explore if this could free up your ops bandwidth too?</p>", "Message": "Hey Alex, noticed CompanyX is scaling fast — congrats! 👏 At Amply, we help growing businesses use AI-driven automations to eliminate repetitive ops work and boost team productivity by 30–50%. Would it make sense to explore if this could free up your ops bandwidth too?" }
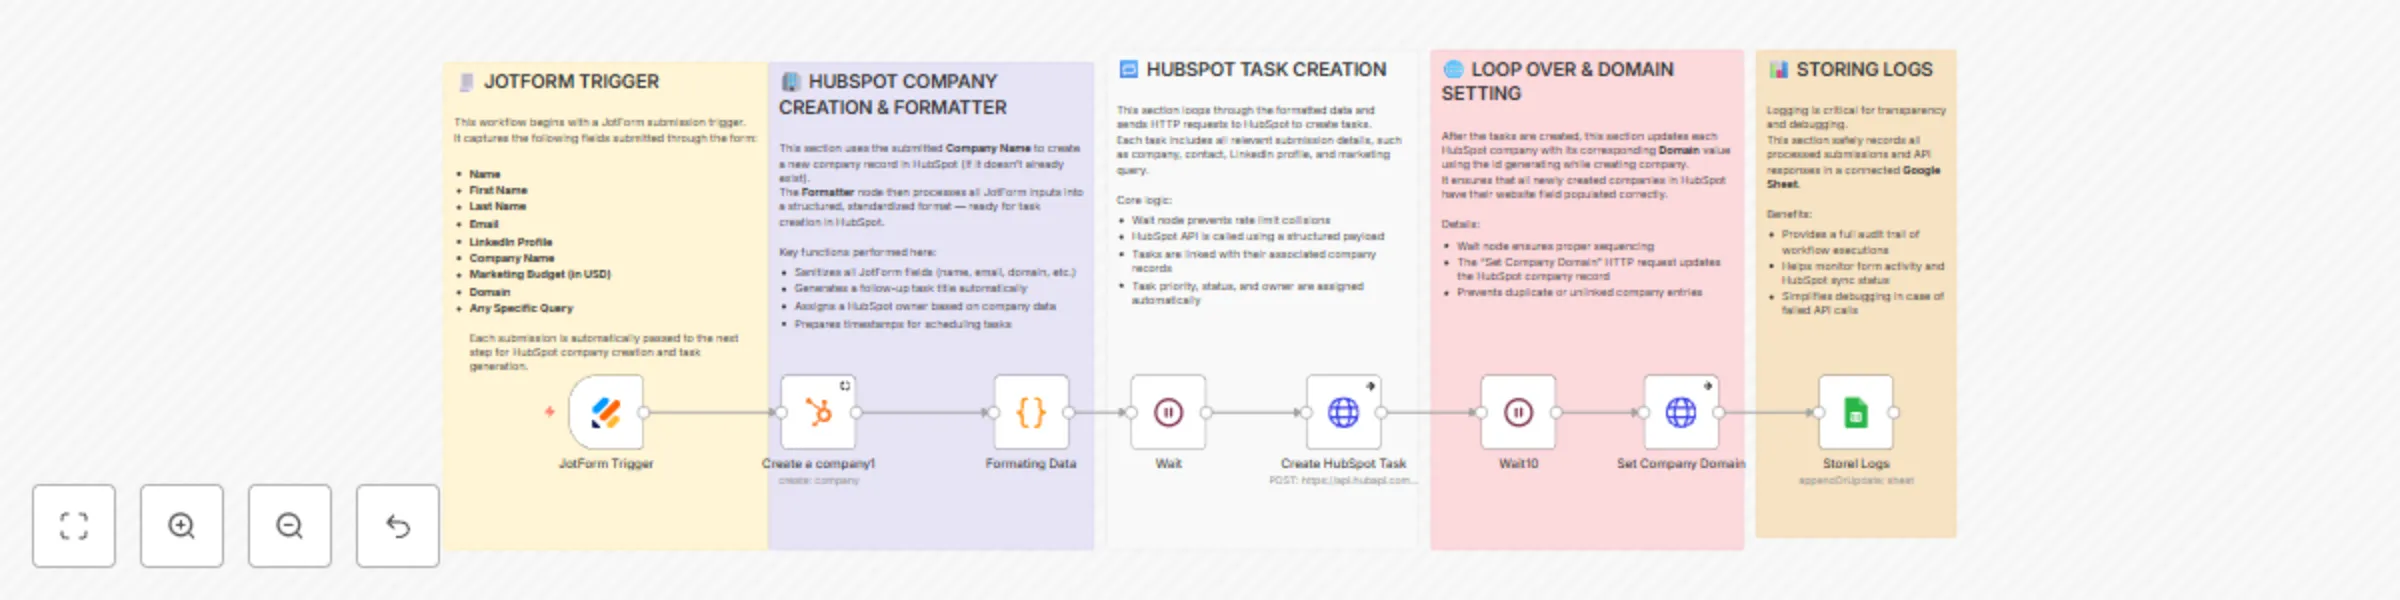
Create HubSpot companies & tasks from Jotform submissions with Google Sheets
# 🛠️ Workflow: Jotform → HubSpot Company + Task Automation Automatically create or update **HubSpot companies** and generate **follow-up tasks** whenever a **Jotform** is submitted. All logs are stored to **Google Sheets** for traceability, transparency, and debugging. --- ## ✅ Use Cases - Capture marketing queries from your website’s **Jotform form** and immediately create tasks for your **sales or SDR team**. - Enrich **HubSpot companies** with submitted domains, company names, and contact data. - Automatically assign tasks to owners and keep all form submissions **logged and auditable**. - Avoid manual handoffs — **full automation** from form submission → CRM. --- ## 🔍 How It Works (Step-by-Step) ### **1. Jotform Trigger** The workflow starts when a new submission is received via the Jotform webhook. Captured fields include: name, email, LinkedIn profile, company name, marketing budget, domain, and any specific query. --- ### **2. Create or Update Company in HubSpot + Format Data** - The **“Create Company”** node ensures the submitted company is either created in HubSpot or updated if it already exists. - A **Formatter (Function)** node standardizes the data — names, email, LinkedIn URL, domain, marketing budget, and query text. - It composes a task title, generates a follow-up timestamp, and dynamically assigns an owner. --- ### **3. Loop & HTTP Request – Create HubSpot Task** - The workflow loops through each formatted item. - A **Wait** node prevents rate limit issues. - It then sends an **HTTP POST** request to HubSpot’s Tasks API, creating a task with: - Subject and body including the submission details - Task status, priority, and type - Assigned owner and associated company --- ### **4. Loop & HTTP Request – Set Company Domain** After tasks are created, another loop updates each HubSpot company record with the submitted **domain**. This ensures all HubSpot companies have proper website data for future enrichment. --- ### **5. Storing Logs (Google Sheets)** All processed submissions, responses, errors, and metadata are appended or updated in a **Google Sheets** document. This provides a complete audit trail — ideal for debugging, reporting, and performance monitoring. --- ## 🧩 Node Structure Overview | Step | Node | Description | |------|------|--------------| | 1️⃣ | **Jotform Trigger** | Receives form submission data | | 2️⃣ | **HubSpot Create Company** | Ensures company record exists | | 3️⃣ | **Formatter / Function Node** | Cleans & structures data, assigns owner, generates task fields | | 4️⃣ | **Wait / Delay Node** | Controls API call frequency | | 5️⃣ | **HTTP Request (Create Task)** | Pushes task to HubSpot | | 6️⃣ | **HTTP Request (Update Domain)** | Updates company domain in HubSpot | | 7️⃣ | **Google Sheets Node** | Logs inputs, outputs, and status | --- ## 📋 Requirements & Setup - 🔑 **HubSpot Private App Token** with permissions to create companies, tasks, and update records - 🌐 **Jotform Webhook URL** pointing to this workflow - 📗 **Google Sheets Credentials** (OAuth or service account) with write access - ✅ HubSpot app must have `crm.objects.companies.write` and `crm.objects.tasks.write` scopes - ⚠️ Add retry or error-handling branches for failed API calls --- ## ⚙️ Customization Tips & Variations - **Add contact association:** Modify the payload to also link the task with a HubSpot Contact (via email) so it appears in both company and contact timelines. - **Use fallback values:** In the Formatter node, provide defaults like “Unknown Company” or “No query provided.” - **Dynamic owner assignment:** Replace hash-based assignment with round-robin or territory logic. - **Conditional task creation:** Add logic to only create tasks when certain conditions are met (e.g., budget > 0). - **Error branches:** Capture failed HTTP responses and send Slack/Email alerts. - **Extended logs:** Add response codes, errors, and retry counts to your Google Sheet for more transparency. --- ## 🎯 Benefits & Why You’d Use This - ⚡ **Speed & Automation** — eliminate manual data entry into HubSpot - 📊 **Data Consistency** — submissions are clean, enriched, and traceable - 👀 **Transparency** — every action logged for full visibility - 🌍 **Scalability** — handle hundreds of submissions effortlessly - 🔄 **Flexibility** — adaptable for other use cases (support tickets, surveys, partnerships, etc.) --- ### ✨ Example Use Case A marketing form on your website captures partnership or franchise inquiries. This workflow instantly creates a HubSpot company, logs the inquiry as a task, assigns it to a regional manager, and saves a record in Google Sheets — all within seconds. --- **Tags:** `HubSpot` `Jotform` `CRM` `GoogleSheets` `Automation` `LeadManagement`
Automated LinkedIn lead enrichment pipeline using Apollo.io & Google Sheets
## LinkedIn to Apollo.io Lead Enrichment System with Google Sheets Automatically capture company and store details from LinkedIn posts, enrich them with domain names and key decision-maker (KDM) data from Apollo.io, and store everything neatly in Google Sheets. This workflow turns LinkedIn post data into a complete, structured lead database — fully automated from detection to enrichment. --- ## 🧾 Summary This workflow reads LinkedIn post data (in JSON format) received via a webhook, extracts company and location information using an AI agent, and progressively enriches the data in three stages: 1. **Find Company Domain** using Apollo.io 2. **Fetch Key Decision Makers (KDMs)** using the company domain 3. **Find Corporate Emails** for those KDMs All results are automatically updated in **Google Sheets**, ensuring your lead list remains fresh, structured, and actionable. --- ## ⚙️ Prerequisites Before running the workflow, make sure you have: - An **Apollo.io API Key** with company and people search access - A connected **Google Sheets** account (OAuth2) - A **Webhook URL or LinkedIn scraper** that feeds JSON-formatted post data - (Optional) An **OpenAI / AI Agent node** to extract company names and store locations from post text --- ## 🧩 Example Input (Webhook JSON) Each LinkedIn post is received as a JSON object containing key clues: ```json { "index": 1, "text": "Excited to announce the opening of our new KFC store at Sky City Mall, Borivali East 🎉🍗\n\nLooking forward to welcoming you all to experience the Finger Lickin’ Good taste at our newest location!\n\n#KFCIndia #NewStoreOpening #Borivali #SkyCityMall #Sapphirefoods", "CompanyName": "MockCompany", "NewStoreLocation": "optional", "PersonPosted": "https://linkedin.com/in/mockperson", "PostImage": null, "PostLink": "https://www.linkedin.com/search/results/all/?keywords=%23kfcindia&origin=HASH_TAG_FROM_FEED", "extracted_at": "2025-09-08T12:05:40.044101" } ``` ## 🧠 Workflow Overview This workflow runs in three main stages, moving from **LinkedIn data → company domain → people → emails**. --- ## **Stage 1: Company Name to Company Domain 🌐** **Goal:** Convert each company name into its website domain using Apollo.io. ### **Nodes & Flow** - **Schedule Trigger** — Runs automatically (e.g., once a week) to check your Google Sheet for companies missing a domain. - **IF Node (Check for Missing Domain)** — Filters only companies without a website. - **Loop Over Items** — Iterates through each company record. - **HTTP Request – Find Domain** — Calls the Apollo.io Company API to find the company’s domain (e.g., `kfc.com`). - **Update Row in Google Sheets** — Writes the found domain back into the corresponding company row. - **Wait Node – Delay Between API Calls** — Adds a small pause to avoid hitting rate limits. --- ## **Stage 2: Domain to Top 10 KDMs 👥** **Goal:** Fetch key decision-makers (KDMs) from each company using Apollo.io. ### **Nodes & Flow** - **Schedule Trigger** — Runs on a weekly cadence to check for companies with a domain but no KDMs. - **Get Rows from Google Sheets** — Pulls company records ready for enrichment. - **IF Node (Check for Missing KDMs)** — Ensures only companies without people data are processed. - **Loop Over Items** — Processes one company at a time. - **HTTP Request – Find KDMs** — Searches Apollo.io People API for top roles such as *Founder, CEO, Head of Retail*, etc. - **Update Row in Google Sheets** — Saves the top 10 names and their LinkedIn profiles into your sheet. - **Wait Node** — Adds a delay to manage rate limits safely. --- ## **Stage 3: KDM Profile to Email Enricher 📧** **Goal:** Find and store verified corporate email addresses for each KDM. ### **Nodes & Flow** - **Schedule Trigger** — Weekly automation trigger. - **Get Rows from Google Sheets** — Pulls KDMs that have LinkedIn profiles but no email yet. - **IF Node (Check for Missing Emails)** — Ensures only valid records are processed. - **Code Node – Prepare Data** — Organizes LinkedIn profile and domain information. - **HTTP Request – Find Email** — Queries Apollo.io’s email enrichment endpoint using the LinkedIn URL and domain. - **Code Node – Format Response** — Cleans and formats the email result. - **Wait Node** — Adds delay to avoid request bursts. - **Update Row in Google Sheets** — Writes the verified email address back to the corresponding KDM entry and marks it as “Updated – email search.” 🎉 --- ## 🧰 Setup Instructions ### **1. Connect APIs & Credentials** - Add your **Apollo.io API Key** under HTTP Request credentials. - Connect your **Google Sheets** account (OAuth2). ### **2. Customize Sheet Structure** Add columns for: `CompanyName`, `Domain`, `KDMs`, `LinkedInProfile`, `Email`, `Status` ### **3. Set Schedule Frequency** Each **Schedule Trigger** can be configured separately (e.g., Stage 1 every Monday, Stage 2 every Wednesday). ### **4. Optional: AI Extraction Node** Use an AI model (like OpenAI or Gemini) to extract **company name and location** from LinkedIn post text before enrichment. --- ## 🧰 Custom Node Names (Recommended for Clarity) | Node Type | Recommended Name | Description | |------------|------------------|-------------| | HTTP Request (Company) | **Find Company Domain (Apollo.io)** | Searches for the company’s official domain | | HTTP Request (People) | **Find Key Decision Makers (Apollo.io)** | Retrieves top company contacts | | HTTP Request (Emails) | **Find Corporate Emails (Apollo.io)** | Gets verified email addresses for each contact | | Wait Node | **API Delay (Rate Limit Buffer)** | Adds delay to avoid hitting API rate limits | | Code Node | **Prepare KDM Data** | Organizes input data for API calls | --- ## ⚙️ Customization Tips - **Multiple Campaigns:** Duplicate the workflow for different industries or store categories, updating parameters as needed. - **Batch Size:** Adjust API request limits (e.g., 100 per batch) based on your Apollo.io plan. - **Filtering:** Add IF conditions to skip records already marked as “Completed.” - **Dashboards:** Build visual analytics directly in Google Sheets or connect to **Looker Studio**. - **Enrichment:** Combine with CRM systems (like **HubSpot** or **Close**) using company domain or lead email as the linking key. --- ## 🔐 Security and Publishing Notes - 🔒 **Never hardcode API keys** in workflow exports. Use **n8n credentials** or environment variables instead. - 🚫 Replace sensitive values (like API keys or Sheet IDs) with placeholders before sharing. - 🔐 Keep your **Google Sheet** private unless intentionally shared. --- ## 🧩 Troubleshooting - **No Data in Sheets:** Check API response for `data[]` and verify Split Out configuration. - **Duplicate Rows:** Ensure the “Matching Column” in Google Sheets is correctly set (e.g., `CompanyName` or `LinkedInProfile`). - **Rate Limits:** Add **Wait Nodes** or reduce batch size. - **Mapping Errors:** Confirm Google Sheet headers exactly match node field mappings. - **Timezone Adjustments:** Apollo.io timestamps are in UTC — convert to local time if needed. --- ## 🎯 Example Use Case Every week, this workflow scans new **LinkedIn store-opening posts**. It extracts company names (like *KFC India*), finds their domains and top executives through **Apollo.io**, retrieves their emails, and logs everything in a **Google Sheet** — ready for your sales team to reach out. --- **Tags:** `LinkedIn` `Apollo` `Automation` `LeadGeneration` `GoogleSheets` `MarketingOps` `DataEnrichment`
Personalized cold email generator with Supabase, Smartlead & Google Gemini AI
# n8n Workflow: AI-Personalized Email Outreach (Smartlead) ## 🔄 Purpose This workflow **automates cold email campaigns** by: - Fetching leads - Generating hyper-personalized email content using AI - Sending emails via Smartlead API - Logging campaign activity into Google Sheets --- ## 🧩 Workflow Structure 1. **Schedule Trigger** - Starts the workflow automatically at scheduled intervals. - Ensures continuous campaign execution. 2. **Get Leads** - Fetches lead data (name, email, company, role, industry). - Serves as the input for personalization. 3. **Loop Over Leads** - Processes each lead one by one. - Maintains individualized email generation. 4. **Aggregate Lead Data** - Collects and formats lead attributes. - Prepares structured input for the AI model. 5. **Basic LLM Chain #1** - Generates **personalized snippets/openers** using AI. - Tailored based on company, role, and industry. 6. **Update Row (Google Sheets)** - Saves AI outputs (snippets) for tracking and QA. 7. **Basic LLM Chain #2** - Expands snippet into a **full personalized email draft**. - Includes subject line + email body. 8. **Information Extractor** - Extracts structured fields from AI output: - Subject - Greeting - Call-to-Action (CTA) - Closing 9. **Update Row (Google Sheets)** - Stores finalized draft in Google Sheets. - Provides visibility and audit trail. 10. **Code** - Formats email into Smartlead-compatible payload. - Maps fields like subject, body, and recipient details. 11. **Smartlead API Request** - Sends the personalized email through Smartlead. - Returns message ID and delivery status. 12. **Basic LLM Chain #3 (Optional)** - Generates **follow-up versions** for multi-step campaigns. - Ensures varied engagement over time. 13. **Information Extractor (Follow-ups)** - Structures follow-up emails into ready-to-send format. 14. **Update Row (Google Sheets)** - Updates campaign logs with: - Smartlead send status - Message IDs - AI personalization notes --- ## ⚙️ Data Flow Summary - **Trigger** → Runs workflow - **Get Leads** → Fetch lead records - **LLM Personalization** → Create openers + full emails - **Google Sheets** → Save drafts & logs - **Smartlead API** → Send personalized email - **Follow-ups** → Generate and log structured follow-up messages --- ## 📊 Use Case - Automates **hyper-personalized cold email outreach** at scale. - Uses AI to improve response rates with contextual personalization. - Provides full visibility by saving drafts and send logs in Google Sheets. - Integrates seamlessly with Smartlead for sending and tracking.
Automated WhatsApp lead nurturing with personalized messages via Postgres & Gallabox
# n8n Workflow: WhatsApp Lead Nurturing (MQL) ## 🔄 Purpose This workflow **fetches unqualified leads** from Postgres at defined retry intervals, sends **personalized WhatsApp template messages** via Gallabox API, and **logs message activity** while updating lead status in the database. --- ## 🧩 Workflow Structure 1. **Schedule Trigger** - Type: `n8n-nodes-base.scheduleTrigger` - Runs the workflow automatically at set intervals (seconds-based). - Entry point of the workflow. 2. **Execute a SQL query** - Type: `n8n-nodes-base.postgres` - Fetches leads from `mql_contacts` that: - Have `count` = 0, 1, 2, or 3. - Respect time delays: - `count=1` → after 3 minutes - `count=2` → after 5 minutes - `count=3` → after 8 minutes - Must have `disposition = unqualified`. 3. **Loop Over Items4** - Type: `n8n-nodes-base.splitInBatches` - Iterates over each lead individually. - Ensures one-by-one processing. 4. **Code1** - Type: `n8n-nodes-base.code` - Selects message content based on: - Lead’s **model** (`nexus`, `magnus`, `reo`, `general`). - Current **count** (0–3). - Ensures personalized, varied message text. 5. **new_lead_4** - Type: `n8n-nodes-base.httpRequest` - Sends WhatsApp template message through Gallabox API. - Dynamic fields: - Lead’s **name** and **phone**. - **Message details** selected from Code1. - Quick reply buttons: *Show Brochure*, *Get Showroom Location*, *Not Interested*. 6. **Insert rows in a table4** - Type: `n8n-nodes-base.postgres` - Inserts a record into `mql_logs`. - Captures: - Phone, name, disposition. - Message count, message_id, timestamps. - Gallabox API response (status, code). 7. **Update rows in a table4** - Type: `n8n-nodes-base.postgres` - Updates `mql_contacts`: - Increments **count** by 1. - Updates **last_message_sent** timestamp. - Matches using phone number. 8. **Sticky Notes** - Provide inline documentation: - SQL query purpose. - Message matrix explanation. - Gallabox API role. - Postgres update/logging details. --- ## ⚙️ Data Flow Summary - **Trigger** → Runs every X seconds - **SQL Query** → Fetches eligible leads (unqualified, retry intervals) - **Loop** → Processes each lead sequentially - **Code1** → Chooses personalized message based on model & count - **HTTP Request** → Sends WhatsApp template via Gallabox - **Insert Log** → Stores activity in `mql_logs` - **Update Contact** → Updates count & last sent in `mql_contacts` - **Cycle repeats** until all leads are processed --- ## 📊 Use Case - Automates **WhatsApp drip campaigns** for unqualified leads. - Respects retry intervals to avoid spamming. - Uses **personalized message variations** based on product model & retry count. - Provides full traceability with logs and lead updates.
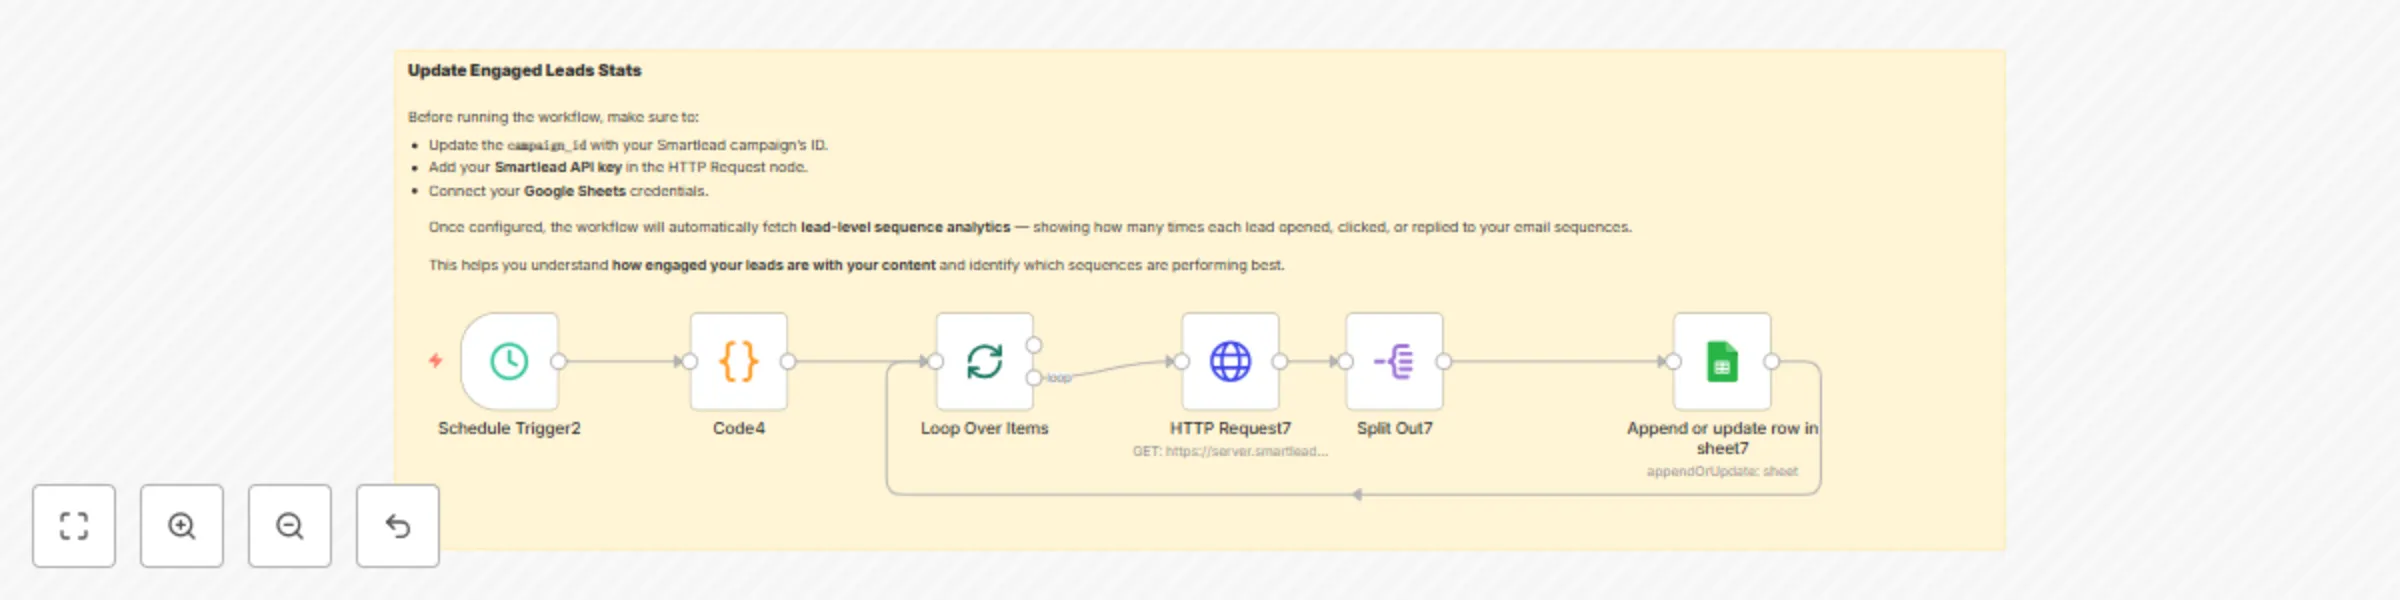
Tracking cold email engagement metrics using Smartlead and Google Sheets
## Workflow: Track Email Campaign Engagement Analytics with Smartlead and Google Sheets Automatically fetch **lead-level email engagement analytics** (opens, clicks, replies, unsubscribes, bounces) from **Smartlead** and update them in **Google Sheets**. Use this to keep a single, always-fresh source of truth for campaign performance and sequence effectiveness. --- ## Summary Pull Smartlead campaign analytics on a schedule and write them to a Google Sheet (append or update). Works with pagination, avoids duplicates via a stable key, and is ready for dashboards, pivots, or BI tools. --- ## What This Workflow Does - Collects campaign stats from Smartlead (per-lead, per-sequence). - Handles pagination safely (offset/limit). - Writes to Google Sheets using **appendOrUpdate** with a **matching column** to prevent duplicates. - Can run on a schedule for near real-time analytics. --- ## Node Structure Overview | Step | Node | Purpose | |---|---|---| | 1️⃣ | Schedule Trigger | Starts the workflow on a cadence (e.g., hourly) | | 2️⃣ | Code (Pagination Generator) | Emits `{offset, limit}` pairs (e.g., 0..9900, step 100) | | 3️⃣ | Split in Batches | Sends each pagination pair to the API sequentially | | 4️⃣ | HTTP Request (Smartlead) | `GET /campaigns/{campaign_id}/statistics` with `offset/limit` | | 5️⃣ | Split Out | Turns the API `data[]` array into one item per lead record | | 6️⃣ | Google Sheets (appendOrUpdate) | Upserts rows by `stats_id` into `EngagedLeads` tab | | 7️⃣ | Loop Back | Continues until all batches have been processed | --- ## Step-by-Step Setup 1. **Prerequisites** - Smartlead account + **API key** with access to campaign statistics. - Google account + **Google Sheets OAuth** connected in n8n. 2. **Create the Google Sheet** - Spreadsheet name: **Email Analytics** (can be anything). - Tab name: **EngagedLeads**. - Add these exact headers (first row): ``` lead_name, lead_email, lead_category, sequence_number, stats_id, email_subject, sent_time, open_time, click_time, reply_time, open_count, click_count, is_unsubscribed, is_bounced ``` 3. **Configure the Schedule Trigger** - Choose a frequency (e.g., every 2 hours). - If you’re testing, set a single run or a short cadence. 4. **Configure the Code Node (Pagination)** - Emit N items like: ```json { "offset": 0, "limit": 100 } { "offset": 100, "limit": 100 } ... ``` - 100 is a good default `limit`. For up to 10,000 records, generate 100 offsets. 5. **Configure the Smartlead API Node** - Method: **GET** - URL: ``` https://server.smartlead.ai/api/v1/campaigns/{campaign_id}/statistics ``` - Query parameters: - `api_key` = `<YOUR_SMARTLEAD_API_KEY>` - `offset` = `{{ $json.offset }}` - `limit` = `{{ $json.limit }}` - Map response to JSON. 6. **Split Out the Response** - Use a Split Out (or similar) to iterate over `data[]` so each lead record is one item. 7. **Google Sheets Node (Append or Update)** - Operation: **appendOrUpdate**. - Document: Your **Email Analytics** sheet. - Sheet/Tab: **EngagedLeads**. - **Matching Column:** `stats_id`. - Map fields from Smartlead response to sheet columns: - `lead_name` ← lead name (or composed from first/last if provided) - `lead_email` ← email - `lead_category` ← category/type if available - `sequence_number` ← sequence step number - `stats_id` ← stable identifier (e.g., Smartlead `stats_id` or message id) - `email_subject` ← subject - `sent_time`, `open_time`, `click_time`, `reply_time` ← timestamps - `open_count`, `click_count` ← integers - `is_unsubscribed`, `is_bounced` ← booleans - If the same `stats_id` arrives again, the row is **updated**, not appended. 8. **Test and Activate** - Run once manually to verify API and sheet mapping. - Check the sheet for new/updated rows. - Activate the workflow to run automatically. --- ## Smartlead API Reference (Used by This Workflow) - **Endpoint** GET https://server.smartlead.ai/api/v1/campaigns/{campaign_id}/statistics - **Required query parameters** - `api_key` (string) - `offset` (number) - `limit` (number) - **Typical response (trimmed example)** ```json { "data": [ { "lead_name": "Jane Doe", "lead_email": "[email protected]", "sequence_number": 2, "stats_id": "15b6ff3a-...-b2b9f343c2e1", "email_subject": "Quick intro", "sent_time": "2025-10-08T10:18:55.496Z", "open_time": "2025-10-08T10:20:10.000Z", "click_time": null, "reply_time": null, "open_count": 1, "click_count": 0, "is_unsubscribed": false, "is_bounced": false } ], "total": 1234 } ``` ## Google Sheets Structure (Recommended) **Spreadsheet**: `Email Analytics` **Tab**: `EngagedLeads` **Columns**:`lead_name`, `lead_email`, `lead_category`, `sequence_number`, `stats_id`, `email_subject`, `sent_time`, `open_time`, `click_time`, `reply_time`, `open_count`, `click_count`, `is_unsubscribed`, `is_bounced` **Matching Column**: `stats_id` (prevents duplicates and allows updates) ## Customization Tips - **Multiple Campaigns** Duplicate the workflow and set a different `{campaign_id}` and/or write results to a separate tab in your Google Sheet. - **Batch Size** Increase or decrease the `limit` value (e.g., `200`) in your Code node if you want fewer or more API calls. - **Filtering** Add a **Code** or **IF** node to skip rows where `is_bounced = true` or `is_unsubscribed = true`. - **Dashboards** Create a new tab named **Dashboard** in Google Sheets and visualize your data using built-in charts or connect it to **Looker Studio** for advanced visualization. - **Enrichment** Join this dataset with your **CRM data** (e.g., HubSpot or Salesforce) using `lead_email` as a key to gain deeper customer insights. --- ## Security and Publishing Notes - **Do not hardcode** your Smartlead API key in the workflow export. Use **n8n credentials** or **environment variables** instead. - When sharing the template publicly, replace sensitive values with placeholders like: `<YOUR_SMARTLEAD_API_KEY>` and `<YOUR_GOOGLE_SHEET_ID>`. - Keep your **Google Sheet private** unless you intentionally want to share it publicly. --- ## Troubleshooting - **No rows in Sheets** Verify that the API response includes `data[]`, confirm that the **Split Out** node is configured correctly, and check field mappings. - **Duplicates** Ensure the **Google Sheets node** has its **matching column** set to `stats_id`. - **Rate Limits** Increase the schedule interval, add a short **Wait** node between batches, or reduce the `limit` size. - **Mapping Errors** Ensure that column names in Sheets exactly match your field mappings — they are **case-sensitive**. - **Timezone Differences** Smartlead timestamps are in **UTC**. Convert them downstream if your local timezone is different. --- ## Example Use Case Run this workflow **hourly** to maintain a live, company-wide **Email Engagement Sheet**. - **Sales teams** can monitor replies and active leads. - **Marketing teams** can track open and click rates by sequence. - **Operations** can export monthly summaries — no Smartlead login required. --- ## Tags `Smartlead` `EmailMarketing` `Automation` `GoogleSheets` `Analytics` `CRM` `MarketingOps`
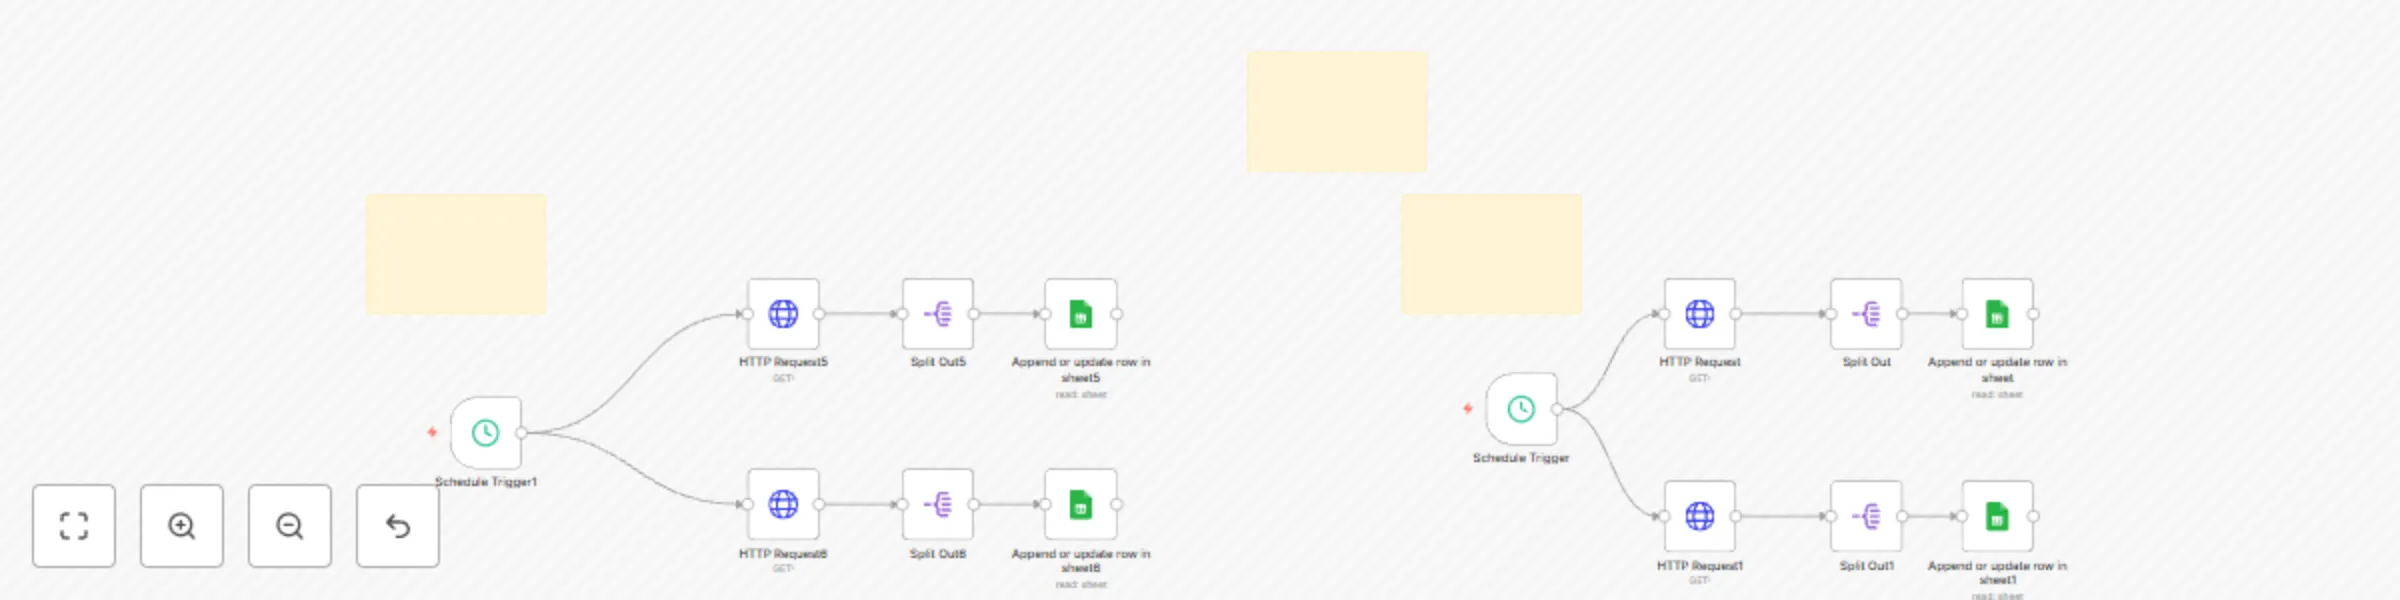
Smartlead email campaign analytics dashboard with Google Sheets integration
**Workflow 1: Domain and Email Health 🩺** This part of the workflow is triggered every 5 hours by the Schedule Trigger1 node. Its purpose is to pull health metrics for both email domains and individual email addresses. How it Works: ++Schedule Trigger:++ The Schedule Trigger1 node initiates the workflow every 5 hours. ++API Requests:++ Two separate HTTP Request nodes, HTTP Request5 and HTTP Request6, make API calls to Smartlead. ++HTTP Request5 calls++ the endpoint for domain-wise health metrics. ++HTTP Request6 calls++ the endpoint for email-wise health metrics. Both requests use the same api_key and a date range from 2025-07-04 to the current day. ++Data Splitting:++ The Split Out5 and Split Out6 nodes take the JSON response from the API calls and split the data into individual items. This is necessary so each row of data can be processed and added to Google Sheets separately. ++Google Sheets Integration:++ Finally, the Append or update row in sheet5 and Append or update row in sheet6 nodes update two different Google Sheets: ++Append or update row in sheet5 adds++ or updates rows in the DomainHealth sheet, matching on the domain column. ++Append or update row in sheet6 adds++ or updates rows in the EmailHealth sheet, matching on the from_email column. **Workflow 2: Global and Campaign-Specific Analytics 📊** This second part of the workflow is triggered every 2 hours by the Schedule Trigger node. Its goal is to get a day-by-day overview of email engagement and campaign-specific performance. How it Works: Schedule Trigger: The Schedule Trigger node starts this workflow every 2 hours. ++API Requests:++ Two HTTP Request nodes, HTTP Request and HTTP Request1, call different Smartlead API endpoints. ++HTTP Request++ retrieves day-wise overall stats for email engagement. ++HTTP Request1 ++retrieves overall stats for each campaign. ++Data Splitting:++ The Split Out and Split Out1 nodes separate the JSON responses into individual data items for processing. ++Google Sheets Integration:++ The Append or update row in sheet and Append or update row in sheet1 nodes then write the data to Google Sheets. ++Append or update row in sheet++ updates the Sheet1 sheet with day-wise metrics, using the date as a matching column. ++Append or update row in sheet1++ updates the CampaignWise sheet with campaign performance metrics, using the campaign id to match rows.
Automated WhatsApp messaging & lead nurturing with Gallabox & Supabase
WABA Message Journey Flow Documentation This document outlines the automated workflow for sending WhatsApp messages to contacts, triggered hourly and managed through disposition and message count logic. The workflow is designed to ensure contacts receive messages based on their status and the frequency of previous interactions. 1. Trigger and Data Retrieval The journey begins with a time-based trigger and data retrieval from the Supabase contacts table. Trigger: A "Schedule Trigger3" node initiates the workflow every hour. This ensures that the system regularly checks for contacts requiring messages. Get Contacts: The "Get many rows1" node (Supabase) then retrieves all relevant contact data from the contacts_ampere table in Supabase. This brings in contact details such as name, phone, Disposition, Count, and last_message_sent. 2. Disposition-Based Segregation After retrieving the contacts, the workflow segregates them based on their Disposition status. Disposition Switch: The "Disposition Switch" node acts as the primary routing mechanism. It evaluates the Disposition field of each contact and directs them to different branches of the workflow based on predefined categories. Case 0: new_lead: Contacts with the disposition new_lead are routed to the "Count Switch" for further processing. Cases 1-4: The workflow also includes branches for test_ride, Booking, walk_in, and Sale dispositions, though the detailed logic for these branches is not fully laid out in the provided JSON beyond the switch nodes ("Switch2", "Switch3", "Switch4", "Switch5"). The documentation focuses on the new_lead disposition's detailed flow, which can be replicated for others. 3. Message Count Logic (for new_lead Disposition) For contacts identified as new_lead, the workflow uses a "Count Switch" to determine which message in the sequence should be sent. Count Switch: This node evaluates the Count field for each new_lead contact. This Count likely represents the number of messages already sent to the contact within this specific journey. Count = 0: Directs to "Loop Over Items1" (first message in sequence). Count = 1: Directs to "Loop Over Items2" (second message in sequence). Count = 2: Directs to "Loop Over Items3" (third message in sequence). Count = 3: Directs to "Loop Over Items4" (fourth message in sequence). 4. Looping and Interval Check Each "Loop Over Items" node processes contacts in batches and incorporates an "If Interval" check (except for Loop Over Items1). Loop Over Items (e.g., "Loop Over Items1", "Loop Over Items2", "Loop Over Items3", "Loop Over Items4"): These nodes iterate through the contacts received from the "Count Switch" output. Interval Logic: "If Interval" (for Count = 1 from "Loop Over Items2"): Checks if the interval is greater than or equal to 4. This interval value is handled by a separate Supabase cron job, which updates it every minute based on Current time - last api hit time in hours. "If Interval1" (for Count = 2 from "Loop Over Items3"): Checks if the interval is exactly 24 hours. "If2" (for Count = 3 from "Loop Over Items4"): Checks if the interval is exactly 24 hours. 5. Sending WhatsApp Messages If a contact passes the interval check (or immediately for Count = 0), a WhatsApp message is sent using the Gallabox API. HTTP Request Nodes (e.g., "new_lead_0", "new_lead_", "new_lead_3", "new_lead_2"): These nodes are responsible for sending the actual WhatsApp messages via the Gallabox API. They are configured with: Method: POST URL: https://server.gallabox.com/devapi/messages/whatsapp Authentication: apiKey and apiSecret are used in the headers. Body: Contains channelId, channelType (whatsapp), and recipient (including name and phone). WhatsApp Message Content: Includes type: "template" and templateName (e.g., testing_rahi, wu_2, testing_rahi_1). The bodyValues dynamically insert the contact's name and other details. Some messages also include buttonValues for quick replies (e.g., "Show me Brochure"). 6. Logging and Updating Contact Status After a message is sent (or attempted), the workflow logs the interaction and updates the contact's record. Create Logs (e.g., "Create Logs", "Create Logs1", "Create Logs2", "Create Logs3"): These Supabase nodes record details of the message send attempt into the logs_nurture_ampere table. This includes: message_id (from the Gallabox API response body) phone and name of the contact disposition and mes_count (which is Count + 1 from the contacts table) last_sent (timestamp from Gallabox API response headers) status_code and status_message (from Gallabox API response or error). These nodes are configured to "continueRegularOutput" on error, meaning the workflow will attempt to proceed even if logging fails. Status Code Check (e.g., "If StatusCode", "If StatusCode 202", "If StatusCode 203", "If StatusCode 204"): Immediately after attempting to create a log, an "If" node checks if the status_code from the message send attempt is "202" (indicating acceptance by the messaging service). Update Contact Row (e.g., "Update a row1", "Update a row2", "Update a row3", "Update a row4"): If the status code is 202, these Supabase nodes update the contacts_ampere table for the specific contact. The Count for the contact is incremented by 1 (Count + 1). The last_message_sent field is updated with the date from the Gallabox API response headers. These nodes are also configured to "continueRegularOutput" on error. This structured flow ensures that contacts are nurtured through a sequence of WhatsApp messages, with each interaction logged and the contact's status updated for future reference and continuation of the journey.