Edoardo Guzzi
Workflows by Edoardo Guzzi
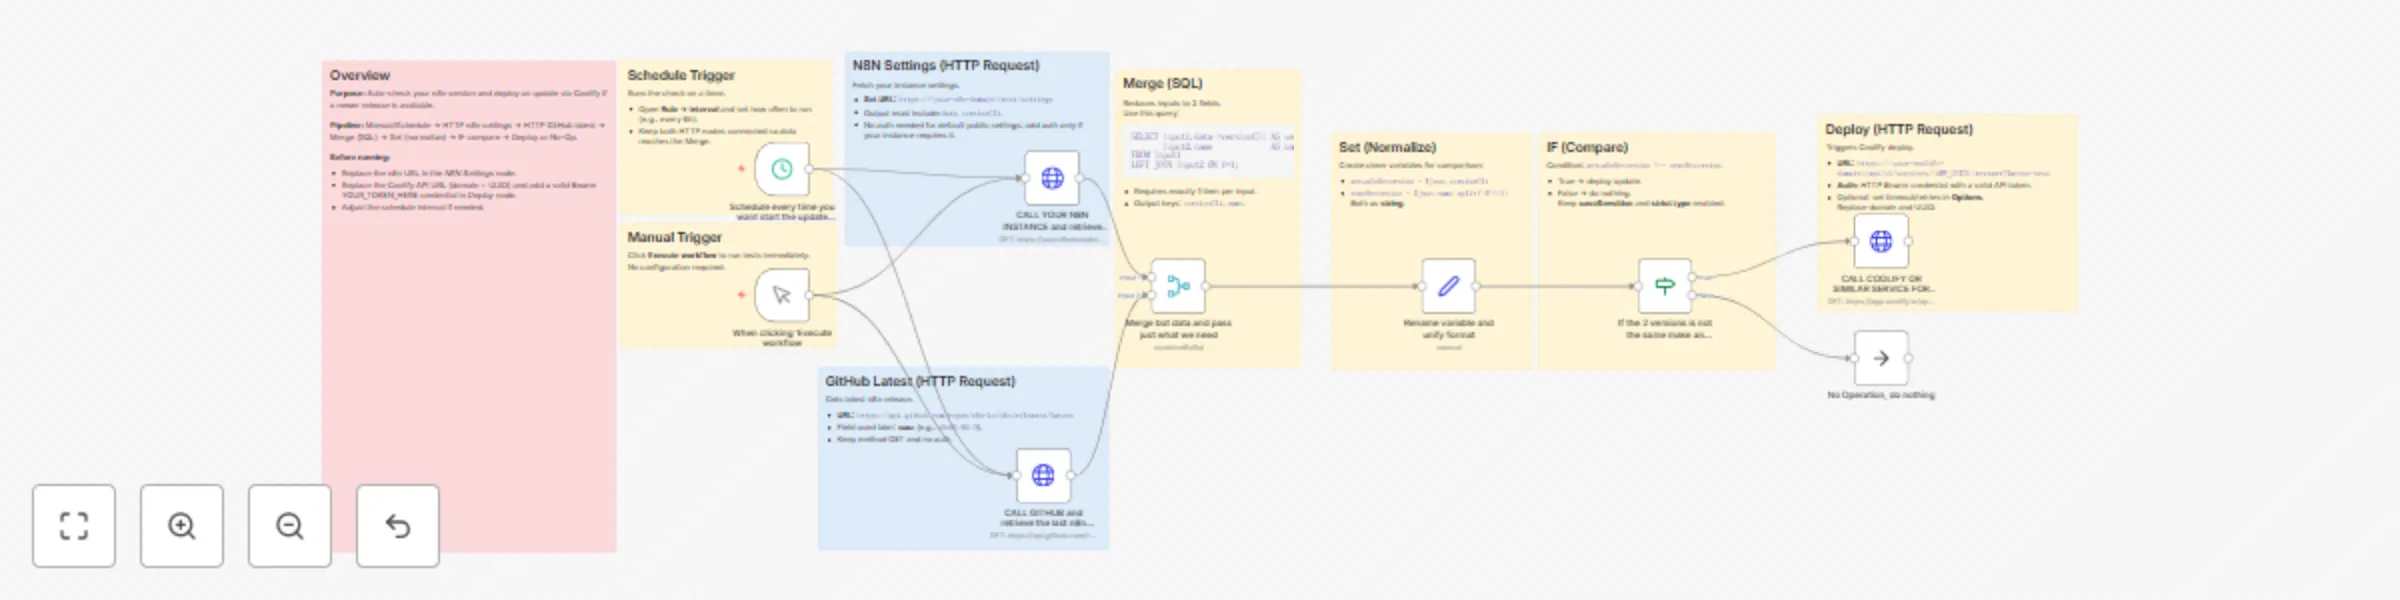
Automatic self-hosted application updates with Coolify deployments
## Auto-update n8n instance with Coolify ### Who’s it for This workflow is designed for **self-hosted n8n administrators** who want to keep their instance automatically updated to the latest stable release. It removes the need for manual version checks and ensures deployments are always up to date. ### What it does The workflow checks your **current n8n version** against the **latest GitHub release**. If a mismatch is detected, it triggers a **Coolify deployment** to update your instance. If both versions match, the workflow ends safely without action. ### How it works 1. **Trigger**: Start manually or on a schedule. 2. **HTTP Request (n8n settings)**: Fetches your current version (`versionCli`). 3. **HTTP Request (GitHub)**: Fetches the latest n8n release (`name`). 4. **Merge (SQL)**: Keeps only the two fields needed. 5. **Set (Normalize)**: Converts values into comparable variables. 6. **IF Check**: Compares current vs latest version. - If different → Deploy update. - If same → Stop with no operation. 7. **HTTP Request (Coolify)**: Triggers a forced redeploy via API. ### How to set up - Replace `https://yourn8ndomain/rest/settings` with your own **n8n domain**. - Replace the Coolify API URL with your **Coolify domain + app UUID**. - Add an **HTTP Bearer credential** containing your Coolify API token. - Adjust the schedule interval (e.g., every 6 hours). ### Requirements - Self-hosted n8n instance with `/rest/settings` endpoint accessible. - Coolify (or a similar service) managing your n8n deployment. - Valid API token configured as Bearer credential in n8n. ### How to customize - Change the schedule frequency depending on how often you want checks. - Modify the IF condition if you want stricter or looser version matching (e.g., ignore patch versions). - Replace Coolify API call with another service (like Docker, Portainer, or Kubernetes) if you use a different deployment method.
Generate and Edit Images with OpenAI's GPT-Image-1 Model
This template integrates OpenAI's image generation and editing endpoints via the GPT-Image-1 model to visually create and manipulate images based on prompts. It features base64 conversion, binary handling, and prompt chaining. Perfect for marketing, design, product visuals and creative workflows. **🛠️ Requirements** OpenAI account with access to gpt-image-1(probably you need organizations verifications for access to that model) OpenAI API credentials configured in n8n A self-hosted or cloud n8n instance Basic familiarity with the n8n UI (no programming required) **🔧 Step-by-step Instructions** Step 1: Manual Trigger Starts the workflow on click. Ideal for testing the generation and edit logic. Step 2: Generate Image The Create image call node sends a prompt to OpenAI and returns a base64 image. **Example prompt:** A cyberpunk city at night with flying cars and neon lights **Step 3: Convert to Binary** The base64 image is converted into a usable binary PNG file with the Convert json binary to File node. **Step 4: Edit the Image** The binary file is passed to OpenAI’s /images/edits endpoint. A new prompt applies changes to the image. **Example:** Add a glowing robot in the foreground with a neon sword ✅ Supports model: gpt-image-1 ⚠️ Requires binary file (not base64) **Step 5: Final Conversion** Converts the final edited image from base64 to file so it can be downloaded or used in other nodes. **🎯 Real-World Use Cases** 🎨 Artists & Creators: concept art and illustration variations 🛍️ E-commerce: auto-generate product mockups 📰 Marketing: create eye-catching blog or social visuals **💡 Bonus Ideas** Add a Telegram or Slack node to generate or edit images via chat Use a Webhook to feed prompts from a form or frontend Add a mask to restrict edits to specific areas (e.g., background only)
Simple social: Instagram single image post with Facebook API
# Simple Social: Instagram Single Image Post with Facebook API ## Who is this workflow for? This workflow is designed for businesses, social media managers, content creators, and developers who need to automate the process of posting single images to Instagram using the Facebook API. It is ideal for anyone looking to streamline their social media posting process, saving time and ensuring consistent content delivery. ## Use Case / Problem Solved Manually posting images and captions on Instagram can be time-consuming, especially for businesses and content creators managing multiple accounts. This workflow automates the process from image preparation to publishing, reducing manual effort and increasing efficiency. ## What this workflow does 1. **Trigger Initialization**: The workflow starts with a manual trigger that can be adapted to other triggers (e.g., HTTP webhook or schedule). 2. **Set Parameters**: The workflow includes a node that sets essential parameters, such as the image URL, Instagram business account ID, and caption. 3. **Prepare Instagram Media**: A node prepares the media for upload using the Facebook API, sending the image and caption for pre-publication processing. 4. **Check Media Upload Status**: The workflow verifies if the media preparation is complete. 5. **Conditional Check**: If the media preparation is successful, the workflow proceeds to publish; otherwise, it triggers an error-handling path. 6. **Publish Media**: The media is published on Instagram if the conditions are met. 7. **Post-Publish Check**: The workflow checks the status after publication. 8. **Conditional Check for Publication**: If the publication status is "PUBLISHED," it triggers a success path; otherwise, it triggers a failure handling. 9. **Email Notifications**: The workflow sends email notifications to indicate successful or unsuccessful outcomes. ## Setup Here is a quick video in italian language with sub eng(https://youtu.be/obWJFJvg_6g) 1. **Add API Credentials**: Ensure that valid Facebook API credentials are added and configured for use. 2. **Permissions Required**: Ensure your app has the necessary permissions (`ads_management`, `business_management`, `instagram_basic`, `instagram_content_publish`, `pages_read_engagement`). App review may be required for external user access. 3. **Node Configuration**: Customize the `Set Instagram Parameters` node to specify the image URL, caption, and Instagram business account ID. 4. **Trigger Adaptation**: Adapt the initial trigger if needed to fit your workflow's requirements (e.g., schedule, webhook). ## How to customize this workflow - **Change the Image URL and Caption**: Modify the `Set Instagram Parameters` node to change the image and caption. - **Trigger Customization**: Replace the manual trigger with other triggers like a webhook to automate posting based on external events. - **Notifications**: Adjust the email nodes to send customized messages or trigger other workflows based on the outcome. ## Limitations - **Image Format**: Only JPEG images are supported. Extended JPEG formats such as MPO and JPS are not compatible. - **Unsupported Tags**: Shopping tags, branded content tags, and filters are not supported. - **Instagram TV**: Publishing to Instagram TV is not supported. - **Rate Limit**: Instagram accounts are limited to 50 API-published posts within a rolling 24-hour period. Carousels count as a single post. Check usage with `GET /{ig-user-id}/content_publishing_limit`. ### Example Usage Imagine managing a business account that needs consistent posts. You can schedule this workflow or trigger it manually to automatically post images with captions at the right time, ensuring that your audience stays engaged without manual posting efforts.