小林幸一
Workflows by 小林幸一
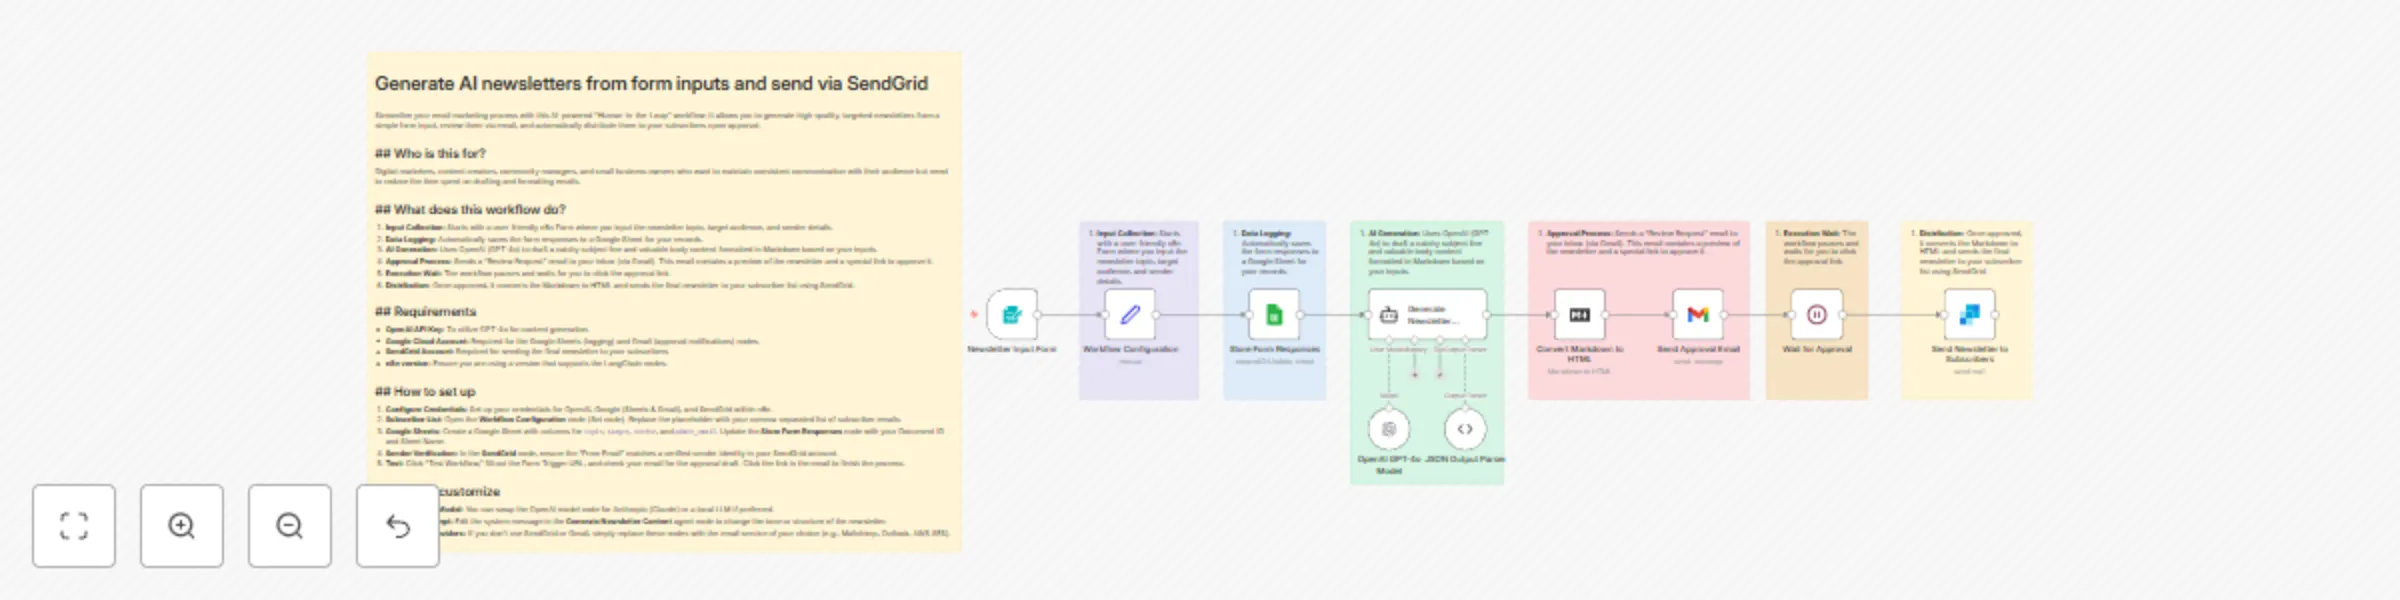
Create AI newsletters with GPT-4o, human approval workflow, and SendGrid
# Generate AI newsletters from form inputs and send via SendGrid Streamline your email marketing process with this AI-powered "Human-in-the-Loop" workflow. It allows you to generate high-quality, targeted newsletters from a simple form input, review them via email, and automatically distribute them to your subscribers upon approval. ## ## Who is this for? Digital marketers, content creators, community managers, and small business owners who want to maintain consistent communication with their audience but need to reduce the time spent on drafting and formatting emails. ## ## What does this workflow do? 1. **Input Collection:** Starts with a user-friendly n8n Form where you input the newsletter topic, target audience, and sender details. 2. **Data Logging:** Automatically saves the form responses to a Google Sheet for your records. 3. **AI Generation:** Uses OpenAI (GPT-4o) to draft a catchy subject line and valuable body content formatted in Markdown based on your inputs. 4. **Approval Process:** Sends a "Review Request" email to your inbox (via Gmail). This email contains a preview of the newsletter and a special link to approve it. 5. **Execution Wait:** The workflow pauses and waits for you to click the approval link. 6. **Distribution:** Once approved, it converts the Markdown to HTML and sends the final newsletter to your subscriber list using SendGrid. ## ## Requirements - **OpenAI API Key:** To utilize GPT-4o for content generation. - **Google Cloud Account:** Required for the Google Sheets (logging) and Gmail (approval notifications) nodes. - **SendGrid Account:** Required for sending the final newsletter to your subscribers. - **n8n version:** Ensure you are using a version that supports the LangChain nodes. ## ## How to set up 1. **Configure Credentials:** Set up your credentials for OpenAI, Google (Sheets & Gmail), and SendGrid within n8n. 2. **Subscriber List:** Open the **Workflow Configuration** node (Set node). Replace the placeholder with your comma-separated list of subscriber emails. 3. **Google Sheets:** Create a Google Sheet with columns for `topic`, `target`, `sender`, and `admin_email`. Update the **Store Form Responses** node with your Document ID and Sheet Name. 4. **Sender Verification:** In the **SendGrid** node, ensure the "From Email" matches a verified sender identity in your SendGrid account. 5. **Test:** Click "Test Workflow," fill out the Form Trigger URL, and check your email for the approval draft. Click the link in the email to finish the process. ## ## How to customize - **Change the AI Model:** You can swap the OpenAI model node for Anthropic (Claude) or a local LLM if preferred. - **Adjust the Prompt:** Edit the system message in the **Generate Newsletter Content** agent node to change the tone or structure of the newsletter. - **Swap Email Providers:** If you don't use SendGrid or Gmail, simply replace these nodes with the email service of your choice (e.g., Mailchimp, Outlook, AWS SES).
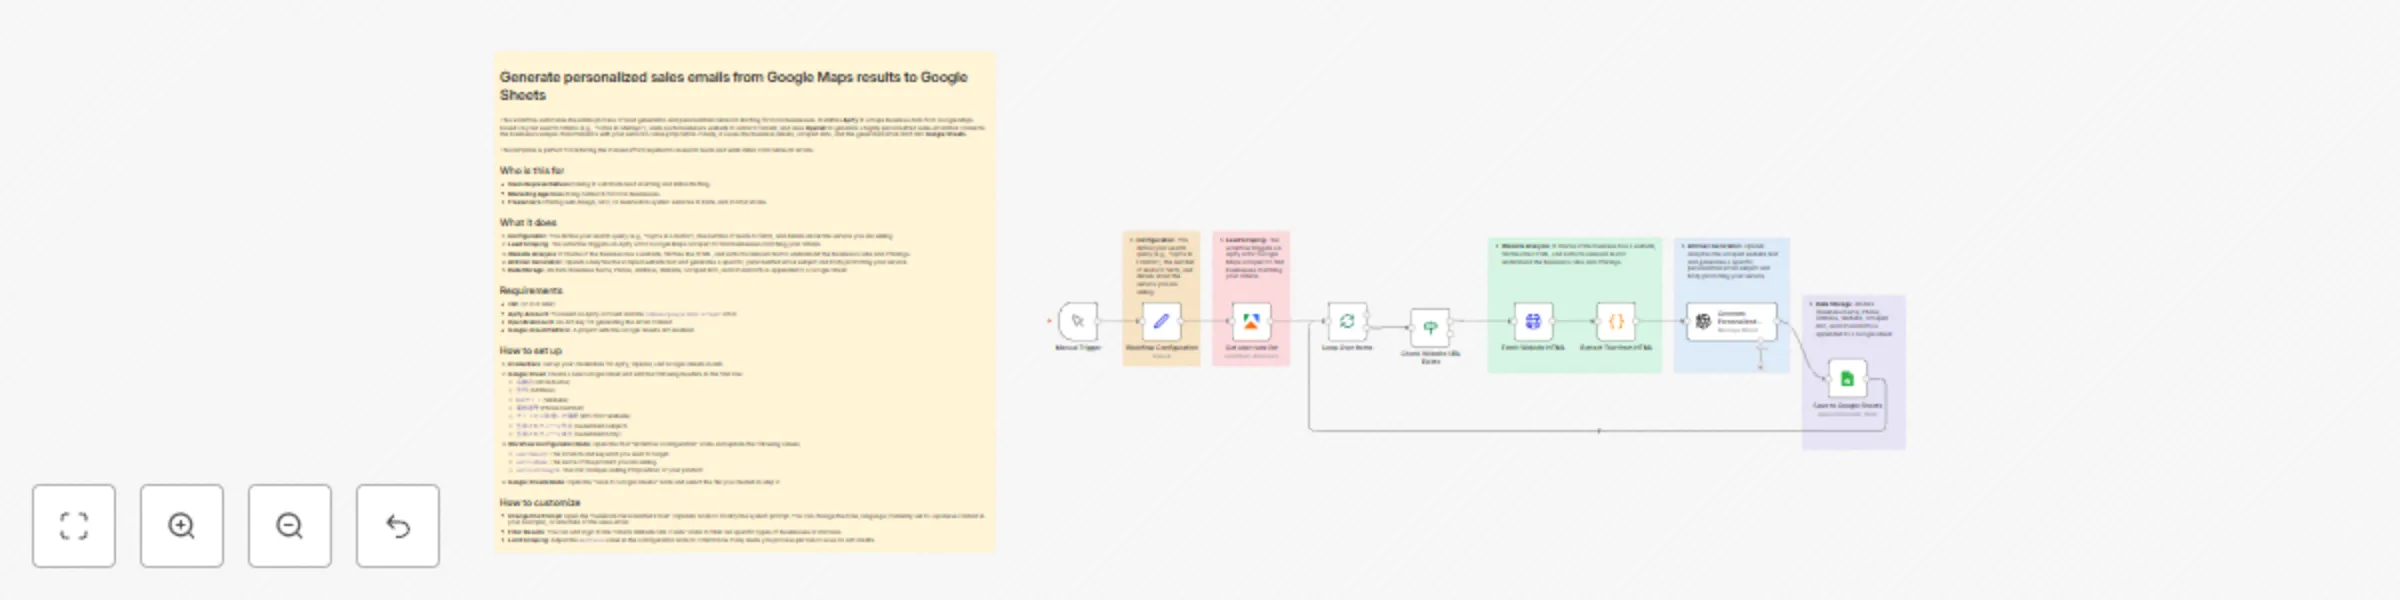
Generate personalized sales emails from Google Maps with OpenAI to Google Sheets
# Generate personalized sales emails from Google Maps results to Google Sheets This workflow automates the entire process of lead generation and personalized outreach drafting for local businesses. It utilizes **Apify** to scrape business data from Google Maps based on your search criteria (e.g., "Cafes in Shibuya"), visits each business's website to extract content, and uses **OpenAI** to generate a highly personalized sales email that connects the business's unique characteristics with your service's value proposition. Finally, it saves the business details, scraped data, and the generated email draft into **Google Sheets**. This template is perfect for reducing the manual effort required to research leads and write initial cold outreach emails. ## Who is this for - **Sales Representatives** looking to automate lead sourcing and initial drafting. - **Marketing Agencies** doing outreach for local businesses. - **Freelancers** offering web design, SEO, or reservation system services to brick-and-mortar stores. ## What it does 1. **Configuration**: You define your search query (e.g., "Gyms in London"), the number of leads to fetch, and details about the service you are selling. 2. **Lead Scraping**: The workflow triggers an Apify actor (Google Maps Scraper) to find businesses matching your criteria. 3. **Website Analysis**: It checks if the business has a website, fetches the HTML, and extracts relevant text to understand the business's vibe and offerings. 4. **AI Email Generation**: OpenAI analyzes the scraped website text and generates a specific, personalized email subject and body promoting your service. 5. **Data Storage**: All data (Business Name, Phone, Address, Website, Scraped Info, and Email Draft) is appended to a Google Sheet. ## Requirements - **n8n** (v1.0 or later) - **Apify Account**: You need an Apify account and the `compass/google-maps-scraper` actor. - **OpenAI Account**: An API key for generating the email content. - **Google Cloud Platform**: A project with the Google Sheets API enabled. ## How to set up 1. **Credentials**: Set up your credentials for Apify, OpenAI, and Google Sheets in n8n. 2. **Google Sheet**: Create a new Google Sheet and add the following headers in the first row: - `店舗名` (Store Name) - `住所` (Address) - `Webサイト` (Website) - `電話番号` (Phone Number) - `サイトから取得した情報` (Info from Website) - `生成されたメール件名` (Generated Subject) - `生成されたメール本文` (Generated Body) 3. **Workflow Configuration Node**: Open the first "Workflow Configuration" node and update the following values: - `searchQuery`: The location and keyword you want to target. - `serviceName`: The name of the product you are selling. - `serviceStrength`: The USP (Unique Selling Proposition) of your product. 4. **Google Sheets Node**: Open the "Save to Google Sheets" node and select the file you created in step 2. ## How to customize - **Change the Prompt**: Open the "Generate Personalized Email" (OpenAI) node to modify the system prompt. You can change the tone, language (currently set to Japanese context in your example), or structure of the sales email. - **Filter Results**: You can add logic to the "Check Website URL Exists" node to filter out specific types of businesses or domains. - **Limit Scraping**: Adjust the `maxPlaces` value in the Configuration node to control how many leads you process per run to save on API credits.
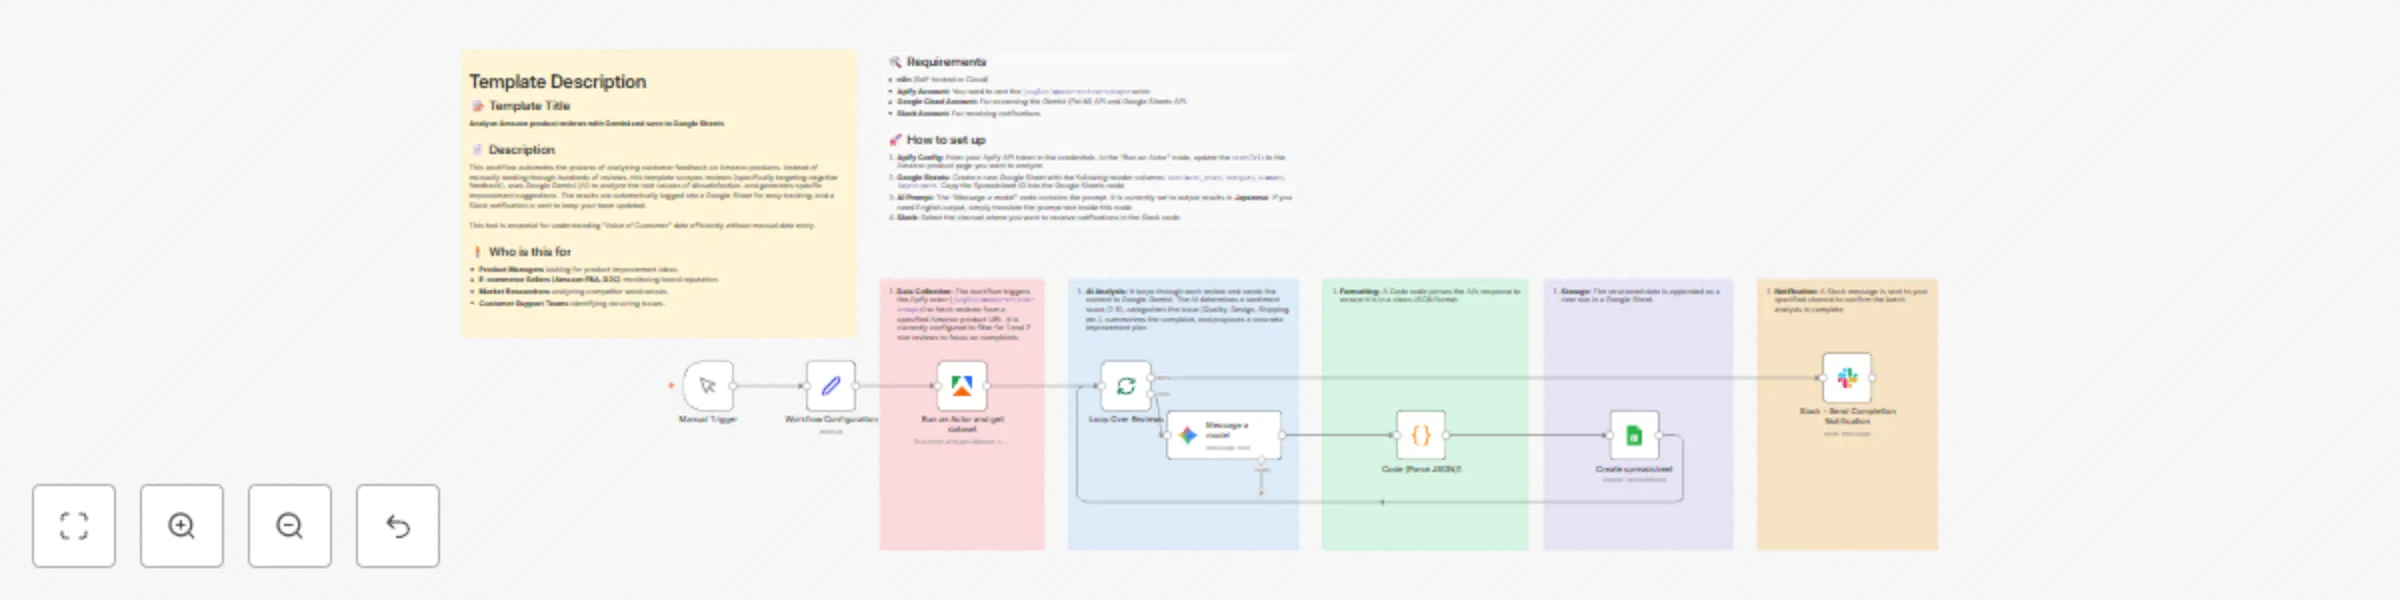
Extract & analyze Amazon reviews with Apify, Gemini AI & save to Google Sheets
# Template Description ## 📝 Template Title **Analyze Amazon product reviews with Gemini and save to Google Sheets** ## 📄 Description This workflow automates the process of analyzing customer feedback on Amazon products. Instead of manually reading through hundreds of reviews, this template scrapes reviews (specifically targeting negative feedback), uses Google Gemini (AI) to analyze the root causes of dissatisfaction, and generates specific improvement suggestions. The results are automatically logged into a Google Sheet for easy tracking, and a Slack notification is sent to keep your team updated. This tool is essential for understanding "Voice of Customer" data efficiently without manual data entry. ## 🧍 Who is this for - **Product Managers** looking for product improvement ideas. - **E-commerce Sellers (Amazon FBA, D2C)** monitoring brand reputation. - **Market Researchers** analyzing competitor weaknesses. - **Customer Support Teams** identifying recurring issues. ## ⚙️ How it works 1. **Data Collection:** The workflow triggers the Apify actor (`junglee/amazon-reviews-scraper`) to fetch reviews from a specified Amazon product URL. It is currently configured to filter for 1 and 2-star reviews to focus on complaints. 2. **AI Analysis:** It loops through each review and sends the content to Google Gemini. The AI determines a sentiment score (1-5), categorizes the issue (Quality, Design, Shipping, etc.), summarizes the complaint, and proposes a concrete improvement plan. 3. **Formatting:** A Code node parses the AI's response to ensure it is in a clean JSON format. 4. **Storage:** The structured data is appended as a new row in a Google Sheet. 5. **Notification:** A Slack message is sent to your specified channel to confirm the batch analysis is complete. ## 🛠️ Requirements - **n8n** (Self-hosted or Cloud) - **Apify Account:** You need to rent the `junglee/amazon-reviews-scraper` actor. - **Google Cloud Account:** For accessing the Gemini (PaLM) API and Google Sheets API. - **Slack Account:** For receiving notifications. ## 🚀 How to set up 1. **Apify Config:** Enter your Apify API token in the credentials. In the "Run an Actor" node, update the `startUrls` to the Amazon product page you want to analyze. 2. **Google Sheets:** Create a new Google Sheet with the following header columns: `sentiment_score`, `category`, `summary`, `improvement`. Copy the Spreadsheet ID into the Google Sheets node. 3. **AI Prompt:** The "Message a model" node contains the prompt. It is currently set to output results in **Japanese**. If you need English output, simply translate the prompt text inside this node. 4. **Slack:** Select the channel where you want to receive notifications in the Slack node.