Julian Reich
Workflows by Julian Reich
Analyze weekly notes with GPT-4 for actionable tasks & summaries
This n8n template demonstrates how to automatically analyze all your accumulated notes from the past week and generate actionable insights, task lists, and priorities using AI. Use cases are many: Try automating weekly planning sessions, extracting action items from meeting notes, identifying recurring themes in your thoughts, or creating data-driven weekly reports for personal productivity tracking! ## Good to know - ChatGPT analysis costs approximately $0.01-0.05 per week depending on the volume of notes - The workflow uses advanced date filtering to process exactly 7 days of content - Email sending requires SMTP configuration (Gmail, Outlook, etc.) - **Perfect companion:** Works seamlessly with the "**Audio Notes to Google Docs**" workflow - it reads and analyzes all notes created by that system! ## How it works - A schedule trigger runs every Sunday at your preferred time (default: 11 PM) - The workflow reads your complete Google Doc containing all accumulated notes - A smart filter function extracts only entries from the past 7 days using date stamp recognition - The filtered content gets sent to ChatGPT which analyzes patterns and extracts: Actionable tasks for next week Important deadlines and appointments Key insights and learnings Top 3 priorities Category distribution (Work, Private, Health, etc.) - A second AI call creates a personalized email summary with context and recommendations - The structured analysis gets appended to your Google Doc as a weekly summary - You receive a Telegram notification when the review is complete - A detailed email report lands in your inbox with the full analysis and action items ## How to use - The workflow runs automatically every Sunday - no manual intervention needed - Adjust the schedule trigger to your preferred day/time for weekly planning - Review the email summary and use the extracted tasks for your upcoming week planning - The Google Doc serves as your permanent archive of weekly insights ## Requirements - Google Docs API access to read your notes document - OpenAI API account for ChatGPT analysis (GPT-4 recommended for best results) - SMTP email configuration for sending summary reports - Telegram Bot Token for notifications - **Prerequisite:** The **"Audio Notes to Google Docs**" workflow or similar system that creates timestamped entries ## Customising this workflow - Modify the AI analysis prompt to focus on specific areas (business metrics, health tracking, learning goals) - Add multiple analysis modes (daily, bi-weekly, monthly reviews) - Include additional outputs like calendar event creation, task manager integration, or team sharing - Connect to project management tools like Notion, Asana, or Monday.com for automatic task creation
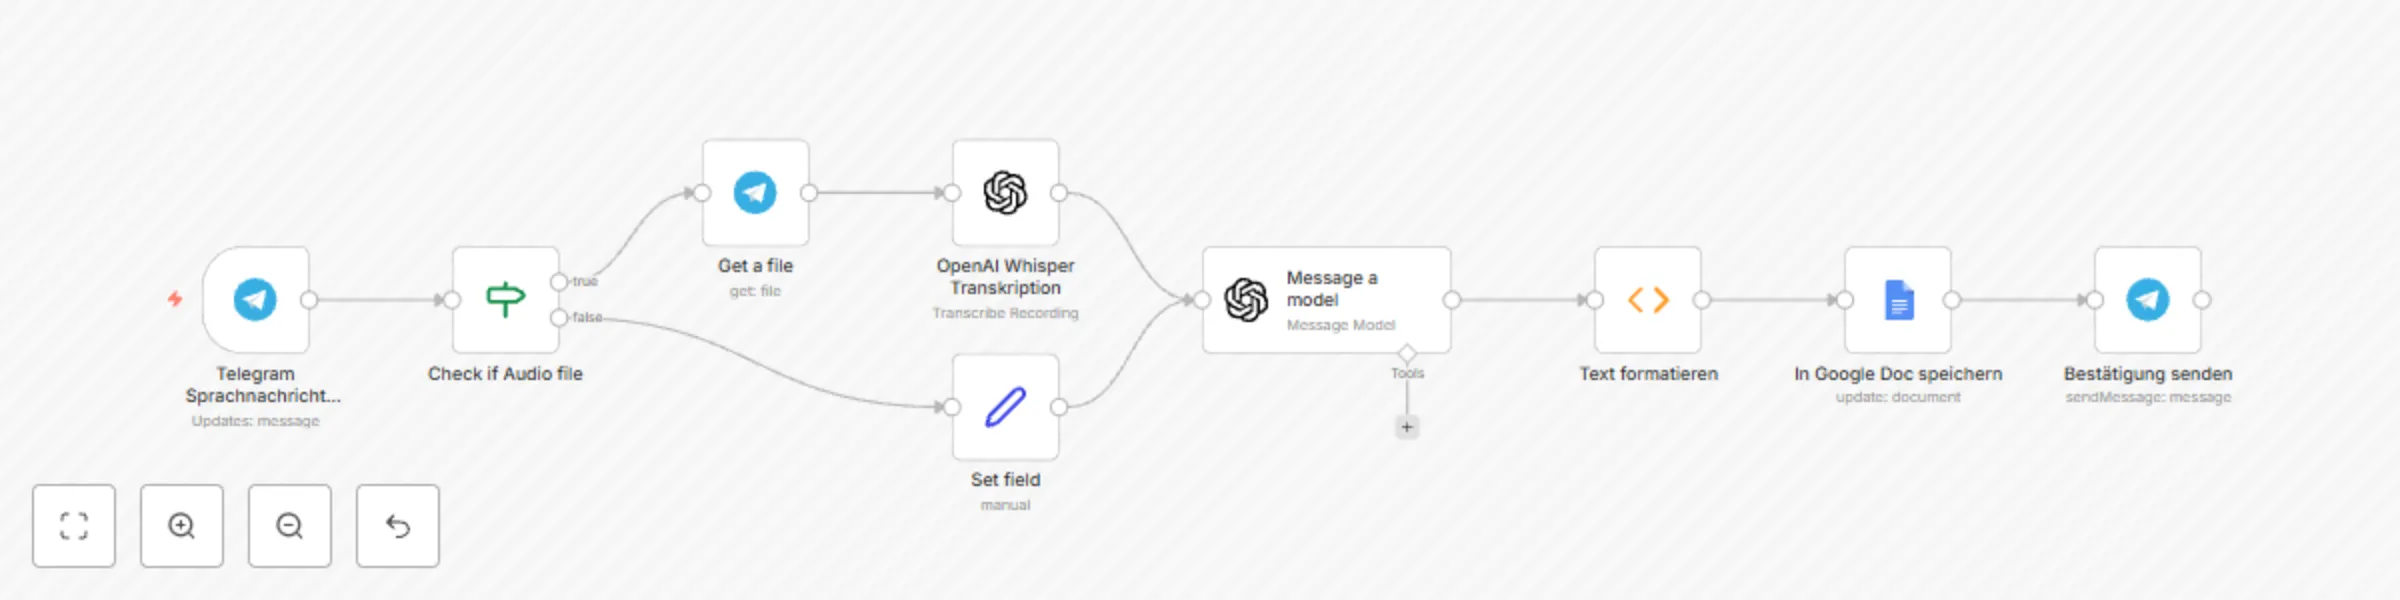
Convert Telegram voice messages to Google Docs with Whisper & GPT-4o tagging
This n8n template demonstrates how to automatically convert voice messages from Telegram into structured, searchable notes in Google Docs using AI transcription and intelligent tagging. Use cases are many: Try capturing ideas on-the-go while walking, recording meeting insights hands-free, creating voice journals, or building a personal knowledge base from spoken thoughts! ## Good to know - OpenAI Whisper transcription costs approximately $0.006 per minute of audio - ChatGPT tagging adds roughly $0.001-0.003 per message depending on length - The workflow supports both German and English voice recognition - Text messages are also supported - they bypass transcription and go directly to AI tagging - **Perfect companion**: Combine with the "**Weekly AI Review**" workflow for automated weekly summaries of all your notes! ## How it works - Telegram receives your voice message or text and triggers the workflow - An IF node intelligently detects whether you sent audio or text content - For voice messages: Telegram downloads the audio file and OpenAI Whisper transcribes it to text - For text messages: Content is passed directly to the next step - ChatGPT analyzes the content and generates up to 3 relevant keywords (Work, Ideas, Private, Health, etc.) - A function node formats everything with Swiss timestamps, message type indicators, and clean structure - The formatted entry gets automatically inserted into your Google Doc with date, keywords, and full content - Telegram sends you a confirmation with the transcribed/original text so you can verify accuracy ## How to use - Simply send a voice message or text to your Telegram bot - the workflow handles everything automatically - The manual execution can be used for testing, but in production this runs on every message - Voice messages work best with clear speech in quiet environments for optimal transcription ## Requirements - Telegram Bot Token and configured webhook - OpenAI API account for Whisper transcription and ChatGPT tagging - Google Docs API access for document writing - A dedicated Google Doc where all notes will be collected ## Customising this workflow - Adjust the AI prompt to use different tagging categories relevant to your workflow (e.g., project names, priorities, emotions) - Add multiple Google Docs for different contexts (work vs. private notes) - Include additional processing like sentiment analysis or automatic task extraction - Connect to other apps like Notion, Obsidian, or your preferred note-taking system And don't forget to also implement the complimentary workflow **Weekly AI Review!**
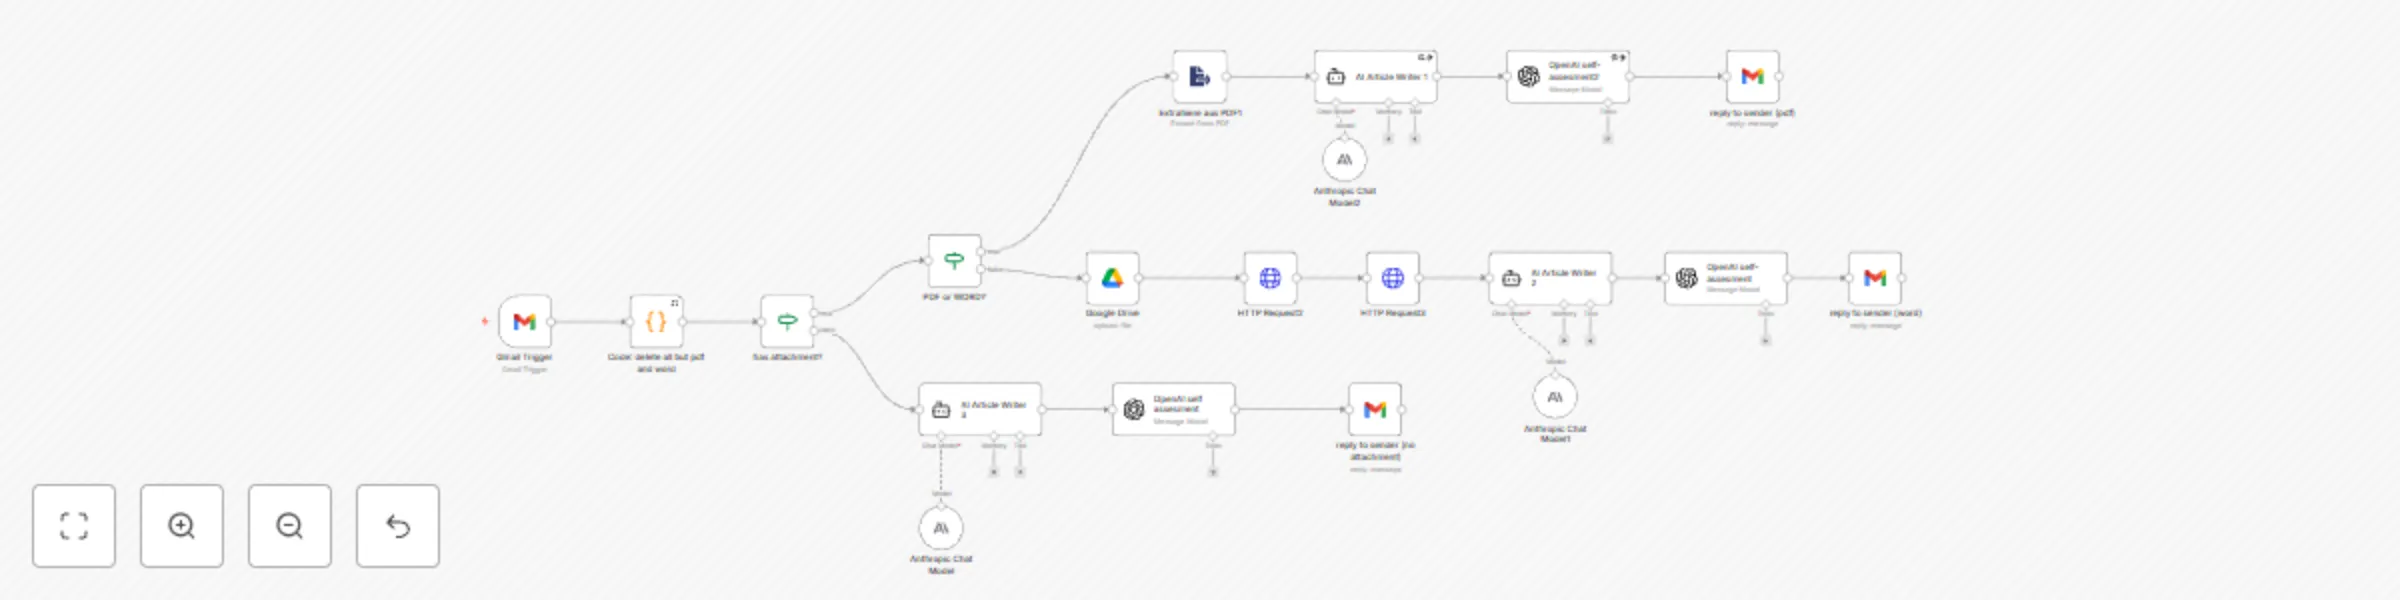
Transform press releases (PDF & Word) into polished articles with Gmail & OpenAI
This n8n workflow automates the transformation of press releases into polished articles. It converts the content of an email and its attachments (PDF or Word documents) into an AI-written article/blog post. ## What does it do? This workflow assists editors and journalists in managing incoming press-releases from governments, companies, NGOs, or individuals. The result is a draft article that can easily be reviewed by the editor, who receives it in a reply email containing both the original input and the output, plus an AI-generated self-assessment. This self-assessment represents an additional feedback loop where the AI compares the input with the output to evaluate the quality and accuracy of its transformation. ## How does it work? Triggered by incoming emails in Google, it first filters attachments, retaining only Word and PDF files while removing other formats like JPGs. The workflow then follows one of three paths: - If no attachments remain, it processes the inline email message directly. - For PDF attachments, it uses an extractor to obtain the document content. - For Word attachments, it extracts the text content by a http request. In each case, the extracted content is then passed to an AI agent that converts the press release into a well-structured article according to predefined prompts. A separate AI evaluation step provides a self-assessment by comparing the output with the original input to ensure quality and accuracy. Finally, the workflow generates a reply email to the sender containing three components: the original input, the AI-generated article, and the self-assessment. This streamlined process helps editors and journalists efficiently manage incoming press releases, delivering draft articles that require minimal additional editing." ## How to set it up ### 1. Configure Gmail Connection: - Create or use an existing Gmail address - Connect it through the n8n credentials manager - Configure polling frequency according to your needs - Set the trigger event to "Message Received" Optional: Filter incoming emails by specifying authorized senders - Enable the "Download Attachments" option ### 2. Set Up AI Integration: - Create an OpenAI account if you don't have one - Create a new AI assistant or use an existing one - Customize the assistant with specific instructions, style guidelines, or response templates - Configure your API credentials in n8n to enable the connection ### 3. Configure Google Drive Integration: - Connect your Google Drive credentials in n8n - Set the operation mode to "Upload" - Configure the input data field name as "data" -Set the file naming format to dynamic: {{ $json.fileName }} ### 4. Configure HTTP Request Node: - Set request method to "POST" - Enter the appropriate Google API endpoint URL - Include all required authorization headers - Structure the request body according to API specifications - Ensure proper error handling for API responses ### 5. Configure HTTP Request Node 2: - Set request method to "GET" - Enter the appropriate Google API endpoint URL - Include all required authorization headers - Configure query parameters as needed - Implement response validation and error handling ### 6. Configure Self-Assessment Node: - Set operation to "Message a Model" - Select an appropriate AI model (e.g., GPT-4, Claude) - Configure the following prompt in the Message field: Please analyze and compare the following input and output content: (for example) Original Input: {{ $('HTTP Request3').item.json.data }} {{ $('Gmail Trigger').item.json.text }} Generated Output: {{ $json.output }} Provide a detailed self-assessment that evaluates: 1. Content accuracy and completeness 2. Structure and readability improvements 3. Tone and style appropriateness 4. Any information that may have been omitted or misrepresented 5. Overall quality of the transformation ### 7. Configure Reply Email Node: - Set operation to "Send" and select your Gmail account - Configure the "To" field to respond to the original sender: {{ $('Gmail Trigger').item.json.from }} - Set an appropriate subject line: RE: {{ $('Gmail Trigger').item.json.subject }} - Structure the email body with clear sections using the following template: handlebars ***EDITED ARTICLE*** {{ $('AI Article Writer 2').item.json.output }} ***SELF-ASSESSMENT*** Rating: 1 (poor) to 5 (excellent) {{ $json.message.content }} ***ORIGINAL MESSAGE*** {{ $('Gmail Trigger').item.json.text }} ***ATTACHMENT CONTENT*** {{ $('HTTP Request3').item.json.data }} Note: Adjust the template fields according to the input source (PDF, Word document, or inline message). For inline messages, you may not need the "ATTACHMENT CONTENT" section.