Ghufran Ridhawi
Workflows by Ghufran Ridhawi
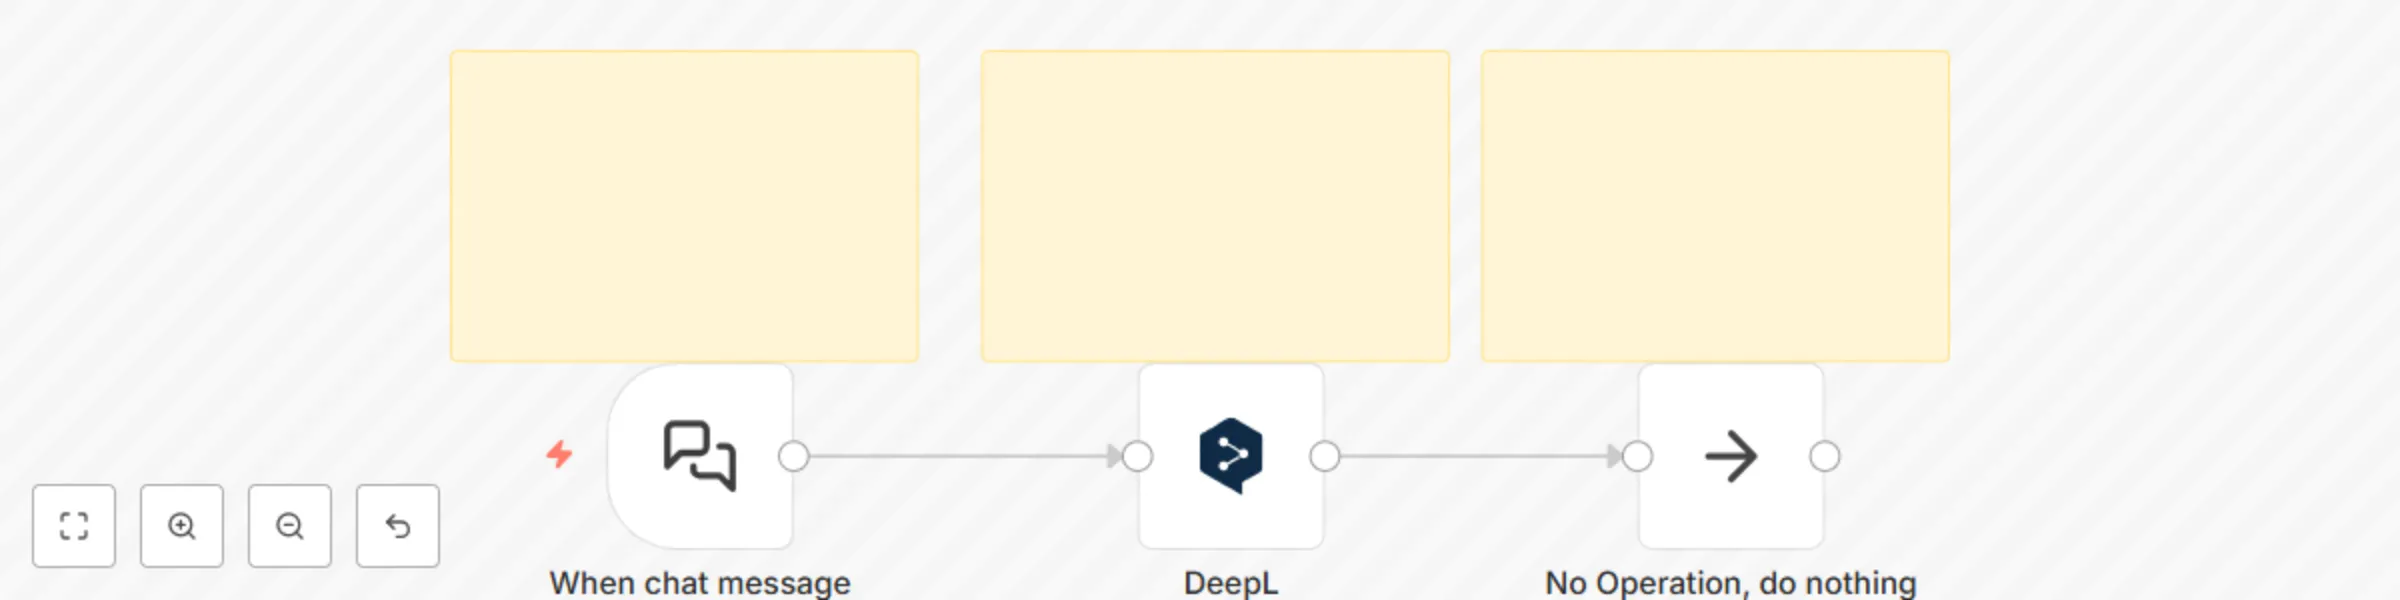
Real-time chat translation with DeepL
## Who is this for? This workflow is intended for users, workers, creatives or students who want to translate languages quickly and automatically via text chat. translating a sentence will take time and seem impractical, with this the results will be practical and save time. This is also a form of devotion to the community at n8n and the n8n company, as well as devotion to users and students so that reality is no longer tiring and is able to answer the problems of existing reality. ## How does it work? Easy explanation: Trigger Chat functions as a place or container for inputting text or sentences to be translated and the results come out directly here. Then the DeepL node will become the translation machine, here there are already parameters, the language can be adjusted, and the last node is useful for after the DeepL node no more operations appear And enjoy this workflow that suits you. ## Setup instructions Complete what is in the node as stated in the notes column. You need a "Credential Account" on the DeepL node, then select the language. If you already have an account, just connect it, and if not, create it first, you can register it by following the guide from n8n, it's very easy. Because here it is neatly and cleanly arranged. Then, save and run, test the workflow and activate the workflow. This workflow is ready to use. ## Requirements As a reminder: There must be (if not, make sure it is registered) in each "Credential Account" by following the guide on how to create it, n8n's guide is very complete Don't forget to save, and make sure the workflow is active. ## How to customize this workflow to your needs You can directly set the parameters in the language, so that the suitability is also high when working on tasks and answering them.
Automated Disqus forum reports with Gmail HTML tables
## Who is this for? This workflow is intended for forum organizers on disqus, forum automation learning to be able to read forum contents through clean data. In reality, we have to first see the contents of the forum and read them one by one, such as likes, comments, messages, this is very time consuming. With a workflow system like this, it will automate the process and shorten the time, meaning we only need to read clean data. This is also a form of devotion to the community at n8n and the n8n company, as well as devotion to forum organizers on disqus so that reality is no longer tiring and is able to answer existing reality problems. ## How does it work? Easy explanation: Manual Trigger will run the four existing disqus nodes, after that using account credentials, will take the conditions in the forum based on the data, after the data is obtained it will be selected and classified via the merge node, after that the merge node will all be neatly one, then the function node to tidy up and clean the data containing the code will make it work, and the table function node in html will work to send a message to the gmail node as a notification which contains a clean data report and is ready to be read comfortably And enjoy the workflow that suits you. ## Setup instructions Complete what is in the node as stated in the notes column. You need a "Credential Account" on each Disqus node, then write the name of the forum that you have created in each Disqus parameter node. If you already have an account, just connect it, and if not, create it first, you can register it by following the guide from n8n, it's very easy. Because here it has been arranged neatly and cleanly like in the merge and function nodes. Next, you need to connect the account credentials in the gmail node. After that, don't forget to add an email address to the Gmail node for notification of the success or failure of each customer from the running of this system. Save and run, test the workflow and activate the workflow. This workflow is ready to use. ## Requirements As a reminder: There must be (if not, make sure it is registered) in each "Credential Account" by following the guide on how to create it n8n the guide is very complete Don't forget to save, and make sure the workflow is active. ## How to customize this workflow to your needs You can directly set the merge or function variable data in these nodes, to suit your wishes, but here I have made everything completely.
WhatsApp AI customer service bot with GPT-4o-mini and Gmail alerts
## Who is this for? This workflow is intended for WhatsApp admins, customer service, individual users or teams in businesses who want to automate their small business or medium to large businesses on WhatsApp practically by automatically replying about your business products or services using Open AI capabilities on AI Agent. Based on an automated system there is a task to answer many customers or clients on WhatsApp, in reality answering one by one is very time consuming and tiring, especially if we have to compose sentences first or click on the template and send them. This is also a form of devotion to the community at n8n and the n8n company, as well as devotion to small businesses so that the reality is no longer tiring and able to answer the problems of reality that exist. ## How does it work? Easy explanation: Whatsapp trigger here the "Input submissions" node is responsible for inputting chats from customers in the form of data. Then, it is sent to the next node, namely the if node, here there are two if nodes, namely "Signpost" and "Is text message?" responsible for forwarding customer chat input data and selecting if correct then it will be forwarded to the AI Agent and if wrong then there is a "Fallback Text" node. Once correct, the AI Agent will analyze with the OpenAI model capability and store it in Simple Memory. The AI Agent here has been given directions and commands on what it should be like, in the parameters section, the prompt contains a special task, the knowledge base of your business, and several points and rules that must be there. After that, it will be sent via the WhatsApp reply node which is addressed to the customer. After that, the Gmail Set will process it again to be addressed to the Send Gmail Notifications Node, which contains email address parameters and also the contents of the email as a notification of success or failure. Then, there are no operations after that after the Gmail node. And enjoy this workflow that works for you. ## Setup instructions Complete what is in the node as stated in the notes column. You need a "Credential Account" on each WhatsApp node, then the OpenAI node and the Gmail Node. If you already have an account, just connect it, and if not, create it first, you can register it by following the guide from n8n, it makes it very easy. Because here it has been set up neatly and cleanly like in the if node. Next, you need to add your business to the AI Agent node, there are parameters and a prompt section, I have made a sample here to make it easier for you. You can immediately adjust it to your business or service or product, later what communication or sentence you want to convey to customers on WhatsApp. After that, don't forget to add an email address to the Gmail node for notification of success or failure of each customer from the running of this system. Save and run, test the workflow and activate the workflow. This workflow is ready to use. ## Requirements As a reminder: Must be set in nodes such as your business description, also according to the conditions of your business, services, products, so that the AI Agent matches your business knowledge base Must have (if not, make sure you have registered) in each "Credential Account" by following the guide on how to create it n8n the guide is very complete Don't forget to save, and make sure the workflow is active. ## How to customize this workflow to your needs You can immediately set up your business knowledge base in the nodes, so that the accuracy is also high when carrying out tasks and answering them.
Automate SAP Business Partner analysis with OpenAI GPT-4o & Gmail reporting
## Who is this for? This workflow is intended for micro businesses, SAP users, companies, users or owners who need system simplicity in SAP. In micro businesses, SAP users or individuals, there must be the task of manually inputting a lot of data or here in partner businesses in SAP, the reality is that it is very time consuming and tiring, especially since we have to arrange it first or click one by one and send it. This is also a form of community service in n8n and n8n companies, as well as dedication to small businesses using SAP, SAP users, companies or owners who use SAP so that reality is no longer tiring and is able to answer existing reality problems automatically. ## How it works? Easy explanation: The First Manual Trigger Node is used when clicking to start the program running. It's like starting by clicking the button first. After that the HTTP Request will be sent to the next node, here containing SAP. After that, each function will program and process it into clean data. Then after that it will be sent to Gmail via the Gmail node. The AI Agent will carry out the task of reporting, analyzing and sending it via Gmail, here using model Open AI. You can immediately see the data thoroughly, because the data has been processed. If you want to process it again, just direct the AI system to process it again. And all duties and responsibilities have been completed Very practical and easy, plus its automatic nature. I'm sure you can understand it wisely. ## Set up instructions Complete what is in the nodes as stated in the notes column. Because the other nodes have been set up neatly, what you have to set up is, first, you have to connect the Gmail and Open AI "Credential Accounts" only. After that, enter the email address you want to send or receive in the Gmail node parameters. Well, it's very simple. Everything is organized wisely, so you just follow the notes or setup instructions provided, or you can add other things according to your specific purpose and congratulations you are ready to use it. ## Requirements As a reminder: It must be arranged in nodes, what your business description looks like, also according to the conditions of your small business, so that the AI Agent matches your business knowledge base. Must have (if not, make sure you are registered) in each "Credential Account" by following the guide on how to do it n8n the guide is very complete. Don't forget to save, and make sure the workflow is active and don't forget about "Account Credentials". ## How to customize this workflow to your needs You can directly organize your business knowledge base in these nodes, so that according to your business in its field and what services it sells or has or here is your business partner, you can then carry out tasks and answer them.
Receive Bitcoin, Etherium, Solana, Binance data with Gecko Coin and Gmail
## Who is this for? This workflow is intended for Traders for trading, Crypto Investors, Professionals in Web 3, Web 3 Developers, Crypto Marketers, Web 3 Programmers, especially in the world of Crypto Currency, Blockchain, and all professionals working in the world of Web 3, including agencies or companies that use Web 3 data. Here you can read Bitcoin, Etherium, Solana and Binance data. And this is specifically for those who want and need to automate workflows involving data in Web 3 and Market Crypto, facilitating access to Web 3 and Crypto data without manual coding, improving decision-making performance for buy or sell so that it can be integrated with other tools. In fact, to read market patterns on web 3 and crypto requires precise data on Dex Market. In particular, you have to analyze and research extensively and precisely in a traditional way, which will take time. This is also a form of dedication to the community at n8n and the n8n company, as well as dedication to Traders, Investors, Web 3 Companies, Programmers, Developers, including professionals in Web 3 and Crypto so that reality no longer experiences failure and is able to answer existing reality problems. ## How it works? Easy explanation: The First Schedule Trigger is used to position the right and wise time, and organize the get data to the next Node. It's like the right execution must be at the right time. After that an HTTP Request will be received from Gecko Coin to work together with the Function, in this case I chose manual coding because it is detailed and specific. After that, the Function will carry out its task, namely changing the raw data into data that is ready to be read by humans. Then after everything is sent and received by Gmail, it produces results in the form of ready-to-read data. You can immediately see the data thoroughly, because the data has been processed. If you want to process it again, just direct the AI system to process it again. And all duties and responsibilities have been completed Very practical and easy, plus its automatic nature. I'm sure you can understand it wisely. ## Set up instructions Complete what is in the nodes as stated in the notes column. First, you have to connect or create a Gmail “Credentials Account”. Because all nodes have been setup neatly and cleanly. Second, next in Gmail, write your email address to receive the data. Here, just follow the module instructions that n8n has provided, making it very easy. This will honor you of course. Everything is organized wisely, so you just follow the notes or setup instructions provided, or you can add other things according to your specific purpose and congratulations you are ready to use it. ## Requirements As a reminder: Everything according to the conditions of your destination. There must be (if not, make sure it is registered) in each "Credential Account" by following the guide on how to do it n8n the guide is very complete Don't forget to save, and make sure the workflow is active. ## How to customize this workflow to your needs You can immediately add another node to save it again in the advanced node layer. Prepare the coins you want for your needs in additional nodes, so that your specific coins are also high when carrying out tasks and answering them, and according to your goals.
Automate URL shortening with Bitly using Llama3 chat interface
## Who is this for? This workflow is intended for online users who want and need workflow automation that minimizes link creation time and shortens links. This has an impact on the speed of work time and energy. In reality, links created one by one and are very long are very time consuming and impractical, especially if we have to compile them first and send them. This is also a form of service to the community at n8n and the n8n company, and so that reality is no longer tiring and is able to answer existing reality problems. It can also be used to learn how automatic link building works. ## How it works? Easy explanation: 1) Firstly, open chat is intended to trigger commands that are sent to the AI model and Bitly Tools, you can do any command and just include the link. Later here we will also create a link. 2) The two, AI Agents will send AI models to work according to input commands and produce output via open chat. 3) Third, the Bitly tool that is set up to create links will do its job. Because it is tied to the AI Agent and AI model. 4) Finally, you can immediately see and open the link that has been created. This is very simple and very simple. Makes it easy for everyone. ## Set up instructions Complete what is in the nodes as stated in the notes column. 1) First, you download Ollama, using the guide that has been provided. Then after you run the model, you can create and connect a "Credential Account". 2) Second, you need an open chat trigger node or you can use other triggers too. 3) Third, the AI Agent selects the Ollama model, and the Bitly tools that have been prepared are set up here. 4) Fourth, just run it and it works. This is very simple and very practical. ## Requirements As a reminder: It should be set in each node, like what your goal is, also according to the conditions of your goal. There must be (if not, make sure it is registered) in each "Account Credential" by following the guide on how to do it n8n the guide is very complete Don't forget to save, and make sure the workflow is active. ## How to customize this workflow to your needs You can immediately add other nodes or other triggers to be able to send this link, such as email and so on, which will provide knowledge for your needs in additional nodes, so that accuracy is also high when carrying out tasks, task goals and responsibilities. ## Congratulations on this automation and Thank you to n8n and the n8n community
Retrieve NASA space weather & asteroid data with GPT-4o-mini and Telegram
## Who is this for? This workflow is intended for researchers, educators, developers, media publications, scientists, engineers, science teachers, researchers & scientists in the fields of astronomy, astrophysics, and space weather, science journalists & content creators, educators & education platform managers, data analysts & data engineers in the space research sector, museum managers or public science institutions and professions that use space data who want and need to automate workflows involving NASA space data, facilitate access to NASA science data without manual coding, increase the efficiency of research/education teams until they can be combined with other tools. In reality, data if processed and work on data one by one is very time-consuming and tiring, especially if we have to compile it first and send it. This is also a form of devotion to the community at n8n and the n8n company, as well as devotion to scientists, teachers, developers, education and media publications so that the reality is no longer tiring and is able to answer the problems of existing reality. ## How it works? Easy explanation: 1) The First Nodes Telegram Trigger is used to receive data that is delivered to the next Nodes. It is like inputting information or instructions to the AI Agent and the AI Agent will process it. 2) After that, the AI Agent will accept to work together with the AI Model, in this case I chose OpenAI because of its capabilities. 3) After that, the AI Agent will carry out its task, namely taking data from each NASA Node that I have set up. 4) Then, after the NASA Nodes send and are received and then processed by the AI Agent, the AI Agent will send it to the last node, namely Telegram, which receives and sends the results of the AI Agent's task. 5) You can immediately see the data in a mature manner, because the data has been processed. If you want to process it again, just direct this AI System to process it again. 6) And all tasks and responsibilities are completed It is very practical and easy, plus its automated nature. I'm sure you can understand it wisely. ## Set up instructions Complete what is in the nodes as stated in the notes column. 1) First you have to connect Telegram "Credential Account" to the nodes. 2) Second, Next I set up using "Define below" it's like customization, because the output that is issued later will be in accordance with the existing trigger. Here I have set it up so just use it. 3) Then, the AI Model that fits the purpose and has the capability is the OpenAI Model. Here you need to create or connect a "Credential Account" and just choose the model. Here I have set up with a wise and capable choice. 4) Next, for each NASA Nodes, you must create or connect a "Credential Account" (Using only one Credential Account). Here, just follow the instructions of the module that has been given n8n, it makes it very easy. 5) Finally, for the Telegram node action, you only need to connect the "Credential Account" that you have created on the first Telegram node. Everything has been set up wisely, so you just have to follow the notes or setup instructions given, or you can add other things according to your specific purpose and congratulations you are ready to use it. ## Requirements As a reminder: It must be set in each node, such as what your goals are, also according to the conditions of your goals. There must be (If not, make sure it is registered) in each "Credential Account" by following the guide on how to do it n8n the guide is very complete Don't forget to save, and make sure the workflow is active. ## How to customize this workflow to your needs You can directly add nodes to store them again in the 2nd data layer. Prepare a knowledge base for your purposes in additional nodes, so that the accuracy is also high when performing tasks and answering them, and in accordance with the objectives of the task and responsibilities.
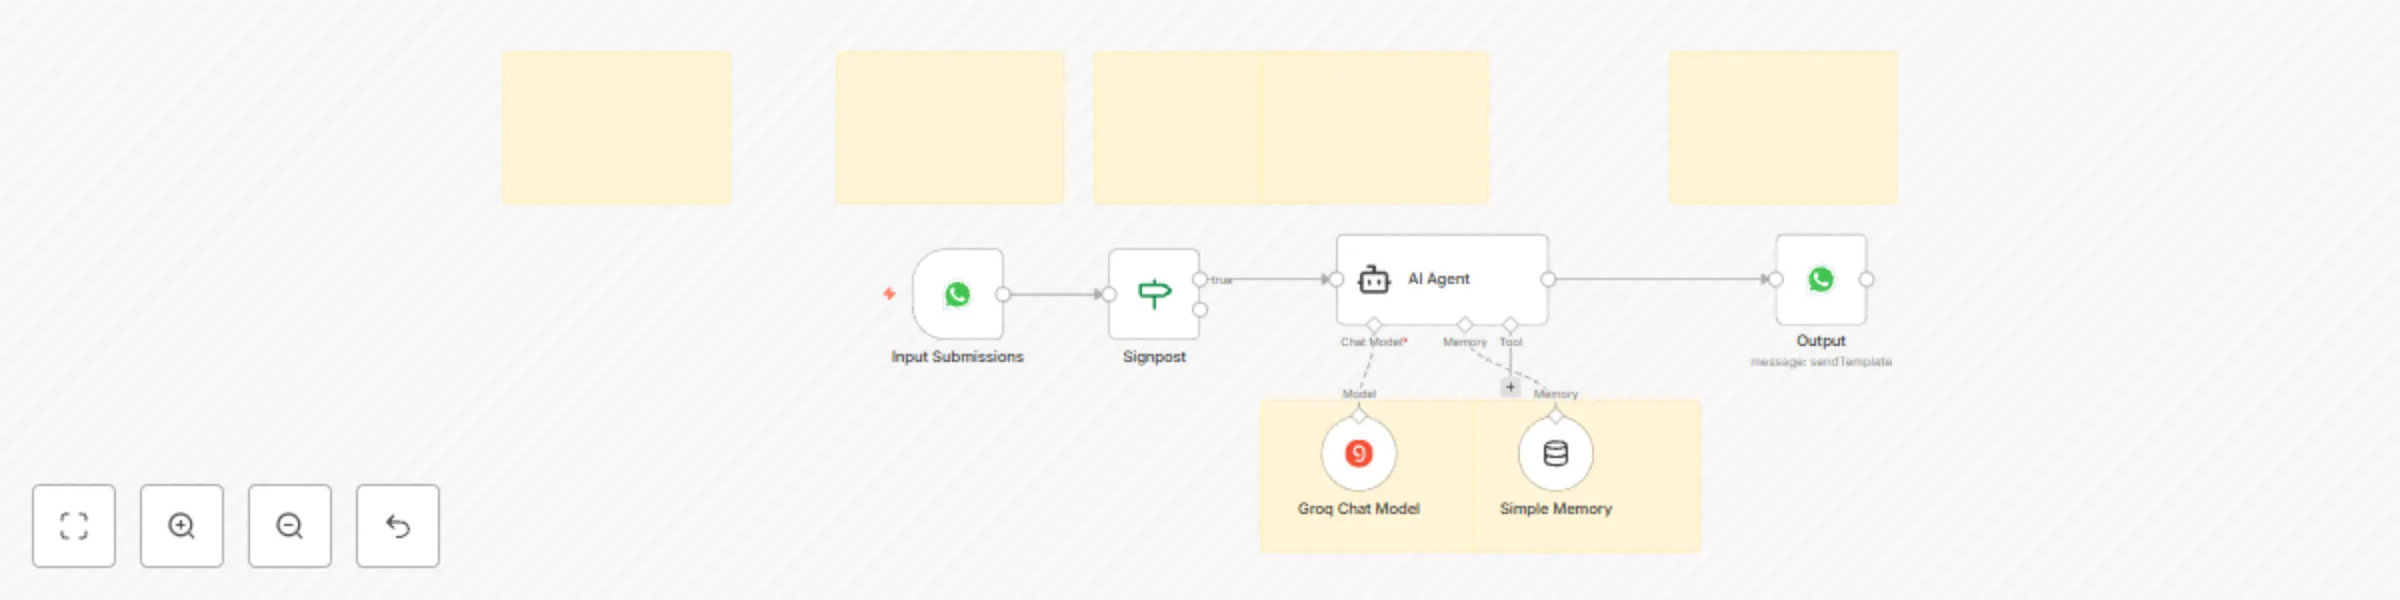
Automatic WhatsApp response with Groq LLM and conversation memory
### **Who is this for?** This workflow is intended for individual users or teams who want to automate their small business on WhatsApp practically by automatically replying about your business products or services using the groq model. Based on small businesses, there is a task to answer many customers or clients on WhatsApp, in reality answering one by one is very time-consuming and tiring, moreover we have to compose sentences first or click on templates and send them. This is also a form of dedication to the community at n8n and n8n company, as well as dedication to small businesses so that reality is no longer tiring and able to answer the problems of existing reality. ### **How it works?** Easy explanation: 1) Whatsapp Trigger is used to receive whatsapp messages from other numbers, this is also a place to input data and send it to the next node or to the AI Agent 2) If node is used to direct the workflow flow under certain conditions. This will be like checking whether a condition is met or not, directing the action to the next node, until it meets the criteria. 3) Then it is directed to the AI Agent to be able to use the groq model and storage using simple memory, why? Because it minimizes the costs used later but still works as expected. 4) The Groq chat model will think and carry out its tasks and store data in simple memory, and carry out its tasks to answer/send messages to whatsapp customers/clients on the AI Agent node bond. 5) And enjoy this workflow working for you. ### **Set up instructions** Complete what is in the nodes as stated in the notes column. 1) You need a "Credential Account" On the first node, namely as a WhatsApp trigger, you can register it by following the guide from n8n 2) You need an AI Agent to carry out the objectives of these tasks. You can change it to define below in “Source for Prompt (User Message)>Fix and “Prompt (User Message)” to text body>Expression. 3) You need a Groq model to be able to think and carry out tasks, you have to set this up by creating a “Credential Account” and just follow the steps on n8n and select the model. 4) After that, for practical and simple storage, add memory to the Nodes AI agent, namely “Simple Memory”, select Define below in “Session ID” and in “Key” is used to store incoming chat receipts. 5) After that, add nodes to produce action output on WhatsApp, namely Message Actions>Send message. After adding this set up nodes according to the existing notes, and I have set it up. 6) Save and run, test the workflow and activate the workflow. And this Workflow is ready to use. ### **Requirements** As a reminder: 1) Must set up in nodes, such as what your business description is, also according to your small business conditional, so that the AI Agent is in accordance with your business knowledge base 2) Must have (if not, make sure you have registered) on each "Credential Account" by following the guide on how to do it n8n the guidelines are very complete 3) Do not forget to save, and make sure the workflow is active. ### **How to customize this workflow to your needs ** You can directly set up your business knowledge base on the nodes, so that the accuracy is also high when carrying out tasks and answering them.