Fahmi Fahreza
Workflows by Fahmi Fahreza
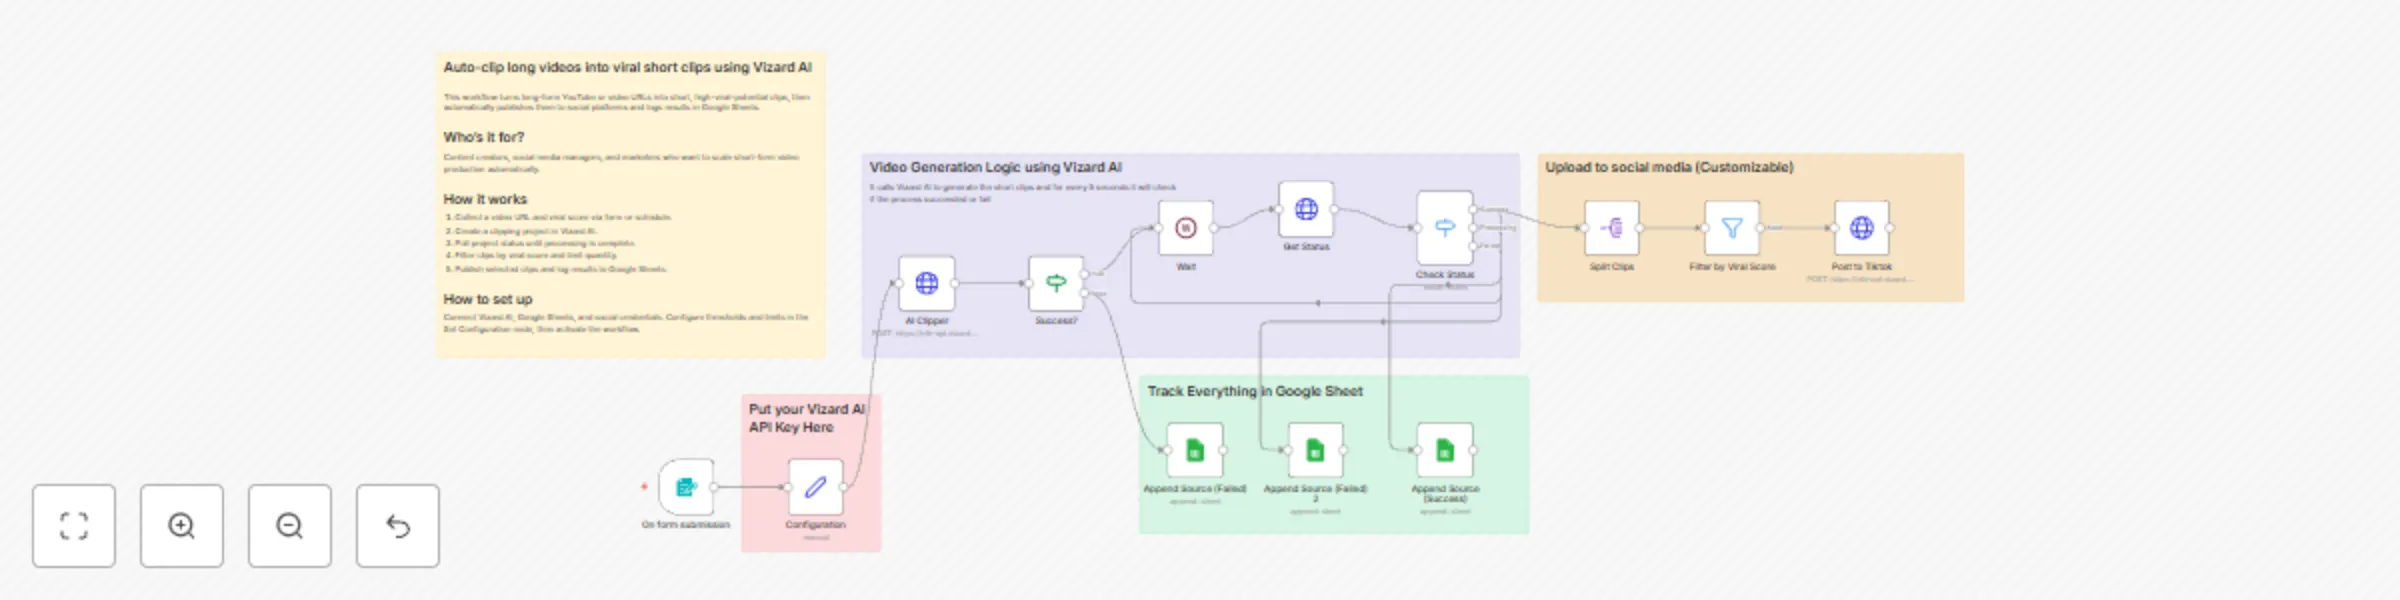
Auto-clip long videos into viral short clips with Vizard AI and social publishing
## Auto-clip long videos into viral short clips using Vizard AI This workflow turns long-form YouTube or video URLs into short, high-viral-potential clips, then automatically publishes them to social platforms and logs results in Google Sheets. ## Who’s it for? Content creators, social media managers, and marketers who want to scale short-form video production automatically. ## How it works 1. Collect a video URL and viral score via form or schedule. 2. Create a clipping project in Vizard AI. 3. Poll project status until processing is complete. 4. Filter clips by viral score and limit quantity. 5. Publish selected clips and log results to Google Sheets. ## How to set up Connect Vizard AI, Google Sheets, and social credentials. Configure thresholds and limits in the Set Configuration node, then activate the workflow.
TikTok trend analyzer with Apify + Gemini + Airtable
## TikTok Trend Analyzer with Apify + Gemini + Airtable Automatically scrape trending TikTok videos, analyze their virality using Gemini AI, and store insights directly into Airtable for creative research or content planning. ## Who’s it for? Marketing analysts, creators, and creative agencies looking to understand why videos go viral and how to replicate successful hooks and formats. ## How it works 1. A scheduled trigger runs the Apify TikTok Trends Scraper weekly. 2. The scraper collects trending video metadata. 3. Data is stored in Airtable (views, likes, captions, sounds, etc.). 4. When a specific video is submitted via webhook, the workflow fetches it from Airtable. 5. Gemini AI analyzes the video and extracts structured insights: summary, visual hook, audio, and subtitle analysis. 6. The workflow updates the Airtable record with these AI insights. ## How to set up Connect Apify and Airtable credentials, link Gemini or OpenAI keys, and adjust the schedule frequency. Add your Airtable base and table IDs. You can trigger analysis manually via the webhook endpoint.
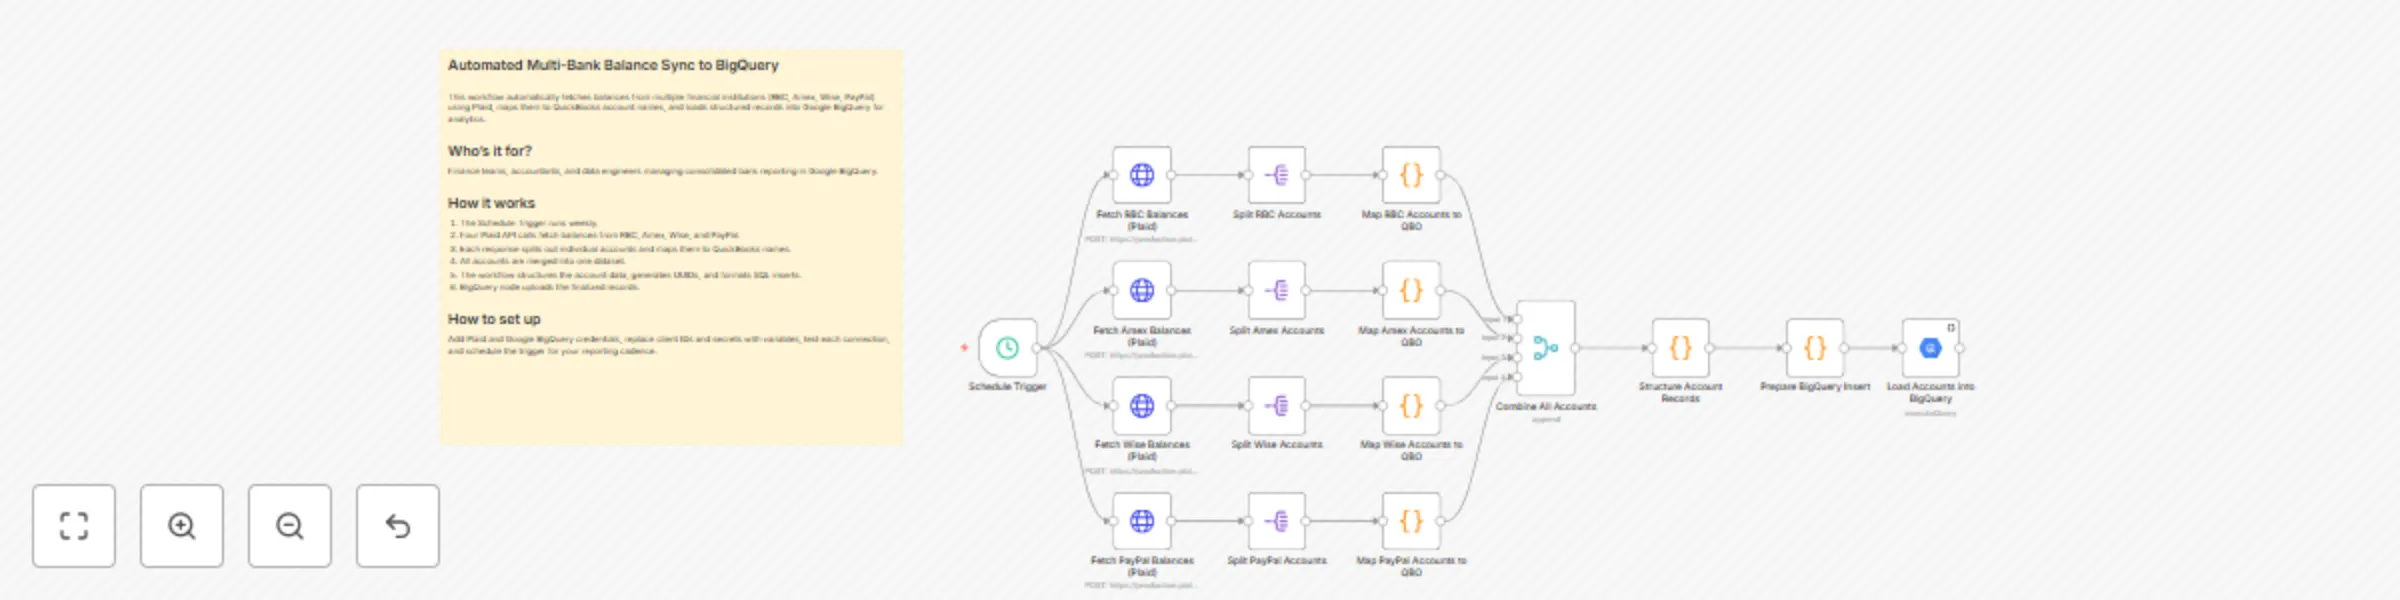
Sync multi-bank balance data to BigQuery using Plaid
## Automated Multi-Bank Balance Sync to BigQuery This workflow automatically fetches balances from multiple financial institutions (RBC, Amex, Wise, PayPal) using Plaid, maps them to QuickBooks account names, and loads structured records into Google BigQuery for analytics. ## Who’s it for? Finance teams, accountants, and data engineers managing consolidated bank reporting in Google BigQuery. ## How it works 1. The Schedule Trigger runs weekly. 2. Four Plaid API calls fetch balances from RBC, Amex, Wise, and PayPal. 3. Each response splits out individual accounts and maps them to QuickBooks names. 4. All accounts are merged into one dataset. 5. The workflow structures the account data, generates UUIDs, and formats SQL inserts. 6. BigQuery node uploads the finalized records. ## How to set up Add Plaid and Google BigQuery credentials, replace client IDs and secrets with variables, test each connection, and schedule the trigger for your reporting cadence.
AI-powered product video generator (Foreplay + Gemini + Sora 2)
## AI-Powered Product Video Generator (Foreplay + Gemini + Sora 2) Sign Up For Foreplay [HERE](https://foreplay.co/?via=urpwUS) Automatically generate personalized, cinematic-quality product videos using Foreplay’s ad data, Google Gemini AI for creative prompts, and Sora 2 for text-to-video generation. ## Who’s it for? Perfect for marketers, brand managers, or creators who want to produce quick, high-quality video ads without manual scripting or editing. ## How it works 1. Fetch product data and related competitor videos from Foreplay. 2. Use Gemini AI to generate creative text-to-video prompts. 3. Send the prompt and image to Kie.ai to generate a short, cinematic product video. 4. Save the finished video automatically to Google Drive. ## How to set up - Connect your [Foreplay](https://foreplay.co/?via=urpwUS), Google Drive, Gemini, and Kie.ai credentials. - Set your product image folder's permission (Google Drive) as public. - Add your API keys inside the _**Set Workflow Credentials**_ node. - Then run the workflow manually to generate your first video ad!
Analyze Trustpilot & Sitejabber sentiment with Decodo + Gemini to sheets
## Analyze Trustpilot & Sitejabber sentiment with Decodo + Gemini to Sheets Sign up for Decodo [HERE](https://visit.decodo.com/discount) for Discount This template scrapes public reviews from **Trustpilot** and **Sitejabber** with a Decodo tool, converts findings into a **flat, spreadsheet-ready JSON**, generates a concise sentiment summary with **Gemini**, and appends everything to **Google Sheets**. It’s ideal for reputation snapshots, competitive analysis, or lightweight BI pipelines that need structured data and a quick narrative. ## Who’s it for? Marketing teams, growth analysts, founders, and agencies who need repeatable review collection and sentiment summaries without writing custom scrapers or manual copy/paste. ## How it works 1. A **Form Trigger** collects the *Business Name or URL*. 2. **Set (Config Variables)** stores `business_name`, `spreadsheet_id`, and `sheet_id`. 3. The **Agent** orchestrates the Decodo tool and enforces a **strict JSON schema** with at most **10 reviews per source**. 4. **Gemini** writes a succinct summary and recommendations, noting missing sources with: “There’s no data in this website.” 5. A **Merge** node combines JSON fields with the narrative. 6. **Google Sheets** appends a row. ## How to set up 1. Add **Google Sheets**, **Gemini**, and **Decodo** credentials in Credential Manager. 2. Replace `(YOUR_SPREADSHEET_ID)` and `(YOUR_SHEET_ID)` in **Set: Config Variables**. 3. In **Google Sheets**, select **Define below** and map each column explicitly. 4. Keep the parser and agent connections intact to guarantee flat JSON. 5. Activate, open the form URL, submit a business, and verify the appended row.
Weekly SEO watchlist audit to Google Sheets with Gemini and Decodo
## Weekly SEO Watchlist Audit to Google Sheets (Gemini + Decodo) Sign up for Decodo [HERE](https://visit.decodo.com/discount) for Discount Automatically fetches page content, generates a compact SEO audit (score, issues, fixes), and writes both a per-URL summary and a normalized “All Issues” table to Google Sheets—great for weekly monitoring and prioritization. ## Who’s it for? Content/SEO teams that want lightweight, scheduled audits of key pages with actionable next steps and spreadsheet reporting. ## How it works 1. Weekly trigger loads the Google Sheet of URLs. 2. Split in Batches processes each URL. 3. Decodo fetches page content (markdown + status). 4. Gemini produces a strict JSON audit via the AI Chain + Output Parser. 5. Code nodes flatten data for two tabs. 6. Google Sheets nodes append Summary and All Issues rows. 7. Split in Batches continues to the next URL. ## How to set up - Add credentials for Google Sheets, [Decodo](https://visit.decodo.com/discount), and Gemini. - Set `sheet_id` and Sheet GIDs in the Set node. - Ensure input sheet has a `URL` column. - Configure your Google Sheets tabs with proper headers matching each field being appended (e.g., URL, Decodo Score, Priority, etc.). - Adjust schedule as needed. - Activate the workflow.
Match resumes to jobs automatically with Gemini AI and Decodo Scraping
## Match Resumes to Jobs Automatically with Gemini AI and Decodo Scraping Sign up for Decodo [HERE](https://visit.decodo.com/discount) for Discount This automation intelligently connects candidate profiles to job opportunities. It takes an intake form with a short summary, resume link, and optional LinkedIn profile, then enriches the data using Decodo and Gemini. The workflow analyzes skills, experience, and role relevance, ranks top matches, and emails a polished HTML report directly to your inbox—saving hours of manual review and matching effort. ## Who’s it for? This template is designed for recruiters, hiring managers, and talent operations teams who handle large candidate volumes and want faster, more accurate shortlisting. It’s also helpful for job seekers or career coaches who wish to identify high-fit openings automatically using structured AI analysis. ## How it works 1. Receive an intake form containing a candidate’s resume, summary, and LinkedIn URL. 2. Parse and summarize the resume with Gemini for core skills and experience. 3. Enrich the data using Decodo scraping to gather extra profile details. 4. Merge insights and rank job matches from Decodo’s job data. 5. Generate an HTML shortlist and email it automatically through Gmail. ## How to set up 1. Connect credentials for Gmail, Google Gemini, and Decodo. 2. Update the Webhook path and test your form connection. 3. Customize variables such as location or role preferences. 4. Enable **Send as HTML** in the Gmail node for clean reports. 5. Publish as **self-hosted** if community nodes are included.
Telegram research assistant for academic papers using Gemini AI and Decodo
## AI Research Assistant Using Gemini AI and Decodo Sign up for Decodo [HERE](https://visit.decodo.com/discount) for Discount This workflow transforms your Telegram bot into a smart academic research assistant powered by Gemini AI and Decodo. It analyzes queries, interprets URLs, scrapes scholarly data, and returns concise summaries of research papers directly in chat. ## Who’s it for? For researchers, students, and AI enthusiasts who want to search and summarize academic content via Telegram using Google Scholar and arXiv. ## How it works 1. The Telegram bot captures text, voice, or image messages. 2. Gemini models interpret academic URLs and user intent. 3. Decodo extracts paper details like titles, abstracts, and publication info. 4. The AI agent summarizes results and delivers them as text or file (if too long). ## How to set up - Add your Telegram bot credentials in the `Start Telegram Bot` node. - Connect Google Gemini and Decodo API credentials. - Replace `{{INPUT_SEARCH_URL_INSIGHTS}}` placeholder on `Research Summary Agent`'s system message with your search URL insights (or use the pinned example). - Test by sending a text, image, or voice message to your bot. - Activate the workflow to run in real-time.
Scrape, structure, and store news data using Decodo, Gemini AI and Google Sheets
Sign up for Decodo [HERE](https://visit.decodo.com/discount) for Discount Automatically scrape, structure, and log forum or news content using Decodo and Google Gemini AI. This workflow extracts key details like titles, URLs, authors, and engagement stats, then appends them to a Google Sheet for tracking and analysis. ## Who’s it for? Ideal for data journalists, market researchers, or AI enthusiasts who want to monitor trending topics across specific domains. ## How it works 1. **Trigger:** Workflow runs on schedule. 2. **Data Setup:** Defines forum URLs and geolocation. 3. **Scraping:** Extracts raw text data using the Decodo API. 4. **AI Extraction:** Gemini parses and structures the scraped text into clean JSON. 5. **Data Storage:** Each news item is appended or updated in Google Sheets. 6. **Logging:** Records scraping results for monitoring and debugging. ## How to set up - Add your **Decodo**, **Google Gemini**, and **Google Sheets** credentials in n8n. - Adjust the **forum URLs**, **geolocation**, and **Google Sheet ID** in the `Workflow Config` node. - Set your preferred trigger interval in `Schedule Trigger`. - Activate and monitor from the n8n dashboard.
CoinGecko crypto price forecasting pipeline with Gemini AI, Decodo, and Gmail
## Automated Crypto Forecast Pipeline using Decodo and Gmail Sign Up for Decodo [HERE](https://visit.decodo.com/discount) for discount This template scrapes CoinGecko pages for selected coins, converts metrics into clean JSON, stores them in an n8n Data Table, generates 24-hour direction forecasts with Gemini, and emails a concise report. ## Who’s it for? Crypto watchers who want automated snapshots, forecasts, and a daily email—without managing a full data stack. ## How it works 1. 30-min schedule loops coins, scrapes CoinGecko (Decodo), parses metrics, and upserts to Data Table. 2. 18:00 schedule loads last 48h data. 3. Gemini estimates next-24h direction windows. 4. Email is rendered (HTML + plain text) and sent. ## How to set up - Add [Decodo](https://visit.decodo.com/discount), Gmail, and Gemini credentials. - Open **Configure Coins** to edit tickers. - Set Data Table ID. - Replace recipient email. - (Self-host only) Community node **Decodo** required. @decodo/n8n-nodes-decodo (community)
Send Personalized B2B/B2C Welcome Emails with Jotform, GPT-4o & Perplexity AI
## Send smart, personalized welcome emails to any Jotform lead This workflow intelligently qualifies new Jotform leads and sends the perfect welcome email every time. It detects whether a lead is using a business or personal email address and tailors the outreach accordingly—either with deep company research for B2B leads or a warm, direct welcome for B2C leads. ## Who's it for? - **Businesses with mixed audiences:** Companies that serve both business clients and individual users. - **Sales & Marketing Teams:** To automate lead qualification and send context-aware first-touch emails. - **Founders & Solopreneurs:** To ensure every new lead gets a relevant, personalized welcome without manual effort. ## How it works 1. **Trigger:** The workflow starts on a new Jotform submission. 2. **Filter:** It checks if the lead's email is a work email (e.g., `[email protected]`) or a personal one (e.g., `[email protected]`). 3. **Path A (Work Email):** The workflow researches the company using Perplexity AI and then uses OpenAI to draft a deeply personalized email referencing company-specific details. 4. **Path B (Personal Email):** The workflow skips the research and uses OpenAI to draft a warm, friendly, but more general welcome email. 5. **Send:** The appropriate, context-aware email is sent to the new lead via Gmail. ## How to set up 1. **Jotform:** Connect your Jotform credentials and choose your lead capture form. **Important:** Your form must contain fields with the exact names `name` and `email`. You can add other fields for more context (e.g., `company_size`). 2. **Credentials:** Connect your Perplexity AI, OpenAI, and Gmail accounts. 3. **Activate Workflow:** Turn the workflow on. ## Requirements - An [n8n account](https://n8n.partnerlinks.io/hsfk0lhyvur4). - A [Jotform account](https://www.jotform.com/?partner=fahmifahreza). - A Perplexity AI account with API access. - An OpenAI account with API access. - A Gmail account. ## How to customize the workflow - **Filter Logic:** Add more personal email domains (e.g., `icloud.com`) to the list in the `Check if Email is Work or Personal` node to improve filtering. - **Prompts:** Customize the prompts in both the AI Agent nodes to match your brand's voice and tone.
Automated content migration from ClickUp Docs to Airtable records
## Create Airtable records from new ClickUp Doc pages This workflow automates the process of turning content from ClickUp Docs into structured data in Airtable. When a new task is created in ClickUp with a link to a ClickUp Doc in its name, this workflow triggers, fetches the entire content of that Doc, parses it into individual records, and then creates a new record for each item in a specified Airtable base and table. ## Who's it for This template is perfect for content creators, project managers, and operations teams who use ClickUp Docs for drafting or knowledge management and Airtable for tracking and organizing data. It helps bridge the gap between unstructured text and a structured database. ## How it works 1. **Trigger:** The workflow starts when a new task is created in a specific ClickUp Team. 2. **Fetch & Parse URL:** It gets the new task's details and extracts the ClickUp Doc URL from the task name. 3. **Get Doc Content:** It uses the URL to fetch the main Doc and all its sub-pages from the ClickUp API. 4. **Process Content:** A Code node parses the text from each page. It's designed to split content by `* * *` and separate notes by looking for the "notes:" keyword. 5. **Find Airtable Destination:** The workflow finds the correct Airtable Base and Table IDs by matching the names you provide. 6. **Create Records:** It loops through each parsed content piece and creates a new record in your specified Airtable table. ## How to set up 1. **Configure the `Set` Node:** Open the "Configure Variables" node and set the following values: * `clickupTeamId`: Your ClickUp Team ID. Find it in your ClickUp URL (e.g., `app.clickup.com/9014329600/...`). * `airtableBaseName`: The exact name of your target Airtable Base. * `airtableTableName`: The exact name of your target Airtable Table. * `airtableVerticalsTableName`: The name of the table in your base that holds "Vertical" records, which are linked in the main table. 2. **Set Up Credentials:** Add your ClickUp (OAuth2) and Airtable (Personal Access Token) credentials to the respective nodes. 3. **Airtable Fields:** Ensure your Airtable table has fields corresponding to the ones in the `Create New Record in Airtable` node (e.g., `Text`, `Status`, `Vertical`, `Notes`). You can customize the mapping in this node. 4. **Activate Workflow:** Save and activate the workflow. 5. **Test:** Create a new task in your designated ClickUp team. In the task name, include the full URL of the ClickUp Doc you want to process. ## How to customize the workflow * **Parsing Logic:** You can change how the content is parsed by modifying the JavaScript in the `Parse Content from Doc Pages` Code node. For example, you could change the delimiter from `* * *` to something else. * **Field Mapping:** Adjust the `Create New Record in Airtable` node to map data to different fields or add more fields from the source data. * **Trigger Events:** Modify the `Trigger on New ClickUp Task` node to respond to different events, such as `taskUpdated` or `taskCommentPosted`.
Generate AI videos from text prompts with Google Veo
This n8n workflow uses the Google Gemini node to generate AI videos via the Veo model. It replaces complex manual API setups with a simple, plug-and-play experience. ### Important Prerequisite To use the Veo model, your Google Cloud project **must have billing enabled**. The feature is not available on the free tier and may incur charges. ### Who Is This For? * **Marketers & Content Creators** Quickly create B-roll, ad clips, or social content from text prompts. * **Filmmakers & Artists** Prototype scenes and visualize ideas without filming. * **Anyone exploring AI video generation** Use Google’s Veo model without any manual API work. ### What the Workflow Does * **Define Prompt** Write a text prompt in the `1. Set Video Prompt` node. * **Trigger** Manually run the workflow with one click. * **Generate** The Gemini node sends the prompt to the Veo model and generates a video. * **Output** Returns a binary video file ready to save or share. ### Setup Instructions **1. Enable Google Cloud Billing** Make sure your Google Cloud project has billing activated. **2. Add Credentials** Add your Google AI (Gemini) credentials in n8n. **3. Set the Prompt** Open the `1. Set Video Prompt` node and write your video idea. **4. Activate Workflow** Save and activate the workflow. **5. Run It** Click “Execute Workflow” to generate a video. ### Requirements * n8n (Cloud or Self-Hosted) * Google Cloud Project with billing enabled * Google AI (Gemini) credentials linked to that project ### Customization Ideas * **Save Output** Add a Google Drive, Dropbox, or S3 node to store the video. * **Post Automatically** Connect social media nodes (YouTube Shorts, TikTok, etc.) to publish content. * **Generate in Bulk** Replace the Set node with Google Sheets or Airtable to generate multiple videos from a list of prompts.
Analyze any video and generate text summaries with Google Gemini 2.5 Pro
*This workflow contains community nodes that are only compatible with the self-hosted version of n8n.* ## Analyze Any Video and Get a Text Summary with Google Gemini This workflow uses the NEW native Google Gemini node in n8n to analyze videos and generate detailed text summaries. Just upload a video, and Gemini will describe the scenes, objects, and actions frame by frame. ### Who Is This For? * **Content Creators & Marketers** Quickly generate summaries, shot lists, or descriptions for video content. * **Video Editors** Get a fast overview of footage without manual review. * **Developers & n8n Beginners** Learn how to use multimodal AI in n8n with a simple setup. * **AI Enthusiasts** Explore the new capabilities of the Gemini Pro model. ### How It Works * **Upload** Triggered via a form where you upload a video file. * **Analyze** The video is sent to the Gemini 2.5 Pro model for analysis. * **Describe** Gemini returns a detailed text summary of what it sees in the video. ### Setup Instructions **1. Add Credentials** Connect your Google AI (Gemini) credentials in n8n. **2. Activate Workflow** Save and activate the workflow. **3. Upload Video** Open the Form Trigger URL, upload a video, and submit the form. ### Requirements * An n8n instance (Cloud or Self-Hosted) * A Google AI (Gemini) account ### Customization Ideas * **Translate the Summary** Add another LLM node to translate the analysis. * **Create Social Media Posts** Use the output to generate Twitter or LinkedIn content. * **Store the Output** Save the summary to Google Sheets or Airtable. * **Automate with Cloud Storage** Replace the Form Trigger with a Google Drive or Dropbox trigger to process videos automatically.
Sync QuickBooks chart of accounts to Google BigQuery
## Sync QuickBooks Chart of Accounts to Google BigQuery Keep a historical, structured copy of your QuickBooks Chart of Accounts in BigQuery. This n8n workflow runs weekly, syncing new or updated accounts for better reporting and long-term tracking. ### Who Is This For? * **Data Analysts & BI Developers** Build a robust financial model and analyze changes over time. * **Financial Analysts & Accountants** Track structural changes in your Chart of Accounts historically. * **Business Owners** Maintain a permanent archive of your financial structure for future reference. ### What the Workflow Does * **Extract** Every Monday, fetch accounts created or updated in the past 7 days from QuickBooks. * **Transform** Clean the API response, manage currencies, create stable IDs, and format the data. * **Format** Convert cleaned data into an SQL insert-ready structure. * **Load** Insert or update account records into BigQuery. ### Setup Steps **1. Prepare BigQuery** * Create a table (e.g., `quickbooks.accounts`) with columns matching the final SQL insert step. **2. Add Credentials** * Connect QuickBooks Online and BigQuery credentials in n8n. **3. Configure the HTTP Node** * Open `1. Get Updated Accounts from QuickBooks`. * Replace the Company ID {COMPANY_ID} with your real Company ID. * Press `Ctrl + Alt + ?` in QuickBooks to find it. **4. Configure the BigQuery Node** * Open `4. Load Accounts to BigQuery`. * Select the correct project. * Make sure your dataset and table name are correctly referenced in the SQL. **5. Activate** * Save and activate the workflow. It will now run every week. ### Requirements * QuickBooks Online account * QuickBooks Company ID * Google Cloud project with BigQuery and a matching table ### Customization Options * **Change Sync Frequency** Adjust the schedule node to run daily, weekly, etc. * **Initial Backfill** Temporarily update the API query to `select * from Account` for a full pull. * **Add Fields** Modify `2. Structure Account Data` to include or transform fields as needed.
Archive trending TikTok hashtags using TikTok, Airtable, and Apify
## Archive Trending TikTok Hashtags to Airtable with Apify This template uses a community node (`@apify/n8n-nodes-apify`). It will not work without the required node installed. ### Who it's for **Social Media Managers & Content Creators** Discover relevant hashtags and build content calendars based on real trends. **Marketing & Brand Strategists** Track cultural shifts and find opportunities by understanding regional audience interests. **Data Analysts** Create a dataset for analyzing hashtag trends, virality, and performance over time. ### What it does This workflow automates trend discovery and data collection from TikTok into Airtable. * **Schedule**: Triggers automatically once a month. * **Scrape**: Runs an Apify Actor to scrape TikTok’s top 100 trending hashtags for a specified country (default is US). * **Retrieve**: Fetches the dataset with hashtag metrics after scraping completes. * **Process & Load**: Splits the dataset and saves each hashtag as a new record in Airtable with relevant details. ### How to set it up **1. Install the Community Node** Go to `Settings; Community Nodes` on your n8n instance and install `@apify/n8n-nodes-apify`. **2. Prepare Airtable** Create a base with a table named `Trending Hashtags`: * ID * Name * Country * Industry * Date Added * Publish Count * Video Views * Rank * Status **3. Add Credentials** Add your Apify and Airtable credentials in n8n. **4. Configure Scraper (Optional)** Open the `1. Run TikTok Hashtag Scraper` node. In the **Custom Body**, you can adjust: * `country_code` (e.g., `"US"` to `"GB"`) * `top100_period` (e.g., `"30"` to `"7"`) **5. Configure Airtable Node** Open the `4. Save Hashtag to Airtable` node. Select the correct Airtable Base and the `Trending Hashtags` table. **6. Activate Workflow** Save and activate the workflow. It will now run automatically every month. ### Requirements * Installed community node: `@apify/n8n-nodes-apify` * Apify account * Airtable account with a structured base ### How to customize the workflow **Change Schedule** Modify the `Start: Monthly Schedule` node to run weekly or on another interval. **Add Notifications** Attach a Slack or Discord node after the `4. Save Hashtag to Airtable` node to alert your team when new data is added. **Filter Hashtags** Use a `Filter` node after `3. Split Hashtags into Items` to only save hashtags that meet specific conditions (e.g., over 1M video views).
Weekly ETL pipeline: QuickBooks financial data to Google BigQuery
This template sets up a weekly ETL (Extract, Transform, Load) pipeline that pulls financial data from QuickBooks Online into Google BigQuery. It not only transfers data, but also cleans, classifies, and enriches each transaction using your own business logic. ### Who It's For - **Data Analysts & BI Developers** Need structured financial data in a warehouse to build dashboards (e.g., Looker Studio, Tableau) and run complex queries. - **Financial Analysts & Accountants** Want to run custom SQL queries beyond QuickBooks’ native capabilities. - **Business Owners** Need a permanent, historical archive of transactions for reporting and tracking. ### What the Workflow Does #### 1. Extract Fetches transactions from the previous week every Monday from your QuickBooks Online account. #### 2. Transform Applies custom business logic: - Cleans up text fields - Generates stable transaction IDs - Classifies transactions (income, expense, internal transfer) #### 3. Format Prepares the cleaned data as a bulk-insert-ready SQL statement. #### 4. Load Inserts the structured and enriched data into a Google BigQuery table. ### Setup Guide #### 1. Prepare BigQuery - Create a dataset (e.g., `quickbooks`) and table (e.g., `transactions`) - The table schema must match the SQL query in the "Load Data to BigQuery" node #### 2. Add Credentials - Add QuickBooks Online and Google BigQuery credentials to your n8n instance #### 3. Configure Business Logic - Open the `Clean & Classify Transactions` node - Update the JavaScript arrays: - `internalTransferAccounts` - `expenseCategories` - `incomeCategories` - Ensure these match your QuickBooks Chart of Accounts exactly #### 4. Configure BigQuery Node - Open the `Load Data to BigQuery` node - Select the correct Google Cloud project - Ensure the SQL query references the correct dataset and table #### 5. Activate the Workflow - Save and activate it - The workflow will now run weekly ### Requirements - A running n8n instance (Cloud or Self-Hosted) - A QuickBooks Online account - A Google Cloud Platform project with BigQuery enabled - A BigQuery table with a matching schema ### Customization Options - **Change Schedule**: Modify the schedule node to run daily, monthly, or at a different time - **Adjust Date Range**: Change the date macro in the `Get Last Week's Transactions` node - **Refine Classification Rules**: Add custom logic in the `Clean & Classify Transactions` node to handle specific edge cases
Automate CV screening and applicant scoring from Gmail to Airtable with AI
### How It Works 1. **Trigger** Watches for new emails with attachments in a Gmail label. 2. **Extract Data** * Extracts job code from the email subject (e.g., `FN-001`) * Extracts raw text from the attached CV (PDF) 3. **AI Parsing** Uses Google Gemini to parse the CV and extract: * Name * Email * Years of experience * Skills 4. **Job Lookup** Uses the extracted job code to retrieve job details from Airtable. 5. **AI Scoring** * Compares applicant data with job requirements * Scores from 1–100 * Generates a brief reasoning summary (in Bahasa Indonesia) 6. **Log to Airtable** Saves applicant data, score, and AI notes to the "Applications" table. ### Setup Instructions 1. **Prepare Airtable Base** * **Job Posts Table** * Columns: Job Code, Job Title, Required Skills, Minimum Experience, Job Description * **Applications Table** * Columns: Applicant Name, Email, Score, Notes * Include a linked field to the Job Posts table 2. **Add Credentials in n8n** * Gmail * Google AI (Gemini) * Airtable 3. **Configure Nodes** * **Trigger**: Set Gmail filter (e.g., `label:job-applications`) * **Extract Job Code**: Verify regex format, default is `([A-Z]{2}-\d{3})` * **Airtable Nodes**: Select your base and table in: * "Find Job Post..." * "Save Applicant..." 4. **Activate Workflow** * Save and enable the workflow * New applications will be processed automatically