Richard Uren
Workflows by Richard Uren
Sync products between Airtable and Shopify with inventory management
## Create Products in Shopify from Airtable This workflow creates products in your Shopify store from Airtable. It also enables inventory tracking and sets the quantity of an inventory item at your store's default location. This is a great way to keep shopify in sync with Airtable if Airtable is your primary source of data, Only records with the 'sync' column set to true are sync'd. Setup Airtable Automations so that if any records are created or updated then this flag is set to true. Records are matched using the 'slug' column which Shopify calls a handle. ### Airtable Setup Notes The Airtable products table has the following columns title - free text description - free text company - free text type - free text status - ACTIVE, DRAFT or ARCHIVE slug - used in the product url, text with no spaces, can also use hyphen. price - sale price of the products compare_at_price - compare at price for products sku - unique code for each product stock_on_hand - quantity of this item available for purchase. sync - boolean, set to true to sync this record. ### Update GraphQL nodes with your Shopify store URL 1) Replace the URL in all GraphQL nodes with the URL for your Shopify store. 2) All GraphQL requests all use the Shopify 2025-04 GraphQL Admin API.
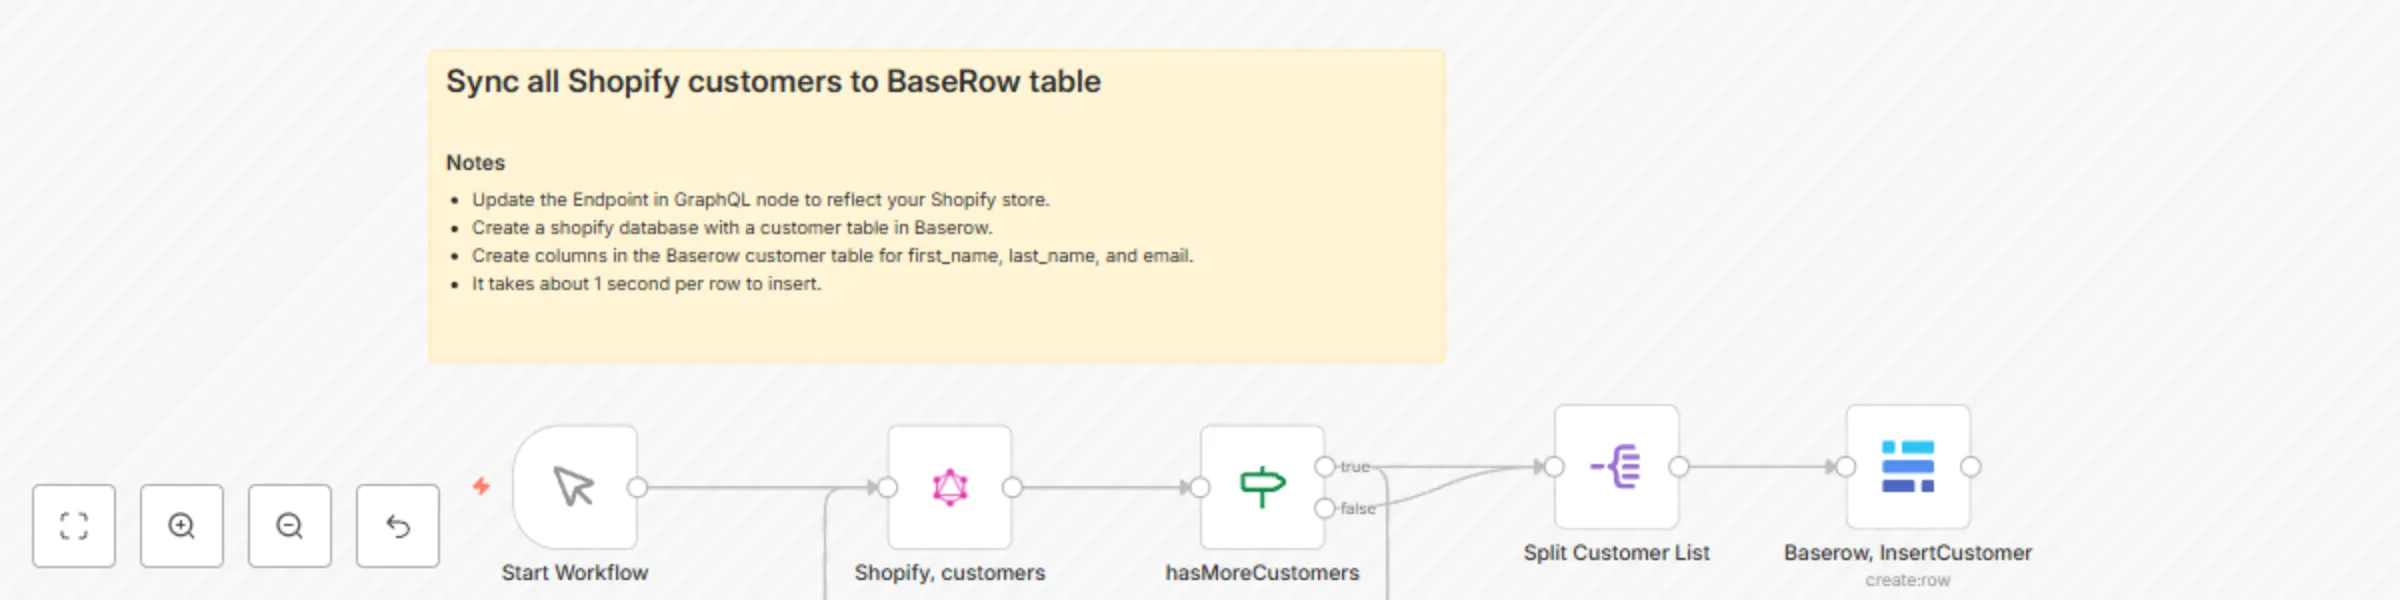
One-way sync Shopify customers to Baserow using GraphQL
This template extracts all customers from shopify using GraphQL and the shopify admin API and sync them into a Baserow table. Setup Notes - Update the Endpoint in GraphQL node to reflect your Shopify store. - In Baserow create a shopify database with a customer table in Baserow. - Create columns in the Baserow customer table for first_name, last_name, and email. - It takes about 1 second per row to insert.
Bulk create Shopify products with inventory management from Google Sheets
## Create Products in Shopify from a Google Sheet This workflow creates products in your Shopify store from a google sheet. It also enables inventory tracking and sets the quantity of an inventory item at your store's default location. This is a great way to get test data into test or staging stores to try out apps, update templates or try out new designs. This Automation will only import new products. It will skip existing products if the slug matches an existing product's handle (Shopify's term for a slug). ### Setup Notes The Google Sheet has the following columns : title - free text description - free text company - free text category - free text status - ACTIVE, DRAFT or ARCHIVE slug - used in the product url, text with no spaces, can also use hyphen. price - sale price of the products compare_at_price - compare at price for products sku - unique code for each product stock_on_hand - quantity of this item available for purchase. Use those labels in the first row of your sheet and N8N will create one object per row with the column names as object fields. ### Update GraphQL nodes with your Shopify store URL 1) Replace the URL in all GraphQL nodes with the URL for your Shopify store. 2) These GraphQL requests all use the Shopify 2025-04 GraphQL Admin API. This flow is updated to use Airtable at [Sync Products between Airtable and Shopify with Inventory Management](https://n8n.io/workflows/7468-sync-products-between-airtable-and-shopify-with-inventory-management/)
Paginate Shopify products with GraphQL cursor-based navigation
## Shopify GraphQL cursor loop Many Shopify GraphQL queries have the ability to return a cursor which you can loop over, however the N8N GraphQL node does not natively have the ability to fetch pages. This simple 3 node workflow displays how to setup a cursor to fetch all items in a collection. Note : The pageSize in the "Shopify, products" node is set to 5 to illustrate how querying by cursor works. In production set this to a much larger value. Also, Update the Endpoint in GraphQL node to reflect your Shopify store.
Create Shopify customers from a Google Sheet
### Task Read a list of customers from a GoogleSheet and create them in Shopify using Shopify's Admin API (GraphQL). ### Why ? - Generate test users for development stores. - Migrate customers from other platforms. - Easy intro to Shopify's GraphQL API. ### Setup #### Setting up Google Sheets access Follow the instructions in the [N8N Docs](https://docs.n8n.io/integrations/builtin/credentials/google/oauth-generic/) for granting Oauth2 access to Google services. You'll need to grant API access to Google Sheets and Google Drive (to list available sheets). #### Setting up Shopify access Shopify's Admin API uses 'Header Auth' with a **key** of X-Shopify-Access-Token and a **value** of your shopify access token which starts with shpat_ . ##### How to generate a Shopify Access Token To generate a Shopify Access Token create an app, grant the app the necessary scopes, then generate a token. ##### From inside a store do the following : 1. click Settings (nav link) 2. click Apps and sales channels (nav link) 3. click Develop Apps (button) 4. click Create App (button) 5. give the app a name 6. click configure Admin API Scopes (button) 7. at a minimum grant read_customers and write_customers scope. Grant additional scopes if you plan on accessing other parts of the API. 8. click save ##### To generate the token 1. click install app (button) 2. click install on the dialog that pops up (button) 3. click 'reveal token once' (button) 4. copy the token into a password vault or somewhere secure. ### Template Updates To test this out you'll need to make the following changes : 1) Create a header credential where the **key** is X-Shopify-Access-Token and the **value** is your Shopify Access Token (it starts with shpat_ 2) In the GraphQL node change the endpoint URL to your store. Something like https://{your store goes here}.myshopify.com/admin/api/2025-04/graphql.json ### Google Sheet Structure Columns can be in any order, because the rows will be mapped to fields in a json object. N8N will treat the first row in the sheet as a column name, so at a minimum use the column names below in row 1 of your sheet. - first_name : Any string - last_name : Any string - email : Valid email - mobile_phone : International mobile phone format with no spaces eg. +61414708406 (Shopify will reject anything else). Example CSV "first_name","last_name","email","mobile_phone" "Bob","Smith","[email protected]","+61414999999"