Easy8.ai
Workflows by Easy8.ai
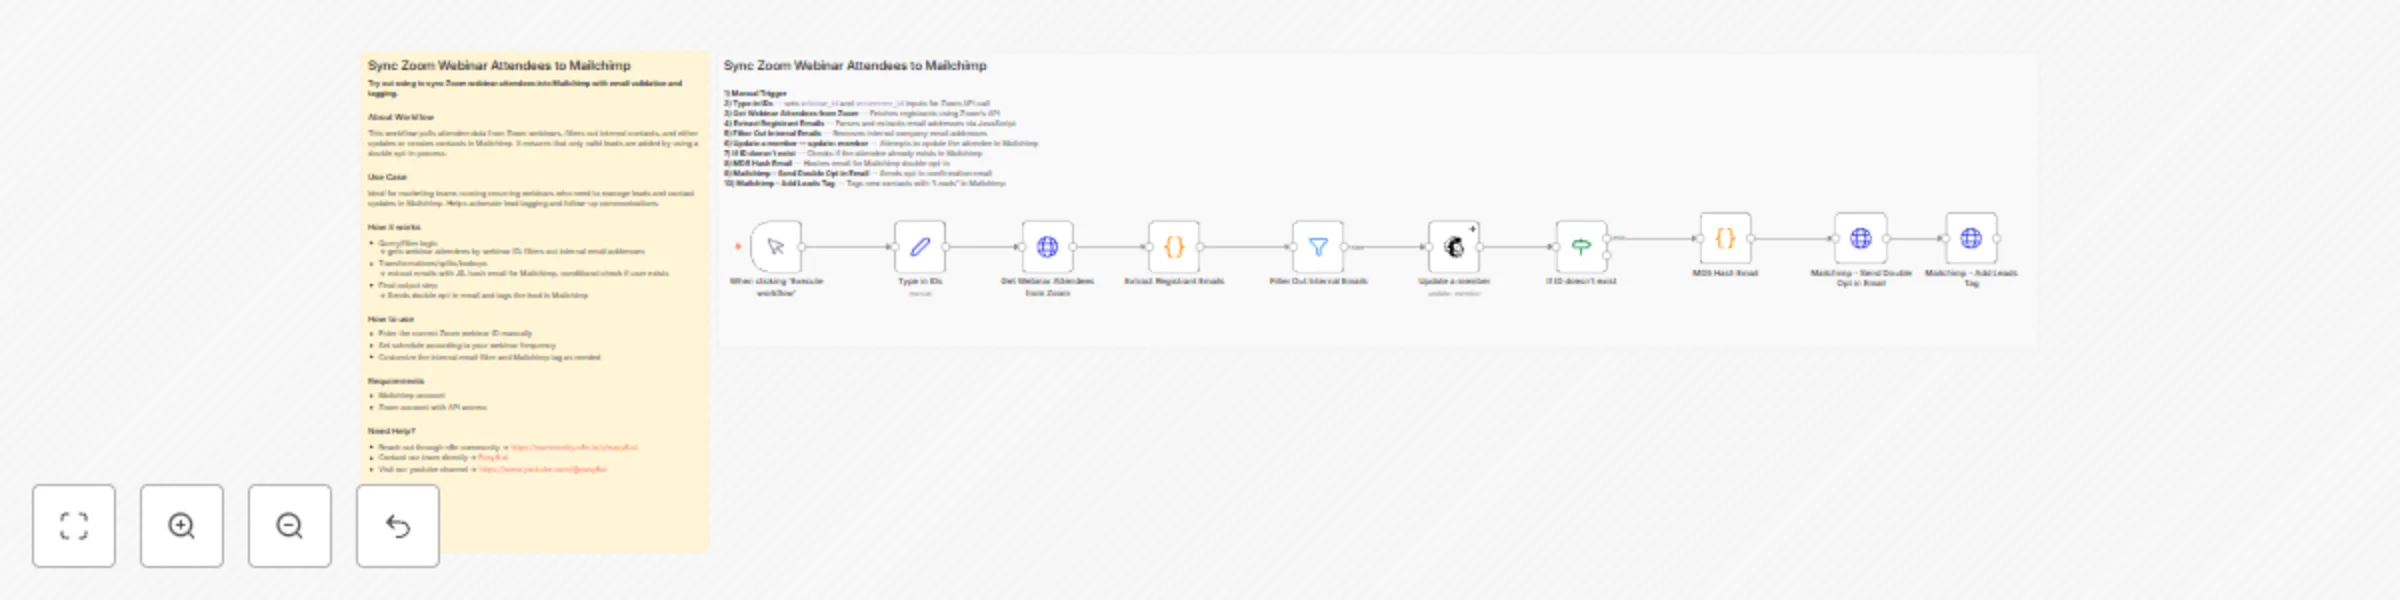
Sync Zoom webinar attendees to Mailchimp with double opt-in and email filtering
## Description Use this workflow to automatically sync Zoom webinar registrants into Mailchimp, filter out internal contacts, and send double opt-in confirmation emails. Ideal for keeping your newsletter audiences clean, accurate, and enriched with new leads—without manual export/import steps. ## About Workflow This workflow connects Zoom Webinars with Mailchimp via API to automate the onboarding of webinar attendees into your marketing audience. It retrieves registrant data from Zoom (based on Webinar ID and Occurrence ID), extracts attendee emails, filters out internal domains, checks whether the contact already exists in Mailchimp, and then creates or updates each record. New contacts receive a double opt-in confirmation email, and all newly added leads are tagged for segmentation inside Mailchimp. ## Use Case Perfect for marketing teams running webinars who need to transfer participants into Mailchimp quickly and reliably. This automation streamlines attendee follow-up, ensures compliance with double opt-in requirements. ## How it works - **Manual Trigger – Execute workflow** The workflow starts manually. You can optionally replace the manual trigger with a Schedule Trigger if you want to automate recurring webinars. - **Manual Input – Set Webinar ID and Occurrence ID** The workflow includes a *Set* node that requires you to enter: - `webinar_id` - `occurence_id` These define which Zoom webinar instance will be synced. - **Zoom API – Get Webinar Attendees** Retrieves registrants for the selected webinar occurrence using the Zoom API. - **Code Node – Extract Registrant Emails** Processes the Zoom API response and extracts the email addresses of all registrants. - **Filter Node – Filter Out Internal Emails** Removes internal/company email addresses by checking that they do *not* contain your domain. (This is fully configurable.) - **Mailchimp – Update a Member** Attempts to update the contact in Mailchimp based on their email address. This determines whether the contact already exists. - **IF Node – If ID Doesn’t Exist** Checks if Mailchimp returned an `id` during the update attempt. If Mailchimp **did not return an ID**, the contact is treated as new and continues through the creation + confirmation path. - **Code Node – MD5 Hash Email** Hashes the email using MD5. Mailchimp uses this hash as the unique identifier for list members. - **Mailchimp – Send Double Opt-In Email** Creates the contact with “pending” status and sends a double opt-in email. - **Mailchimp – Add Leads Tag** Tags the contact with **"Leads"** immediately as part of the creation process. ## How to Use 1. **Import the workflow into your n8n instance** 2. **Configure credentials:** - Zoom OAuth2 credential - Mailchimp HTTP Basic Auth credential 3. **Enter webinar details:** - Set `webinar_id` and `occurence_id` in the *Type in IDs* node 4. **Adjust internal email filtering:** - Update the domain in the “Filter Out Internal Emails” node (e.g., change `@yourcompanydomain.com`) 5. **Configure Mailchimp nodes:** - Replace `LIST_ID_HERE` with your Mailchimp Audience/List ID - Adjust tags if needed 6. **Test the workflow:** - Run it with a real webinar and confirm behavior: - internal emails are excluded - existing contacts are updated - new contacts receive the double opt-in email - tags are applied correctly ## Example Use Cases - Automated lead generation from webinar attendance - Keeping marketing lists clean and external-only - Recurring webinars with scheduled syncing - Easy double opt-in compliance with no manual steps ## Requirements - **Zoom account** with API access - **Mailchimp account** with API access - **n8n instance** with correctly configured credentials ## Optional Enhancements - Replace the manual trigger with a Webhook for recurring syncs - Auto-detect the latest webinar ID using a Zoom API call - Add additional filters (e.g., job title, country, language) - Add Slack/email notifications summarizing new leads - Add error-handling paths for retrying failed API calls
Lusha to Easy Redmine CRM: automated lead enrichment
**Use this workflow to enrich lead records from Easy Redmine with Lusha data and sync updated fields back to the CRM.** ### About Workflow This workflow connects Easy Redmine CRM with Lusha via API to enrich lead records. It fetches lead data from Easy Redmine, queries Lusha for matching contact information, transforms the results (e.g., phone, employee count, LinkedIn), and updates the original records in Easy Redmine CRM automatically. ### Use Case Built for CRM and sales teams using Easy Redmine, this automation replaces manual Lusha lookups and lead updates. It ensures that enriched data is consistently added to your CRM—boosting lead quality and reducing data maintenance time. ### How it works - **Schedule Trigger** => Runs daily at a set hour (e.g., 10:00) - **Get Leads from Easy Redmine** => Pulls leads via saved query (e.g., today's leads) using the `easy_leads` resource - **Split Out** => Breaks down the batch of leads into single records for enrichment - **Get Data from Lusha** => Sends HTTP requests to Lusha’s API using lead fields (email, name, company) - **Filter Leads Found in Lusha** => Skips leads with missing or failed Lusha enrichment - **Contact Data Transformation for CRM** => Maps and transforms contact data: - Extracts phones, email, LinkedIn, job info - Converts employee ranges like [1000, 5000] into `5000` - Flattens nested Lusha response into CRM-friendly format - **Update Leads in Easy Redmine CRM** => Sends a PUT request to update each lead ### How to use - Import the workflow into your n8n instance - Set credentials for: - Easy Redmine API - Lusha API (HTTP Header Auth) - Update the `Get Leads from Easy Redmine` node with your query ID - Ensure Lusha API fields (email, name, company) match available lead fields - Adjust the transformation logic in the Code node if needed - Update the custom field ID in the final PUT request if your CRM uses different IDs - Test with sample data before activating the automation ### Example Use Cases - **Sales Intelligence**: Enrich new leads with verified phone and social info - **CRM Hygiene**: Keep records consistent and complete without manual edits - **Lead Scoring**: Add employee count and LinkedIn for better segmentation ### Requirements - Easy Redmine API access - Lusha API access - API credentials for both platforms ### Customization Options - Add more fields from Lusha (job title, company website, etc.) - Include error notifications if updates fail - Add filters to target only leads missing phone or LinkedIn info - Use Merge node if fetching multiple lead segments ### Workflow Improvement Suggestions - Rename technical node labels for better readability - Secure credentials via environment variables or vault - Handle rate limits or retries if using large lead batches **This workflow automates lead enrichment, ensuring CRM records are updated with accurate, verified data—without the manual copy-paste.**
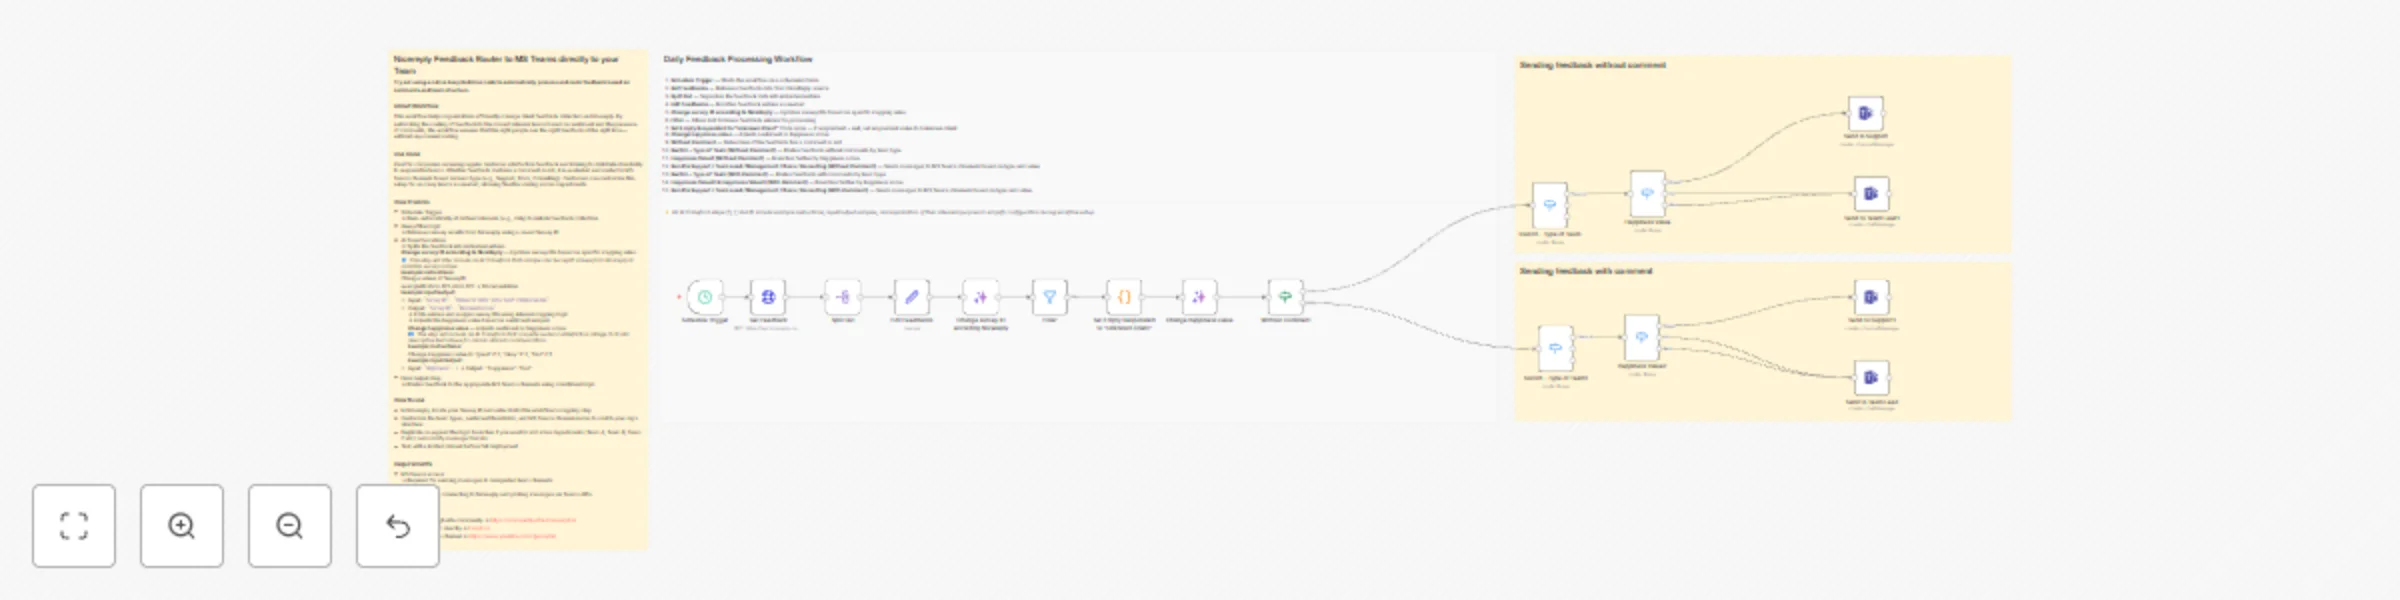
Automated Nicereply feedback routing to MS Teams by team and sentiment
# Auto-Routing Nicereply Feedback to Microsoft Teams by Team and Sentiment Automatically collect client feedback from Nicereply, analyze sentiment, and send it to the right Microsoft Teams channels — smartly split by team, tone, and comment presence. --- ## About this Workflow This workflow pulls customer satisfaction feedback from Nicereply, filters out irrelevant or test entries, and evaluates each item based on the team it belongs to and the sentiment of the response (Great, OK, Bad). It automatically routes the feedback to Microsoft Teams — either as a summary in a channel or a direct message — depending on the team's role and whether a comment is included. Perfect for support, delivery, consulting, and documentation teams that want to stay in the loop with customer sentiment. It ensures that positive feedback reaches the teams who earned it, and that negative feedback is escalated quickly to leads or management. --- ## Use Cases - Send daily customer feedback directly to the responsible teams in MS Teams - Automatically escalate negative responses to leads or managers - Avoid clutter by filtering out unimportant or test entries - Keep internal teams motivated by sharing only the most relevant praise --- ## How it works 1. **Schedule Trigger** Starts the workflow on a set schedule (e.g., daily at 7:00 AM) 2. **Get Feedback** Pulls customer feedback from Nicereply using survey ID 3. **Split Out** Processes each feedback entry separately 4. **Edit Feedbacks** Renames or adjusts fields for easier filtering and readability 5. **Change Survey ID** Maps internal survey identifiers for accurate team routing _(Survey ID can be found in Nicereply: `Settings > Surveys > [Survey] > ID`)_ 6. **Filter** Excludes old responses 7. **Code Node** Tag unknown clients 8. **Change Happiness Value** Converts score into “Great”, “OK”, or “Bad” for routing logic 9. **Without Comment** Checks if feedback includes a text comment or not 10. **Send Feedback Without Comment** Routes simple feedback (no comment) to MS Teams based on team + score 11. **Send Feedback With Comment** Routes full feedback with comment to MS Teams for closer review --- ## Feedback Routing Logic Each team receives only what’s most relevant: - **Support, Docs, Consulting** get only **Great** feedback to boost morale - **Team Leads** receive **OK and Bad** feedback so they can follow up - **Management** is only alerted to **Bad** feedback for critical response These rules can be **freely customized**. For example, you may want Support to receive all responses, or Management only when multiple Bad entries are received. The structure is modular and easily adjustable. --- ## How to Use 1. **Import the workflow** Load the `.json` file into your Easy Redmine automation workspace 2. **Set up connections** - Nicereply API key or integration setup - Microsoft Teams integration (chat and/or channel posting) 3. **Insert your Survey ID(s)** - You’ll find these in the Nicereply admin panel under Survey settings 4. **Customize team logic** - Adjust survey-to-team mappings and message routing as needed 5. **Edit Teams message templates** - Modify message text or formatting based on internal tone or content policies 6. **Test with real data** - Run manually and verify correct delivery to MS Teams 7. **Deploy and schedule** - Let it run on its own to automate the feedback cycle --- ## Requirements - Nicereply account with active surveys - Microsoft Teams account with permissions to post to channels or send chats --- ## Optional Enhancements - Add AI to summarize long comments - Store feedback history in external DB - Trigger follow-up tasks or alerts for repeated Bad scores - Localize messages for multilingual feedback systems - Integrate additional tools like Slack, Easy Redmine, etc. --- ## Tips for a Clean Setup - Keep team routing logic in one place for easy updates - Rename all nodes clearly to reflect their function (e.g., `Change Happiness Value`) - Add logging or alerting in case of failed delivery or empty feedback pull - Use environment variables for tokens and survey IDs where possible
Generate SEO FAQ content with OpenAI GPT-4o from Google Sheets to WordPress
# Auto-Generate SEO FAQ Answers from Google Sheets with OpenAI ## Intro/Overview This workflow automates the process of generating SEO-optimized FAQ answers using AI, pulling questions from a Google Sheet and writing answers back into the same sheet. It’s ideal for content marketers, SEO specialists, and digital teams looking to scale FAQ content generation with minimal manual input. By combining the power of Google Sheets, AI, and WordPress, the workflow transforms raw questions into structured, keyword-targeted answers tailored for specific audiences — ready for use on landing pages, blogs, or help centers, and automatically publishes them as WordPress posts. --- ## How it works - **Schedule Trigger**: Executes the workflow at a set interval to check for new or unprocessed questions in the Google Sheet. - **Get Questions from Sheet**: Reads from a specific Google Sheet, targeting columns for: - `Question` (FAQ prompt) - `KW` (target SEO keyword) - `Audience` (intended reader) - `Article` (desired WordPress post title) - **Filter**: Ensures only rows without an existing answer are processed (i.e., empty "Answer" column). - **Generate FAQ Answer**: Passes the question, keyword, and audience to the OpenAI Chat Model using a structured prompt to generate: - A concise TL;DR-style summary - A detailed, SEO-optimized markdown-formatted answer - **OpenAI Chat Model**: Utilizes GPT-4 Turbo with a controlled temperature (0.7) and token limit (1000) to produce structured, on-brand, keyword-optimized content. - **Parse FAQ Answer**: Extracts and formats the AI response into separate fields for writing back to the sheet. - **Update Sheet with Answer**: Writes the AI-generated answer into the `Answer` column of the same row in the source Google Sheet. - **WordPress Node**: Publishes each generated answer as a new WordPress post - Uses “Create Post” operation - **Title:** Taken from the `Article` column in the sheet - **Content:** Uses the detailed AI-generated answer - Requires valid WordPress credentials (REST API / Application Password) --- ## How to Use 1. **Importing the Workflow** - Download or import the workflow JSON into your n8n instance. 2. **Credential Setup** - Connect your **Google Sheets** credentials. - Add your **OpenAI API Key** in the relevant node. - Connect your **WordPress** credentials for content publishing. 3. **Node Assignment** - Update the following: - **Google Sheet ID** - **Sheet range** (ensure it includes all relevant columns) 4. **Timezone & Schedule** - Adjust the **Schedule Trigger** node to match your preferred time and frequency (e.g., every weekday at 9 AM). 5. **Testing Guidance** - Add a few sample FAQ entries in your sheet. - Run the workflow manually to verify: - Prompt quality - Answer accuracy - Proper sheet update - Successful WordPress post creation --- ## Example Use Cases - Marketing teams generating bulk FAQ content for landing pages - SEO professionals creating keyword-optimized responses for user queries - Agencies producing personalized FAQ sections for multiple client niches - SaaS companies automating knowledge base content with targeted messaging - Content teams publishing AI-generated FAQs directly to WordPress blogs --- ## Requirements - ✅ **Google Account** with access to the target Google Sheet - ✅ **OpenAI API Key** (GPT-4 Turbo or equivalent) - ✅ **WordPress account** with REST API or Application Password access - ✅ Google Sheet with the following columns: - `Question`: The FAQ prompt - `KW`: Target keyword for SEO - `Audience`: Intended reader persona - `Article`: Desired WordPress post title - `Answer`: Output column (leave empty initially) --- ## Customization (Optional Section) - **Tone & Style**: Modify the system prompt to reflect your brand voice (e.g., friendly, expert, concise). - **Model**: Use a different AI model (e.g., Gemini, Claude, or OpenAI GPT-4.1). - **Output Format**: Adjust the markdown output to use different heading levels, bullet styles, or HTML if required. - **Audience Logic**: Expand the input options to fine-tune responses for more specific demographics or buyer personas. - **Multi-output Options**: Extend the workflow to post content to Notion, CMS, or documentation platforms alongside Google Sheets and WordPress. --- This automation accelerates content creation, automatically keeps your FAQ sections SEO-friendly, and publishes the results directly to WordPress — keeping your content pipeline running hands-free once deployed.
Sync Calendly bookings to Easy Redmine CRM with comments and sales activities
**Sync New Calendly Bookings to Esko CRM with Comment, Sales Activity, and Outlook Email** ## Intro/Overview This automation workflow automatically syncs newly scheduled Calendly meetings into Easy Redmine CRM. When a meeting is booked via Calendly, it finds the associated lead in Easy Redmine CRM using the invitee’s email address and logs both a comment and a sales activity in the lead’s record. In addition, the workflow sends an email in Microsoft Outlook, ensuring the account manager can check and knows about the meeting. Ideal for sales teams and customer success managers, this workflow ensures your CRM and calendar stay updated with every new meeting—no manual entry required. ## How it works **Calendly Trigger** - Watches for `invitee.created` events (newly booked meetings) - Authenticates with Calendly via OAuth2 **Get ID from email** - Sends a GET request to Easy Redmine CRM to search for a lead using the invitee’s email - Extracts the lead ID, required for further CRM actions **Add Comment** - Posts a comment to the lead’s record in Easy Redmine CRM - The comment includes: - Invitee’s full name - Scheduled date/time of the meeting - Meeting description **Sales Activity POST** - Creates a new sales activity in Easy Redmine CRM under the same lead - Includes structured details: - Invitee’s name - Meeting date and time - Description of the meeting **Send an email** - Sends a notification email in Microsoft Outlook - Maps the name, start time, and description using dynamic values from the Calendly booking - Ensures the account manager is informed about the scheduled meeting ## How to Use **Import the workflow** - Copy or download the JSON of this workflow - In your n8n editor, click **Import Workflow** and paste/upload the JSON **Set up credentials** - *Calendly API*: - Use OAuth2 credentials - Ensure proper scopes for reading event data - Follow n8n’s setup guide: https://docs.n8n.io/integrations/builtin/credentials/calendly/ - *Easy Redmine CRM*: - Add credentials using an API token or OAuth2, depending on your CRM setup - *Microsoft Outlook*: - Set up OAuth2 credentials and connect your Outlook email **Assign and configure nodes** - *Calendly Trigger*: - Confirm it’s set to listen for `invitee.created` - *Get ID from email*: - Update the GET request URL to match your Easy Redmine CRM lead search endpoint - Ensure it uses the invitee’s email from the trigger - *Add Comment & Sales Activity POST*: - Use your Easy Redmine CRM’s correct endpoints - Map dynamic fields like lead ID, name, meeting time, and description - *Send email notification*: - Set up your preferred Outlook email - Map meeting details into email body (e.g. name, time, description) **Timezone and formatting** - If needed, use a Code node to convert the meeting time if your CRM or Outlook expects a specific format or timezone **Test the workflow** - Schedule a test meeting via Calendly using an email tied to an existing CRM lead - Check Easy Redmine CRM to confirm: - A comment was added - A sales activity was created under the correct lead - Check Outlook to confirm: - An email notification was received ## Example Use Cases **Sales Enablement** - Log every discovery or demo call automatically, helping reps track all activity in one place - Block time in calendars without double-booking risk **Customer Success** - Keep onboarding and check-in meetings logged, improving visibility across the team - Ensure calendar events are created for every scheduled session **Lead Qualification** - Identify engaged leads based on bookings and trigger follow-up sequences ## Requirements - Calendly account with API access - Easy Redmine CRM user with API access - Microsoft Outlook account with email access ## Customization (Optional) **Add Filters** - Use IF or Switch nodes to handle only specific event types (e.g., demo calls vs intro calls) **Extend Comments** - Include additional data from Calendly like meeting location or answers to custom questions
Auto-sync Easy Redmine tasks to Microsoft To-Do
# Auto-Sync Easy Redmine Tasks to Microsoft To Do This workflow automatically synchronizes tasks from Easy Redmine into a Microsoft To Do list using a predefined filter. Before syncing, it clears the target list in Microsoft To Do to avoid duplicates. It’s ideal for teams or individuals who plan work in Redmine but prefer Microsoft To Do for daily task tracking. By connecting Redmine’s task filtering with Microsoft To Do’s simple interface, this setup ensures your task list is always focused and up to date—without manual copying or switching tools. ## How it works **Scheduled Trigger** – Run Daily Sync Triggers the workflow automatically at a set time (e.g., every morning at 9:00 AM). Supports different time zones and execution intervals. **Get All To Do Tasks** – Clean Target List Fetches all existing tasks in a specific Microsoft To Do list. Prepares the list to be cleared before syncing new tasks. **Delete All Tasks** – Reset To Do List Deletes previously existing tasks to prevent duplication. A code node ensures that the workflow only proceeds after all deletions are complete. **Get Redmine Tasks by Filter** – Pull Fresh Data Retrieves tasks from Easy Redmine using saved filters (e.g., assigned to the user, due this week). Only pulls the relevant tasks defined by your Redmine criteria. **Split and Format Tasks** – One at a Time Processes each Redmine task individually. A code node enriches each task with a direct link back to the Easy Redmine issue. **Create To Do Task** – Sync to Microsoft To Do Creates a new Microsoft To Do task with name, due date, and optionally a formatted description. The result is a clean, updated task list reflecting current Redmine assignments. ## How to Use 1. Connect credentials: Easy Redmine API token (with permission to access issues). Microsoft credentials (to manage Microsoft To Do lists). 2. In the Redmine filter node, configure the filter to fetch relevant issues. 3. In the Microsoft To Do nodes, select the correct list for both retrieval and creation. 4. Open the Schedule Trigger node and adjust to your desired sync time and timezone. 5. Run a test to confirm that the Redmine tasks appear correctly in your Microsoft To Do list. ## Example Use Cases - Daily Planning: Automatically refill your Microsoft To Do list with current Redmine tasks every morning. - Team Sync: Push sprint items or task board assignments into a shared team to-do list. - Priority Focus: Only pull in tasks due today or marked as high priority in Redmine. ## Requirements - Easy Redmine account - API access enabled - Saved filters for task selection - Microsoft 365 account - Microsoft To Do access ## Customization - Adjust the Redmine filters to target different users, statuses, or projects. - Modify the function node to format the task title or description with more detail. - Add conditionals to only sync urgent or near-due tasks. - Route different project tasks to different To Do lists. - Optionally send a confirmation message (email, Slack) when the sync completes. ## Workflow Improvement Suggestions - Rename nodes for clarity (e.g., “Delete Old Tasks”, “Fetch Redmine Tasks”). - Add error handling if API requests fail. - Use environment variables for list IDs and API URLs to improve reusability. - Add logging or tracking (e.g., number of tasks synced per execution).
Easy Redmine and Microsoft Teams workflow template
*This workflow contains community nodes that are only compatible with the self-hosted version of n8n.* # Daily Easy Redmine Task Digest to Microsoft Teams Channel ## Overview This workflow automatically collects newly assigned Easy Redmine tasks for a specific team and sends a concise, formatted summary to a Microsoft Teams channel each weekday morning. It’s designed to keep your team updated without manual copy-pasting or sifting through outdated information. Perfect for project managers, team leads, or consultants using Easy Redmine, this automation ensures that no high-priority or recent tasks are missed, improving transparency and daily planning. --- ## How it works - **Daily Trigger (8:30 AM on workdays):** Initiates the automation at a fixed schedule. - **Get Issues by Query:** Easy Redmine node retrieves all issues matching a saved filter - **Split Out Issues:** Breaks the received array of tasks into individual items for separate processing. - **Keep Relevant Fields & Add Link:** Filters to essential data (ID, author, subject, description) and creates a clickable issue link using URL concatenation. - **Run for Each Task:** Iterates over tasks to process and send individually. - **Message into Team Channel:** Uses the Microsoft Teams node to post formatted HTML content into the chosen channel. --- ## How to Use 1. **Import the workflow** into your n8n instance. 2. **Set up Easy Redmine credentials** with API access. - Add or configure your Easy Redmine API credential. 3. **Set up Microsoft Teams credentials** with API access. - Add or configure your Microsoft Teams OAuth2 API credential. 4. Adjust the **saved filter in Easy Redmine** to match your team’s needs. 5. Update **Teams channel or chat selection** in the final node. 6. Modify the **scheduled trigger time** if desired. 7. Test with a smaller query before enabling full automation. --- ## Example Use Cases - **Daily Team Stand-ups:** Provide an automated pre-meeting digest of all new or updated tasks. - **Consulting Project Management:** Keep consultants aware of the latest client requests. - **Support Teams:** Quickly distribute newly assigned tickets without manual coordination. --- ## Requirements - Easy Redmine account with API access and permission to use saved filters. - Microsoft Teams account with permission to post to the target channel. --- ## Customization - Adjust the saved filter in Easy Redmine to target different teams, statuses, or update windows. - Change the schedule to match your meeting cadence (daily, twice daily, etc.). - Alter the HTML formatting for better readability or company branding. - Add more fields from Easy Redmine (priority, due date, etc.) for richer summaries. --- **Workflow Improvement Suggestions:** - Rename generic nodes like “manual” and “get-manyissues” to descriptive titles (e.g., “Filter Fields & Build Link”). - Remove any real names or project-specific data before publishing. - Consider adding error handling if Easy Redmine or Teams API calls fail.
Smart helpdesk ticket alerts from Easy Redmine to Teams with GPT-4 summaries
# Automated Helpdesk Ticket Alerts to Microsoft Teams from Easy Redmine ## Intro/Overview This workflow automatically posts a Microsoft Teams message whenever a new helpdesk ticket is created in Easy Redmine. It’s perfect for IT teams who want real-time visibility into new issues without constantly checking ticket queues or inboxes. By integrating Easy Redmine with Teams, this setup ensures tickets are discussed and resolved faster, improving both response and resolution times. --- ## How it works 1. **Catch Easy Webhook – New Issue Created** - Triggers whenever Easy Redmine sends a webhook for a newly created ticket. - Uses the webhook URL generated from Easy Redmine’s webhook settings. 2. **Get a new ticket by ID** - Fetches full ticket details (subject, priority, description) via the Easy Redmine API using the ticket ID from the webhook payload. 3. **Pick Description & Create URL to Issue** - Extracts the ticket description. - Builds a direct link to the ticket in Easy Redmine for quick access. 4. **AI Agent – Description Processing** - Uses an AI model to summarize the ticket and suggest possible solutions based on the issue description. 5. **MS Teams Message to Support Channel** - Formats and sends the ticket details, priority, summary, and issue link into a designated Microsoft Teams channel. - Uses the Teams message layout for clarity and quick scanning. --- ## How to Use 1. **Import the workflow** into your n8n instance. 2. **Set up credentials**: - Easy Redmine API credentials with permission to read helpdesk tickets. - Microsoft Teams credentials for posting messages to a channel. 3. **Configure Easy Redmine webhook** - To trigger on ticket creation events. - Insert n8n webhook URL to your active Easy Redmine Webhook which can be created at https://easy-redmine-application.com/easy_web_hooks 4. **Adjust node settings**: - In the webhook node, use your Easy Redmine webhook URL. - In the “Get a new ticket by ID” node, insert your API endpoint and authentication. - In the Teams message node, select the correct Teams channel. 5. **Adjust timezone or scheduling** if your team works across different time zones. 6. **Test the workflow** by creating a sample ticket in Easy Redmine and confirming that it posts to Teams. --- ## Example Use Cases - **IT Helpdesk**: Notify the support team immediately when new issues are logged. - **Customer Support Teams**: Keep the entire team updated on urgent tickets in real time. - **Project Teams**: Ensure critical bug reports are shared instantly with the right stakeholders. --- ## Requirements - Easy Redmine application - Easy Redmine technical user for API calls with “read” permissions on tickets - Microsoft Teams technical user for API calls with “post message” permissions - Active n8n instance --- ## Customization - Change the AI prompt to adjust how summaries and solutions are generated. - Modify the Teams message format (e.g., bold priority, add emojis for urgency). - Add filters so only high-priority or specific project tickets trigger notifications. - Send alerts to multiple Teams channels based on ticket type or project. --- **Workflow Improvement Suggestions:** - Rename nodes for clarity (e.g., “Fetch Ticket Details” instead of “get-one-issue”). - Ensure no private ticket data is exposed beyond intended recipients. - Add error handling for failed API calls to avoid missing ticket alerts.
Automate daily Outlook calendar digests to Microsoft Teams
### This workflow sends an automatic daily summary of your Microsoft Outlook calendar events into a Microsoft Teams channel. Perfect for team visibility or personal reminders. This automation is ideal for team leads, project managers, and remote workers who need to keep stakeholders informed of scheduled events without manual effort. It saves time, ensures consistent communication, and reduces the chance of missing important meetings. ## How it works **Scheduled Trigger** - The workflow runs automatically every midnight (00:00 UTC). **Create filter for "TODAY" value (Code Node)** - The code node generates the date value for "today" - Calculates UTC start and end of the current day - Builds a Microsoft Graph-compatible filter string **Microsoft Outlook Node: Get Today’s Events** - Resource : Event - Operation : Get Many - Uses {{ $json.filter }}, which is generated from today's date, to retrieve only relevant entries **Format Events as HTML (Code Node)** - Code node transforms each event into a formatted HTML message **Meeting Time:** 2025-07-08T10:00:00Z **Subject:** Weekly Sync **Summary:** Discuss project milestones and blockers. **Microsoft Teams Node: Send Summary Message** - Chat Message | Create | Selected Channel | HTML content - Uses the htmlMessage field from the previous node as the message body ## How to Use 1. **Import the Workflow** - Load the `.json` file into your n8n instance via “Import from File” or directly via the workflow UI. 2. **Set Up Credentials** - Go to **Credentials** in n8n. - Add or configure your **Microsoft Outlook OAuth2 API** credential. - Add or configure your **Microsoft Teams OAuth2 API** credential. - Assign these credentials to the corresponding nodes in the workflow. 3. **Adjust Timezone and Schedule** - Edit the **Schedule Trigger** node to reflect your local timezone or preferred time. 4. **Configure the Microsoft Outlook Node** - Ensure the correct Outlook calendar is targeted. - Confirm the `Get Many` node includes this expression in the filter field: ```handlebars {{ $json.filter }} ``` 5. **Customize the HTML Output (Optional)** - Open the “Format Events” Code node to: - Add new fields like `Location`, `Organizer`, or `Attendees`. - Adjust date formatting to local time if needed. 6. **Target the Correct Teams Channel** - Open the **Microsoft Teams node**, select the team and channel where messages should be posted. - Message type must be set to `HTML` if sending formatted content. 7. **Test the Workflow** - Run it manually to verify: - Events are fetched correctly. - The message is well-formatted and appears in the correct Teams channel. - If you see no events, double-check the date filter logic or ensure events exist for today. ### Example Use Cases - **Team Syncs**: Automatically notify your project channel every morning with today's meetings. - **Remote Work**: Help remote teams stay aligned on shared calendars. - **Personal Assistant**: Keep track of your own day’s agenda with an automatic Teams message. ## Requirements - **Microsoft Outlook** - Account must have permission to access calendar events via Graph API. - OAuth2 credential must be configured in n8n Credential Manager. - **Microsoft Teams** - Requires permission to post messages to specific channels. - OAuth2 credential must be configured and authorized.