Dhruv Dalsaniya
Workflows by Dhruv Dalsaniya
Generate product images & videos with Gemini AI, DeepSeek, and GoAPI for e-commerce
This workflow is designed for e-commerce, marketing teams, or creators who want to automate the production of high-quality, AI-generated product visuals and ad creatives. Here is what the workflow does: * It accepts a product description and other creative inputs through a web form. * It uses AI to transform your text input into a detailed, creative prompt. * This prompt is then used to generate a product image. * The workflow analyzes the generated image and creates a new prompt to generate a second image that includes a model, adding a human element to the visual. * A final prompt is created from the model image to generate a short, cinematic video. * All generated assets (images and video) are automatically uploaded to your specified hosting platform, providing you with direct URLs for immediate use. This template is an efficient solution for scaling your content creation efforts, reducing time spent on manual design, and producing a consistent stream of visually engaging content for your online store, social media, and advertising campaigns. **Prerequisites:** * **OpenRouter Account:** Required for AI agents to generate image and video prompts. * **GOAPI Account:** Used for the final video generation process. * **Media Hosting Platform:** A self-hosted service like MediaUpload, or any alternative like Google Drive or a similar service that can provide a direct URL for uploaded images and videos. This is essential for passing the visuals between different steps of the workflow.
Discord AI chatbot with GPT-4o-mini & Redis memory persistence
**Description:** This n8n workflow automates a Discord bot to fetch messages from a specified channel and send AI-generated responses in threads. It ensures smooth message processing and interaction, making it ideal for managing community discussions, customer support, or AI-based engagement. This workflow leverages Redis for memory persistence, ensuring that conversation history is maintained even if the workflow restarts, providing a seamless user experience. ## How It Works - The bot listens for new messages in a specified Discord channel. - It sends the messages to an AI model for response generation. - The AI-generated reply is posted as a thread under the original message. - The bot runs on an Ubuntu server and is managed using PM2 for uptime stability. - The Discord bot (Python script) acts as the bridge, capturing messages from Discord and sending them to the n8n webhook. The n8n workflow then processes these messages, interacts with the AI model, and sends the AI's response back to Discord via the bot. ## Prerequisites to host Bot - Sign up on [Pella](https://www.pella.app/), which is a managed hosting service for Discord Bots. (Easy Setup) - A Redis instance for memory persistence. Redis is an in-memory data structure store, used here to store and retrieve conversation history, ensuring that the AI can maintain context across multiple interactions. This is crucial for coherent and continuous conversations. ## Set Up Steps ### **1️⃣ Create a Discord Bot** 1. Go to the [Discord Developer Portal](https://discord.com/developers/applications). 2. Click **“New Application”**, enter a name, and create it. 3. Navigate to **Bot** > **Reset Token**, then copy the **Bot Token**. 4. Enable **Privileged Gateway Intents** (Presence, Server Members, Message Content). 5. Under **OAuth2 > URL Generator**, select **bot** scope and required permissions. 6. Copy the generated URL, open it in a browser, select your server, and click **Authorize**. ### **2️⃣ Deploy the Bot on Pella** 1. Create a new folder `discord-bot` and navigate into it: 2. Create and configure an `.env` file to store your bot token: 3. Copy the code to .env: (You can copy the webhook URL from the n8n workflow) ```bash TOKEN=your-bot-token-here WEBHOOK_URL=[https://your-domain.tld/webhook/getmessage](https://your-domain.tld/webhook/getmessage) ``` 4. Create file `main.py` copy the below code and save it: 5. Copy this Bot script to `main.py`: ```py import discord import requests import json import os from dotenv import load_dotenv # Load environment variables from .env file load_dotenv() TOKEN = os.getenv("TOKEN") WEBHOOK_URL = os.getenv("WEBHOOK_URL") # Bot Configuration LISTEN_CHANNELS = ["YOUR_CHANNEL_ID_1", "YOUR_CHANNEL_ID_2"] # Replace with your target channel IDs # Intents setup intents = discord.Intents.default() intents.messages = True # Enable message event intents.guilds = True intents.message_content = True # Required to read messages client = discord.Client(intents=intents) @client.event async def on_ready(): print(f'Logged in as {client.user}') @client.event async def on_message(message): if message.author == client.user: return # Ignore bot's own messages if str(message.channel.id) in LISTEN_CHANNELS: try: fetched_message = await message.channel.fetch_message(message.id) # Ensure correct fetching payload = { "channel_id": str(fetched_message.channel.id), # Ensure it's string "chat_message": fetched_message.content, "timestamp": str(fetched_message.created_at), # Ensure proper formatting "message_id": str(fetched_message.id), # Ensure ID is a string "user_id": str(fetched_message.author.id) # Ensure user ID is also string } headers = {'Content-Type': 'application/json'} response = requests.post(WEBHOOK_URL, data=json.dumps(payload), headers=headers) if response.status_code == 200: print(f"Message sent successfully: {payload}") else: print(f"Failed to send message: {response.status_code}, Response: {response.text}") except Exception as e: print(f"Error fetching message: {e}") client.run(TOKEN) ``` 6. Create `requirements.txt` and copy: ```bash discord python-dotenv ``` ### **3️⃣ Follow the video to set up the bot which will run 24/7** 1. Tutorial - https://www.youtube.com/watch?v=rNnK3XlUtYU Note: Free Plan will expire after 24 hours, so please opt for the Paid Plan in Pella to keep your bot running. ### **4️⃣ n8n Workflow Configuration** The n8n workflow consists of the following nodes: - **Get Discord Messages (Webhook):** This node acts as the entry point for messages from the Discord bot. It receives the `channel_id`, `chat_message`, `timestamp`, `message_id`, and `user_id` from Discord when a new message is posted in the configured channel. Its webhook path is `/getmessage` and it expects a POST request. - **Chat Agent (Langchain Agent):** This node processes the incoming Discord message (`chat_message`). It is configured as a conversational agent, integrating the language model and memory to generate an appropriate response. It also has a prompt to keep the reply concise, under 1800 characters. - **OpenAI -4o-mini (Langchain Language Model):** This node connects to the OpenAI API and uses the `gpt-4o-mini-2024-07-18` model for generating AI responses. It is the core AI component of the workflow. - **Message History (Redis Chat Memory):** This node manages the conversation history using Redis. It stores and retrieves chat messages, ensuring the `Chat Agent` maintains context for each user based on their `user_id`. This is critical for coherent multi-turn conversations. - **Calculator (Langchain Tool):** This node provides a calculator tool that the AI agent can utilize if a mathematical calculation is required within the conversation. This expands the capabilities of the AI beyond just text generation. - **Response fromAI (Discord):** This node sends the AI-generated response back to the Discord channel. It uses the Discord Bot API credentials and replies in a thread under the original message (`message_id`) in the specified `channel_id`. - **Sticky Note1, Sticky Note2, Sticky Note3, Sticky Note4, Sticky Note5, Sticky Note:** These are informational nodes within the workflow providing instructions, code snippets for the Discord bot, and setup guidance for the user. These notes guide the user on setting up the `.env` file, `requirements.txt`, the Python bot code, and general recommendations for channel configuration and adding tools. ### **5️⃣ Setting up Redis** 1. **Choose a Redis Hosting Provider:** You can use a cloud provider like Redis Labs, Aiven, or set up your own Redis instance on a VPS. 2. **Obtain Redis Connection Details:** Once your Redis instance is set up, you will need the host, port, and password (if applicable). 3. **Configure n8n Redis Nodes:** In your n8n workflow, configure the "Message History" node with your Redis connection details. Ensure the Redis credential `✅ redis-for-n8n` is properly set up with your Redis instance details (host, port, password). ### **6️⃣ Customizing the Template** - **AI Model:** You can easily swap out the "OpenAI -4o-mini" node with any other AI service supported by n8n (e.g., Cohere, Hugging Face) to use a different language model. Ensure the new language model node is connected to the `ai_languageModel` input of the "Chat Agent" node. - **Agent Prompt:** Modify the `text` parameter in the "Chat Agent" node to change the AI's persona, provide specific instructions, or adjust the response length. - **Additional Tools:** The "Calculator" node is an example of an AI tool. You can add more Langchain tool nodes (e.g., search, data lookup) and connect them to the `ai_tool` input of the "Chat Agent" node to extend the AI's capabilities. Refer to the "Sticky Note5" in the workflow for a reminder. - **Channel Filtering:** Adjust the `LISTEN_CHANNELS` list in the `main.py` file of your Discord bot to include or exclude specific Discord channel IDs where the bot should listen for messages. - **Thread Management:** The "Response fromAI" node can be modified to change how threads are created or managed, or to send responses directly to the channel instead of a thread. The current setup links the response to the original message ID (`message_reference`). ### **7️⃣ Testing Instructions** 1. **Start the Discord Bot:** Ensure your `main.py` script is running on Pella. 2. **Activate the n8n Workflow:** Make sure your n8n workflow is active and listening for webhooks. 3. **Send a Message in Discord:** Go to one of the `LISTEN_CHANNELS` in your Discord server and send a message. 4. **Verify Response:** The bot should capture the message, send it to n8n, receive an AI-generated response, and post it as a thread under your original message. 5. **Check Redis:** Verify that the conversation history is being stored and updated correctly in your Redis instance. Look for keys related to user IDs. ✅ **Now your bot is running in the background!** 🚀
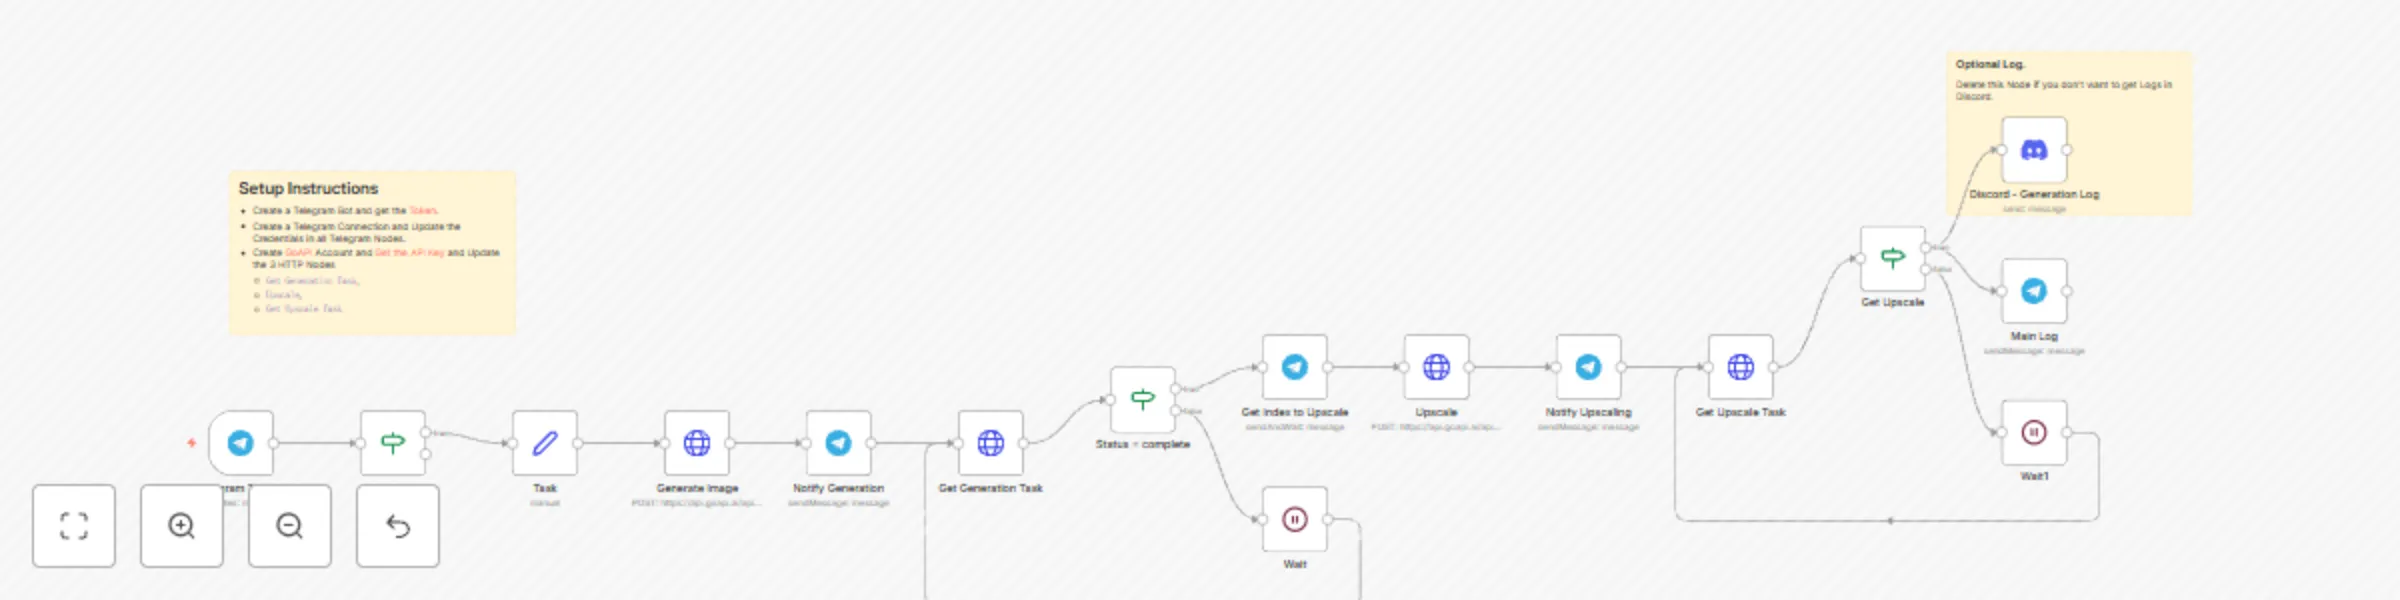
Midjourney Image Generator via Telegram and GoAPI
This workflow connects Telegram to Midjourney through GoAPI, enabling automated image generation and upscaling directly from chat. ### How it Works * **Telegram Command Trigger**: The workflow activates upon receiving a message in Telegram. * **Image Generation**: Your prompt is sent to GoAPI, which then generates an image using Midjourney. * **Upscale Selection**: You receive the generated image and select an option for upscaling. * **Image Upscaling**: The selected image is upscaled via GoAPI. * **Notifications and Logs**: Progress updates are sent to Telegram, and all images are logged in Discord. ### Set Up Steps 1. Create a Telegram Bot and update credentials in Telegram nodes. 2. Create a GoAPI account, obtain an API key, and update the three HTTP nodes: "Get Generation Task," "Upscale," and "Get Upscale Task". 3. (Optional) Configure the Discord node for logging if desired. Setup takes approximately 10-15 minutes. Detailed descriptions are available in sticky notes within the workflow.