Baptiste Fort
Workflows by Baptiste Fort
Automated daily stock market report with Bright Data, GPT-4.1, Airtable/Gmail
# 📘 Workflow Documentation – Stock Market Daily Digest  ## 👋 Introduction Wake up to a clean, analyst-style stock digest in your inbox—top gainers/losers, a readable performance table, 3–5 insights, and upcoming events—**no spreadsheets, no manual scraping, no copy-paste**. This article explains, step by step, how to build a robust, daily, end-to-end automation that collects market data (Bright Data), waits until scraping is done, aggregates results, asks an AI model (OpenAI) to draft a **styled HTML email**, logs everything to Airtable, and finally sends the report via Gmail. You’ll find a friendly but technical tour of **every single node**, so you can rebuild or adapt the same pipeline with confidence. --- ## 🎯 Who is this workflow for? - **Investors & traders** who want a quick, readable daily summary. - **Finance/Product teams** building data-driven alerts/digests. - **Consultants & agencies** sending recurring client updates. - **Automation builders** prototyping finance ops quickly. --- ## 🧰 Tools you’ll need - **Bright Data** — dataset triggers & snapshots for reliable web data. - ** OpenAI (GPT)** — to generate a professional HTML digest. - **Airtable** — store daily rows for history, filters, dashboards. ### Example Airtable Table: `Daily Stocks` | Ticker | Company | Price | Change % | Sentiment | Date | |--------|--------------------------|---------|----------|-----------|---------------------| | AAPL | Apple Inc. | 225.80 | +1.4% | 🟢 Positive | 2025-09-18 09:00 | | MSFT | Microsoft Corporation | 415.20 | -0.7% | 🔴 Negative | 2025-09-18 09:00 | | NVDA | NVIDIA Corporation | 124.55 | +2.1% | 🟢 Positive | 2025-09-18 09:00 | | TSLA | Tesla Inc. | 260.00 | -3.0% | 🔴 Negative | 2025-09-18 09:00 | | META | Meta Platforms Inc. | 310.45 | +0.5% | 🟡 Neutral | 2025-09-18 09:00 | - **Gmail** — deliver the final HTML email to stakeholders. - **n8n** — the automation engine that orchestrates every step. > Keep API keys in n8n **Credentials** (never hard-code secrets). --- ## 🗺️ Architecture at a glance 1. **Schedule** fires daily 2. **Seed list** of tickers 3. **Split** into one item per stock 4. **Prepare keyword** for scraping 5. **Launch Bright Data** job 6. **Poll progress** with a **wait-loop** 7. **Fetch snapshot data** 8. **Aggregate** for the AI 9. **Generate HTML summary** (GPT) 10. **Save rows to Airtable** 11. **Send email via Gmail** --- # ⚙️ Step-by-step — Every node explained ## ⏰ Daily Run Trigger (Schedule Trigger)  ### Purpose Start the automation at a precise time each day so nobody needs to push a button. ### Parameters (English) - **Trigger Type**: `Time Interval` or `Cron` - **Every X**: `1 Day` (or your preferred cadence) - **Timezone**: `UTC` (or your own) - **Start Time**: optional (e.g., `09:00`) --- ## 📝 Set Stock List (Set Node – SAMPLE DATA) ### Purpose Define the universe of stocks to monitor. This acts as the **seed data** for scraping. ### Parameters - **Values to Set**: `Fixed JSON (array of objects)` - **Keep Only Set**: `true` - **Fields per item**: `ticker`, `name`, `market_cap` (you may add `sector`, `isin`, etc.) --- ## 🔀 Split Stocks (Split Out) ### Purpose Turn the array into **individual items** so each ticker is processed independently (scraping, polling, results). ### Parameters - **Operation**: `Split Out Items` - **Field to Split**: the array defined in the previous Set node --- ## 🏷 Prepare Stock Keyword (Set Node) ### Purpose Create a `keyword` field (typically equal to `ticker`) for Bright Data discovery. ### Parameters - **Values to Set**: `Add Field` - **Field Name**: `keyword` - **Value**: use an expression referencing the current item’s ticker (e.g., `` {{ $json.ticker }} ``) --- ## 🕸 Bright Data Scraper (HTTP Request) ### Purpose Trigger the Bright Data dataset to start collecting information for the `keyword`. Returns a `snapshot_id` to poll later. ### Parameters - **Method**: `POST` - **Endpoint**: `https://api.brightdata.com/datasets/v1/trigger` - **Authentication**: `Authorization: Bearer <token>` (header) - **Body Fields**: - `dataset_id`: your Bright Data dataset ID - `discover_by`: usually `keyword` - `keyword`: the value prepared above > Add a retry/backoff policy on 429/5xx in node options. --- ## 🔄 Check Scraper Progress (HTTP Request)  ### Purpose Poll Bright Data to see whether the snapshot is `running` or `ready`. ### Parameters - **Method**: `GET` - **Endpoint**: `https://api.brightdata.com/datasets/v1/snapshots/{snapshot_id}` - **Authentication**: `Authorization: Bearer <token>` - **Expected Output**: a `status` field (`running`, `ready`) --- ## ⏳ Wait for Data (Wait Node) ### Purpose Pause between progress checks to avoid rate limits and give Bright Data time to finish. ### Parameters - **Mode**: `Wait a fixed amount of time` - **Time**: e.g., `30 seconds` (tune to your dataset size) --- ## 🔀 Scraper Status Switch (Switch Node) ### Purpose Route logic based on the polled `status`. ### Parameters - **Value to Check**: `status` - **Rules**: - Equals `running` → go to **Wait for Data** (then re-check) - Equals `ready` → proceed to **Fetch Scraper Results** > Loop pattern: **Check → Wait → Check**, until `ready`. --- ## 📥 Fetch Scraper Results (HTTP Request) ### Purpose Download the completed snapshot data once Bright Data marks it `ready`. ### Parameters - **Method**: `GET` - **Endpoint**: `https://api.brightdata.com/datasets/v1/snapshots/{snapshot_id}/data` - **Authentication**: `Authorization: Bearer <token>` - **Query**: `format=json` - **Output**: array of rows per ticker (price, change %, any fields your dataset yields) > Normalize fields with a **Set/Code** node if needed. --- ## 📊 Aggregate Stock Data (Aggregate Node) ### Purpose Combine all individual items into **one consolidated object** so the AI can analyze the entire market snapshot. ### Parameters - **Mode**: `Aggregate` (merge to a single item) - **Fields to Include**: `ticker`, `name`, `price`, `change`, `sentiment` (plus any extra fields captured) - **Output**: one JSON item containing an array/map of the day’s stocks --- ## 🤖 Generate Daily Summary (AI Node – OpenAI) ### Purpose Ask the model to convert raw data into a **styled HTML email**: headline, top movers, table, insights, and (optional) upcoming events. ### Parameters - **Model**: gpt-4.1 - **Input**: the aggregated JSON from the previous node - **Prompt guidelines**: - Output **HTML only** with inline styles (email-safe) - Include a **table** (Ticker, Company, % Change with ↑/↓ & color, Market Cap, Sentiment icon) - Highlight **top 2 gainers & 2 losers** with short reasoning if present - Provide **3–5 insights** (sector rotation, volatility, outliers) - Add **upcoming events** when available (earnings, launches, macro) - Footer: “Generated automatically by your AI-powered stock monitor” - **Output field**: confirm the exact property that contains the HTML (e.g., `output`, `message`, `text`) --- ## 🗂 Save to Airtable (Airtable – Create Record) ### Purpose Log each item (or the roll-up) to Airtable for history, filtering, and dashboards. ### Parameters - **Operation**: `Create Record` - **Base ID**: from your Airtable URL - **Table**: e.g., `Daily Stocks` - **Field Mapping**: - `Ticker` ← `` {{ $json.ticker }} `` - `Company` ← `` {{ $json.name }} `` - `Price` ← `` {{ $json.price }} `` - `Change %` ← `` {{ $json.change }} `` - `Sentiment` ← `` {{ $json.sentiment }} `` - `Date` ← `` {{ $now.toISO() }} `` > Use a Single-Select for `Sentiment` (🟢 / 🟡 / 🔴) to build clean Airtable views. --- ## 📧 Send Report via Gmail (Gmail Node)  ### Purpose Deliver the AI-generated HTML digest to your recipients. ### Parameters - **Operation**: `Send Email` - **Send To**: one or more recipients (e.g., `[email protected]`) - **Subject**: `Daily Stock Market Digest – {{ $now.format("yyyy-MM-dd") }}` - **Message (HTML)**: reference the AI node’s HTML property (e.g., `` {{ $('Generate Daily Summary').first().json.output }} ``) - **Options**: set **Append Attribution** to `false` (keep the email clean) > Test in Gmail, Outlook, and mobile to validate inline CSS. --- # 🧪 Error handling & reliability tips - **Backoff on Bright Data** — If scraping many tickers, increase **Wait** or batch requests. - **Guard against empty results** — If a snapshot returns 0 rows, branch to a fallback email (“No data today”). - **AI guardrails** — Enforce “HTML-only” and skip missing sections gracefully. - **Airtable normalization** — Strip `%`, cast numbers to float before insert. - **Observability** — Add a final Slack/Email **On Fail** node with run ID and error message. --- # 🧩 Customization ideas - **Sector deep-dives**: add sector fields and a second AI paragraph on sector rotation. - **CSV attachment**: generate & attach a CSV for power users. - **Multiple lists**: run parallel branches for Tech, Healthcare, or regions. - **Other asset classes**: Crypto, ETFs, Indices, FX. - **Audience targeting**: different “To” lists and slightly different prompts per audience. --- # ✅ Why this workflow is powerful - **Hands-off** — the report simply shows up every day. - **Analyst-grade** — clean HTML, top movers, tidy table, actionable insights. - **Auditable** — rows archived in Airtable for history and dashboards. - **Composable** — swap scrapers, LLMs, storage, or email service. - **Scalable** — start with 10 tickers, grow to many lists using the same loop. For advanced no-code & AI projects, see [0vni – Agence automatisation](https://www.0vni.fr/).
Export Google Search Console data to Airtable automatically
# Export Google Search Console Data to Airtable Automatically  *If you’ve ever downloaded CSV files from Google Search Console, opened them in Excel, cleaned the weird formatting, and pasted them into a sheet just to get a simple report… this workflow is made for you.* ## Who Is This Workflow For? This automation is perfect for: - **SEO freelancers and consultants** → who want to track client performance without wasting time on manual exports. - **Marketing teams** → who need fresh daily/weekly reports to check what keywords and pages are performing. - **Website owners** → who just want a clean way to see how their site is doing without logging into Google Search Console every day. Basically, if you care about SEO but don't want to babysit CSV files, this workflow is your new best friend. If you need a **professional n8n agency** to build advanced data automation workflows like this, check out [Vision IA's n8n automation services](https://visionia.io/agence-n8n). ## What Does It Do? Here’s the big picture: 1. It runs on a schedule (every day, or whenever you want). 2. It fetches data directly from the **Google Search Console API**. 3. It pulls 3 types of reports: - By **Query** (keywords people used). - By **Page** (URLs that ranked). - By **Date** (daily performance). 4. It splits and cleans the data so it’s human-friendly. 5. It saves everything into **Airtable**, organized in three tables. End result: every time you open Airtable, you have a neat SEO database with clicks, impressions, CTR, and average position — no manual work required. ## Prerequisites You’ll need a few things to get started: - Access to [Google Search Console](https://search.google.com/search-console). - A [Google Cloud project](https://console.cloud.google.com/) with the Search Console API enabled. - An [Airtable](https://airtable.com) account to store the data. - An automation tool that can connect APIs (like the one we’re using here). That’s it! --- ## Step 1: Schedule the Workflow The very first node in the workflow is the **Schedule Trigger**. - **Why?** → So you don’t have to press “Run” every day. - **What it does** → It starts the whole workflow at fixed times. In the JSON, you can configure things like: - Run every day at a specific hour (e.g., 8 AM). - Or run every X hours/minutes if you want more frequent updates. This is the alarm clock of your automation ⏰. --- ## Step 2: Set Your Domain and Time Range Next, we define the site and the time window for the report. In the JSON, there’s a **Set node** with two important parameters: - `domain` → your website (example: `https://www.vvv.fr/`). - `days` → how many days back you want the data (default: 30). 👉 Changing these two values updates the whole workflow. Super handy if you want 7-day reports instead of 30. ## Step 3: Fetch Data from Google Search Console This is where the workflow talks to the API. There are **3 HTTP Request nodes**: 1. **Get Query Report** - Pulls data grouped by search queries (keywords). - Parameters in the JSON: - `startDate` = today - 30 days - `endDate` = today - `dimensions` = `"query"` - `rowLimit` = `25000` (maximum rows the API can return) 2. **Get Page Report** - Same idea, but grouped by page URLs. - Parameters: - `dimensions` = `"page"` - Same dates and row limit. 3. **Get Date Report** - This one groups performance by date. - Parameters: - `dimensions` = `"date"` - You get a day-by-day performance view. Each request returns rows like this: { "keys": ["example keyword"], "clicks": 42, "impressions": 1000, "ctr": 0.042, "position": 8.5 } ## Step 4: Split the Data The API sends results in a big array (`rows`). That’s not very usable directly. So we add a **Split Out node** for each report. **What it does**: breaks the array into single items → 1 item per keyword, per page, or per date. This way, each line can be saved individually into Airtable. 👉 Think of it like opening a bag of candy and laying each one neatly on the table 🍬. --- ## Step 5: Clean and Rename Fields After splitting, we use **Edit Fields nodes** to make the data human-friendly. For example: - In the **Query report** → rename `keys[0]` into `Keyword`. - In the **Page report** → rename `keys[0]` into `page`. - In the **Date report** → rename `keys[0]` into `date`. This is also where we keep only the useful fields: - `Keyword` / `page` / `date` - `clicks` - `impressions` - `ctr` - `position` --- ## Step 6: Save Everything into Airtable Finally, the polished data is sent into Airtable. In the JSON, there are 3 Airtable nodes: - **Queries table** → stores all the keywords. - **Pages table** → stores all the URLs. - **Dates table** → stores day-by-day metrics. Each node is set to: - **Operation** = `Create` → adds a new record. - **Base** = `Search Console Reports`. - **Table** = `Queries`, `Pages`, or `Dates`. ### Field Mapping For **Queries**: - `Keyword` → `{{ $json.Keyword }}` - `clicks` → `{{ $json.clicks }}` - `impressions` → `{{ $json.impressions }}` - `ctr` → `{{ $json.ctr }}` - `position` → `{{ $json.position }}` 👉 Same logic for **Pages** and **Dates**, just replace `Keyword` with `page` or `date`. --- ## Expected Output Every time this workflow runs: - **Queries table** fills with fresh keyword performance data. - **Pages table** shows how your URLs performed. - **Dates table** tracks the evolution day by day. In Airtable, you now have a complete **SEO database** with no manual exports. --- ## Why This Is Awesome - 🚫 No more messy CSV exports. - 📈 Data is always up-to-date. - 🎛 You can build Airtable dashboards, filters, and interfaces. - ⚙️ Easy to adapt → just change `domain` or `days` to customize. And the best part? You can spend the time you saved on actual **SEO improvements** instead of spreadsheet gymnastics 💃. ## Need Help Automating Your Data Workflows? This n8n workflow is perfect for **automating SEO reporting and data collection**. If you want to go further with **document automation, file processing, and data synchronization across your tools**, our agency specializes in building custom automation systems. 👉 **Explore our document automation services**: [Vision IA – Document Automation Agency](https://visionia.io/agence-automatisation-documents) We help businesses automate their data workflows—from collecting reports to organizing files and syncing information across CRMs, spreadsheets, and databases—all running automatically. Questions about this workflow or other automation solutions? Visit [Vision IA](https://visionia.io/) or reach out for a free consultation.
Automatically reply to customer emails with Airtable, Gmail, and GPT-4.1 Mini
# Automatically Reply to Customer Emails with Airtable, Gmail, and OpenAI  ## Introduction This guide walks you step by step through setting up an automated agent that: - Receives emails sent by your customers. - Analyzes the content of the email. - Generates an appropriate response using an AI model (OpenAI GPT). - Stores all information (received email, AI response, date, customer email) in Airtable. - Automatically replies to the customer in the same Gmail thread. --- ## Prerequisites Before you start, you’ll need: - A [Gmail](https://mail.google.com) account connected to n8n. - An [Airtable](https://airtable.com) account. - An [n8n](https://n8n.io) instance (cloud or self-hosted). - An [OpenAI](https://platform.openai.com) API key. --- ## Prepare the Airtable Base  No need to build everything from scratch — here’s a ready-to-use base you can copy: 👉 [Open the Airtable base](https://airtable.com/invite/l?inviteId=invnYug7i1yK7gqd4&inviteToken=9cd007631d148208bf689d2af7fd95039839ca775a18ad434918652ea370b86e&utm_medium=email&utm_source=product_team&utm_content=transactional-alerts) It already contains the following structure: - **Subject** (text) → email subject. - **Date** (date/time) → date of reception. - **Customer Email** (text) → customer’s email address. - **Message** (long text) → body of the received email. - **AI Response** (long text) → AI-generated reply. You can reuse it as it is or duplicate it into your Airtable account. ## 1. Set Up Gmail Trigger in n8n  Alright, now that we have our Airtable base ready, we need to capture customer emails. That’s the job of the **Gmail Trigger**. Basically, this node lies in wait inside your inbox, and as soon as a new message arrives… *bam*, your workflow fires up. ### Connect Your Gmail Account - In n8n, add a **Gmail Trigger** node. - Click **Credential to connect with** and select your Gmail account. - If you haven’t done it yet, click **Add new**, connect your Google account, and allow access. Pro tip: don’t worry, it won’t read your personal emails to gossip — everything stays inside your workflow. ### Basic Settings - **Poll Times**: select `Every Minute`. → This way, n8n checks your inbox every minute. - **Mode**: `Message Received`. → You want the flow to trigger whenever a customer writes to you. - **Event**: `Message Received`. → Same logic, keep it simple. - **Simplify**: turn it off (`OFF`). → Why? Because if you enable "Simplify," you only get a stripped-down version of the email. And you want it all: subject, sender, raw message… the full package. ### Expected Output When you execute the node, you should see: - **id**: unique identifier of the email. - **threadId**: conversation identifier (super useful to reply in the same thread). - **snippet**: a short preview of the email (first lines). - **From**: your customer’s email address. - **To**: your email address. - **Subject**: the subject of the email. - **payload**: the full body of the email (yep, in base64 — but we’ll handle that later). And that’s it — your Gmail Trigger is set up. In short, the moment a customer writes “Hey, I have an issue with my account,” your workflow kicks in instantly (well, almost — it checks every minute). ## 2. Set Up the AI Agent in n8n  After configuring your **Gmail Trigger** (which captures incoming customer emails), you now need a **brain** to take over, analyze the email, and draft a reply. That’s where the **AI Agent node** comes in. ### Its Role The **AI Agent** node is used to: - Read the email content (via the Gmail Trigger). - Understand the context and tone of the customer. - Generate a clear, concise, and human-like response. - Prepare a personalized reply that will later be sent back via Gmail and stored in Airtable. In short, it’s your **24/7 support colleague**, but coded as a bot. --- ### How to Configure It - **Source for Prompt (User Message)** → choose `Define below`. - **Prompt (User Message)** → describe your business and role as if you were training an intern. Example: *“You are an AI support agent for a company that sells solar panels. You respond to technical requests, quotes, and customer questions. Your replies must be short, clear, friendly, and precise.”* - **Chat Model** → connect your AI model (e.g. OpenAI GPT-4.1 Mini). - **Memory (optional but recommended)** → connect a **Conversation Memory** node. → This allows the AI to retain conversation history and better understand follow-ups. --- ### Expected Output When you run this node, you should see in the output: - A field `output` containing the automatically generated AI reply. - The text should be short, natural, and adapted to the customer’s tone (casual or formal). 👉 With the Gmail Trigger you capture emails, and with the AI Agent you get a reply ready to send — as if you had written it yourself. ## 3. Save Emails and Responses in Airtable Now that your **AI Agent** generates replies, you need to store them somewhere to keep a clear record of all interactions. That’s where **Airtable** comes in. ### Quick Reminder You’ve already copied my ready-to-use Airtable base: 👉 [Access the base](https://airtable.com/invite/l?inviteId=invnYug7i1yK7gqd4&inviteToken=9cd007631d148208bf689d2af7fd95039839ca775a18ad434918652ea370b86e&utm_medium=email&utm_source=product_team&utm_content=transactional-alerts) This base contains a table **Email Support Logs** with the following columns: - **Subject** - **Date** - **Customer Email** - **Message** - **AI Response** --- ### How to Connect Airtable in n8n 1. Add an **Airtable** node right after your **AI Agent**. 2. Under **Operation**, select `Create`. 3. In **Base** → choose **BASE AGENT IA EMAIL**. 4. In **Table** → select **Email Support Logs**. --- ### Map the Correct Values Then, link the fields as follows: - **Subject** → `{{ $('Email Received').item.json.Subject }}` - **Customer Email** → `{{ $('Email Received').item.json.From }}` - **Message** → `{{ $('Email Received').item.json.snippet }}` - **AI Response** → `{{ $('AI Agent').item.json.output }}` - **Date** → `{{ $now }}` --- ### Expected Output For each new email received: - Gmail captures the email. - Your AI drafts the reply. - All details (email, sender, subject, reply) are automatically stored in your Airtable base. 👉 You now have a fully automated **customer support log**. ## 4. Automatically Reply to the Customer in Gmail Now that you’re storing each interaction in Airtable, it’s time to **send your AI’s reply directly back to the customer**. This closes the loop: customer writes → AI replies → everything gets logged in Airtable. ### Add the Gmail Reply Node 1. Add a **Gmail** node right after your **AI Agent** (or after Airtable if you prefer logging before replying). 2. Under **Operation**, select `Reply`. 3. Connect your Gmail account (same credential as your Gmail Trigger). ### Configure the Reply - **Thread ID** → `{{ $('Email Received').item.json.threadId }}` → Ensures the reply is sent in the same conversation thread. - **To** → `{{ $('Email Received').item.json.From }}` → Customer’s email address. - **Subject** → `Re: {{ $('Email Received').item.json.Subject }}` → The "Re:" keeps the continuity of the conversation. - **Message Body** → `{{ $('AI Agent').item.json.output }}` → This is the text automatically generated by your AI. --- ### Expected Output When a customer sends an email: - Gmail Trigger captures the message. - The AI Agent generates a tailored reply. - Airtable logs the full interaction. - Gmail automatically sends the response in the same conversation thread. Your customer receives a **quick, personalized, and natural reply** without you typing a single word. 👉 You now have a **complete support agent**: listen, analyze, log, reply. Want to save hours each week? Visit [Agence automatisation 0vni](https://www.0vni.fr/).
Google Maps leads (names,emails,phones...) Apify + Airtable + custom emails
## Who is it for? This workflow is perfect for anyone who wants to: - **Automatically collect contacts from Google Maps**: emails, phone numbers, websites, social media (LinkedIn, Facebook), city, ratings, and reviews. - **Organize everything neatly in Airtable**, without dealing with messy CSV exports that cause headaches. - **Send a personalized email to each lead**, without writing it or hitting "send" yourself. 👉 In short, it's the perfect tool for marketing agencies, freelancers in prospecting, or sales teams tired of endless copy-paste. If you're looking for a **professional n8n automation agency** to build custom workflows like this one, check out [Vision IA's n8n automation services](https://visionia.io/agence-n8n). ### How does it work? Here's the pipeline: 1. **Scrape Google Maps with Apify** (business name, email, website, phone, LinkedIn, Facebook, city, rating, etc.). 2. **Clean and map the data** so everything is well-structured (Company, Email, Phone, etc.). 3. **Send everything into Airtable** to build a clear, filterable database. 4. **Trigger an automatic email via Gmail**, personalized for each lead. 👉 The result: a real prospecting machine for local businesses. ### What you need before starting ✅ An **Apify account** (for Google Maps scraping). ✅ An **Airtable account** with a prepared base (see structure below). ✅ A **Gmail account** (to send automatic emails). ### Airtable Base Structure Your table should contain the following columns: | Company | Email | Phone Number | Website | LinkedIn | Facebook | City | Category | Google Maps Reviews | Google Maps Link | | ------- | ---------------------------------------- | ----------------- | -------------------------------------------- | -------------- | -------------- | ---------------- | ---------------- | ------------------- | ----------------- | | 4 As | [[email protected]](mailto:[email protected]) | +33 1 89 36 89 00 | [https://www.4-as.fr/](https://www.4-as.fr/) | linkedin.com/… | facebook.com/… | 94100 Saint-Maur | training, center | 48 reviews / 5 ★ | maps.google.com/… | # Detailed Workflow Steps ### **Step 1 – GO Trigger** - **Node**: Manual Trigger - **Purpose**: Start the workflow manually. 👉 You can replace this trigger with a **Webhook** (to launch the flow via a URL) or a **Cron** (to run it automatically on a schedule). ### **Step 2 – Scrape Google Maps**  - **Node**: HTTP Request - **Method**: `POST` **Where to find the Apify URL?** 1. Go to [Google Maps Email Leads Fast Scraper](https://console.apify.com/actors/j66N0LgqJT3a7fSzu/input) 2. Click on **API** (top right) 3. Open **API Endpoints** 4. Copy the URL of the **3rd option**: *Run Actor synchronously and get dataset items* 👉 This URL already includes your **Apify API token**. **Body Content Type**: JSON - **Body JSON (example)**: - **Body Content Type**: JSON - **Body JSON (example)**: *{ "area_height": 10, "area_width": 10, "emails_only": true, "gmaps_url": "https://www.google.com/maps/search/training+centers+near+Amiens/", "max_results": 200, "search_query": "training center" }* ### Step 3 – Wait - **Node**: Wait - **Purpose**: Give the scraper enough time to return data. - **Recommended delay**: *10 seconds* (adjust if needed). 👉 This ensures that Apify has finished processing before we continue. ### Step 4 – Mapping  - **Node**: Set - **Purpose**: Clean and reorganize the raw dataset into structured fields that match Airtable columns. **Assignments (example):** *Company = {{ $json.name }}* *Email = {{ $json.email }}* *Phone = {{ $json.phone_number }}* *Website = {{ $json.website_url }}* *LinkedIn = {{ $json.linkedin }}* *Facebook = {{ $json.facebook }}* *City = {{ $json.city }}* *Category = {{ $json.google_business_categories }}* *Google Maps Reviews = {{ $json.reviews_number }} reviews, rating {{ $json.review_score }}/5* *Google Maps Link = {{ $json.google_maps_url }}* 👉 **Result**: The data is now clean and ready for Airtable. ### Step 5 – Airtable Storage  - **Node**: Airtable → Create Record - **Parameters**: - **Credential to connect with**: Airtable Personal Access Token account - **Resource**: Record - **Operation**: Create - **Base**: Select from list → your base (example: *GOOGLE MAPS SCRAPT*) - **Table**: Select from list → your table (example: *Google maps scrapt*) - **Mapping Column Mode**: Map Each Column Manually 👉 To get your **Base ID** and **Table ID**, open your Airtable in the browser: *https://airtable.com/appA6eMHOoquiTCeO/tblZFszM5ubwwSYDK* Here: - Base ID = *appA6eMHOoquiTCeO* - Table ID = *tblZFszM5ubwwSYDK* ### Authentication 1. Go to: [https://airtable.com/create/tokens](https://airtable.com/create/tokens) 2. Create a new Personal Access Token 3. Give it access to the correct base 4. Copy the token into n8n credentials (select **Airtable Personal Access Token**). ### Field Mapping (example)  *Company: {{ $json['Company'] }}* *Email: {{ $json.Email }}* *Phone: {{ $json['Phone'] }}* *Website: {{ $json['Website'] }}* *LinkedIn: {{ $json.LinkedIn }}* *Facebook: {{ $json.Facebook }}* *City: {{ $json.City }}* *Category: {{ $json['Category'] }}* *Google Maps Reviews: {{ $json['Google Maps Reviews'] }}* *Google Maps Link: {{ $json['Google Maps Link'] }}* 👉 **Result**: Each lead scraped from Google Maps is automatically saved into Airtable, ready to be filtered, sorted, or used for outreach. ## Step 6 – Automatic Email  - **Node**: Gmail → Send Email - **Parameters**: - **To**: *= {{ $json.fields.Email }}* - **Subject**: *= {{ $json.fields['Company'] }}* - **Message**: HTML email with dynamic lead details. **Example HTML message:** *Hello {{ $json.fields['Company'] }} team,* *I design custom automations for training centers.* *Goal: zero repetitive manual tasks, from registration to invoicing.* *Details: {{ $json.fields['Company'] }} in {{ $json.fields.City }} — website: {{ $json.fields['Website'] }} — {{ $json.fields['Google Maps Reviews'] }}* *Interested in a quick 15-min call to see a live demo?* 👉 **Result**: Each contact receives a fully personalized email with their company name, city, website, and Google Maps rating. ## Final Result With just one click: 1. Scrape Google Maps (Apify). 2. Clean and structure the data (Set). 3. Save everything into Airtable. 4. Send personalized emails via Gmail. 👉 All without copy-paste, without CSV, and without Excel headaches. ## Need Help Automating Your Lead Generation? This n8n workflow is a powerful starting point for **automating Google Maps prospecting at scale**. If you want a **turnkey solution** with advanced features like AI-powered personalization, multi-channel outreach, and automatic follow-ups, our agency specializes in building custom lead generation systems. 👉 **Discover our automated lead generation services**: [Vision IA – AI-Powered Lead Generation Agency](https://visionia.io/agence-automatisation-generation-leads) We help B2B companies automate their entire prospecting pipeline—from finding the right contacts to booking meetings—all running 24/7 without manual intervention. Questions about this workflow or other automation possibilities? Visit [Vision IA](https://visionia.io/) or reach out directly for a free consultation.
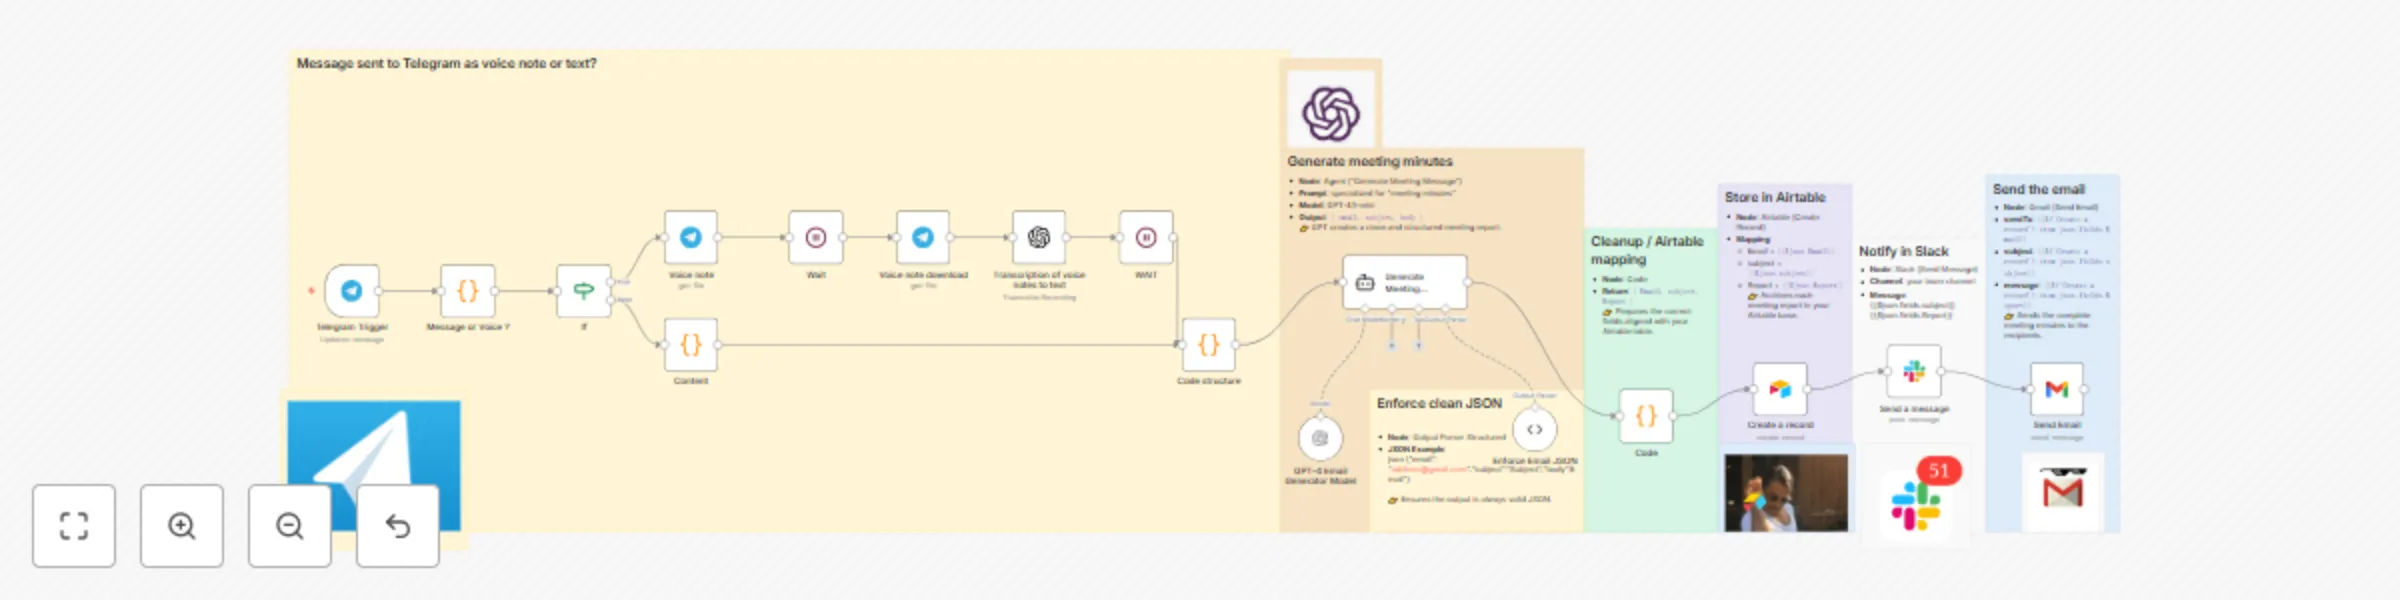
Create meeting minutes from Telegram messages with GPT-5 to Airtable Slack Gmail
# How it works?  1. Send a message or a voice note on Telegram right after the meeting. 2. n8n transcribes (if it's a voice note) and sends the text to GPT. 3. GPT generates a structured and professional meeting minutes report. 4. The report is automatically stored in Airtable. 5. Your team is instantly notified in Slack. 6. A formal email is sent via Gmail to the right recipients. 👉 Works for all types of meetings: client calls, team syncs, project updates… whether you type a message or send a quick voice memo. If you need a **professional n8n automation agency** to build custom workflows like this, check out [Vision IA's n8n automation services](https://visionia.io/agence-n8n). --- # ✅ Requirements Before running this workflow, you’ll need: - A **Telegram account** with a bot configured (to send your messages/voice notes) - An **OpenAI API key** (for GPT and voice transcription) - An **Airtable account** with a base containing these fields: - Email - Subject - Report - A **Slack account** with the target channel for notifications - A **Gmail account** connected to n8n (OAuth2) # 🔧 Step-by-step setup  ## Step 1 – Telegram Trigger - **Node**: Telegram Trigger - **Updates**: `message` 👉 Captures every message or voice note sent to the bot. --- ## Step 2 – Detect text or voice - **Node**: Code (“Message or Voice ?”) - **Expected output**: - `{ type: "text", content }` if message - `{ type: "voice", file_id }` if voice note 👉 Routes the workflow based on the input type. --- ## Step 3 – IF Condition - **Condition**: `{{$json.type}} == voice` 👉 Directs to the transcription branch if it’s a voice note. --- # Voice Branch 🎤 ## Step 4 – Download the voice file - **Node**: Telegram → Voice note - **Parameter**: `fileId = {{$json.file_id}}` ## Step 5 – Wait - **Node**: Wait (2–3s) 👉 Lets Telegram prepare the file. ## Step 6 – Voice note download - **Node**: Telegram (file download) 👉 Retrieves the audio file. ## Step 7 – Transcribe to text - **Node**: OpenAI (Transcription) - **Resource**: `audio` - **Operation**: `transcribe` 👉 Converts the voice note into plain text. ## Step 8 – Short wait 👉 Ensures continuity before sending to GPT. --- # Text Branch ✍️ ## Step 9 – Normalize - **Node**: Code (“Content”) - **Return**: `{ text: $json.content }` 👉 Standardizes the text as if it were already a transcription. --- ## Step 10 – Detect email - **Node**: Code (“Domain or Email detection”) 👉 Extracts the target email (or builds a fallback `[email protected]`). --- ## Step 11 – Generate meeting minutes - **Node**: Agent (“Generate Meeting Message”) - **Prompt**: specialized for “meeting minutes” - **Model**: GPT-4.1-mini - **Output**: `{ email, subject, body }` 👉 GPT creates a clean and structured meeting report. --- ## Step 12 – Enforce clean JSON - **Node**: Output Parser Structured - **JSON Example**: json {"email": "[email protected]","subject":"Subject","body":Email"} 👉 Ensures the output is always valid JSON. ### Step 13 – Cleanup / Airtable mapping - **Node**: Code - **Return**: `{ Email, subject, Report }` 👉 Prepares the correct fields aligned with your Airtable table. If you need help setting up **advanced Airtable workflows and database automation**, check out [Vision IA's Airtable automation services](https://visionia.io/agence-airtable). --- ## Step 14 – Store in Airtable  - **Node**: Airtable (Create Record) - **Mapping**: - Email = `{{$json.Email}}` - subject = `{{$json.subject}}` - Report = `{{$json.Report}}` 👉 Archives each meeting report in your Airtable base. --- ## Step 15 – Notify in Slack - **Node**: Slack (Send Message) - **Channel**: your team channel - **Message**: {{$json.fields.subject}}{{$json.fields.Report}} ## Step 16 – Send the email - **Node**: Gmail (Send Email) - **sendTo**: `{{$('Create a record').item.json.fields.Email}}` - **subject**: `{{$('Create a record').item.json.fields.subject}}` - **message**: `{{$('Create a record').item.json.fields.Report}}` ## Need Help Automating Your Communication Workflows? This n8n workflow shows how powerful **email automation and AI-powered documentation** can be. If you want to go further with **automated email campaigns, meeting follow-ups, and team communication systems**, our agency specializes in building custom solutions. 👉 **Explore our email automation services**: [Vision IA – Email Automation Agency](https://visionia.io/agence-automatisation-emails) We help businesses automate their entire communication pipeline—from meeting notes to client follow-ups and internal notifications—all running automatically with AI assistance. Questions about this workflow or other automation solutions? Visit [Vision IA](https://visionia.io/) or reach out for a free consultation.
Send a voice note on Telegram to generate a professional email with ChatGPT
## Telegram Voice Message → Automatic Email  **Imagine:** What if you could turn a simple Telegram voice message into a professional email—without typing, copying, pasting, or even opening Gmail? This workflow does it all for you: just record a voice note, and it will transcribe, format, and write a clean HTML email, **then send it to the right person—all by itself.** ## Prerequisites - **Create a Telegram bot** (via [BotFather](https://t.me/botfather)) and get the token. - **Have an OpenAI account** (API key for Whisper and GPT-4). - **Set up a Gmail account with OAuth2.** - **Import the JSON template** into your automation platform. ## 🧩 Detailed Flow Architecture ### 1. Telegram Trigger  **Node:** Telegram Trigger This node listens to all **Message** events received by the specified bot (e.g., “BOT OFFICIEL BAPTISTE”). Whenever a user sends a voice message, the trigger fires automatically. > ⚠️ Only one Telegram trigger per bot is possible (API limitation). **Key parameter:** - `Trigger On`: Message ### 2. Wait **Node:** Wait Used to buffer or smooth out calls to avoid collisions if you receive several voice messages in a row. ### 3. Retrieve the Audio File  **Node:** Get a file - **Type:** Telegram (resource: `file`) - **Parameter:** - `fileId = {{$json["message"]["voice"]["file_id"]}}` This node fetches the voice file from Telegram received in step 1 ### 4. Automatic Transcription (Whisper)  **Node:** Transcribe a recording - **Resource:** audio - **Operation:** transcribe - **API Key:** Your OpenAI account The audio file is sent to OpenAI Whisper: the output is clean, accurate text ready to be processed. ### 5. Optional Wait (Wait1) **Node:** Wait1 Same purpose as step 2: useful if you want to buffer or add a delay to absorb processing time. ### 6. Structured Email Generation (GPT-4 + Output Parser) **Node:** AI Agent This is the core of the flow: - The transcribed text is sent to GPT-4 (or GPT-4.1-mini here, via OpenAI Chat Model) - **Prompt used:** ```markdown You are an assistant specialized in writing professional emails. Based on the text below, you must: {{ $json.text }} 1. Detect if there is a recipient's email address in the text (or something similar like "send to fort.baptiste.pro") - If it’s not a complete address, complete it by assuming it ends with `@gmail.com`. 2. Understand the user's intent (resignation, refusal, application, excuse, request, etc.) 3. Generate a relevant and concise email subject, faithful to the content 4. Write a professional message, structured in HTML: - With a polite tone, adapted to the situation - Formatted with HTML tags (`<p>`, `<br>`, etc.) - No spelling mistakes in French - My first name is jeremy and if the text says he is not happy, specify the wish to resign ⚠️ You must always return your answer in the following strict JSON format, with no extra text: ``` ```json { "email": "[email protected]", "subject": "Objet de l’email", "body": "<p>Contenu HTML de l’email</p>" } ``` Everything is strictly validated and formatted with the **Structured Output Parser** node. ### 7. Automatic Email Sending (Gmail) **Node:** Send a message - **To:** `{{$json.output.email}}` - **Subject:** `{{$json.output.subject}}` - **HTML Body:** `{{$json.output.body}}` This node takes the JSON structure returned by the AI and sends the email via Gmail, to the right recipient, with the correct subject and full HTML formatting. If you want to automate manual tasks, visit our French [Agence automatisation 0vni](https://www.0vni.fr/).
Find leads on Google Maps and reach out automatically (GPT-4 + Airtable + Gmail)
### Who is it for? This workflow is perfect for **marketers, sales teams, agencies, and local businesses** who want to save time by automating **lead generation from Google Maps**. It’s ideal for **real estate agencies, restaurants, service providers, and any local niche** that needs a clean database of fresh contacts, including emails, websites, and phone numbers. --- ## ✅ Prerequisites Before starting, make sure you have: - **Apify account** → to scrape Google Maps data - **OpenAI API key** → for GPT-4 email extraction - **Airtable account & base** → for structured lead storage - **Gmail account with OAuth** → to send personalized outreach emails Your Airtable base should have these columns: | Title | Street | Website | Phone Number | Email | URL | |-------------------------|-------------------------|--------------------|-----------------|------------------------|----------------------| | Paris Real Estate Agency| 10 Rue de Rivoli, Paris | https://agency.fr | +33 1 23 45 67 | [email protected] | maps.google.com/... | --- ## 🏡 Example Use Case To keep things clear, we’ll use **real estate agencies in Paris** as an example. But you can replace this with **restaurants, plumbers, lawyers, or even hamster trainers** (you never know). --- ## 🔄 How the workflow works 1. **Scrape Google Maps leads with Apify** 2. **Clean & structure the data** (name, phone, website) 3. **Visit each website & extract emails with GPT-4** 4. **Save all leads into Airtable** 5. **Automatically send a personalized email via Gmail** This works for **any industry, keyword, or location**. ## Step 1 – Scraping Google Maps with Apify  Start simply: Open your n8n workflow and choose the trigger: “Execute Workflow” (manual trigger). Add an HTTP Request node (POST method). Now, head over to [Apify Google Maps Extractor.](https://apify.com/compass/google-maps-extractor) Fill in the fields according to your needs: Keyword: e.g., "real estate agency" (or restaurant, plumber...) Location: "Paris, France" Number of results: 50 (or more) Optional: filters (with/without a website, by categories…) Click Run to test the scraper. Then **click API → select API** endpoints tab. Choose “Run Actor synchronously and get dataset items”. **Copy the URL**, go back to n8n, and paste it into your HTTP Request node (URL field).  Then enable: Body Content Type → JSON Specify Body Using JSON Go back to Apify, click the JSON tab, copy everything, and paste it into the **JSON field of your HTTP Request.** If you now run your workflow, you'll get a nice structured table filled with Google Maps data. Pretty magical already—but we're just getting started! ## Step 2 – Cleaning Things Up (Edit Fields)  Raw data is cool, but messy. Add an **Edit Fields node next**, using Manual Mapping mode. Here’s what you keep (copy-paste friendly): Title → {{ $json.title }} Address → {{ $json.address }} Website → {{ $json.website }} Phone → {{ $json.phone }} URL → {{ $json.url }} Now, you have a clean, readable table ready to use. ## Step 3 – Handling Each Contact Individually (Loop Over Items)  Next, we process each contact one by one. Add the **Loop Over Items node:** Set Batch Size to 20 or more, depending on your needs. This node is simple but crucial to avoid traffic jams in the automation. ## Step 4 – Isolating Websites (Edit Fields again)  Add another Edit Fields node (Manual Mapping). This time, keep just: Website → {{ $json.website }} We've **isolated the websites for the next step**: scraping them one by one. ## Step 5 – Scraping Each Website (HTTP Request)  Now, we send our little robot to visit each website automatically. Add another HTTP Request node: Method: GET URL: {{ $json.website }} (from the previous node) This returns the raw HTML content of each site. Yes, it's ugly, but we won't handle it manually. We'll leave the **next step to AI!** ## Step 6 – Extracting Emails with ChatGPT  We now use OpenAI (Message a Model) to politely ask GPT to **extract only relevant emails.** Configure as follows: Model: GPT-4-1-mini or higher Operation: Message a Model Simplify Output: ON **Prompt to copy-paste:** *Look at this website content and extract only the email I can contact this business. In your output, provide only the email and nothing else. Ideally, this email should be of the business owner, so if you have 2 or more options, try for the most authoritative one. If you don't find any email, output 'Null'.* *Exemplary output of yours:* *[email protected]* *{{ $json.data }}* ChatGPT will kindly return the perfect email address (or 'Null' if none is found). ## Step 7 – Neatly Store Everything in Airtable  Almost done! Add an Airtable → Create Record node. **Fill your Airtable fields like this:** | **Airtable Field** | **Content** | **n8n Variable** | | ------------------ | ------------------------------- | ------------------------------------------ | | Title | Business name | `{{ $('Edit Fields').item.json.Title }}` | | Street | Full address | `{{ $('Edit Fields').item.json.Address }}` | | Website | Website URL | `{{ $('Edit Fields').item.json.Website }}` | | Phone Number | Phone number | `{{ $('Edit Fields').item.json.Phone }}` | | Email | Email retrieved by the AI agent | `{{ $json.message.content }}` | | URL | Google Maps link | `{{ $('Edit Fields').item.json.URL }}` | Now, you have a tidy Airtable database filled with fresh leads, ready for action. ## Step 8 – Automated Email via Gmail (The Final Touch)  To finalize the workflow, **add a Gmail → Send Email** node after your Airtable node. Here’s how to configure this node using the data pulled directly from your Airtable base (from the previous step): Recipient (To): Retrieve the email stored in Airtable ({{ $json.fields.Email }}). Subject: Use the company name stored in Airtable ({{ $json.fields.Title }}) to personalize the subject line. Body: You can include several fields directly from Airtable, such as: Company name: {{ $json.fields.Title }} Website URL: {{ $json.fields.Website }} Phone number: {{ $json.fields["Phone Number"] }} Link to the Google Maps listing: {{ $json.fields.URL }} All of this data is available in Airtable because it was automatically inserted in the previous step (Step 7). This ensures that each email sent is fully personalized and based on clear, reliable, and structured information.
Scrape Google Maps leads (email, phone, website) using Apify + GPT + Airtable
### Who is it for? This workflow is for **marketers, sales teams, and local businesses** who want to quickly collect leads (business name, phone, website, and email) from Google Maps and store them in Airtable. You can use it for **real estate agents, restaurants, therapists, or any local niche**. If you need a **professional automation agency** to build advanced lead generation systems like this, check out [Vision IA's n8n automation services](https://visionia.io/agence-n8n). --- ## How it works 1. **Scrape Google Maps** with [Apify Google Maps Extractor](https://apify.com/compass/google-maps-extractor). 2. **Clean and structure the data** (name, address, phone, website). 3. **Visit each website** and retrieve the raw HTML. 4. **Use GPT** to extract the most relevant email from the site content. 5. **Save everything to Airtable** for easy filtering and future outreach. It works for **any location or keyword** – just adapt the input in Apify. --- ## Requirements Before running this workflow, you’ll need: - ✅ **Apify account** (to use the Google Maps Extractor) - ✅ **OpenAI API key** (for GPT email extraction) - ✅ **Airtable account & base** with the following fields: - `Business Name` - `Address` - `Website` - `Phone Number` - `Email` - `Google Maps URL` --- ## Airtable Structure Your Airtable base should contain these columns: ## Airtable Structure | Title | Street | Website | Phone Number | Email | URL | |-------------------------|-------------------------|--------------------|-----------------|------------------------|----------------------| | Paris Real Estate Agency| 10 Rue de Rivoli, Paris | https://agency.fr | +33 1 23 45 67 | [email protected] | maps.google.com/... | | Example Business 2 | 25 Avenue de l’Opéra | https://example.fr | +33 1 98 76 54 | [email protected] | maps.google.com/... | | Example Business 3 | 8 Boulevard Haussmann | https://demo.fr | +33 1 11 22 33 | [email protected] | maps.google.com/... | --- ## Error Handling - **Missing websites:** If a business has no website, the flow skips the scraping step. - **No email found:** GPT returns `Null` if no email is detected. - **API rate limits:** Add a `Wait` node between requests to avoid Apify/OpenAI throttling.  Now let’s take a detailed look at how to set up this automation, using real estate agencies in Paris as an example. ## Step 1 – Launch the Google Maps Scraper Start with a When clicking Execute workflow trigger to launch the flow manually. Then, **add an HTTP Request** node with the method set to POST. 👉 Head over to Apify: Google Maps Extractor  On the page: [https://apify.com/compass/google-maps-extractor](https://apify.com/compass/google-maps-extractor) Enter your business keyword (e.g., real estate agency, hairdresser, restaurant) Set the location you want to target (e.g., Paris, France) Choose how many results to fetch (e.g., 50) Optionally, use filters (only places with a website, by category, etc.) ⚠️ No matter your industry, this works — just adapt the keyword and location. Once everything is filled in: Click Run to test. Then, go to the top right → click on API. Select the API endpoints tab. Choose Run Actor synchronously and get dataset items.  Copy the URL and paste it into your HTTP Request (in the URL field). Then enable: ✅ Body Content Type → JSON ✅ Specify Body Using JSON` Go back to Apify, click on the JSON tab, copy the entire code, and paste it into the JSON body field of your HTTP Request.  At this point, if you run your workflow, you should see a structured output similar to this: title subTitle price categoryName address neighborhood street city postalCode ........ ## Step 2 – Clean and structure the data  Once the raw data is fetched from Apify, we clean it up using the Edit Fields node. In this step, we manually select and rename the fields we want to keep: Title → {{ $json.title }} Address → {{ $json.address }} Website → {{ $json.website }} Phone → {{ $json.phone }} URL → {{ $json.url }}* This node lets us keep only the essentials in a clean format, ready for the next steps. On the right: a clear and usable table, easy to work with. ## Step 3 – Loop Over Items  Now that our data is clean (see step 2), we’ll go through it item by item to handle each contact individually. The Loop Over Items node does exactly that: it takes each row from the table (each contact pulled from Apify) and runs the next steps on them, one by one. 👉 Just set a Batch Size of 20 (or more, depending on your needs). Nothing tricky here, but this step is essential to keep the flow dynamic and scalable. ## Step 4 – Edit Field (again)  After looping through each contact one by one (thanks to Loop Over Items), we're refining the data a bit more. This time, we only want to keep the website. We use the Edit Fields node again, in Manual Mapping mode, with just: Website → {{ $json.website }} The result on the right? A clean list with only the URLs extracted from Google Maps. 🔧 This simple step helps isolate the websites so we can scrape them one by one in the next part of the flow. ## Step 5 – Scrape Each Website with an HTTP Request  Let’s continue the flow: in the previous step, we isolated the websites into a clean list. Now, we’re going to send a request to each URL to fetch the content of the site. ➡️ To do this, we add an HTTP Request node, using the GET method, and set the URL as: {{ $json.website }} This value comes from the previous Edit Fields input This node will simply “visit” each website automatically and return the raw HTML code (as shown on the right). 📄 That’s the material we’ll use in the next step to extract email addresses (and any other useful info). We’re not reading this code manually — we’ll scan through it line by line to detect patterns that matter to us. This is a technical but crucial step: it’s how we turn a URL into real, usable data. ## Step 6 – Extract the Email with GPT  Now that we've retrieved all the raw HTML from the websites using the HTTP Request node, it's time to analyze it. 💡 Goal: detect the most relevant email address on each site (ideally the main contact or owner). 👉 To do that, we’ll use an OpenAI node (Message a Model). Here’s how to configure it: ⚙️ Key Parameters: Model: GPT-4-1-MINI (or any GPT-4+ model available) Operation: Message a Model Resource: Text Simplify Output: ON **Prompt (message you provide):** Look at this website content and extract only the email I can contact this business. In your output, provide only the email and nothing else. Ideally, this email should be of the business owner, so if you have 2 or more options, try for most authoritative one. If you don't find any email, output 'Null'. Exemplary output of yours: [email protected] {{ $json.data }} ## Step 7 – Save the Data in Airtable  Once we’ve collected everything — the business name, address, phone number, website… and most importantly the email extracted via ChatGPT — we need to store all of this somewhere clean and organized. 👉 The best place in this workflow is Airtable. 📦 Why Airtable? Because it allows you to: Easily view and sort the leads you've scraped Filter, tag, or enrich them later And most importantly… reuse them in future automations ⚙️ What we're doing here We add an Airtable → Create Record node to insert each lead into our database. Inside this node, we manually map each field with the data collected in the previous steps:  | Airtable Field | Description | Value from n8n | | -------------- | ------------------------ | ------------------------------------------ | | `Title` | Business name | `{{ $('Edit Fields').item.json.Title }}` | | `Street` | Full address | `{{ $('Edit Fields').item.json.Address }}` | | `Website` | Website URL | `{{ $('Edit Fields').item.json.Website }}` | | `Phone Number` | Business phone number | `{{ $('Edit Fields').item.json.Phone }}` | | `Email` | Email found by ChatGPT | `{{ $json.message.content }}` | | `URL` | Google Maps listing link | `{{ $('Edit Fields').item.json.URL }}` | 🧠 Reminder: we’re keeping only clean, usable data — ready to be exported, analyzed, or used in cold outreach campaigns (email, CRM, enrichment, etc.). ➡️ And the best part? You can rerun this workflow automatically every week or month to keep collecting fresh leads 🔁. ## Need Help Building an Automated Lead Generation System? This workflow is a solid foundation for **scraping Google Maps and extracting contact emails automatically**. If you want to go further with **AI-powered lead qualification, multi-channel outreach, and automatic follow-ups**, our agency builds custom lead generation systems that run 24/7. 👉 **Explore our lead generation automation services**: [Vision IA – Automated Lead Generation Agency](https://visionia.io/agence-automatisation-generation-leads) We help B2B companies and agencies scale their prospecting without hiring more people—everything from data collection to booking qualified meetings happens on autopilot. Questions about this workflow or other automation solutions? Visit [Vision IA](https://visionia.io/) or reach out for a free consultation.
Daily task reminder system: Airtable to Slack automated notifications
# Still reminding people about their tasks manually every morning? Let’s be honest — who wants to start the day chasing teammates about what they need to do? What if Slack could do it for you — automatically, at 9 a.m. every day — without missing anything, and without you lifting a finger?  In this tutorial, you’ll build a simple automation with n8n that checks Airtable for active tasks and sends reminders in Slack, daily. Here’s the flow you’ll build: **Schedule Trigger → Search Records (Airtable) → Send Message (Slack)** ## STEP 1 : Set up your Airtable base  Create a new base called Tasks Add a table (for example: Projects, To-Do, or anything relevant) Add the following fields: | Field | Type | Example | | -------- | ----------------- | ------------------------------------------- | | Title | Text | Finalize quote for Client A | | Assignee | Text | Baptiste Fort | | Email | Email | [[email protected]](mailto:[email protected]) | | Status | Single select | In Progress / Done | | Due Date | Date (dd/mm/yyyy) | 05/07/2025 | Add a few sample tasks with the status In Progress so you can test your workflow later. ## STEP 2 Create the trigger in n8n In n8n, add a Schedule Trigger node Set it to run every day at 9:00 a.m.: Trigger interval: Days Days Between Triggers: 1 Trigger at hour: 9 Trigger at minute: 0 This is the node that kicks off the workflow every morning. ## STEP 3 : Search for active tasks in Airtable This step is all about connecting n8n to your Airtable base and pulling the tasks that are still marked as "In Progress". **1. Add the Airtable node** In your n8n workflow, add a node called: Airtable → Search Records You can find it by typing "airtable" in the node search. **2. Create your Airtable Personal Access Token**  If you haven’t already created your Airtable token, here’s how: 🔗 Go to: [https://airtable.com/create/tokens](https://airtable.com/create/tokens) Then: Name your token something like TACHES Under Scopes, check: ✅ data.records:read Under Access, select only the base you want to use (e.g. “Tâches”) Click “Save token” Copy the personal token **3. Set up the Airtable credentials in n8n** In the Airtable node: Click on the Credentials field Select: Airtable Personal Access Token Click Create New Paste your token Give it a name like: My Airtable Token Click Save **4. Configure the node**  Now fill in the parameters: Base: Tâches Table: Produits (or Tâches, depending on what you called it) Operation: Search Filter By Formula: {Statut} = "En cours" Return All: ✅ Yes (make sure it’s enabled) Output Format: Simple **5. Test the node** Click “Execute Node”. You should now see all tasks with Statut = "En cours" show up in the output (on the right-hand side of your screen), just like in your screenshot. ## STEP 4: Send each task to Slack Now that we’ve fetched all the active tasks from Airtable, let’s send them to Slack — one by one — using a loop.  ### Add the Slack node Drag a new node into your n8n workflow and select: Slack → Message Name it something like Send Slack Message You can find it quickly by typing "Slack" into the node search bar. ### Connect your Slack account If you haven't already connected your Slack credentials: Go to n8n → Credentials Select Slack API Click Create new Paste your Slack Bot Token (from your Slack App OAuth settings) Give it a clear name like Slack Bot n8n Choose the workspace and save Then, in the Slack node, choose this credential from the dropdown. ### Configure the message Set these parameters: Operation: Send Send Message To: Channel Channel: your Slack channel (e.g. #tous-n8n) Message Type: Simple Text Message Message template Paste the following inside the Message Text field: ### Message template  Paste the following inside the Message Text field: New task for {{ $json.name }}: *{{ $json["Titre"] }}* 👉 Deadline: {{ $json["Date limite"] }} Example output: New task for Jeremy: Relancer fournisseur X 👉 Deadline: 2025-07-04 ### Test it Click Execute Node to verify the message is correctly sent in Slack. If the formatting works, you’re ready to run it on schedule 🚀 Want to scale your workflows? Visit [0vni – Agence automatisation](https://www.0vni.fr/).
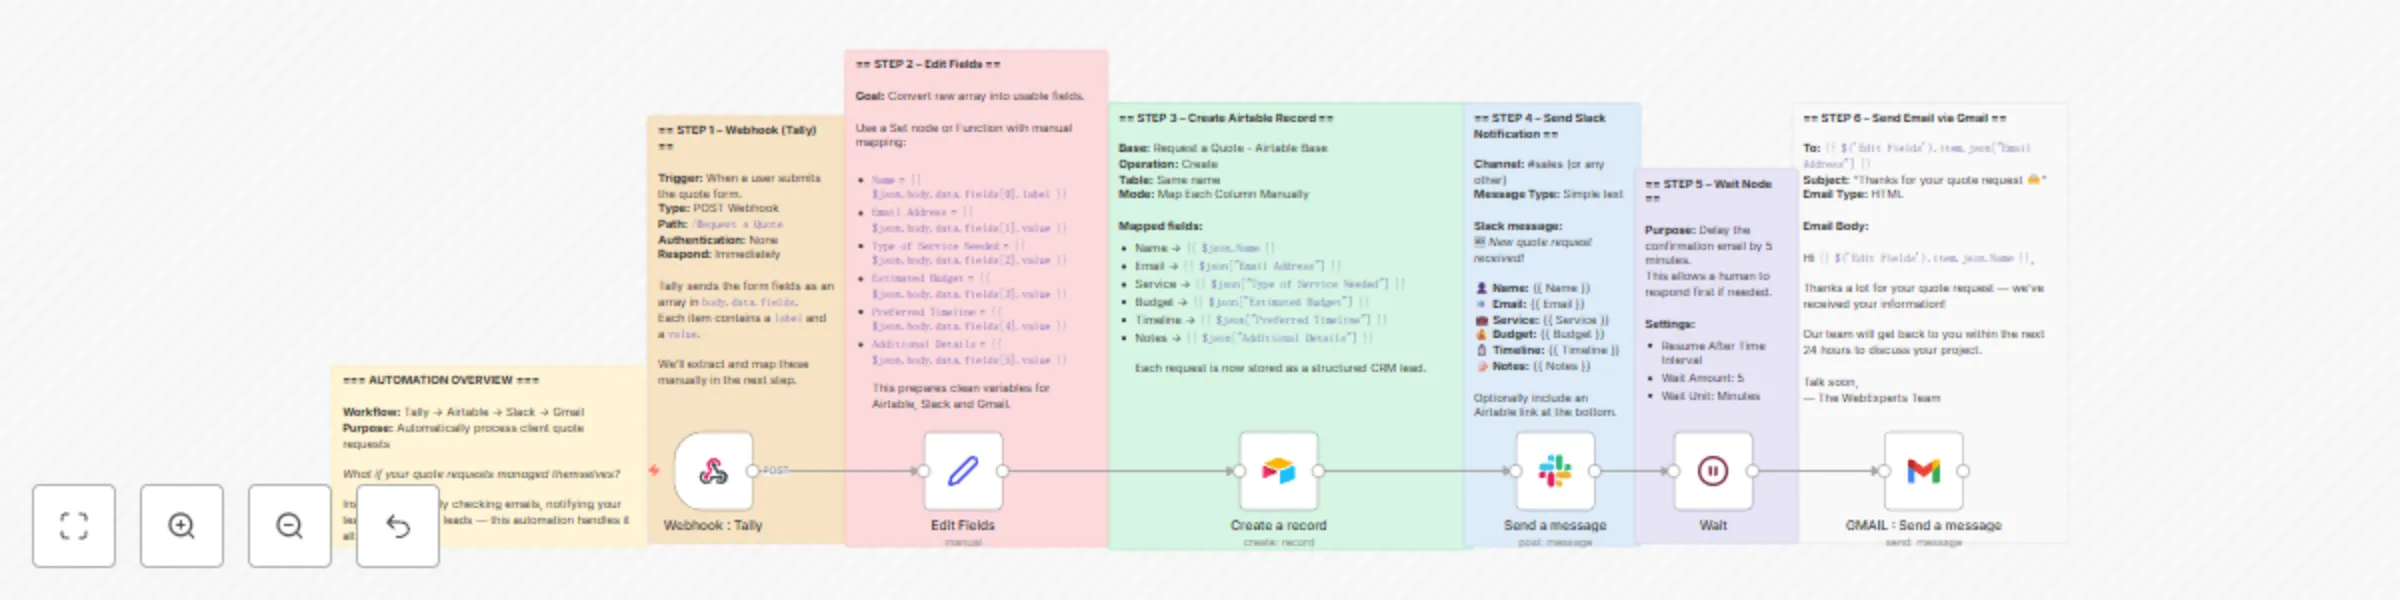
Automate quote request processing with Tally, Airtable, Slack, and Gmail
## What if your quote requests managed themselves? Every quote request is a potential deal — but only if it's handled quickly, properly, and without things falling through the cracks. What if instead of copy-pasting emails and pinging teammates manually, your entire process just... ran itself? This automation makes it happen: it captures form submissions, notifies your sales team on Slack, stores leads in Airtable, and sends an email confirmation to the client — all in one seamless n8n flow. --- ## ⚙️ Tools used * **Tally** – to collect client quote requests * **n8n** – to automate everything, no code needed * **Airtable** – to store leads and track status * **Slack** – to instantly notify your sales team * **Gmail** – to confirm the request with the client --- ## 🧩 Flow structure overview 1. Trigger from a Tally form using a webhook 2. Extract and format the data 3. Create a new record in Airtable 4. Send a message to Slack 5. Wait 5 minutes 6. Send an email confirmation via Gmail --- ## 📥 Step 1 – Webhook (Tally) This node listens for incoming quote requests from the Tally form. * **HTTP Method:** POST * **Path:** /Request a Quote * **Authentication:** None * **Respond:** Immediately The data arrives as an array inside `body.data.fields`. Each field has a `label` and a `value` that we’ll need to map manually. --- ## 🧹 Step 2 – Edit Fields (Set) This step extracts usable values from the raw form data. Example mapping: ``` Name = {{ $json.body.data.fields[0].label }} Email Address = {{ $json.body.data.fields[1].value }} Type of Service Needed = {{ $json.body.data.fields[2].value }} Estimated Budget = {{ $json.body.data.fields[3].value }} Preferred Timeline = {{ $json.body.data.fields[4].value }} Additional Details or Questions = {{ $json.body.data.fields[5].value }} ``` --- ## 📊 Step 3 – Create record in Airtable We send the cleaned fields into a database (CRM) in Airtable. * **Operation:** Create * **Base & Table:** Request a Quote - Airtable Base * **Mapping:** Manual field-to-column matching Each quote submission becomes a new record with all project details. --- ## 📣 Step 4 – Send a message to Slack This node notifies your sales team immediately in a Slack channel. Message format: ``` :new: *New quote request received!* 👤 Name: {{ $json.fields.Name }} 📧 Email: {{ $json.fields.Email }} 💼 Service: {{ $json.fields["Type of Service"] }} 💰 Budget: {{ $json.fields["Estimated Budget (€)"] }} ⏱️ Timeline: {{ $json.fields["Preferred Timeline"] }} 📝 Notes: {{ $json.fields["Additional Details"] }} ``` --- ## ⏳ Step 5 – Wait 5 minutes This node simply delays the email by 5 minutes. Why? To give a human salesperson time to reach out manually before the automated confirmation goes out. It adds a personal buffer. --- ## 📧 Step 6 – Send confirmation via Gmail * **To:** {{ \$('Edit Fields').item.json\["Email Address"] }} * **Subject:** Thanks for your quote request 🙌 * **Email Type:** HTML Message body: ``` Hi {{ $('Edit Fields').item.json.Name }}, Thanks a lot for your quote request — we’ve received your information! Our team will get back to you within the next 24 hours to discuss your project. Talk soon, — The WebExperts Team ``` --- ## ✅ Final result With this automation in place: * The client feels acknowledged and taken seriously * Your team gets notified in real time * You store everything in a clean, structured database All this without writing a single line of backend code. It’s fast, scalable, and business-ready.
Automate a Tally form: store with Airtable, notify via Slack
## 🎯 Workflow Goal Still manually checking form responses in your inbox? What if every submission landed neatly in Airtable — and you got a clean Slack message instantly? That’s exactly what this workflow does. No code, no delay — just a smooth automation to keep your team in the loop: **Tally → Airtable → Slack** Build an automated flow that: - receives Tally form submissions, - cleans up the data into usable fields, - stores the results in Airtable, - and automatically notifies a Slack channel. ## Step 1 – Connect Tally to n8n  ### What we’re setting up A Webhook node in POST mode. ### Technical 1. Add a Webhook node. 2. Set it to POST. 3. Copy the generated URL. 4. In Tally → Integrations → Webhooks → paste this URL. 5. Submit a test response on your form to capture a sample structure. ## Step 2 – Clean the data  After connecting Tally, you now receive raw data inside a fields[] array. Let’s convert that into something clean and structured. ### Goal Extract key info like Full Name, Email, Phone, etc. into simple keys. ### What we’re doing Add a Set node to remap and clean the fields. ### Technical 1. Add a Set node right after the Webhook. 2. Add new values (String type) manually: - Name: Full Name → Value: {{$json["fields"][0]["value"]}} - Name: Email → Value: {{$json["fields"][1]["value"]}} - Name: Phone → Value: {{$json["fields"][2]["value"]}} *(Adapt the indexes based on your form structure.)* Use the data preview in the Webhook node to check the correct order. **Output** You now get clean data like: { "Full Name": "Jane Doe", "Email": "[email protected]", "Phone": "+123456789" } ## Step 3 – Send to Airtable  ✅ Once the data is cleaned, let’s store it in Airtable automatically. **Goal** Create one new Airtable row for each form submission. What we’re setting up An Airtable – Create Record node. **Technical** 1. Add an Airtable node. 2. Authenticate or connect your API token. 3. Choose the base and table. 4. Map the fields: - Name: {{$json["Full Name"]}} - Email: {{$json["Email"]}} - Phone: {{$json["Phone"]}} **Output** Each submission creates a clean new row in your Airtable table. ## Step 4 – Add a delay  ⌛ After saving to Airtable, it’s a good idea to insert a short pause — this prevents actions like Slack messages from stacking too fast. Goal Wait a few seconds before sending a Slack notification. What we’re setting up A Wait node for X seconds. ✅ Technical 1. Add a Wait node. 2. Choose Wait for X minutes. ## Step 5 – Send a message to Slack  💬 Now that the record is stored, let’s send a Slack message to notify your team. **Goal** Automatically alert your team in Slack when someone fills the form. What we’re setting up A Slack – Send Message node. **Technical** 1. Add a Slack node. 2. Connect your account. 3. Choose the target channel, like #leads. 4. Use this message format: **New lead received!** Name: {{$json["Full Name"]}} Email: {{$json["Email"]}} Phone: {{$json["Phone"]}} Output Your Slack team is notified instantly, with all lead info in one clean message. Workflow Complete Your automation now looks like this: **Tally → Clean → Airtable → Wait → Slack** Every submission turns into clean data, gets saved in Airtable, and alerts your team on Slack — fully automated, no extra work. Looking for professional automation support? Try [0vni – Agence automatisation](https://www.0vni.fr/).
Centralize your forms and reply automatically with Tally + Airtable + Gmail
**Still manually copy-pasting your Tally form responses?** What if every submission went straight into Airtable — and the user got an automatic email right after? That’s exactly what this workflow does. No code, no headache — just a simple and fast automation: **Tally → Airtable → Gmail.**  ## STEP 1 — Capture Tally Form Responses  ### Goal Trigger the workflow automatically every time someone submits your Tally form. ### What we're setting up A webhook that catches form responses and kicks off the rest of the flow. ### Steps to follow Add a Webhook node Parameter : Value Method : POST Path : formulaire-tally Authentication : None Respond : Immediately Save the workflow → This will generate a URL like: *https://your-workspace.n8n.cloud/webhook-test/formulaire-tally* * 💡 Use the Test URL first (found under Parameters > Test URL) Head over to Tally Go to your form → Form Settings > Integrations > Webhooks Paste the Test URL into the Webhook field Enable the webhook ✅ Submit a test entry → Tally won’t send anything until a real submission is made. This step is required for n8n to capture the structure. ### Expected output  n8n receives a JSON object containing: General info (IDs, timestamps, etc.) A fields[] array with all the form inputs (name, email, etc.) Each field is nicely structured with a label, key, type, and most importantly, a value. Perfect foundation for the next step: data cleanup. ## STEP 2 — Clean and Structure the Form Data (Set node)  ### Goal Take the raw data sent by Tally and turn it into clean, readable JSON that's easy to use in the rest of the workflow. Tally sends the responses inside a big array called field. Can you grab a field directly with something like {{$json["fields"][3]["value"]}}? Yes. But a good workflow is like a sock drawer — when everything’s folded and labeled, life’s just easier. So we’re going to clean it up using a Set node. ### Steps to follow Add a Set node right after the Webhook. Enable the “Keep only set” option. Define the following fields in the Set node: Field name: Expression full_name: {{$json["fields"][0]["value"]}} company_name: {{$json["fields"][1]["value"]}} job_title: {{$json["fields"][2]["value"]}} email: {{$json["fields"][3]["value"]}} phone_number: {{$json["fields"][4]["value"] ?? ""}} submission_date: {{$now.toISOString()}} ⚠️ The order of fields[] depends on your Tally form. If you change the question order, make sure to update these indexes accordingly. ### Expected output You’ll get a clean, structured JSON like this:  Now your data is clear, labeled, and ready for the rest of your workflow. ## STEP 3 — Save Data in Airtable  ## Goal Every time someone submits your Tally form, their info is automatically added to an Airtable base. No more copy-pasting — everything lands right where it should. ## Steps to follow 1. Create your Airtable base Start by creating a base named Leads (or whatever you prefer), with a table called Form Submissions. Add the following columns in this exact order so everything maps correctly later: ### Generate an Airtable token So n8n can send data into your base: Go to 👉 [ https://airtable.com/create/tokens](https://airtable.com/create/tokens ) Click Create token Give it a name (e.g. Tally Automation) Check the following permissions: data.records:read data.records:write schema.bases:read Under Base access, either choose your base manually or select “All current and future bases” Click Create token and copy the generated key  ### Add configure the Airtable node in n8n Node: Airtable Operation: Create Authentication: Personal Access Token Paste your token n8n will suggest your base and table (or you can manually grab the IDs from the URL: https://airtable.com/appXXXXXXXX/tblYYYYYYYY/...) Map your fields Inside the Airtable node, add the following field mappings:  Every new Tally form submission automatically creates a new row in your Airtable base. ## STEP 4 — Send an Automatic Confirmation Email  ### Goal Send a professional email as soon as a form is completed ### Steps to follow 1. Add a Wait node You don’t want the email to go out instantly — it feels cold and robotic. → Add a Wait node right after Airtable. Mode: Wait for a period of time Delay: 5 to 10 minutes Unit: Minutes 2. Add a Gmail > Send Email node Authentication: OAuth2 Connect a Gmail account (business or test) ⚠️ No API keys here — Gmail requires OAuth. 3. Configure the Send Email node  Field Value Credential to connect with Gmail account via OAuth2 Resource : Message Operation : Send To : {{ $json.fields["Email"] }} Subject : Thanks for reaching out! Email Type : HTML Message: (but do the mapping correctly using the Input so that lead receives its name correctly ) ## End of the Workflow And that’s it — your automation is live! Your lead fills out the Tally form → the info goes to Airtable → they get a clean, professional email without you doing a thing. 