Aitor | 1Node
Workflows by Aitor | 1Node

High-Speed AI Chat with OpenAI's gpt-oss-120B Model via Cerebras Inference
This n8n workflow provides seamless integration with Cerebras' high performance inference platform to leverage OpenAI...

Chat with uncensored Dolphin Mixtral 8x22B using Novita AI
This n8n workflow enables you to chat with the uncensored Dolphin Mixtral 8x22B large language model through the Novi...

Trigger outbound Vapi AI voice calls from new Jotform submissions
This workflow connects JotForm submissions to Vapi AI , triggering a personalized outbound call via an AI voice assis...

Automate video content posting to multiple social platforms with Postiz
This workflow contains community nodes that are only compatible with the self hosted version of n8n. This workflow au...

Automate outbound voice calls with Vapi from form submissions
This n8n automation connects your n8n form submissions to Vapi AI , enabling you to immediately call new respondents...
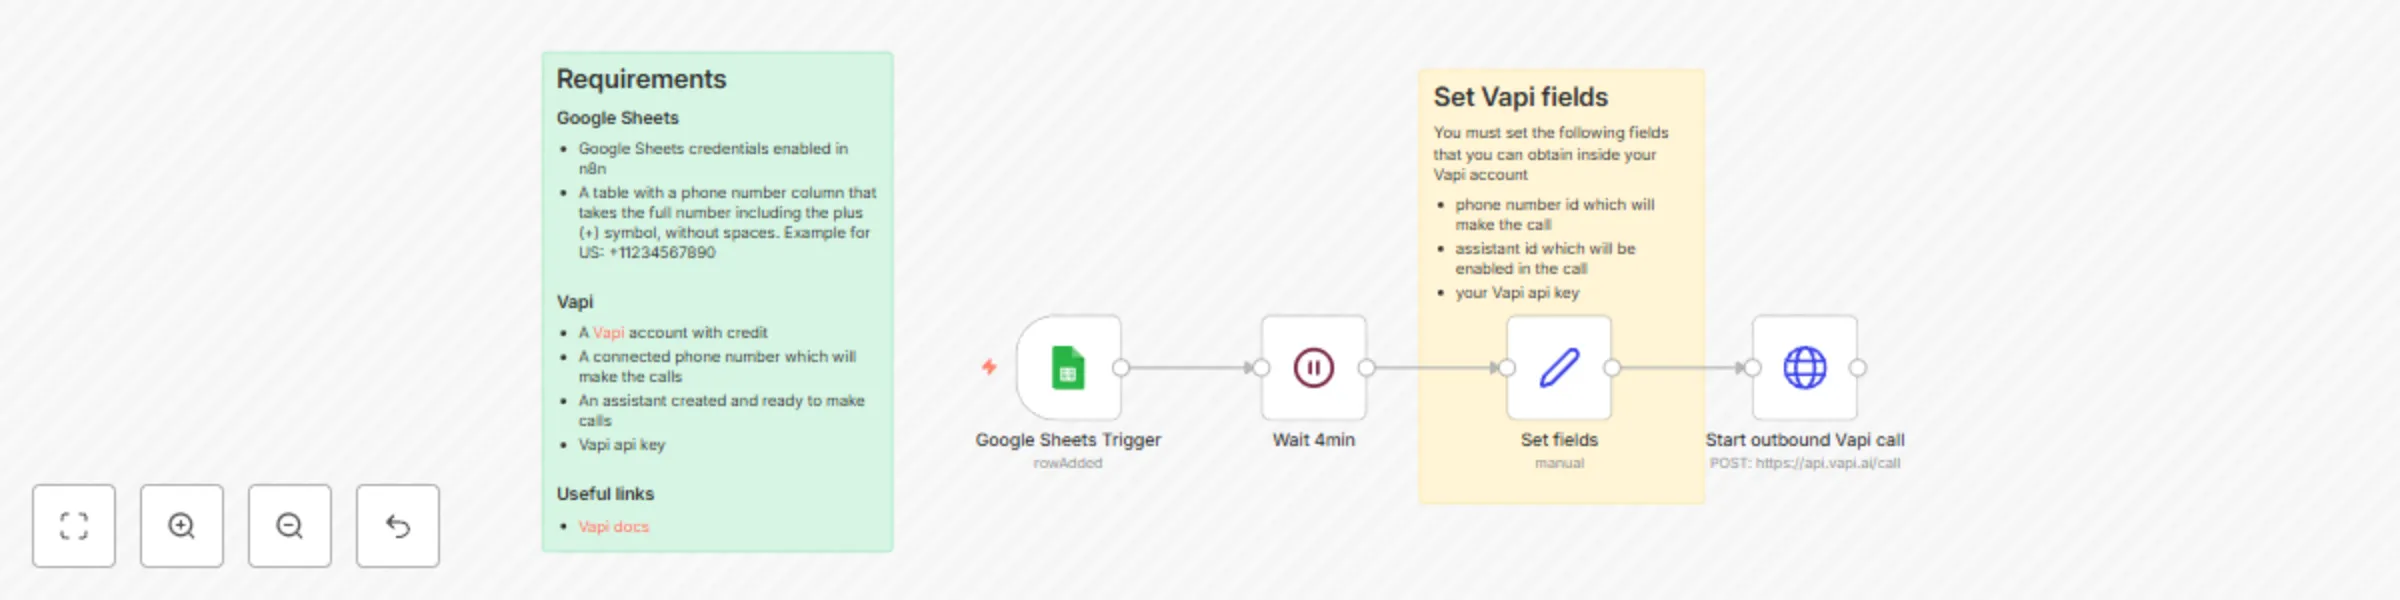
Automate outbound Vapi voice calls from new Google Sheets rows
This n8n automation connects your Google Sheets to Vapi , enabling you to automatically call new contacts as soon as...
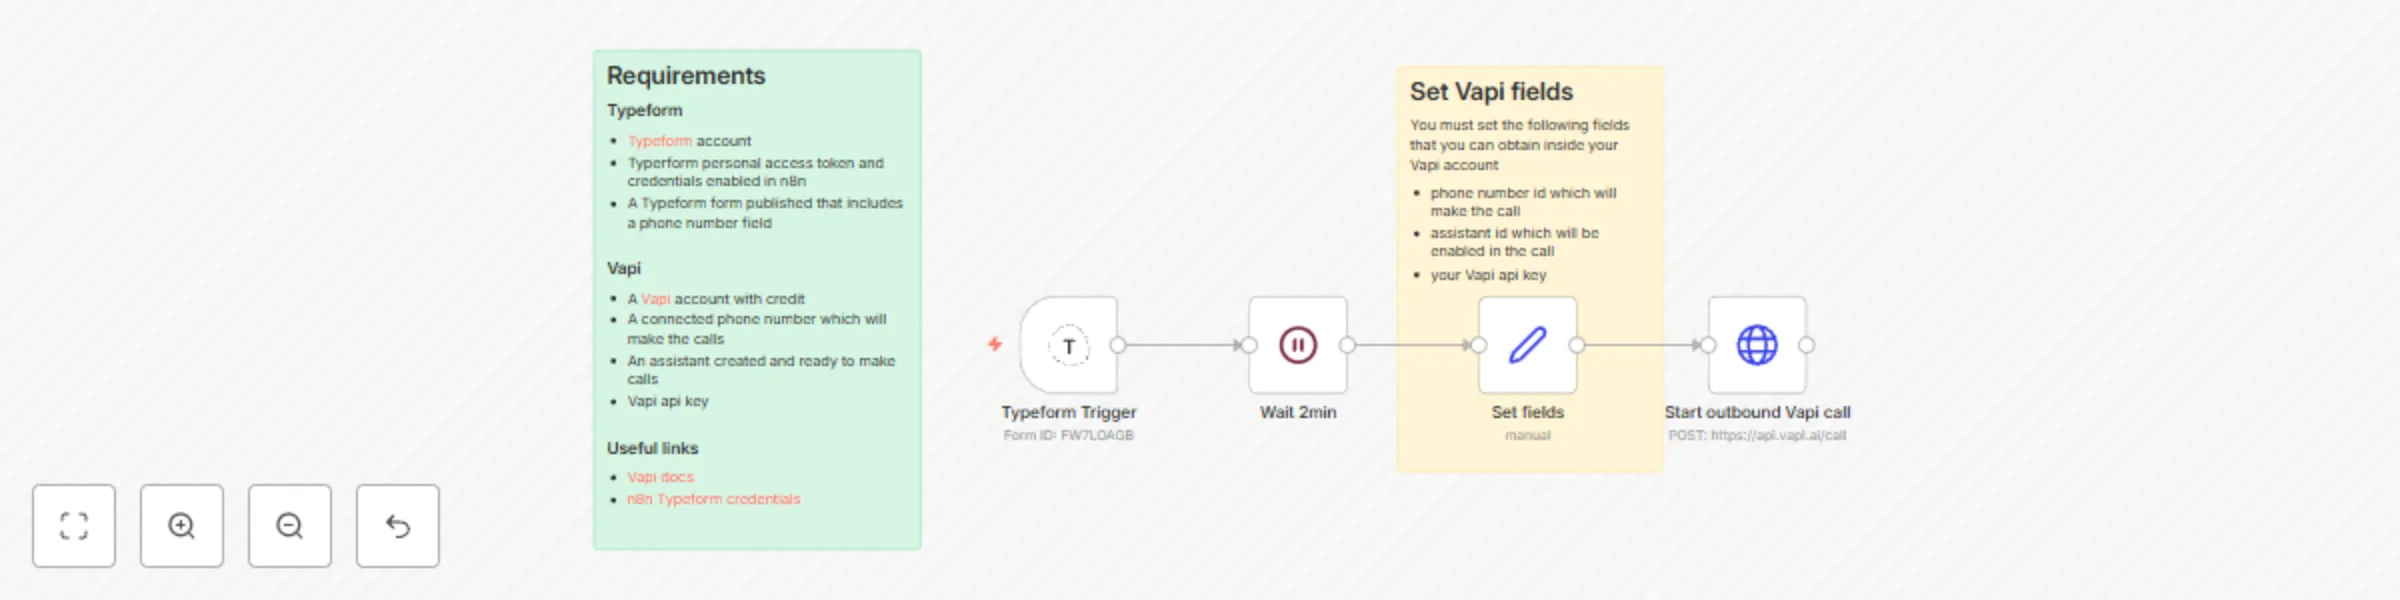
Auto-call new Typeform submissions with Vapi voice assistant
This n8n automation connects your Typeform forms with Vapi AI , allowing you to immediately call new form respondents...
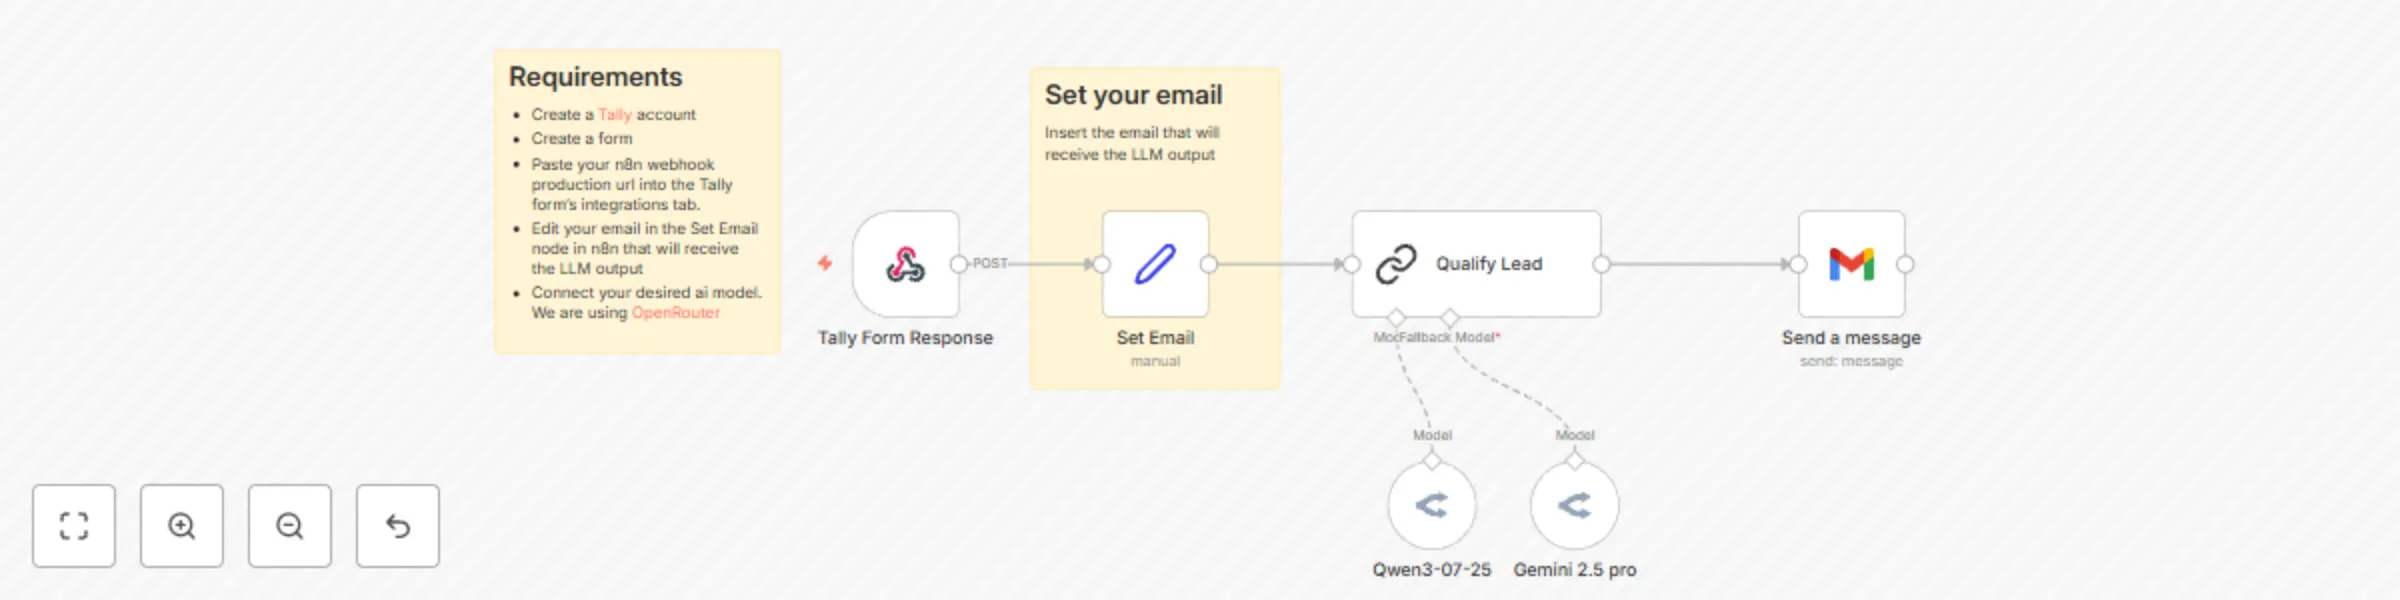
Generate lead qualification reports in Gmail from Tally Forms via Qwen-3
This automated n8n workflow streamlines lead qualification by taking structured lead data from Tally forms, enriching...

Manage Stripe data using natural language with Kimi K2 via OpenRouter
Elevate your Stripe workflows with an AI agent that intelligently, securely, and interactively handles essential Stri...

Automate outbound voice calls from Go High Level opportunities with Vapi
This workflow triggers when a new opportunity is created in Go High Level (GHL) , fetches the associated contact deta...
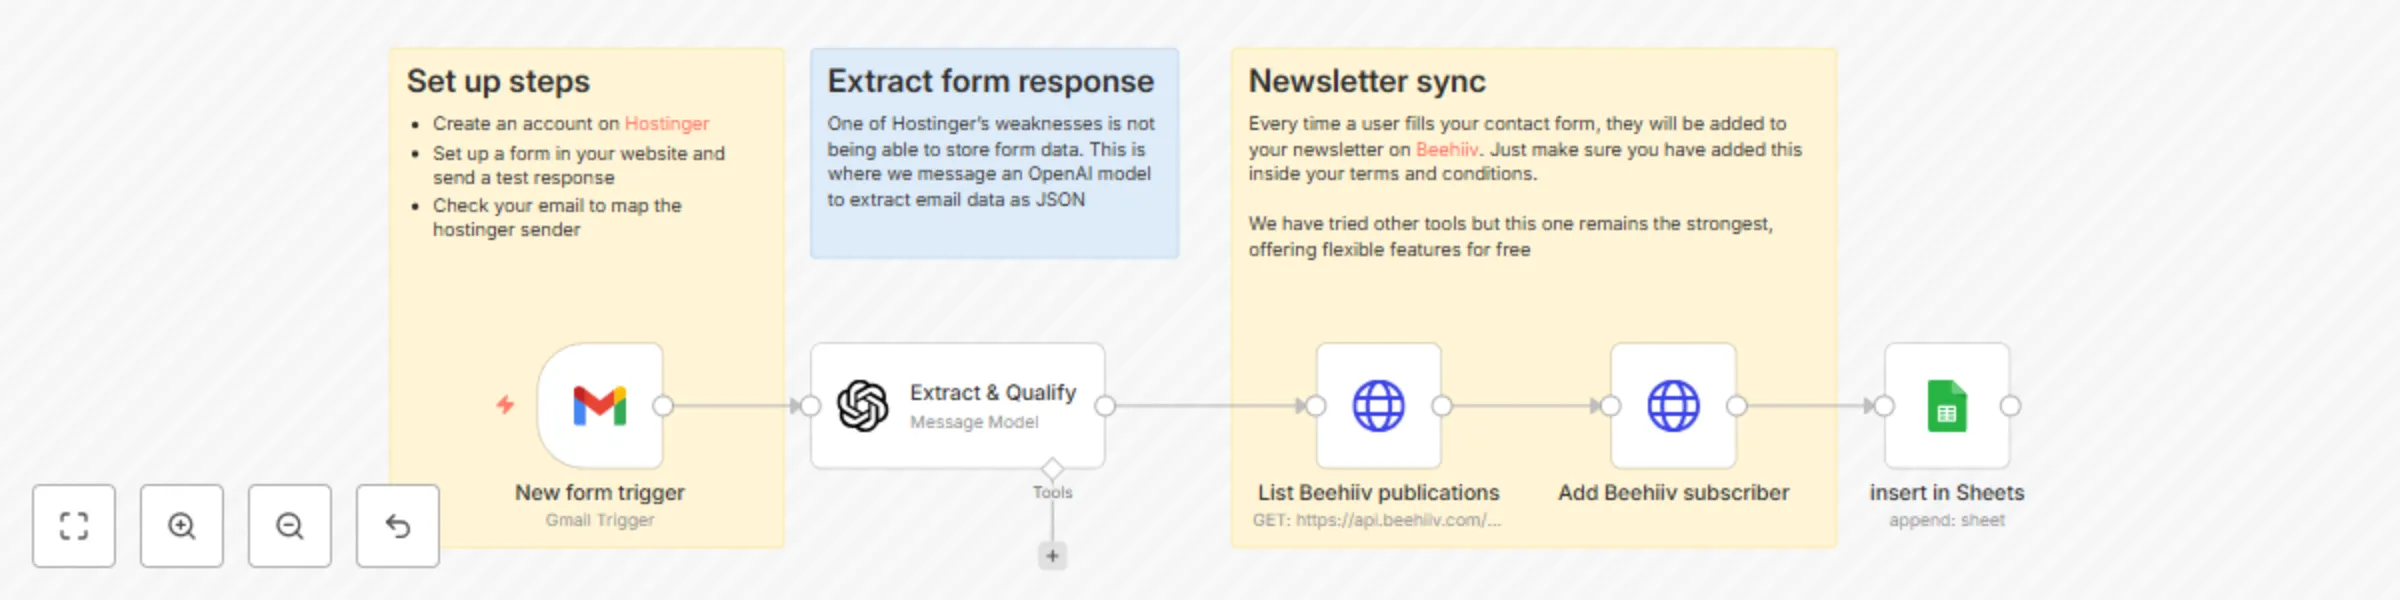
Hostinger form lead capture & qualification with OpenAI, Beehiiv & Google Sheets
This n8n workflow provides a robust solution for Hostinger website owners looking to streamline their lead capture an...
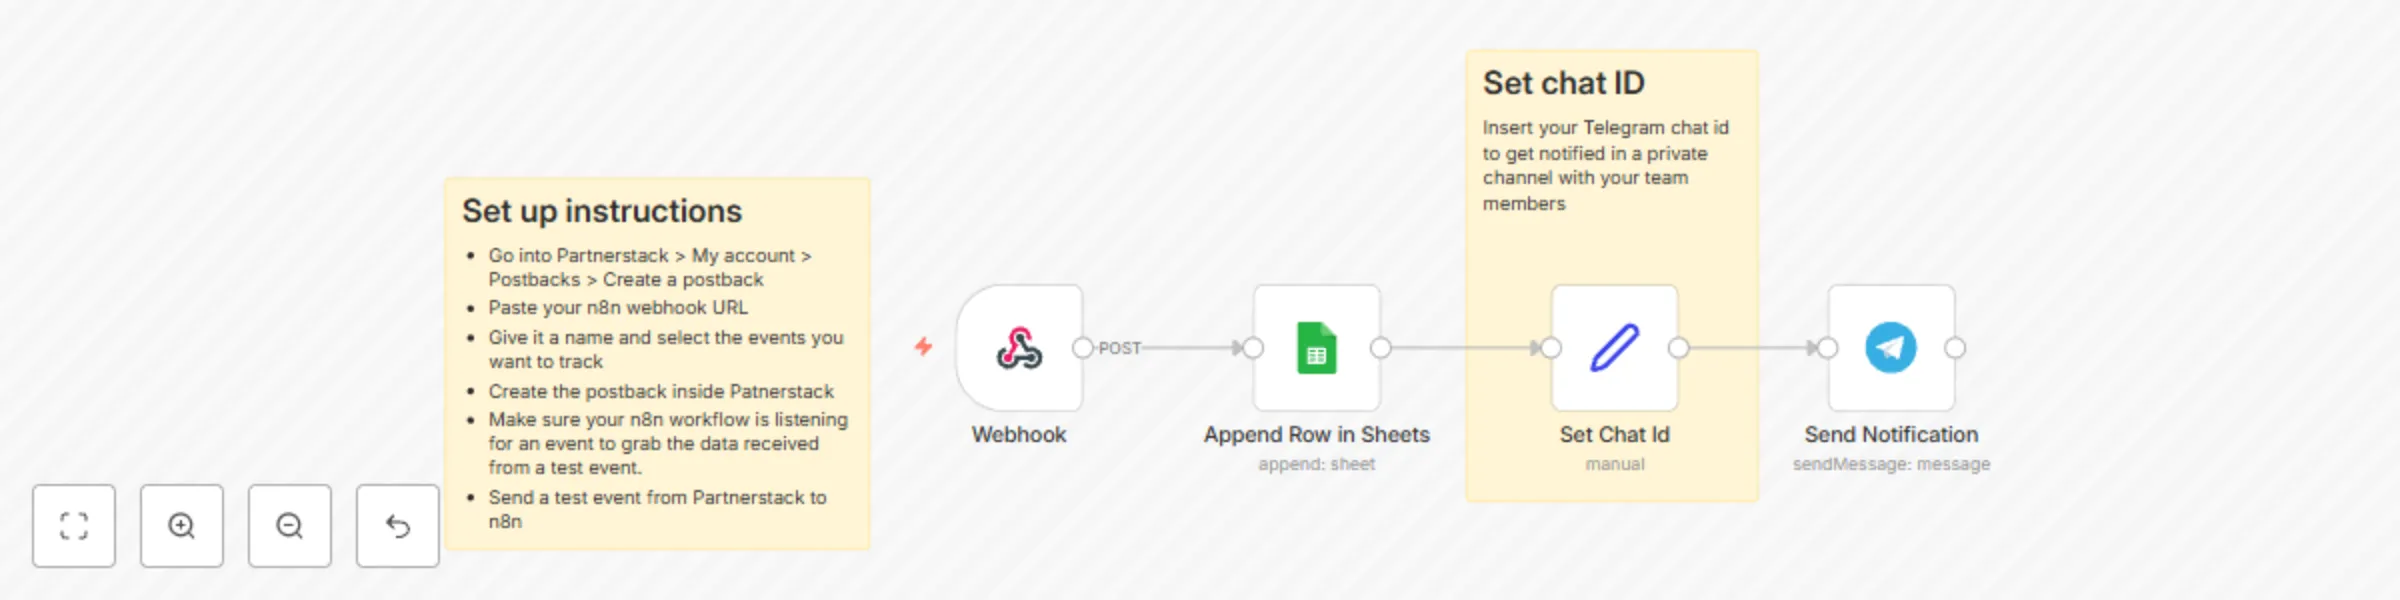
Track Partnerstack affiliate events with Google Sheets & Telegram notifications
This n8n workflow captures Partnerstack events via a webhook, logs the event data into a Google Sheet, and sends a Te...
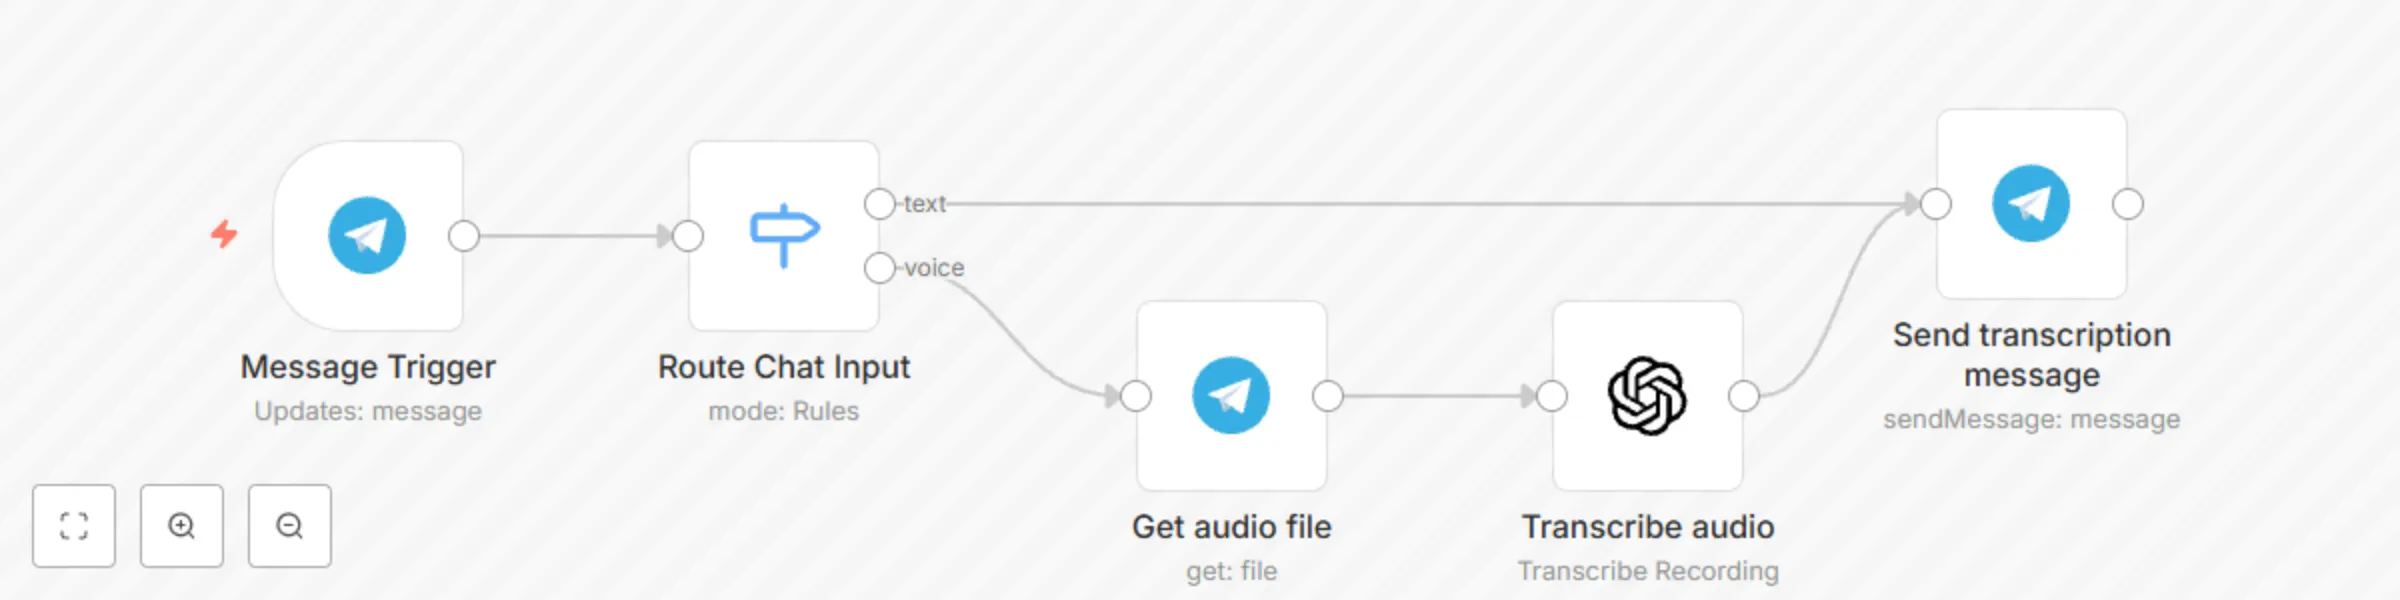
Transcribe voice messages from Telegram using OpenAI Whisper-1
This n8n workflow processes incoming Telegram messages, differentiating between text and voice messages. How it works...

n8n Workflow Error Alerts with Google Sheets, Telegram, and Gmail
This n8n workflow provides a robust error handling and notification system for your n8n workflows. When an error occu...

Generate Daily E-Commerce Order Reports with Supabase, GPT-4.1 and Gmail
This n8n workflow automates the generation and delivery of a daily order summary via email. It leverages an AI Agent...

Build a Pipedrive MCP server with Google Gemini AI
This n8n workflow leverages the power of AI and automation to streamline Pipedrive's CRM operations using natural lan...
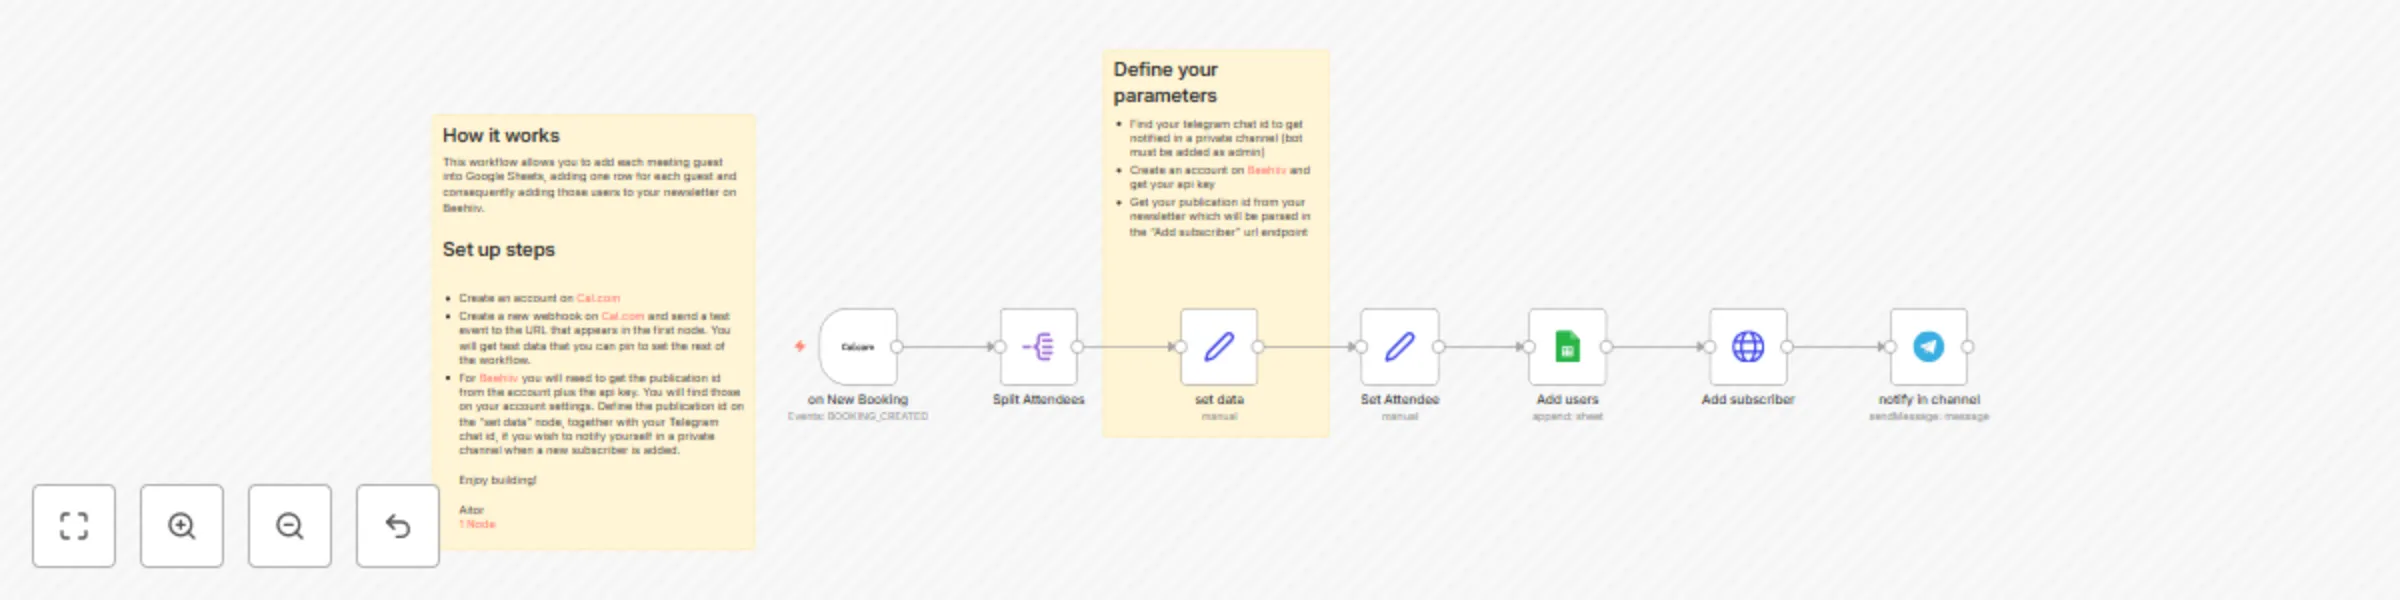
Automate Cal.com meeting attendee management with Google Sheets, Beehiiv & Telegram
This n8n workflow template automates the process of managing meeting guests booked through Cal.com. It captures atten...

Build a personal assistant with Google Gemini, Gmail and Calendar using MCP
Talk to Your Apps: Building a Personal Assistant MCP Server with Google Gemini Wouldn't it be cool to just tell your...

Build an MCP server with Airtable
Who is this for? This template is designed for anyone who wants to integrate MCP with their AI Agents using Airtable....

Build a document QA system with RAG using Milvus, Cohere, and OpenAI for Google Drive
Template Description This template creates a powerful Retrieval Augmented Generation (RAG) AI agent workflow in n8n....
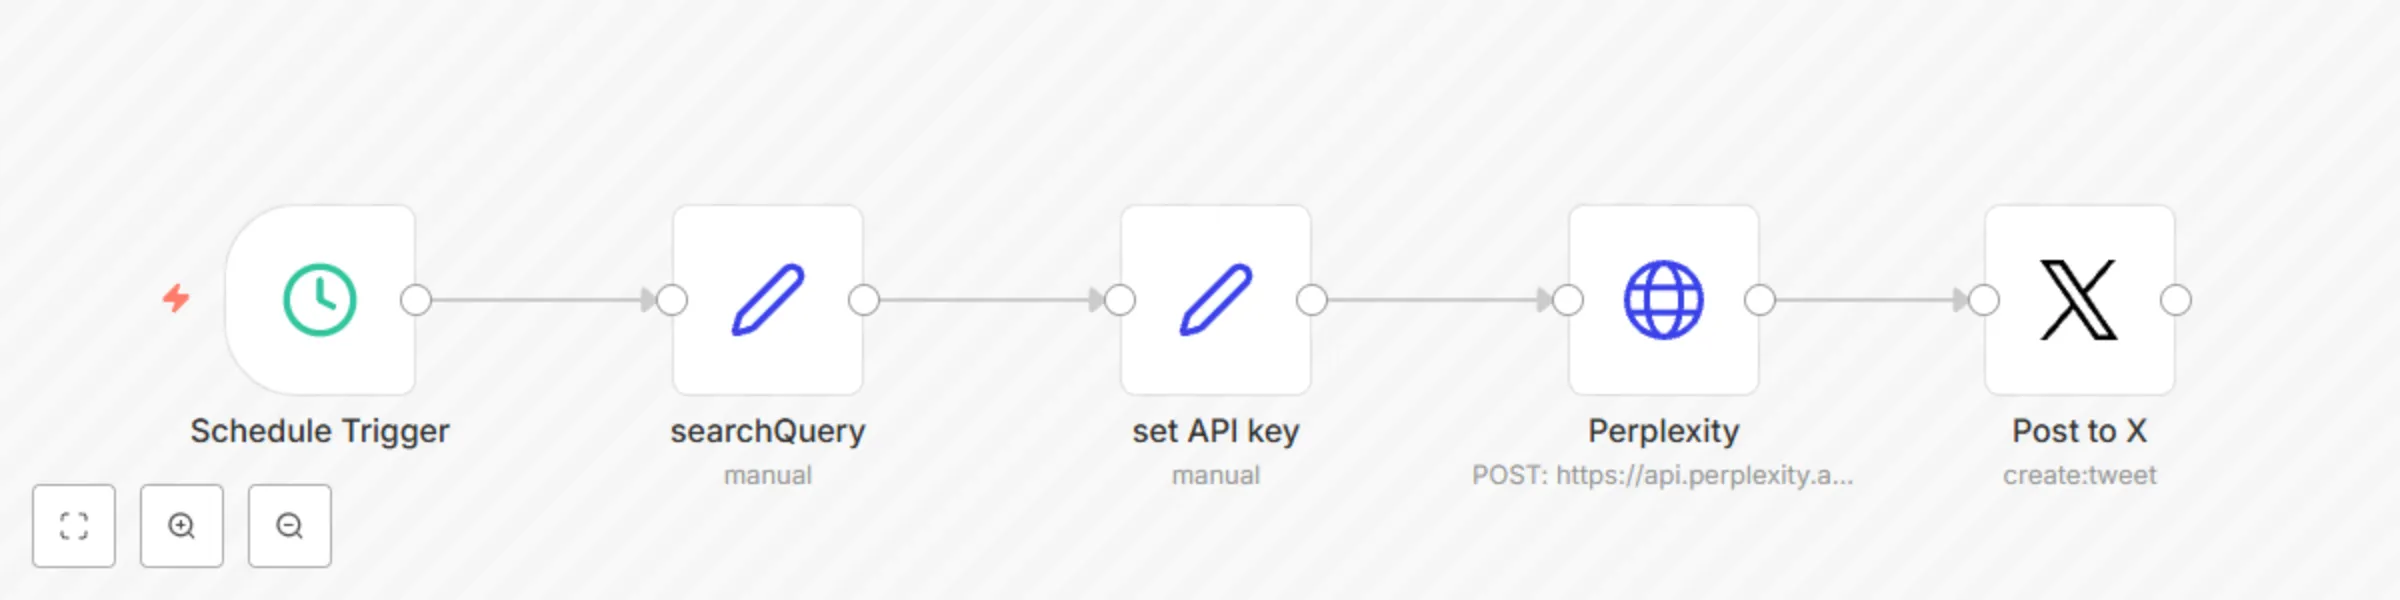
Auto-post breaking news content using Perplexity AI to X (Twitter)
Stay ahead of the curve and keep your followers informed—automatically. This n8n workflow uses Perplexity AI to gener...
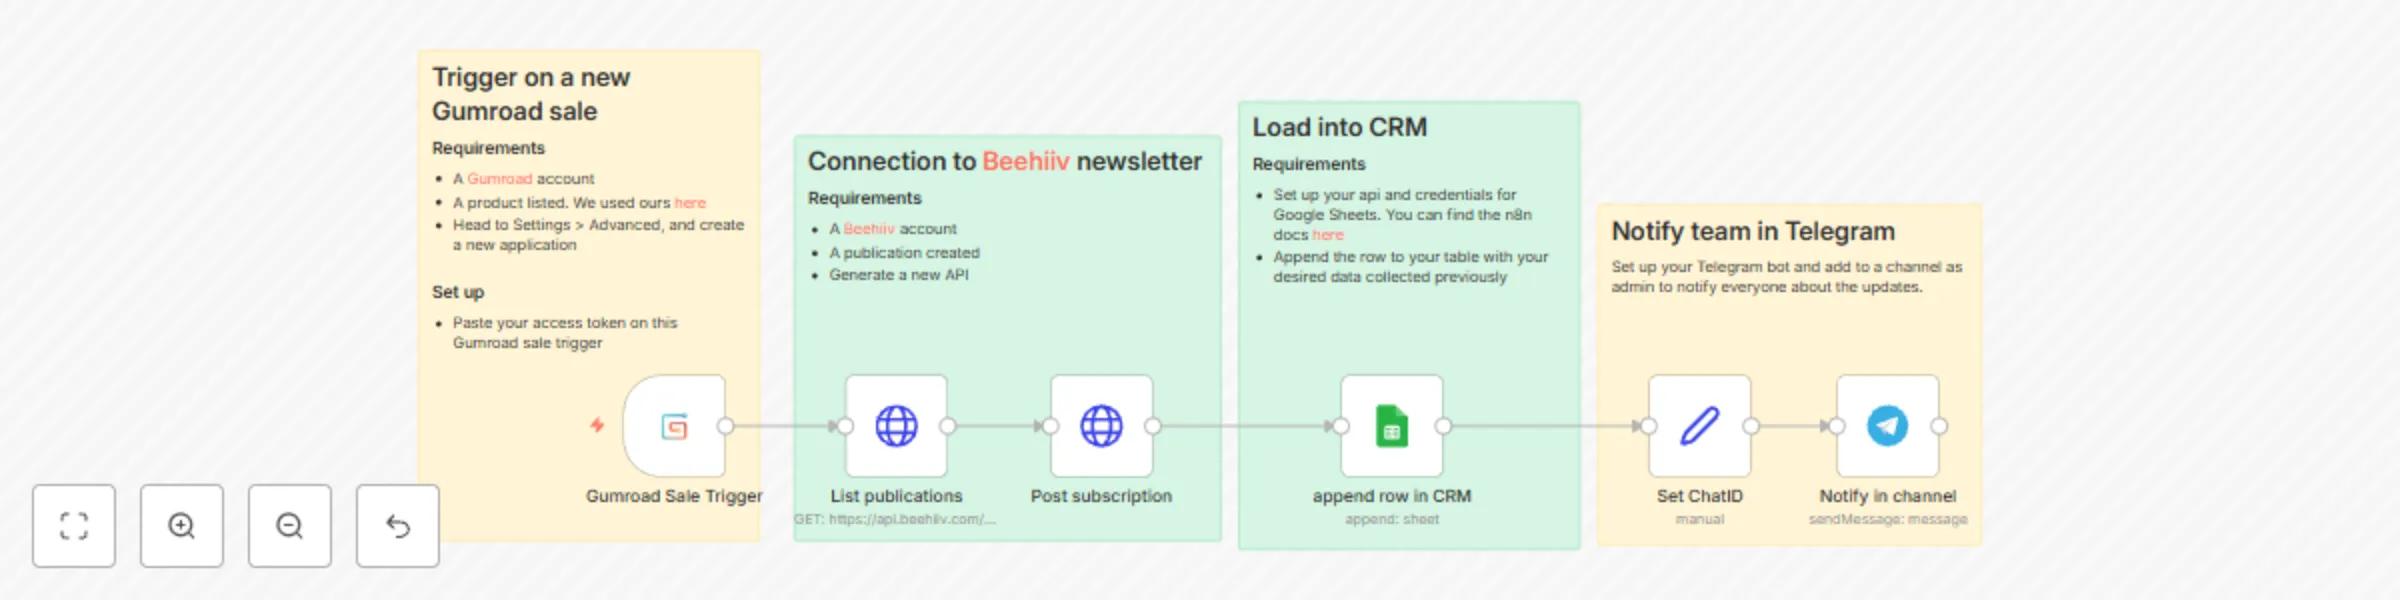
Convert Gumroad sales to Beehiiv subscribers with Sheets & Telegram alerts
Turn Gumroad buyers into newsletter subscribers on Beehiiv, log to Google Sheets and get notified on Telegram Require...

Capture Gumroad sales, add buyer to MailerLite group, log to Google Sheets CRM
Turn Gumroad buyers into loyal email subscribers and keep your CRM up‑to‑date. When someone makes a purchase on your...